Microsoft OAuth - Setup
Setup Oauth for Outlook Account
The instruction video can be found here.
Step 1: Register an application
Detail Steps can be found at: https://learn.microsoft.com/en-us/graph/auth-register-app-v2
- For this step, you will need access to the mailbox you need and register in Azure Portal.
- Get the Application Id, Redirect URI/URL and Client Secret.
- Go to https://portal.azure.com/ and access the created application:
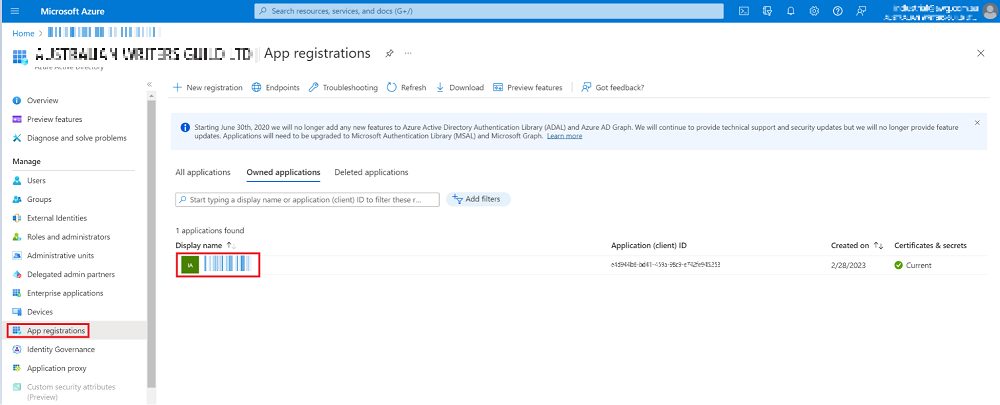
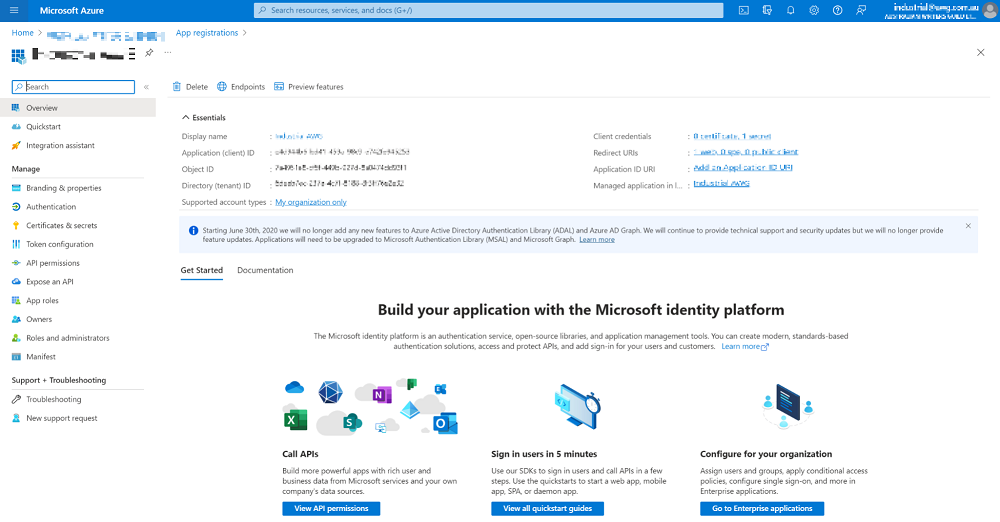
- Click on the application and it will redirect you to Overview page:
- The Application (client) ID is the Application Id.
- The Directory (tenant) ID is the Tenant Id.
- You click on the Redirect URIs to get the Redirect URI, in this case, I set it https://interactivepartners.com.au/.
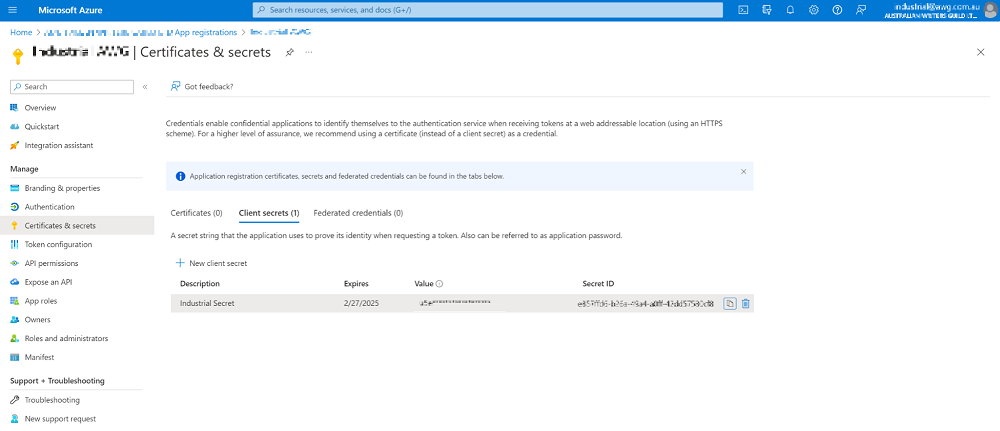
- Click on Certificates & secrets to get the Client Secret:
You can only get this the first time, then store it in a secure location. If you cannot remember it, you can create a new one.
Note: The client secret only lives for maximum 730 days (2 years), so we may need to manually refresh it to make sure the API works (I use may as I’m not sure if the API will not work after 730 days).
Step 2: Get access token and refresh token
Step 2.1: Get the code to request tokens
The goal of this step is to get the code to use to get the refresh token and access token.
Sample URL(Paste this in your browser):
https://login.microsoftonline.com/{tenant_id}/oauth2/v2.0/authorize?client_id={client_id}&response_type=code&redirect_uri={redirect_url}&response_mode=query&scope=offline_access%20 https://outlook.office.com/IMAP.AccessAsU ser.All%
20https://outlook.office.com/POP.AccessAsUser.All&state=12345&access_type=offline
https://login.microsoftonline.com/d495ee85-b84b-4540-960a-6657fa931007/oauth2/v2.0/authorize?client_id=c22dc3e0-b946-4ecb-abaf-37d32819be07&response_type=code&redirect_uri=https://interactivepartners.com.au/&response_mode=query&scope=
offline_access%20https://outlook.office.com/IMAP.AccessAsUser.All%20https://outlook.office.com/POP.AccessAsUser.All&state=12345&access_type=offline
The value needed for the request are:
- tenant_id : it’s the tenant id from step 1
- client_id : it’s the application id from step 1
- response_type : code
- redirect_uri : the redirect url you set up from the first step, I set it https://interactivepartners.com.au/
- scope : offline_access%20https://outlook.office.com/IMAP.AccessAsUser.All%20https://outlook.office.com/POP.AccessAsUser.All
to have the permission for read/write emails from Outlook
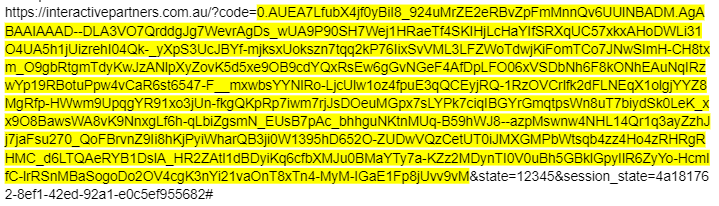
Then, you paste this link to Google Chrome and it will redirect you to the Microsoft Login page, you need to login and it will redirect you to the Redirect URL, then you copy the redirect url to get the code (highlighted in yellow), for example:
Sample of what you will see, this is not the actual code to use in your setup
Step 2.2: Get Access token and refresh token
After having the code, we can send an API request to get both the access token and refresh token, as below image:
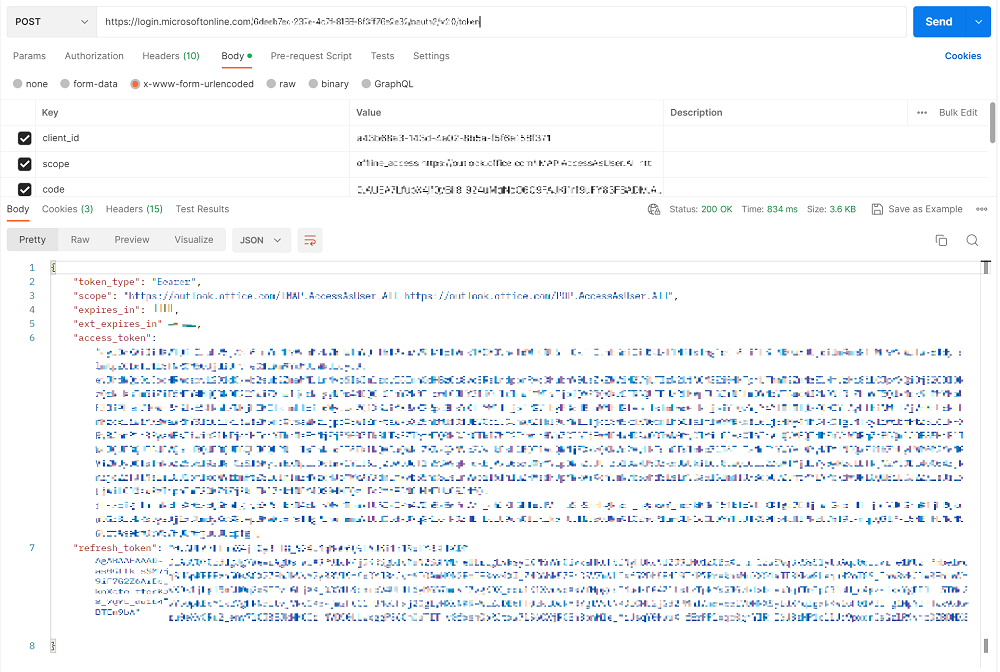
Endpoint: https://login.microsoftonline.com/{tenant_id}/oauth2/v2.0/token
Please use postman to get the response. The parameters below should be in the BODY of the request.
Parameters:
- client_id: you get it from Step 1
- scope: https://outlook.office.com/.default
- code: you get it from Step 2.1
- redirect_url: you set it up in Step 1
- grant_type : refresh_token
- client_secret: you set it up in Step 1
After this step, you can get both access_token and refresh_token.
- The access_token is used to request for the Microsoft Graph API, but it has expiry date and time.
- The refresh_token cannot be used to request API, but it can be used to get the access_token again without getting a new code manually. The refresh_token lives for 90 days and every time you use the refresh_token to get the new access_token, Microsoft will return you a new refresh token, you should replace the old one with the new one, so that it will never expire.
As the schedule to get the tickets is running every 10 minutes, you shouldn’t worry about the expiry time of the refresh token.
For this step, after we get the refresh token manually, we will store the refresh token (with expiry time) in the DB of WebEd9, so we can reuse it and update it for future usage.
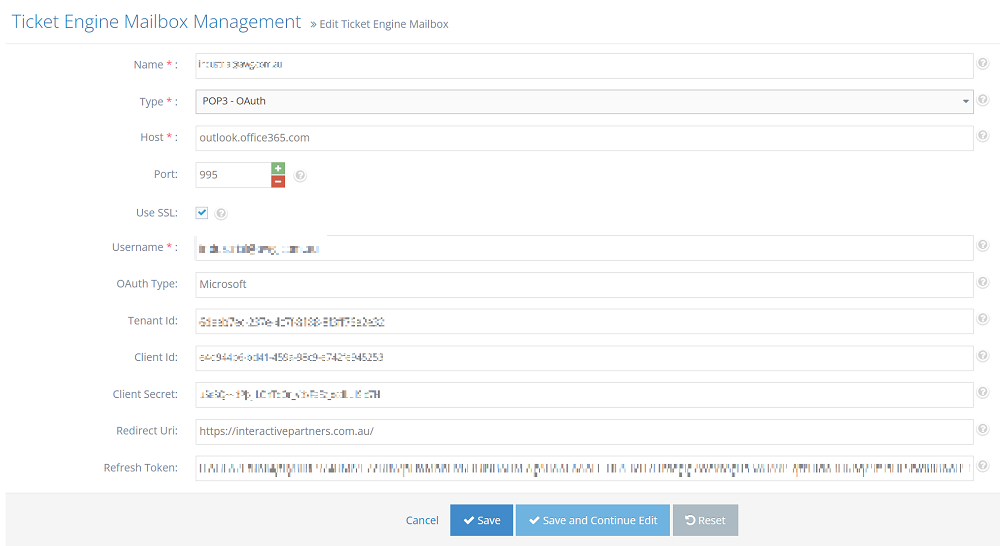
Step 3: Create the Mailbox with token information
Step 3.1: Create mailbox in Ticket Engine Mailbox Management
- Name: Can be anything: Industrial AWG or using email
- Type: POP3 - OAuth
- Host: outlook.office365.com
- Port: 995
- Use SSL: true
- Username: name@mailbox.com
- OAuth Type: Microsoft
- Tenant Id: get from Step
- Client Id: get from Step 1
- Client Secret: get from Step 1
- Redirect Url: get from Step 1
- Refresh Token: get from Step 2.2
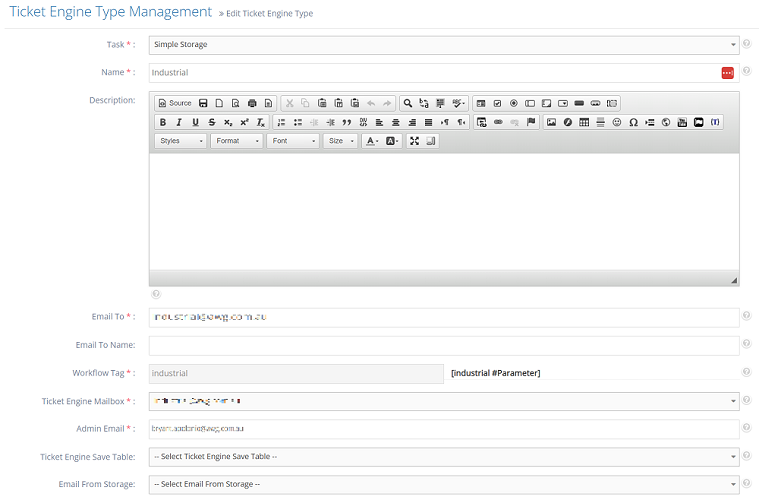
Step 3.2: Create ticket type in Ticket Engine Type Management
- Go to the Menu and type 'Ticket Types'.
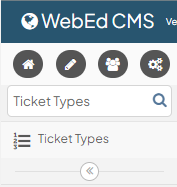
- Click the 'Ticket Types', this will redirect you to the Ticket Engine Management.
- Then configure the following:
Task: Simple Storage
Name: ticket type name
Ticket Engine Mailbox: choose the mailbox you created in Step 3.1
Admin Email: the email of the admin who will handle the tickets
Access another mailbox on the same Directory
If the mailbox you are trying to access is in the same directory, then we can just use the same application we previously created in Azure Portal. We just need to create a separate Client Secret and Refresh Token for the other mailbox user. To do this follow the steps below:
- Go to https://portal.azure.com/ and access the created application:
- Click on Certificates & secrets to get a NEW Client Secret.
- Once you have the Client secret, repeat Step 2 but use the new user email address you need and the new Client Secret.
- This step makes sure that only the mailbox of the user will be accessed when we pass tha authorization to the Mailbox.
- hen continue the whole process from Step 2 unti Step 3.2.