- Email Broadcasts Overview
- Set Up the Broadcast
- Editing the Email Broadcast
- Inserting Properties for Personalisation
- Adding Hyperlinks in the Email Broadcast
- Save the Email Broadcast Template
- Setting Up the From Address (Sender)
- Scheduling of Broadcasts
- Tracking Email Broadcasts
- Email Broadcasts Metrics
- Email Broadcasts Unsubscribes
- Reviewing Unsubscribed
- Tell A Friend
- Setting Page Template as an Email Parent
- Email Sending Score Check
- Countdown Timer in Email Templates
Email Broadcasts
Email Broadcasts Overview
Email Broadcasts are a great way to drive traffic to your website. This section covers how to create and send an email broadcast to your contacts.
A customer relationship management system (CRM) integrated within a content management system (CMS) allows more personal content segmentation and analysis. When used in tandem, an integrated network delivers a targeted and effective distribution of information.
The CRM system will collect and hold information regarding customers’ past sales journey with our brands such as signing up with our offers, subscribing to our newsletter or directly contacting us for business helps. These details can then be used for launching personalised email campaigns.
With those in mind, it is very critical to ensure the usability of newly deployed WebEd’s Email Broadcast not only for our internal use but also for our clients’ ease of access.
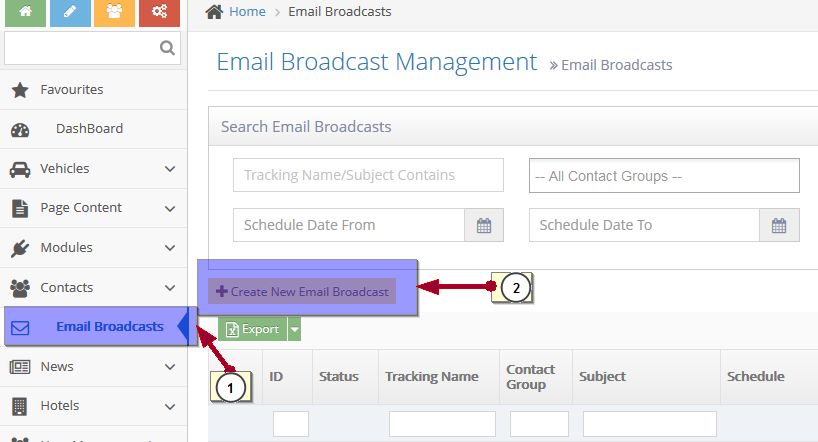
Set Up the Broadcast
-
1Log in as an administrator and go to the Admin Dashboard.
Learn how to log in here → -
2Click the Email Broadcast on the left panel of the dashboard
-
3Click Create Email Broadcast
-
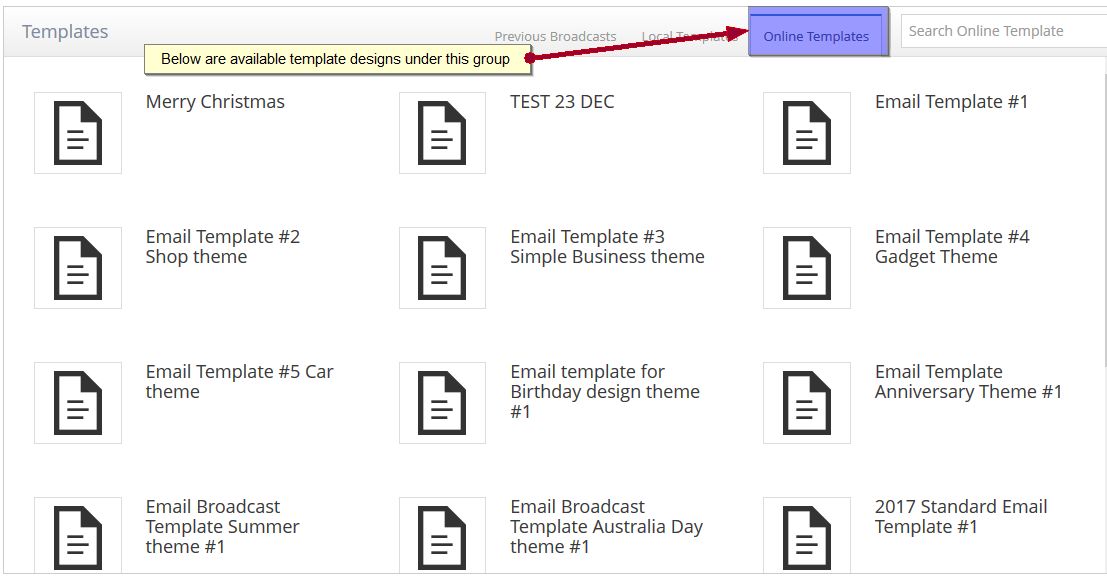
4Select the Template / Newsletter
- On Template Page, you can select from
- Previous Broadcasts - previous broadcasts are a great way to use as a starting point to keep you on brand
- Local Templates - templates you have previously used are downloaded to your site for easy future use. You can also create and save your local templates
- Online Templates - choose from a selection of online templates

- On Template Page, you can select from
-
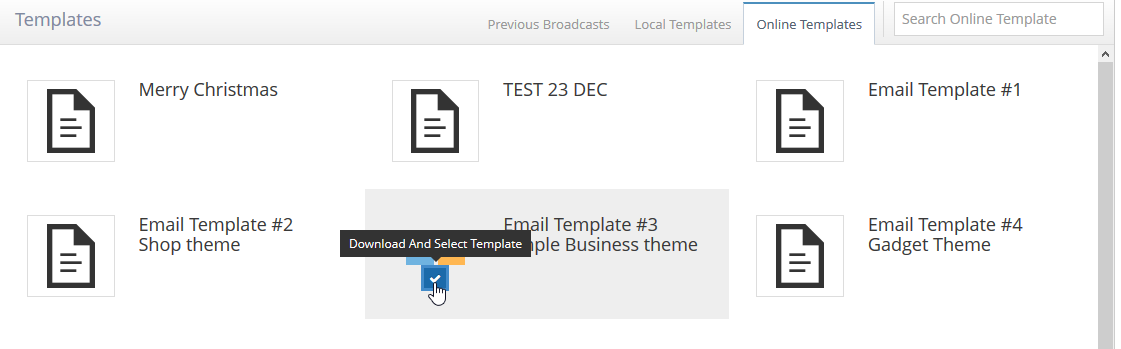
5Click the templates you prefer, to see various designs
-
6Download
-
7Select your preferred template
-
8Enter the preferred name for this email broadcast
-
9Click ok when done.

Editing the Email Broadcast
The template is loaded into your email broadcast and can be edited as needed.
Inserting Properties for Personalisation
Generally, you will want to personalise your email broadcast. Use the drop-down to select from a wide range of properties such as first name, last name or any other contact-related data.
-
1Position your cursor where you want to place the contact data
-
2Click the ADD PROPERTY icon
-
3Select the property to use
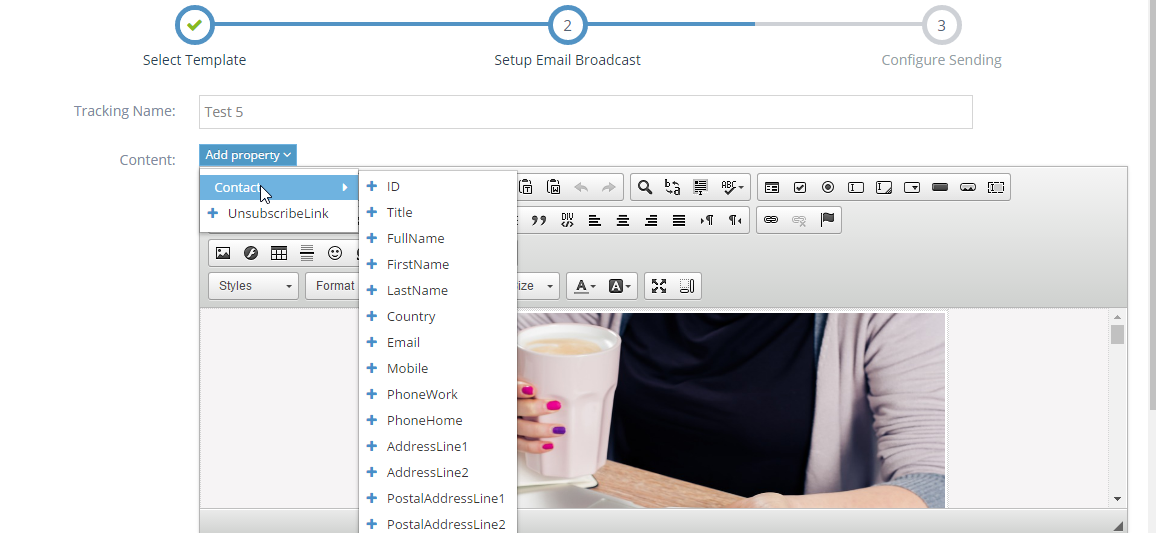
-
4For example, you may select FIRSTNAME
-
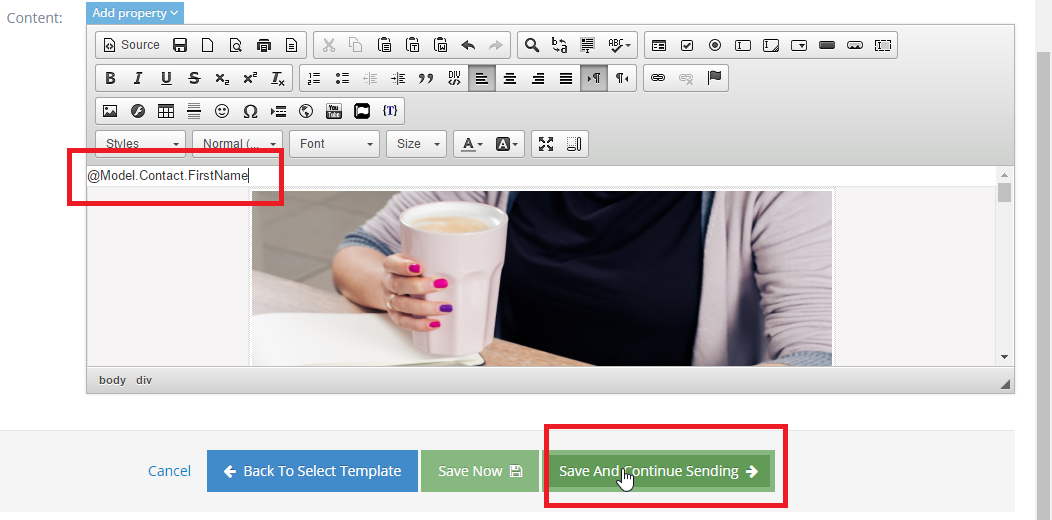
5Note how it inserts the tags for the firstname using the custom format
-
6Continue adding tags and content as needed
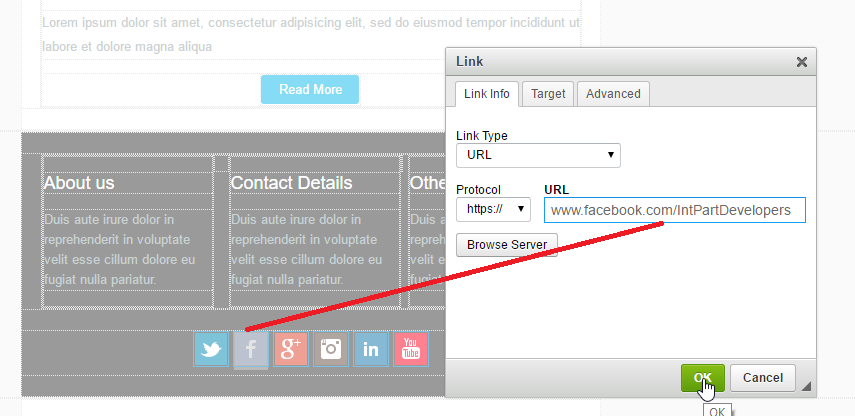
Adding Hyperlinks in the Email Broadcast
Select any Call-to-Action text or buttons and add hyperlinks as needed
Save the Email Broadcast Template
-
1After all copy content, icons, images and links are fully edited
-
2Click Save and Continue Sending
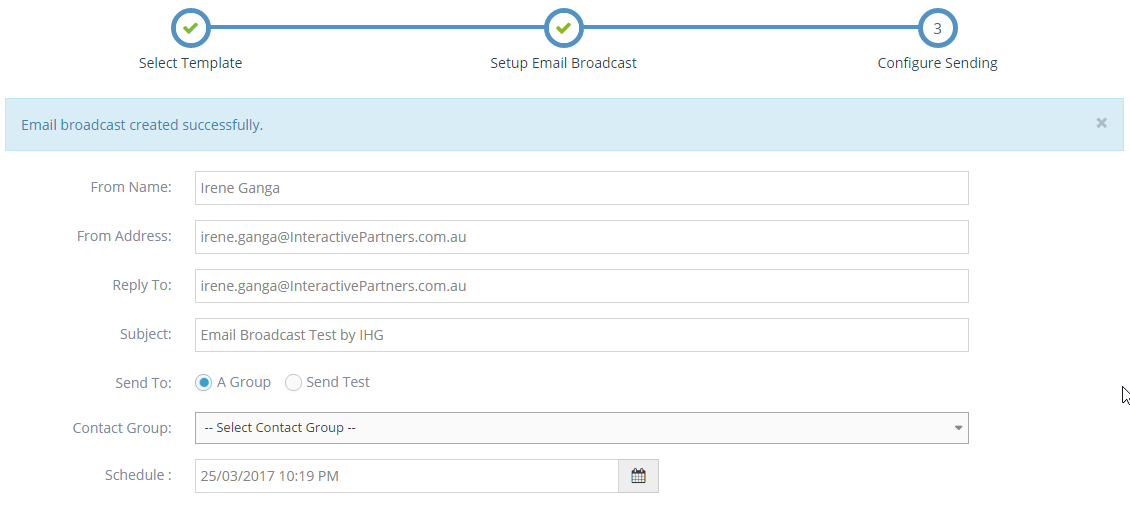
Setting Up the From Address (Sender)
-
1Configure the necessary information
- From Name
- From Address
- Reply To
- Subject
- Send to ( or Test)
- Contact Group (Select a Contact Group - see how to create contact groups in other sections of the user guide)
- Schedule the sending date
-
2When you are done, click the FINISH CONFIGURATION button
-
3Now, your email broadcast is ready for sending
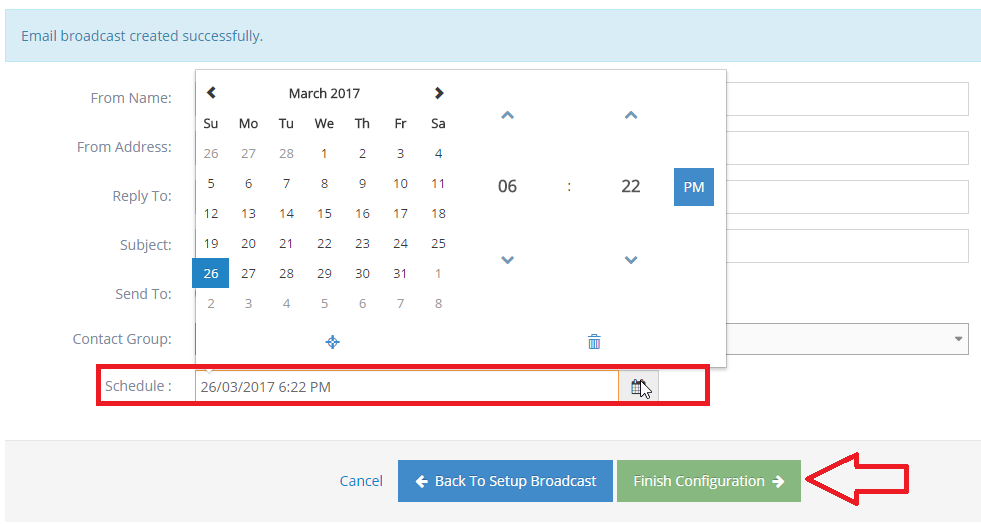
Scheduling of Broadcasts
-
1On the same page FROM EMAIL ADDRESS Configuration, select the calendar icon across the Schedule selection and click the preferred date of sending.
-
2Click finish configuration when done.
Email Broadcasts Metrics
-
1To view the metrics of any sent broadcast, click the CHART ICON on the left side of the ID #.

-
2Click the hyperlinks to view the Open Rate, Bounced, Unsubscribed, and Clicked Links
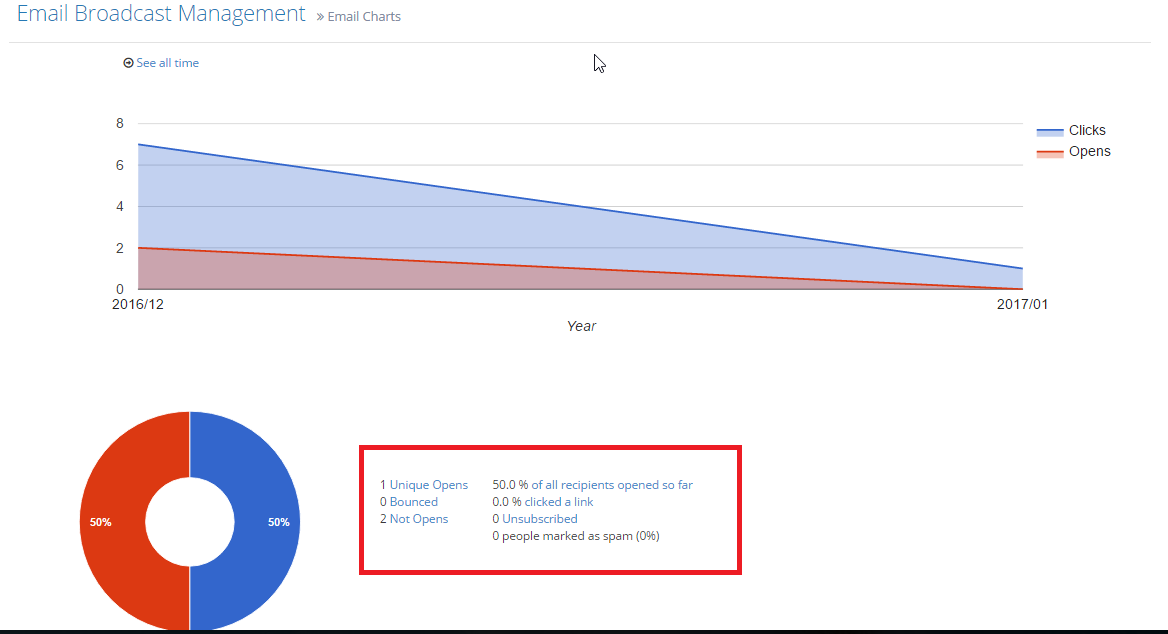
-
3To view the CLICKED LINKS, select a broadcast that has a CLICK Data

-
4Click the # corresponding under the CLICKED Tab to view further information about the links, unsubscribe and open rate
Email Broadcasts Unsubscribes
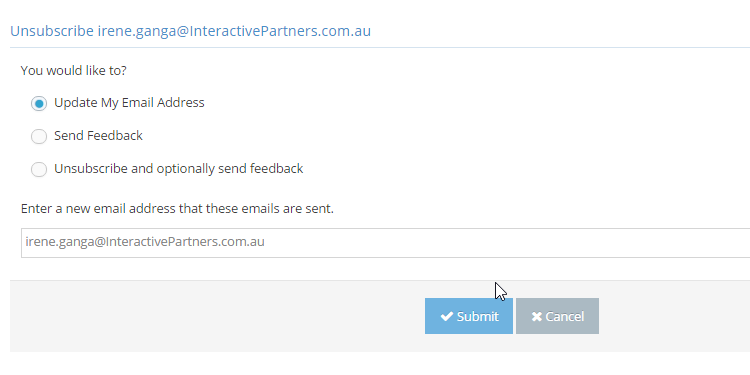
This unsubscribe link appears on every template. The purpose is for (receiver) to click if s/he wants to be taken off our list, and for (marketer/IP) to manage which content receives the most # of bounced.
-
1At the bottom of the email, unsubscribe links are automatically added
-
2You can also add your unsubscribe links anywhere in the email
-
3If the system detects an unsubscribe link, it will not add one automatically to the footer

-
4Enter your email address to be unsubscribed
-
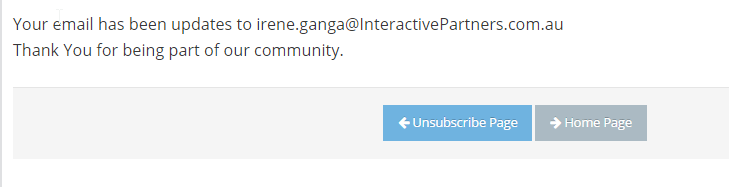
5A confirmation message is displayed
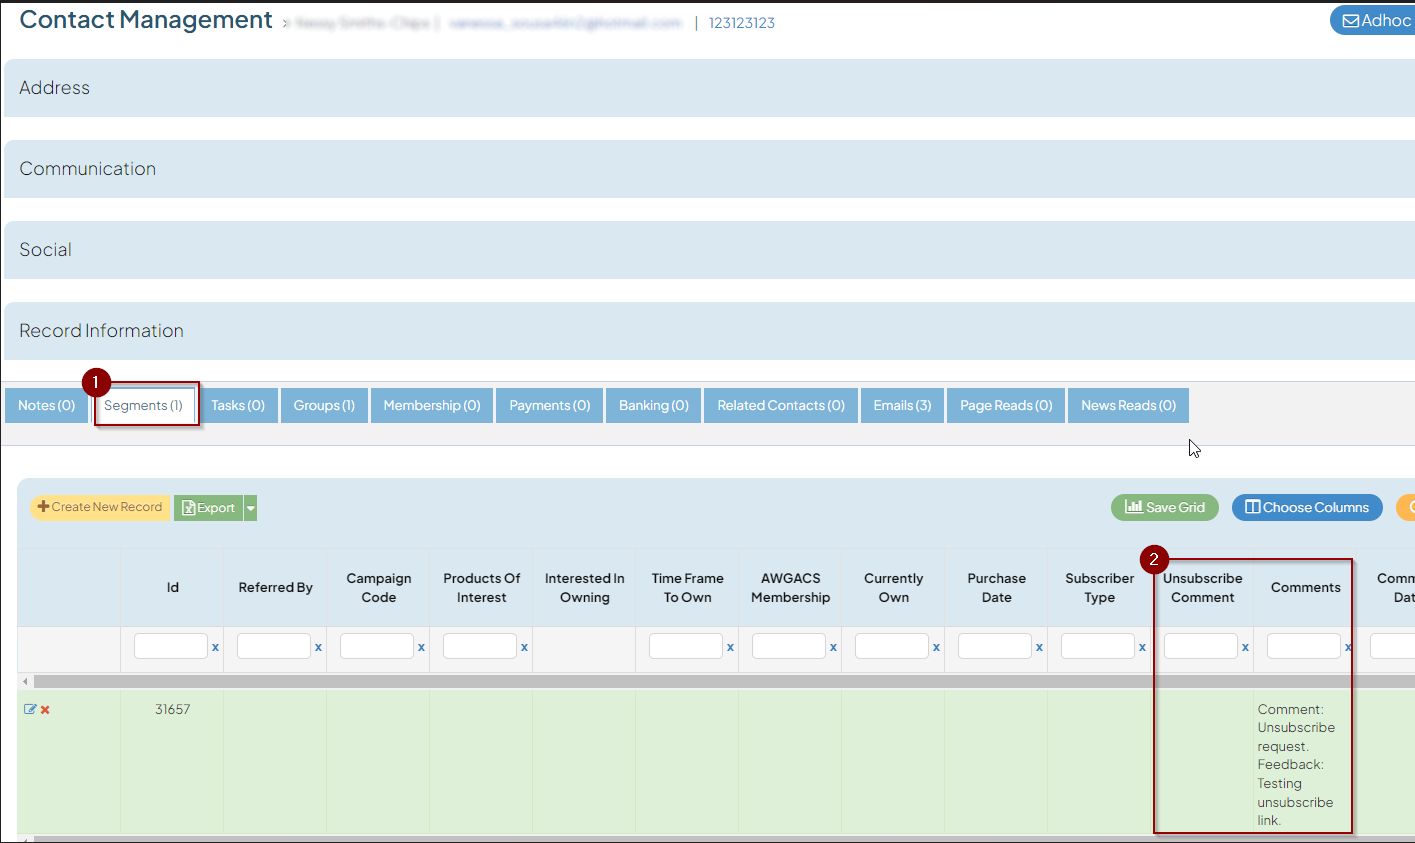
Reviewing Unsubscribed
To find unsubscribe comments, follow the following steps below.
-
1Open the email broadcast
-
2Scroll down to tabs and click Unsubscribes
-
3Click on any contact name to open the contact display
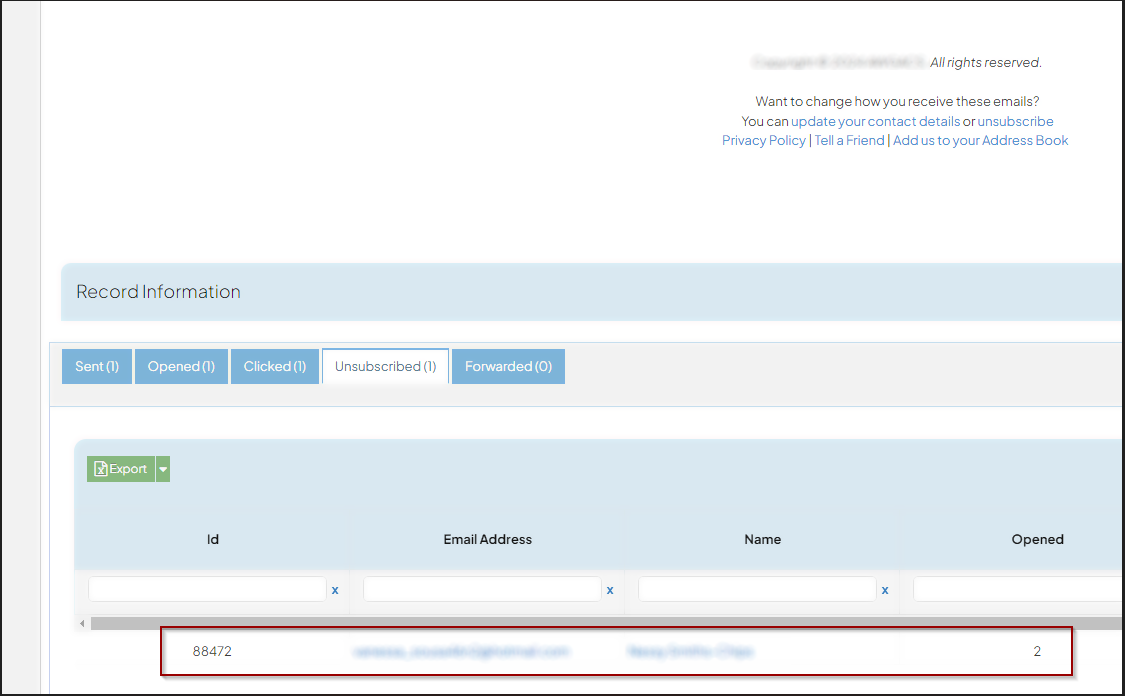
-
4In the Segments tab, you can see the Unsubscribe Comment if a contact entered any information on that field upon unsubscribing
Tell A Friend
This is a link at the footer of the email by default. If you click on the link, it will direct you to a page for forwarding the email/newsletter to your friend with the email input.
-
1At the bottom of the email, by default

-
2Click at Tell A Friend, it will direct you to a page to forward email
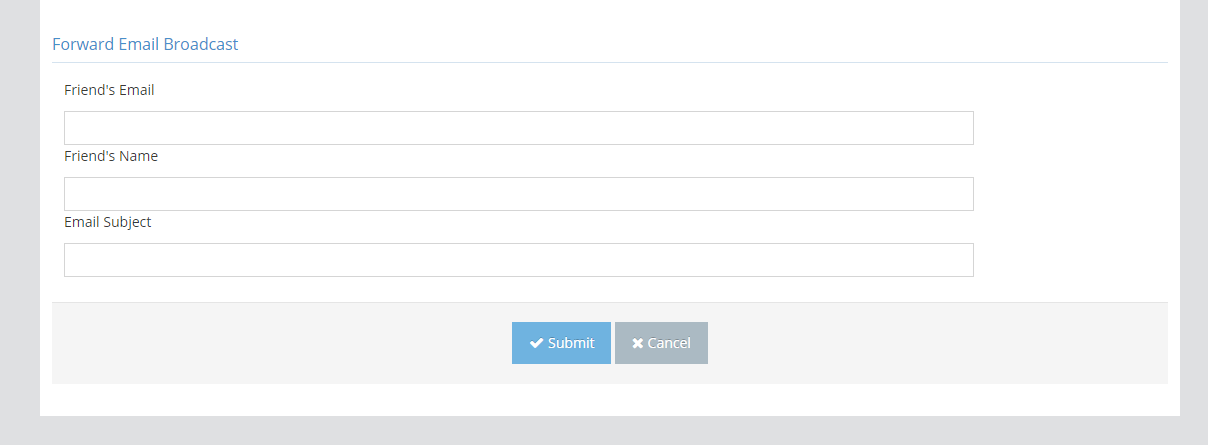
-
3Fill in all the fields and submit the form, the email will be forwarded
Setting Page Template as an Email Parent
Page Template as an Email Parent Overview
Using a page template as an email parent works the same way as using it for pages.
Why you would use an email broadcast online template?
- Using the master email template allows global changes on the email templates without the need to edit every template.
- This provides a centralised look and feels while still allowing the body to be different.
Using a Page Template as a parent for a new Email Template
-
1Log in as an administrator and go to the Admin Dashboard.
Learn how to log in here → -
2Go to Admin > Settings > Email Templates
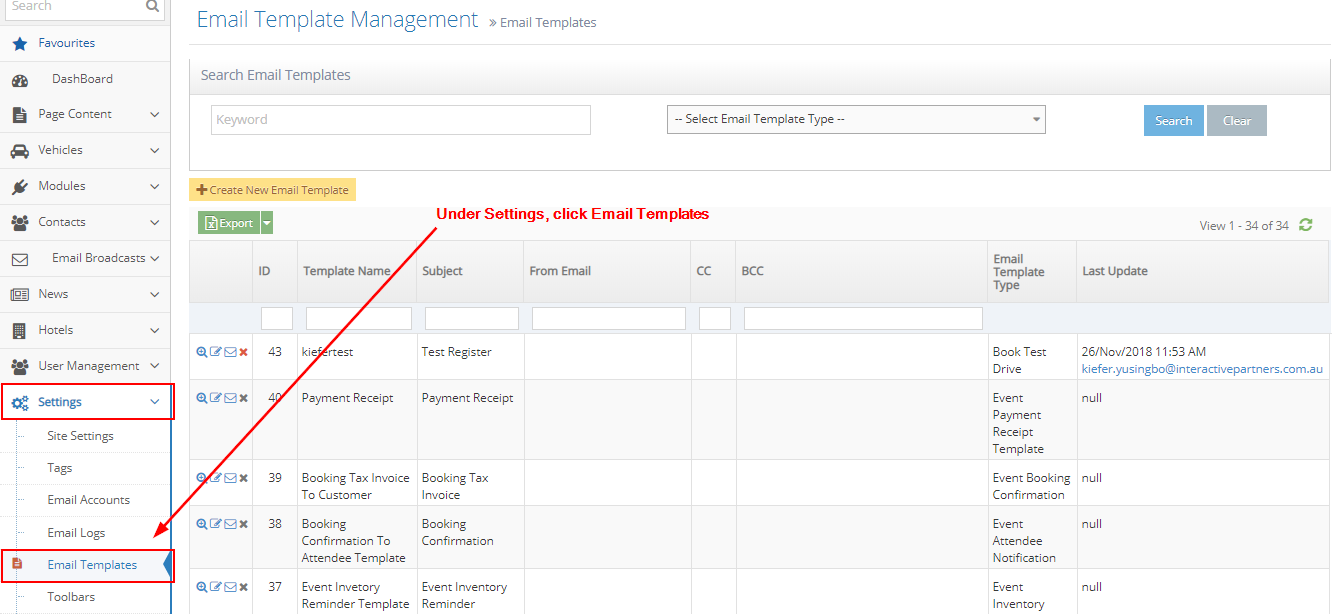
-
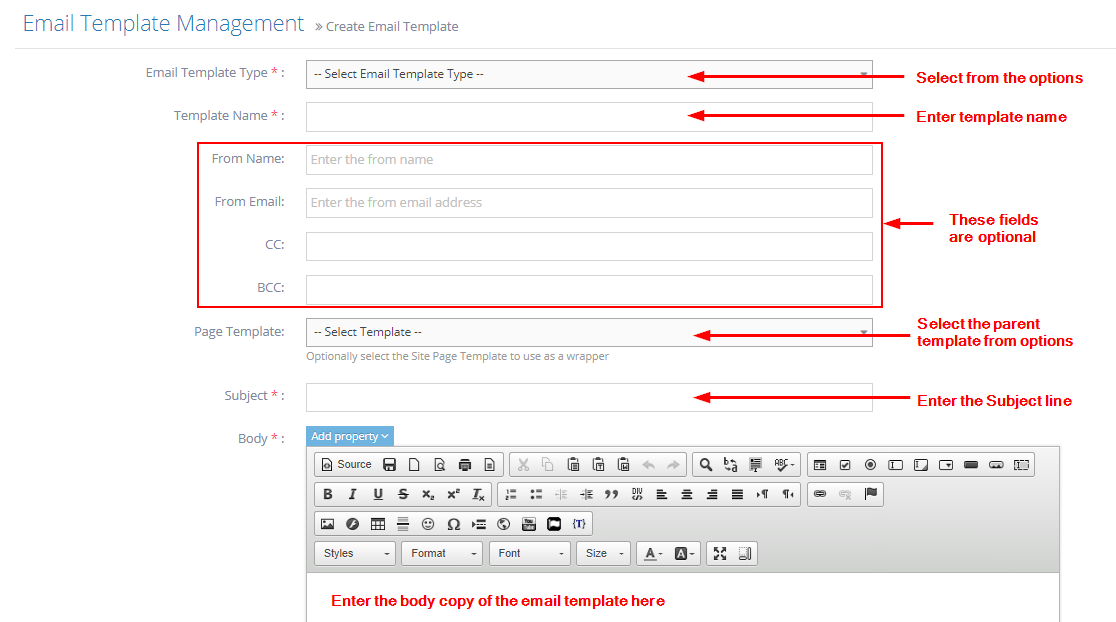
3Supply the details needed:
- Email Template Type - select the email template type from the options. This field is required.
- Template Name - enter the template name for this new email template. This field is required.
- From Name - enter the From Name for this new email template. This field is optional.
- From Email - enter the From email address for this new email template. This field is optional.
- CC - enter the CC email for this new email template. This field is optional.
- BCC - enter the BCC email for this new email template. This field is optional.
- Page Template - select the parent page template type you want to use from the options.This field is optional.
- Subject - enter the subject line for this new email template. This field is required.
- Body - enter the body/copy for this new email template. This field is required.
-
4Save your new email template.
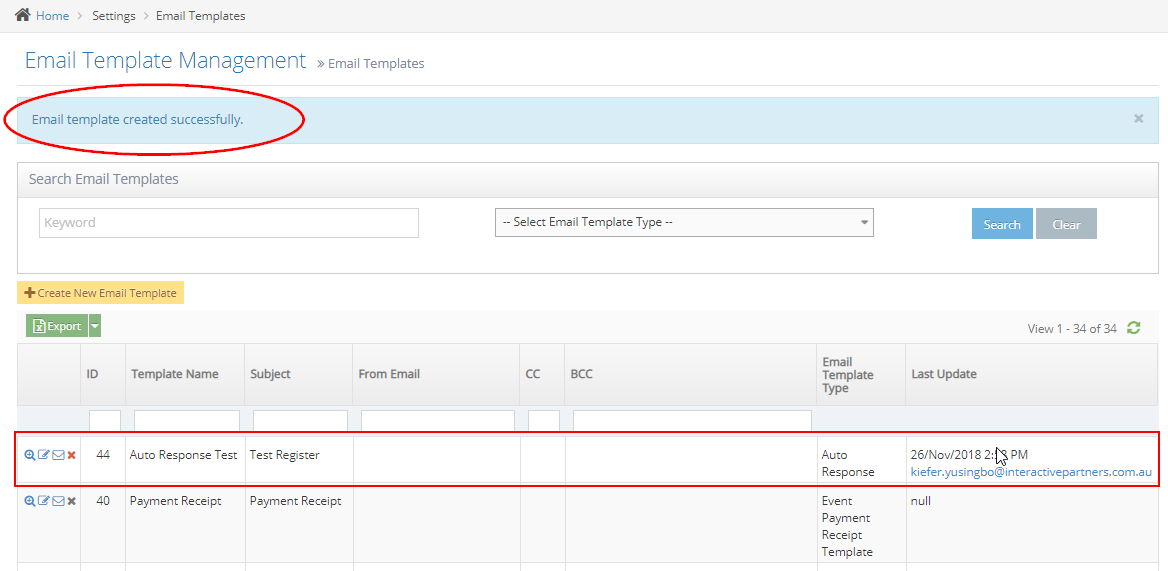
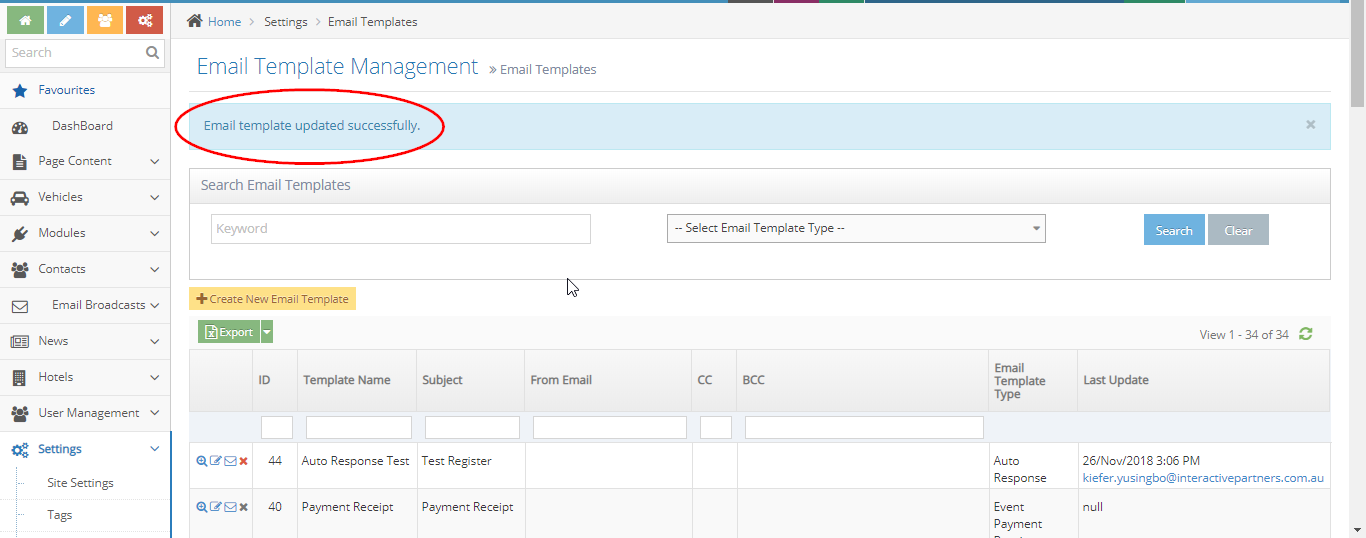
- Create - click the 'Create' button to submit the new email template. This action creates your email template, closes the page and redirects you to the Email Templates listing. On the Event Listing, you will see a note "Email Template created successfully".
- Create and Continue Edit - Click the 'Create and Continue Edit' button to submit the new email template. This action creates your email template but lets you stay on the page.
- Reset - click the 'Reset' button to start over. This action refreshes the page and shows a blank 'Create New Email Template' page. Your email template will not be saved/created.

Using a Page Template as the parent for an existing Email Template
-
1Log in as an administrator and go to the Admin Dashboard.
Learn how to log in here → -
2Go to Admin > Settings > Email Templates
-
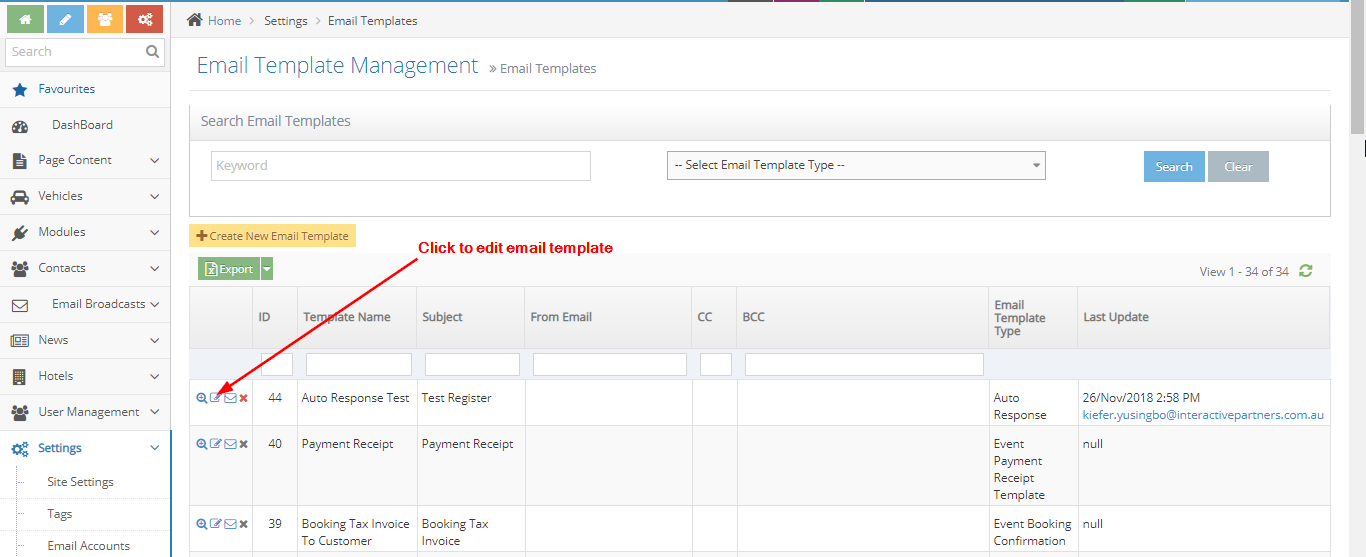
3Navigate to your email template.
-
4Click the Edit icon next to your email template.

-
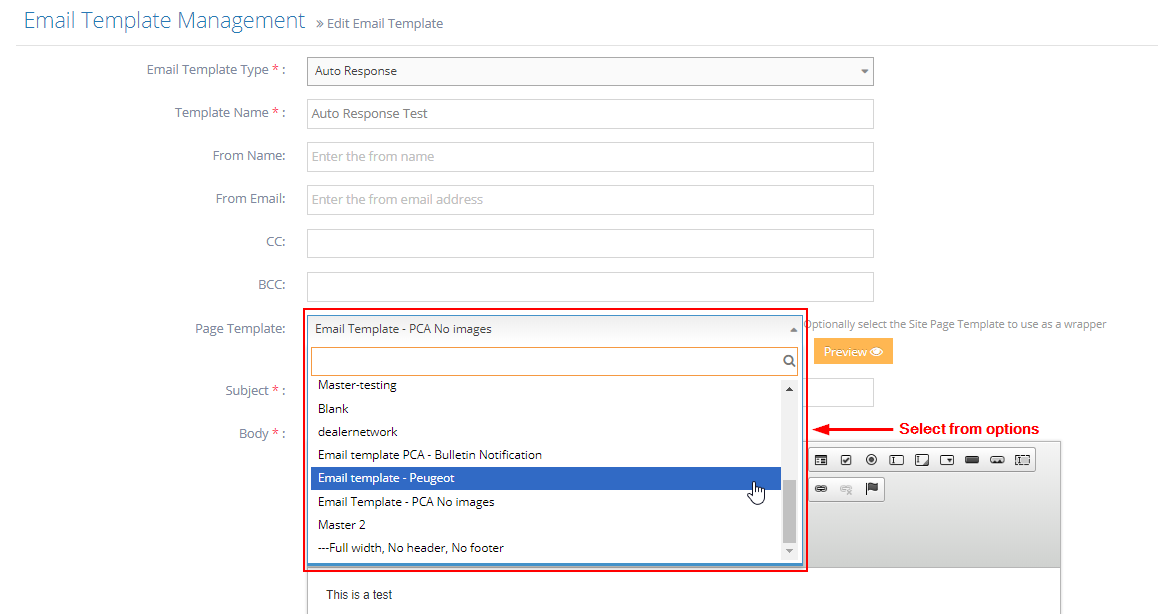
5On the Page Template, select the parent email template you want to use.
-
6Save your update.
- Save - click the 'Save' button to save the changes. This action saves the changes, closes the page and redirects you to the Email Templates listing. On the Email Templates Listing, you will see a note "Email Template created successfully".
- Save and Continue Edit- Click the 'Save and Continue Edit' button to save the changes. This action saves the changes but lets you stay on the page.
- Reset- click the 'Reset' button to start over. This action refreshes the page and shows the current email template's information. The changes will not be saved.

Email Sending Score Check
Email Sending Score Overview
This is to check your email score if you are having trouble with your emails going to your spam or junk folder.
- Sometimes we encounter issues about emails not being sent or received but appearing to be sent on your website.
- Emails marked as sent but not appearing to be delivered may be caught by blacklists or spam filters.
- Use the procedure below to check your spam score and DNS configurations for email delivery
- Note, this will only check emails generated by the web server. For emails generated externally to the webserver please check with your IT provider
Steps to Check Email Spam Score and DNS settings
News listing is where the news information with a teaser and has a URL link to view the whole details of each item.
-
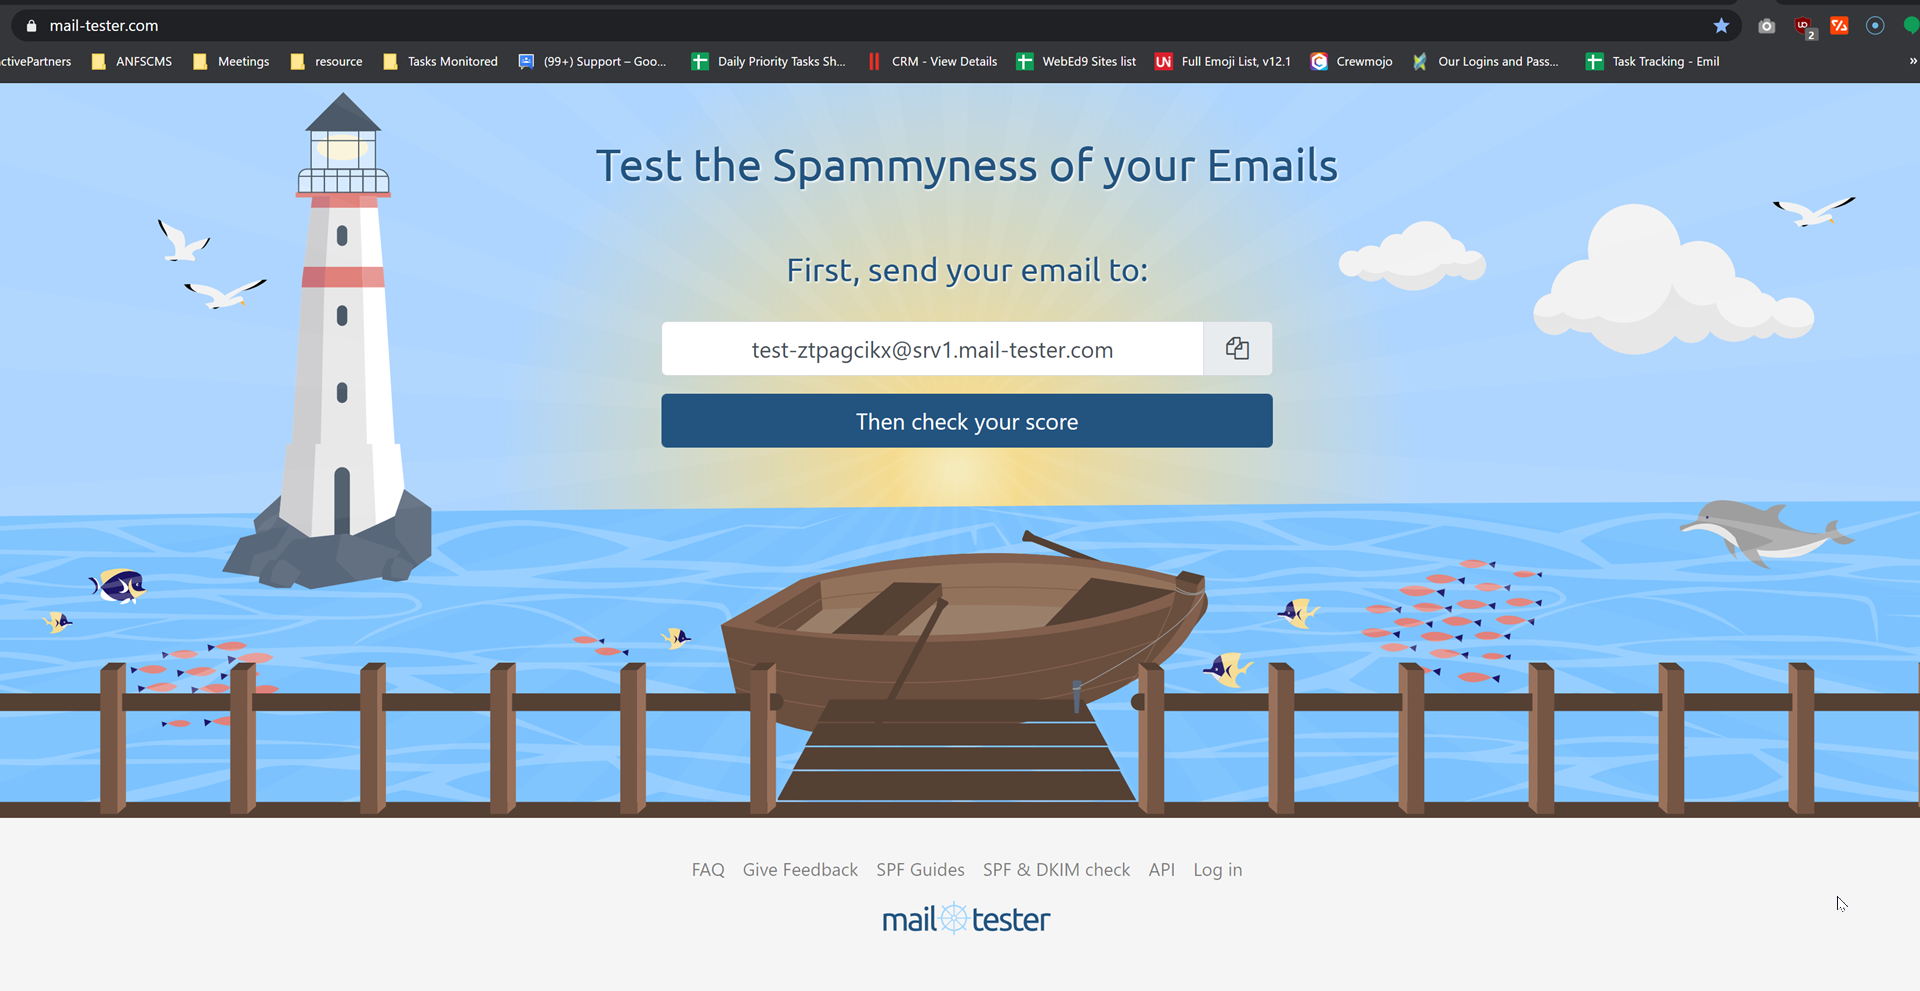
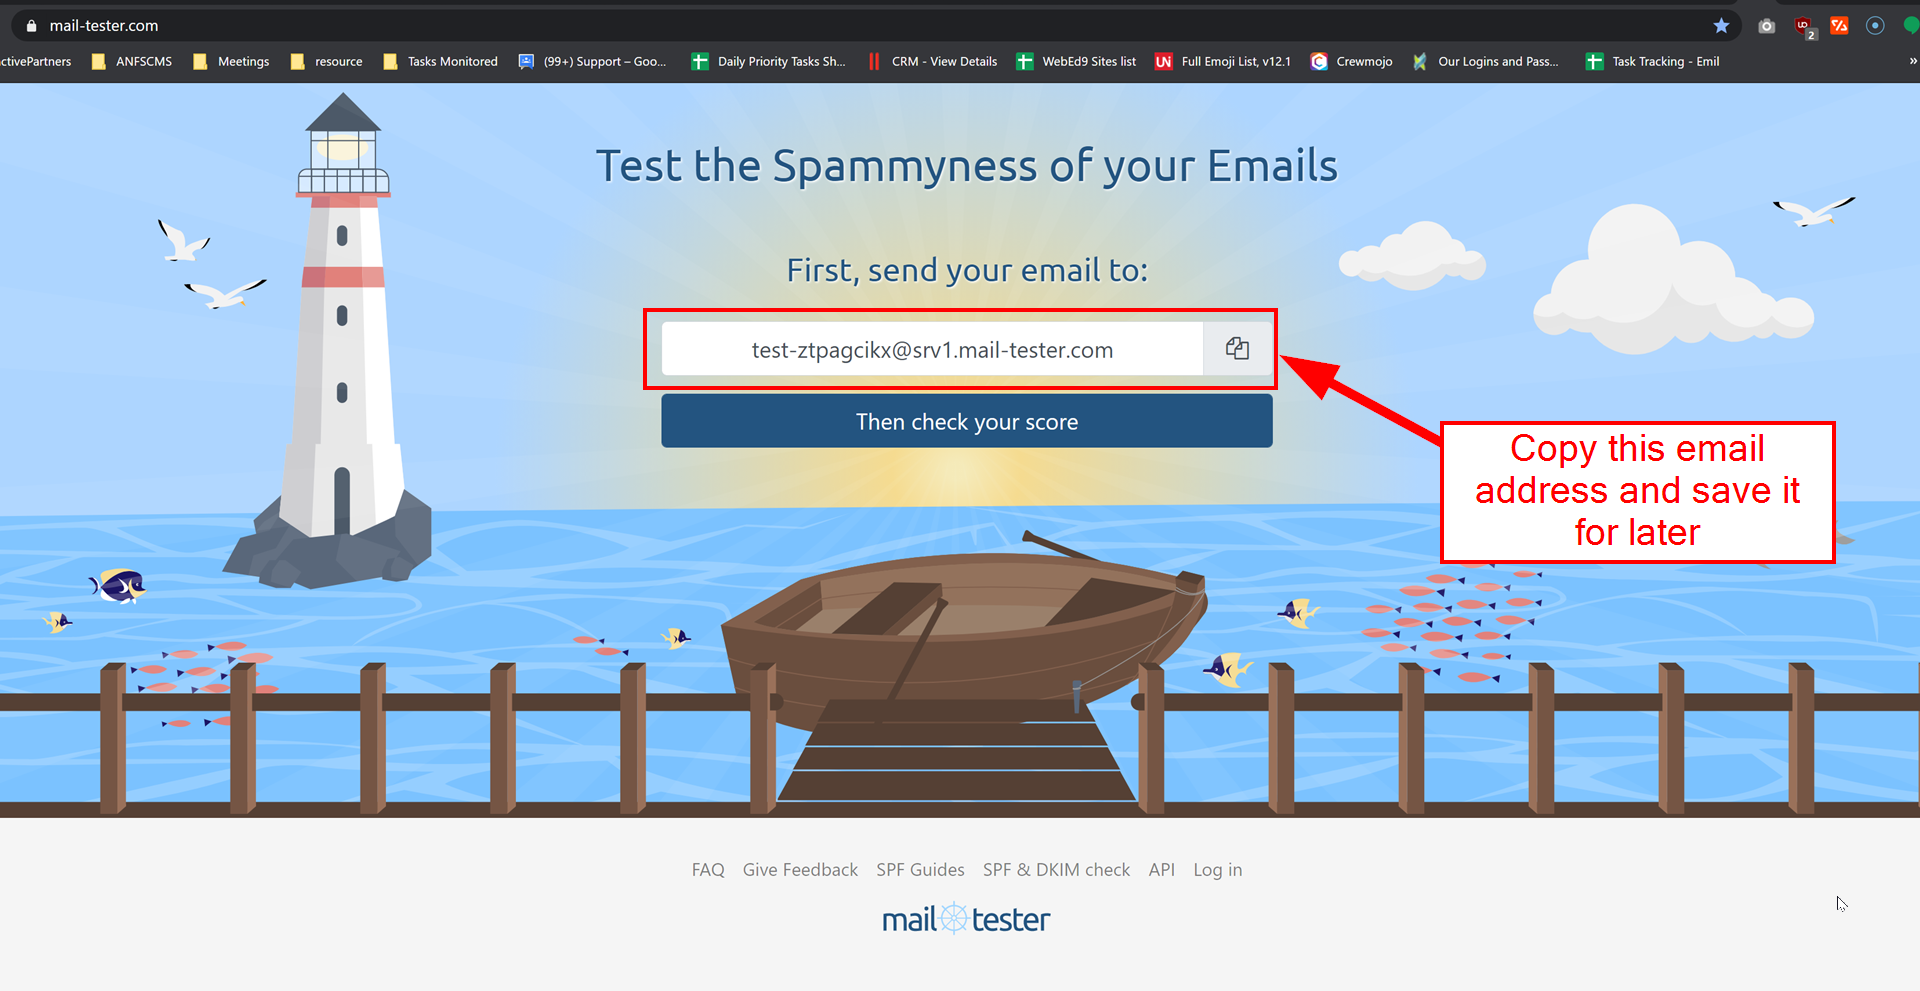
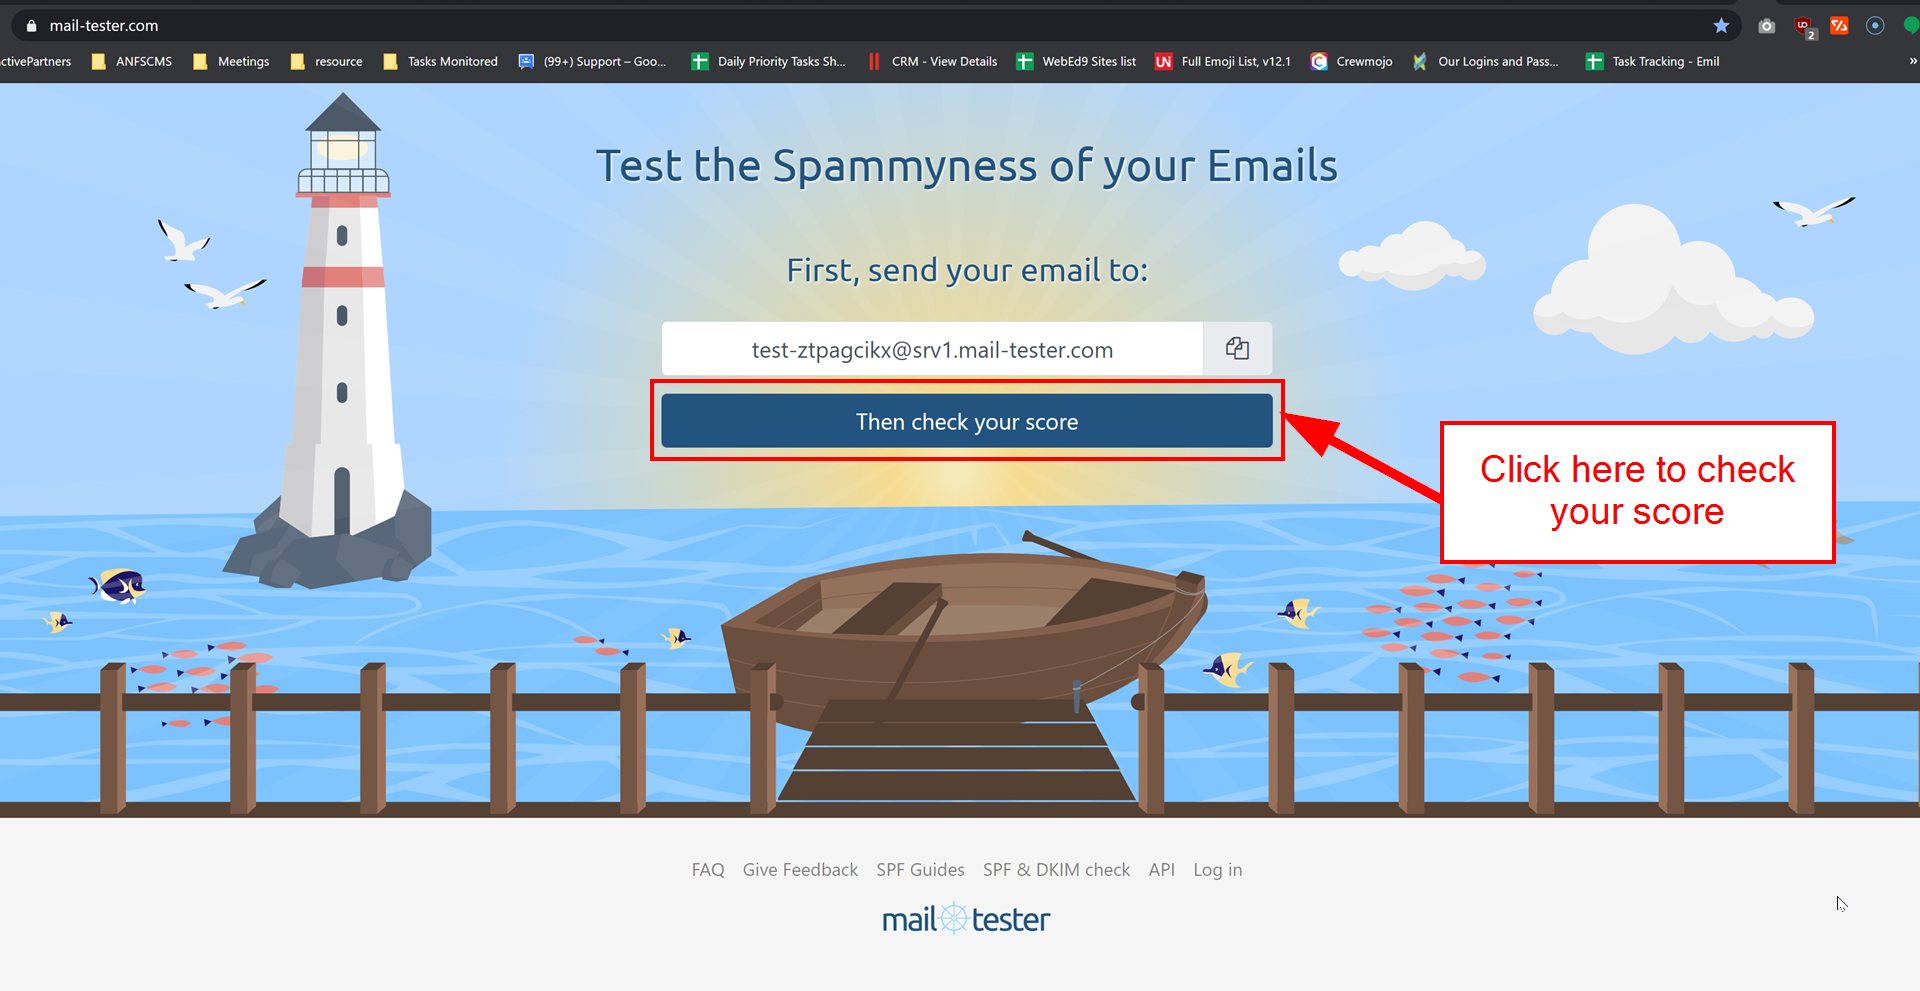
1Get a Test Email Address
-
2Open https://www.mail-tester.com/ in a new tab. Please see the image below.
-
3Copy the email provided by mail-tester.com.
-
4Keep this window open for reference
Send from the Web Server
-
1On a new window, log in as an administrator and go to the Admin Dashboard.
Learn how to log in here → -
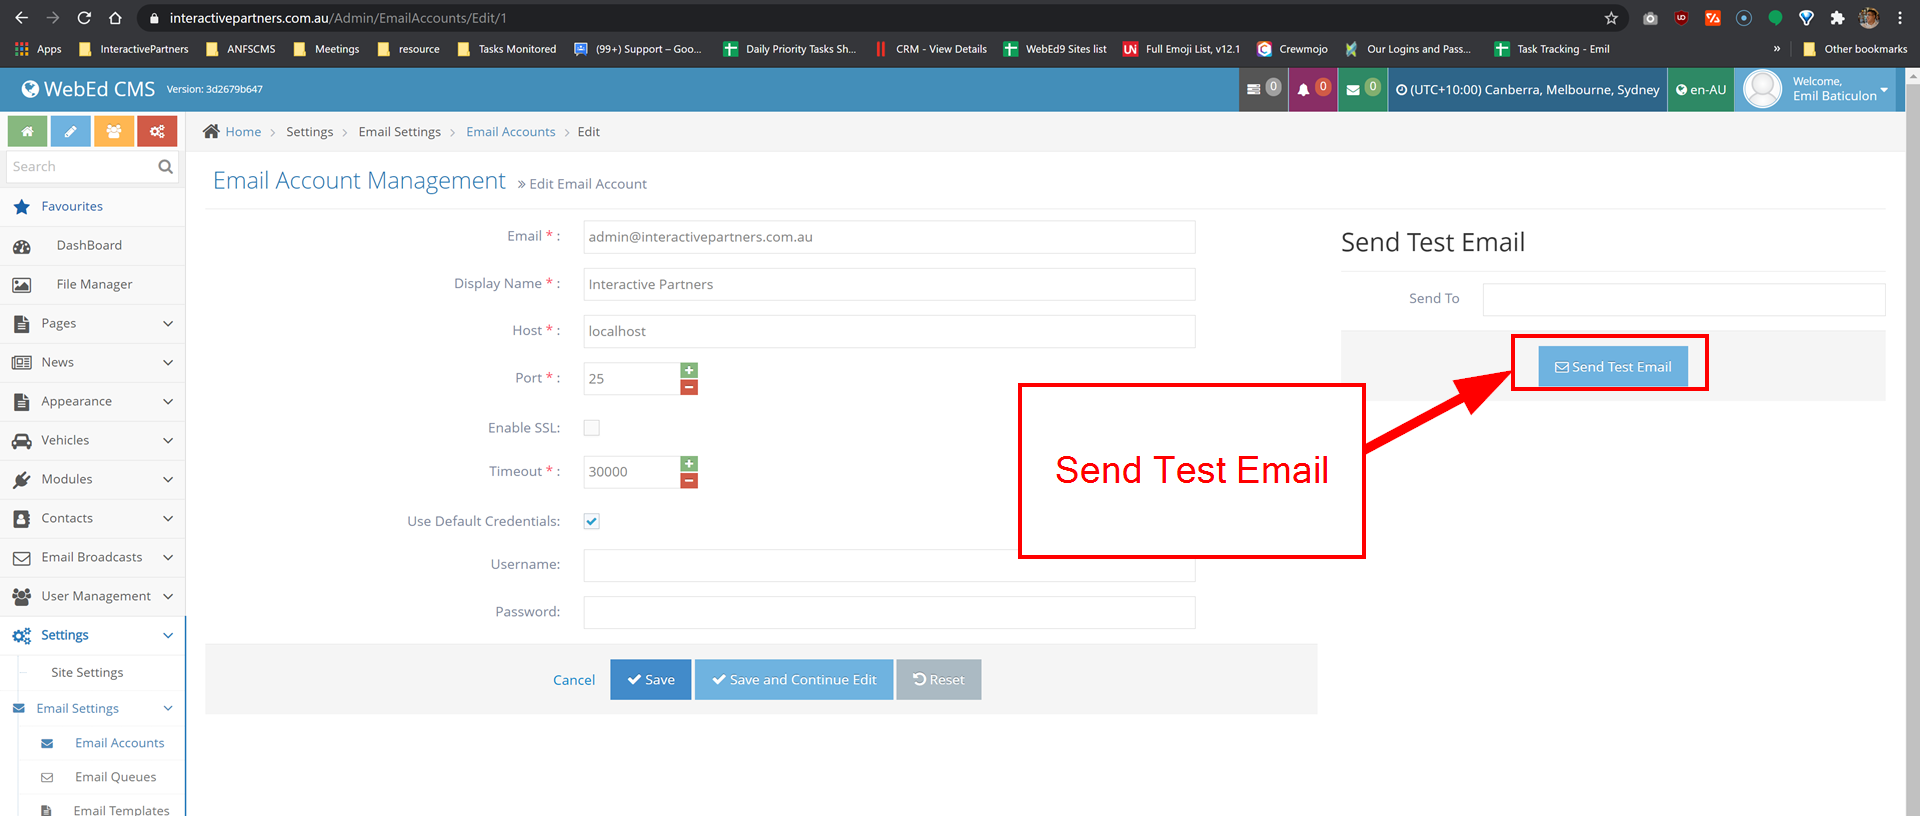
2Select Settings > Email Settings >Email Accounts.
-
3Choose which email account you want to test.
Learn how to create a new email account here →
-
4Click Edit
-
5Click Send Test Email
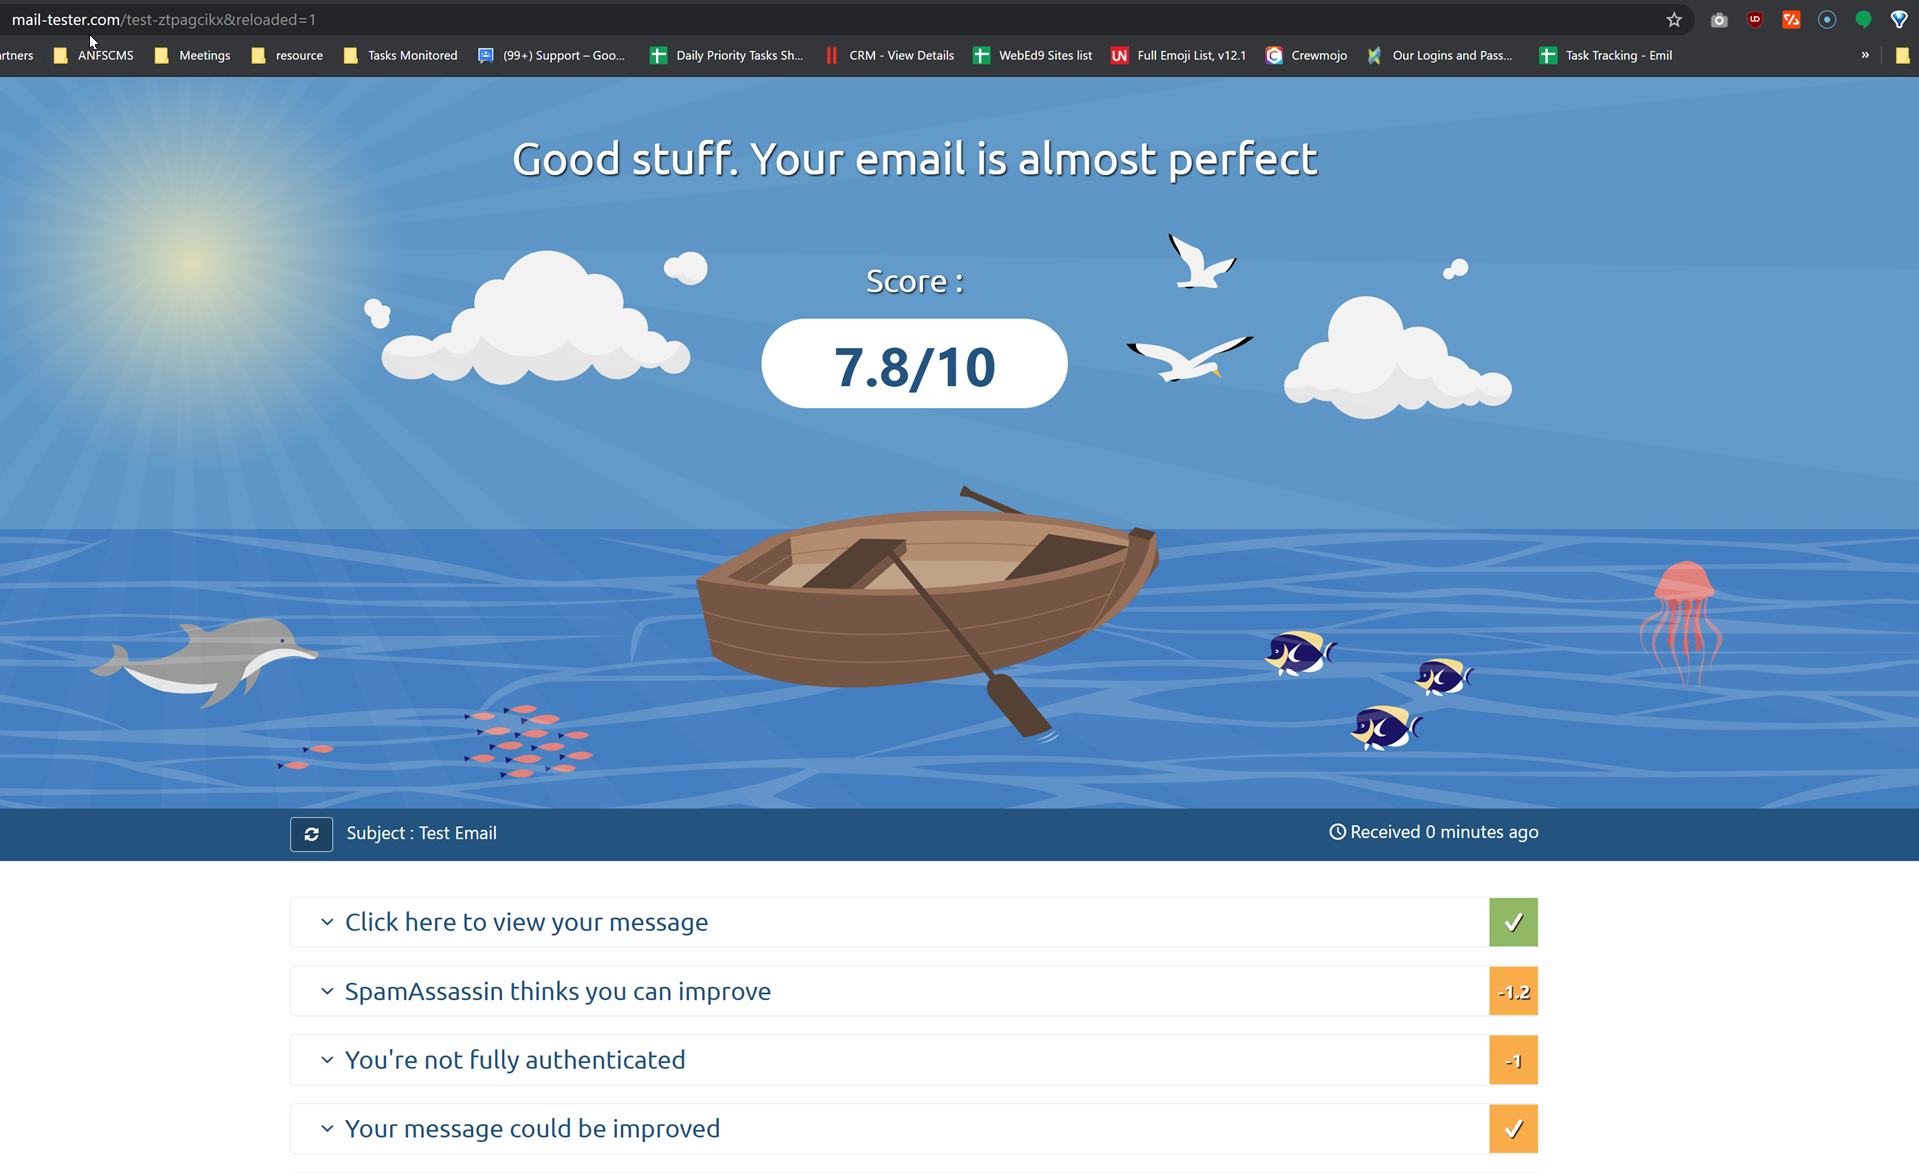
Checking Your Email Score
-
1Switch back to your window https://www.mail-tester.com/
-
2Click check your score
-
3Results will be displayed underneath
-
4If you have issues with your email account please contact us via [email protected].
Displaying a News Article in an Email Broadcast
-
1Create an Email Broadcast
Learn how to create Email Broadcasts here → -
2Insert a Curly Bracket from the editor icons
-
3select "News Details"
-
4News field: select the article you want to include or display in the Email Broadcast
-
5Template Name field: select the correct template you want to use
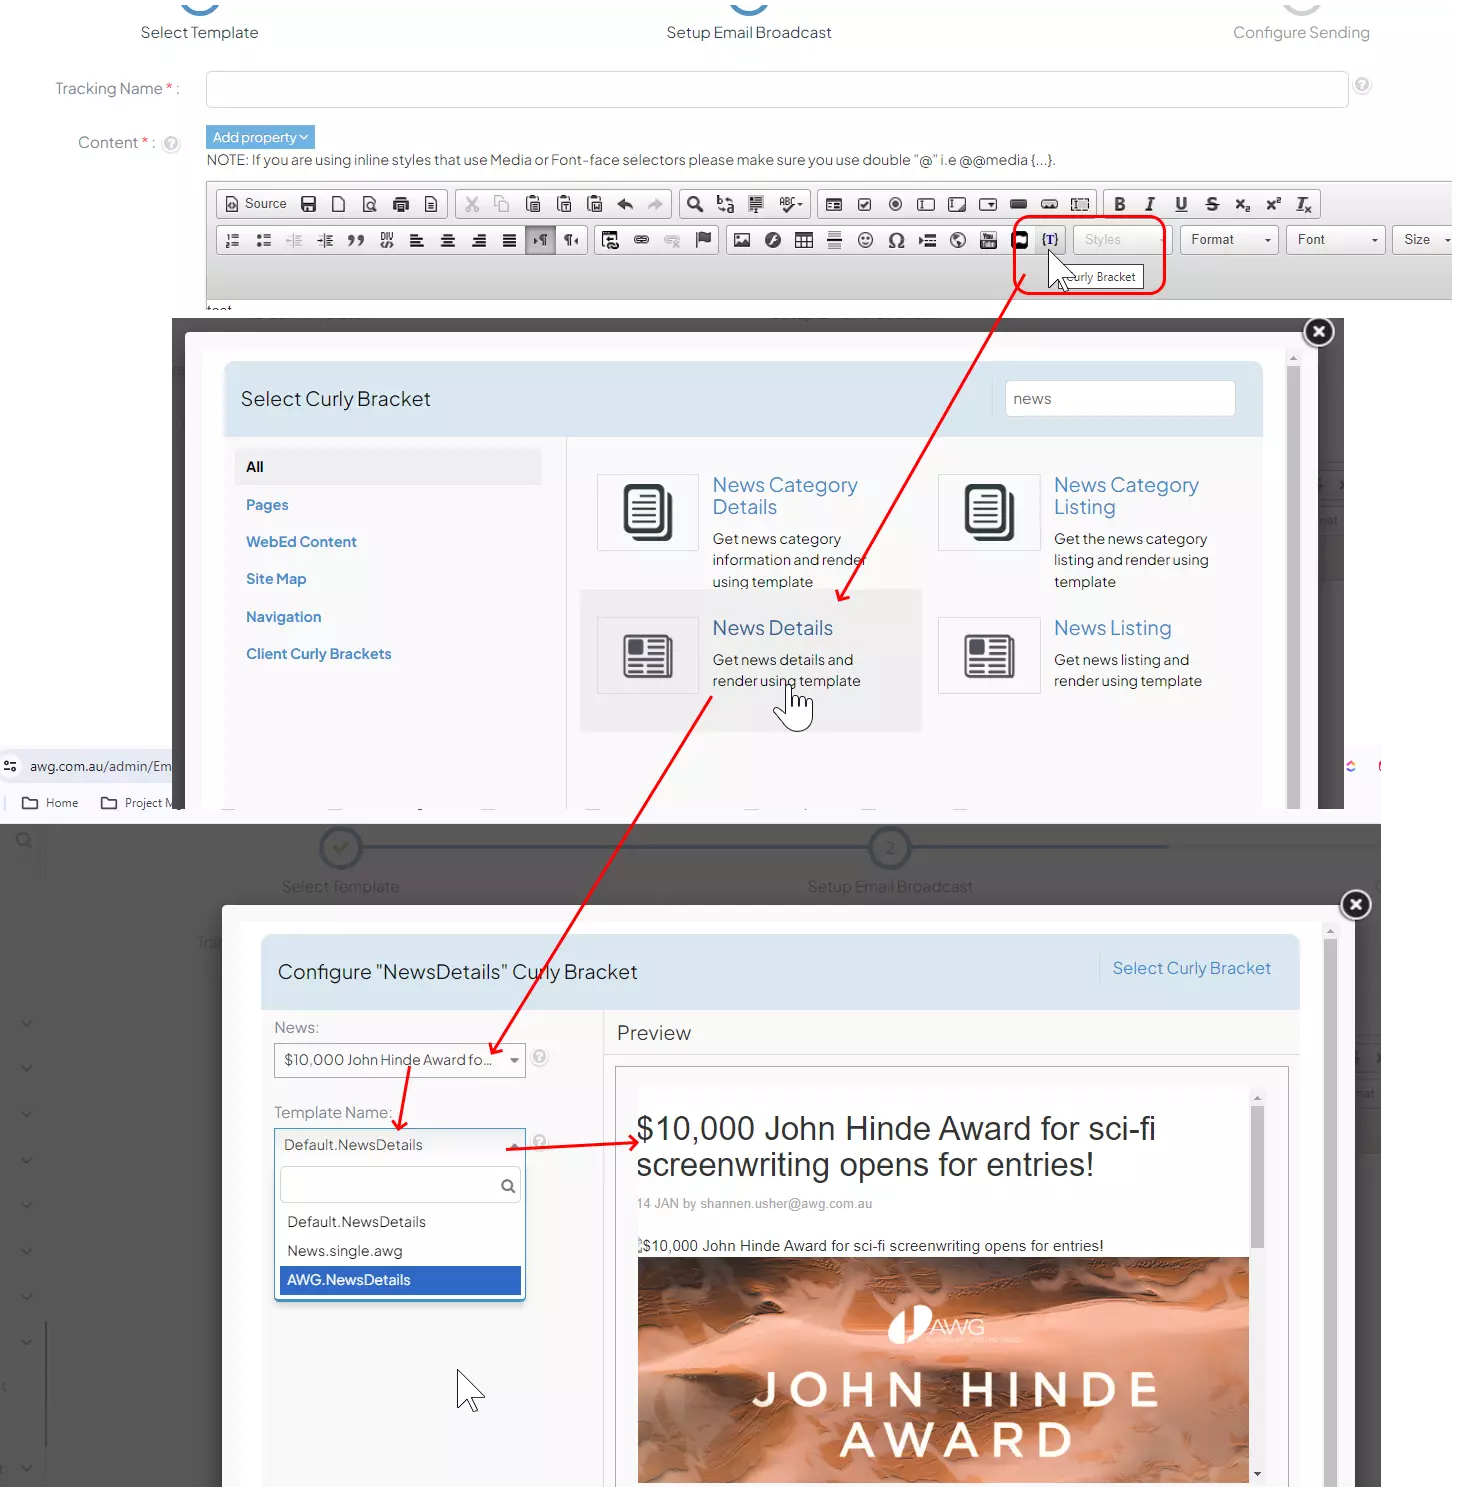
-
6Voila! The email broadcast will now display the news article.
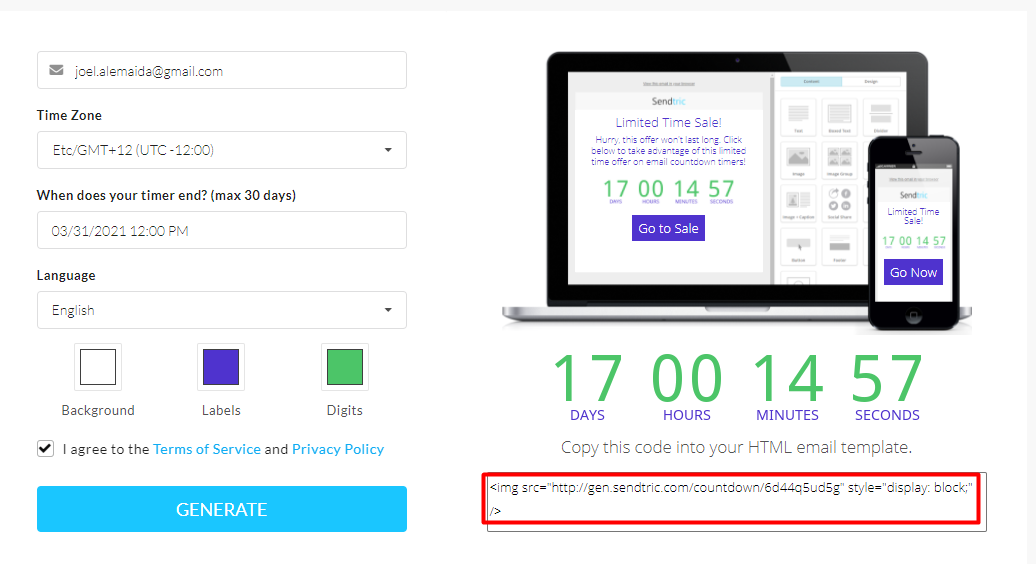
Countdown Timer in Email Templates
-
1
-
2Type in your email address
-
3Set the time zone to Australia/Sydney (UTC +11:00)
-
4Set the end date of the timer. eg. 04/21/2022 12:00 PM
-
5Leave the default Language to English
-
6Choose a background colour
-
7Then set the colours of its label and digits
-
8Then check the I agree to the terms of service and Privacy Policy checkboxes
-
9Then click generate button
-
10Then copy the generated HTML code and paste it to your email templates