- What Image Types Can I use?
- Image Dimensions
- Image Uploaded Converting to WebP format
- How will images convert to WebP?
- WebP advantages
- Image Quality
- Upload images directly on the page/page content
- Upload images to my website using File Manager
- Update existing images on the page/page content
- Check Image Size
- Check the Image size on each page separately
- Resizing Images
- Updating a Photo Gallery
- Remove an image on the page/page content
- Editing a Banner Image
- Creating a Photo Gallery on a Page
- Adding a Popup Lightbox Effect on an Image
- Troubleshooting Tips for Image Loading Problems
Update existing images on the page/page content
STEP-BY-STEP
-
1Log in as an administrator and go to the Admin Dashboard.
Learn how to log in here → -
2In the Admin Module, on the left menu, click Pages, then select Pages and Edit the page you wish to update or
-
3Edit directly the page you wish to Update
-
4Click the Image you will update on the page editor
- Copy and Move
- There are 2 ways to move images within a page
- Drag the image to a new location using your mouse
- Copy (or CTRL-C) your image and then Paste (ctrl-v) into the new location
-
Replace the image
- Ensure you have the new image ready to go
- Delete the old image
- Position your cursor and click the 'Image Icon' on the toolbar -

- Select the new image from the ones available on the server or upload the image
- Copy and Move
-
5Or Double Click the Image you will update on the page editor
-
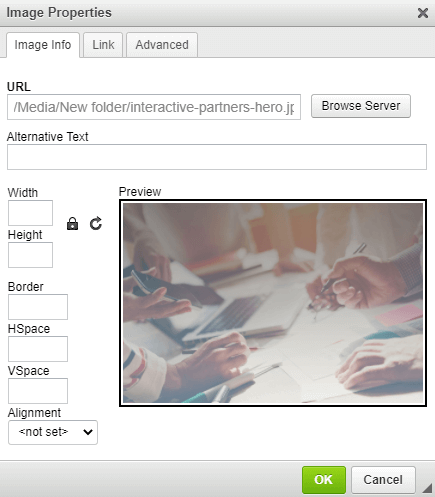
6On the Image Properties window, you can update the below:
- Image Info
- Image URL
- ALT Text
- The width of the image
- The height of the image
- Image preview
- Image Border
- Image HSpace
- Image VSpace
- Image Alignment
- Link
- Image Link URL
- Target
- Advanced
- ID
- Language Direction
- Language Code
- Long Description URL
- Stylesheet Classes
- Advisory Title
- Style
- Image Info