The Basics of managing Page Templates on WebEd9
Templates in WebEd 9 are 2 types:
- Master
- This controls the overall layout of a site.
- This is the place you should put all your JavaScript, CSS and overall "wrapper" for the site.
- Non-Master or Other
- This is for various areas of the page layouts and gives you granular control over page areas.
Templates can cascade in a parent-child relationship:
- Master
- Page Template Blah 1
- Page Template not Blah 1
When you create a new page, you will be prompted for a page template to use.
Sample Layouts
Assume we have the following layouts for the explanation
| Layout for home pages | Layout for the following pages | |||||||||
|---|---|---|---|---|---|---|---|---|---|---|
|
|
|||||||||
Using Master Templates
The simple way
WebEd 9 allows you to have multiple Master templates - one way you can do this is to have two Master pages
- Home Page Master
- Following Page Master
This will allow you to select the template you require for each page type, but what happens if say, the header layout needs to change? You now have to edit in two places and it doubles the work required.
The better way
- Have one Master Template which controls the wrapper or main layout of the page
- Have two child templates that use the Master as a parent
- Master
- Home Page
- Following Pages
Now you will have all the static layouts like header and footer in one place and easily managed. Plus the layouts for the following and the homepage are in one place and easy to manage. At the time of page creation, you just select the page layout you want.
How this works is:
- You select the correct page template for the page (say, Home Page)
- The topmost parent for the page is found (Master)
- Then all page templates which are children, are added to the HTML sent to the browser
- Master
- Home Page
- Master
- Then all page templates which are children, are added to the HTML sent to the browser
- Because templates cascade, you can have very complex template structures if needed.
- Of course, with more complexity comes more maintenance work so we suggest you keep it as simple as possible
Adding Cool Stuff to Specific Pages
Say we have a widget or specific piece of content we need to use in a few places on the site.
- You could just add a piece of content on each page if you need it
- Of course, if it changes, you will need to edit it in multiple places.
Using Cascading Templates, this is a snap
First set up your template structure says:
- Master
- Home Page
- Following Page
Then add the widget as a template. You can do this because templates inherit from their parent.
- Master
- Home Page
- Following Page
- My Very Cool Widget Page
Because the Widget page is just a template, you can control the positioning of the Widget using standard HTML or CSS. Now when you create your new page, you select the My Very Cool Widget template and everything gets rendered correctly due to the Rollup/Hierarchy/Cascade nature of the templates.
Over the long term, your maintenance work will be significantly less as you can easily break things down into simple templates for all kinds of stuff.
- Master
- Home Page
- Following Page
- My Very Cool Widget Page
- Products Page
- Products with Widgets
- My Special Landing Page Master
- My Very Cool Form Template
Managing the Page Template in WebEd9
Where can I find the Page Template module in the system?
-
1Log in as an administrator and go to the Admin Dashboard.
Learn how to log in here → -
2Go to Contents > Pages > Templates > Page Templates
How to create a Page Template?
-
1In the Page Template listing page, click on Create New Template
-
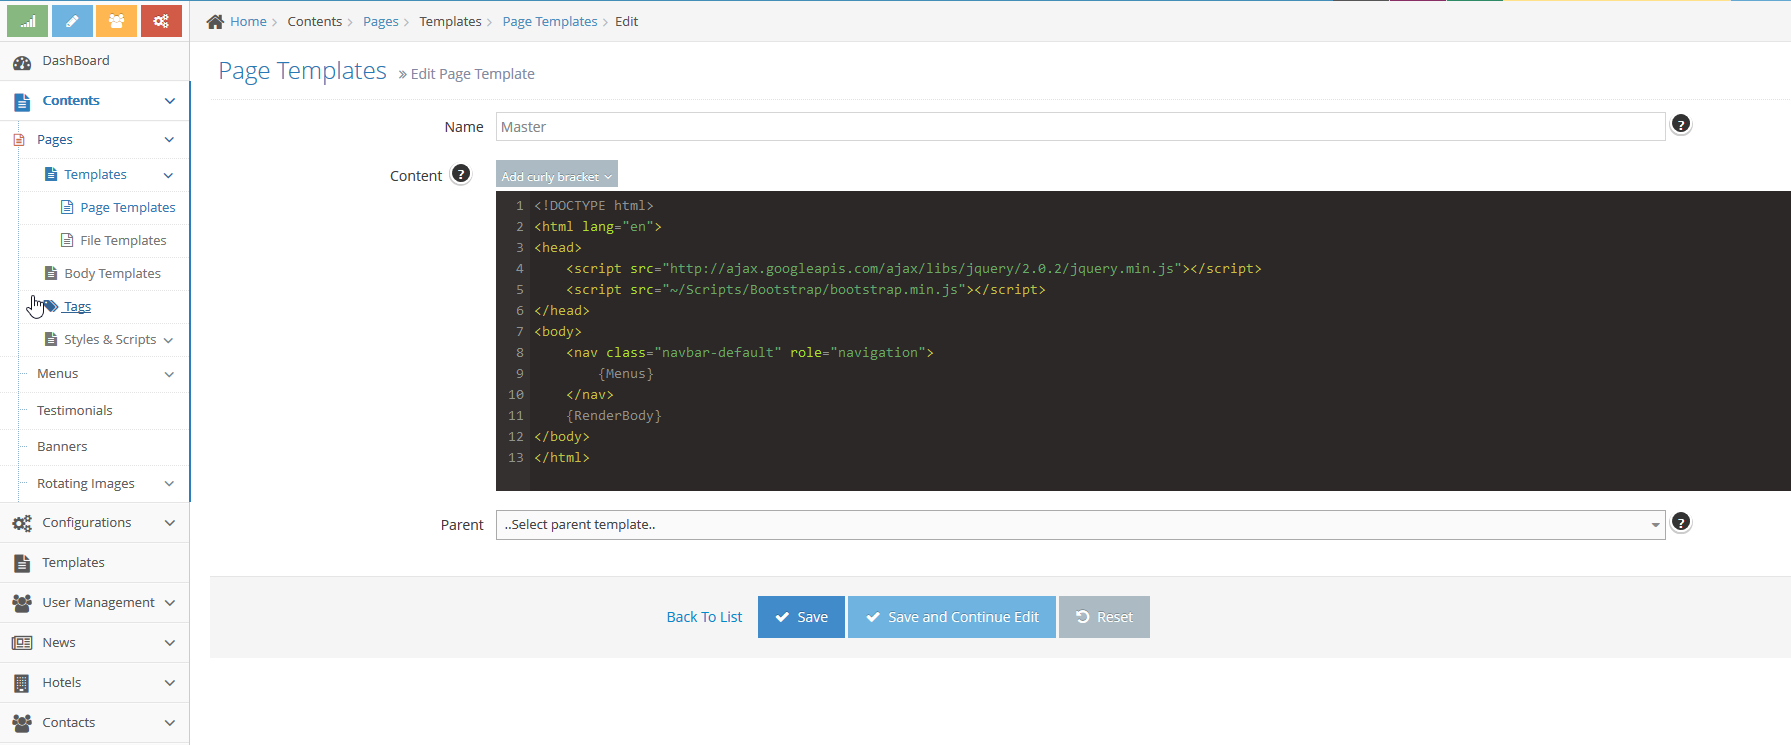
2In the Create screen, you can:
- Edit the page template content
- The Template Name must be unique
- {RenderBody} is required for all templates
- You can use the rich functionality of curly brackets defined here: Config curly brackets
- Or some of the Razor helpers defined here: /wiki/spaces/DEV/pages/13140017
- Choose the parent template
- Edit as needed (don't forget to insert your {RenderBody} tag)
- Click Save to save the template
- Edit the page template content
How to use a Page Template?
-
1Log in as an administrator and go to the Admin Dashboard.
Learn how to log in here → -
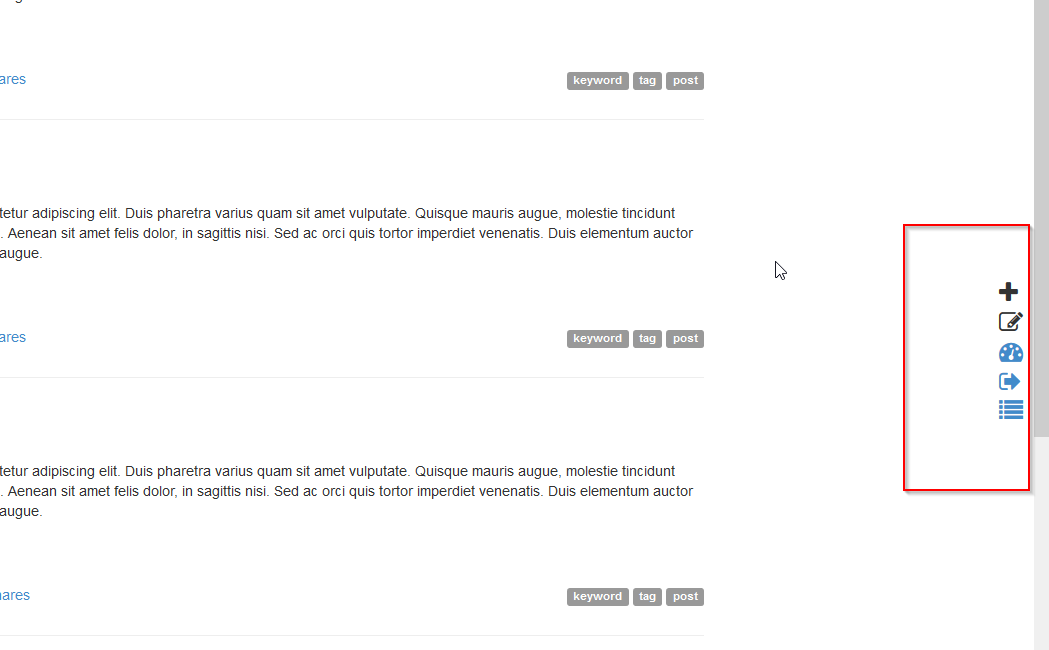
2Click On Manage Your Website
-
3The system will reload the page with admin icons on the right-hand side of the page
 <
<
Creating a new page
-
1Log in as an administrator and go to the Admin Dashboard.
Learn how to log in here → -
2Click On Manage Your Website
-
3Click the Plus icon to create a new page
-
4In the Create Page screen, input some required information
-
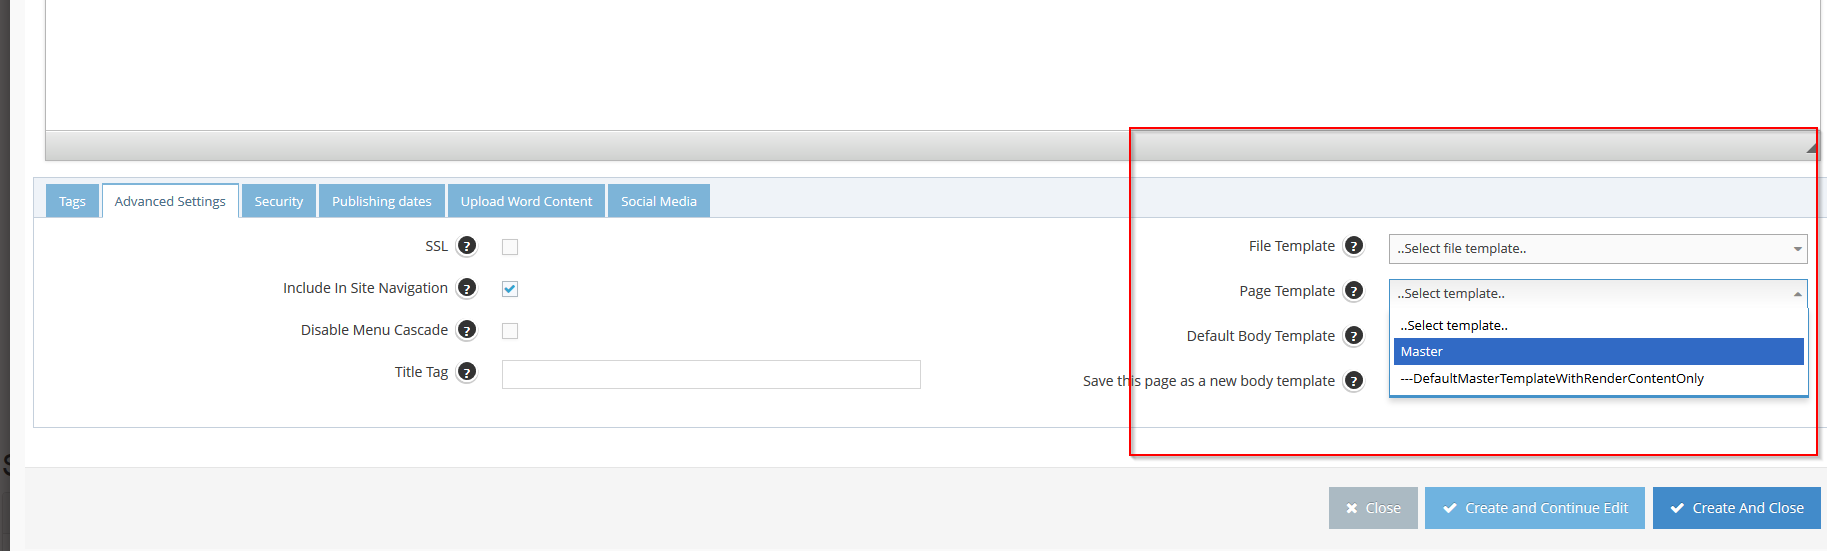
5Go to the tab Advance Settings at the bottom
-
6Choose the template you just create
-
7Click Create And Close
-
8The system will redirect to the newly created page with the template rendered
Applying a template to an existing Page
-
1Log in as an administrator and go to the Admin Dashboard.
Learn how to log in here → -
2Click On Manage Your Website
-
3Click the Plus icon to create a new page
-
4In the Create Page screen, input some required information
-
5Go to the tab Advance Settings at the bottom
-
6Choose the template you require
-
7Click Save And Close
-
8The system will redirect to the page with the template selected
The Technical Stuff
Warning! Danger! Geek speak ahead!
- Working with WebEd 9, all the templates/ scripts/ styles can be stored into the database making maintenance easy.
- There are 2 templates types
- Page Template for any page layouts
- File Template
- WebEd 9 template support Razor Syntax and C#
- You can use most of the features of Razor including:
- You can define section to render between Page Template: http://weblogs.asp.net/scottgu/asp-net-mvc-3-layouts-and-sections-with-razor (*)
- You can also write C# code inside the template
- You can use most of the features of Razor including:
- Page Template can be either a Master Template (no parent) or a child template
- All the content will be placed in {RenderBody} curly bracket
- If the page template has a parent template, then all of its content (except the (*) section) will be placed in the {RenderBody} of the parent template
- All the content will be placed in {RenderBody} curly bracket
- There are some extended helpers you can use when editing page template
- You can add dynamic script and style (from Scripts and Styles modules) in the template, more information here: How to manage and use dynamic Script / Style in the CMS?
- Currently, there are 2 default templates for the system is:
- DefaultMasterTemplateWithRenderContentOnly: this is used for setup some initialize script and HTML for a page like:
- Edit / Create/ Login / Logout / Site map buttons
- Some script is the default script that the CMS need to use like some information about user logged-in, user groups, email and id
- This template will always render as the final template in the system
- Master: This is used to set up the master HTML of the application where you can define sections and body for the page
- DefaultMasterTemplateWithRenderContentOnly: this is used for setup some initialize script and HTML for a page like: