- Why you would use an Event Module?
- See the Events Module in action
- Basic Event Information
- Additional Event Information
- Event Flow Settings
- Event Notifications
- Adding Your New Event to a Website Page
- Event Categories
- Event Schedules
- Event Add-Ons
- Event Attendee Type
- Event Forms
- Event Booking
- Event Coupon
- Event PDF attachment on email
- Event Ticket Pool
- Event Email Processing
- Event Tips: Splitting Additional Info Data in Excel
Adding Your New Event to a Website Page
STEP-BY-STEP
-
1Log in as an administrator and go to the Admin Dashboard.
Learn how to log in here → -
2If the page already exists, Edit the page and skip to step 7.
-
3If you want to create a new page, follow the next steps.
-
4In the Admin, on the left menu, click Pages, then select Pages
-
5Click the Create New Page button
Learn how to create a new page here → -
6In Content section, select Curly Bracket on the page editor.

-
7A modal window will pop up, select Configure Curly Bracket
-
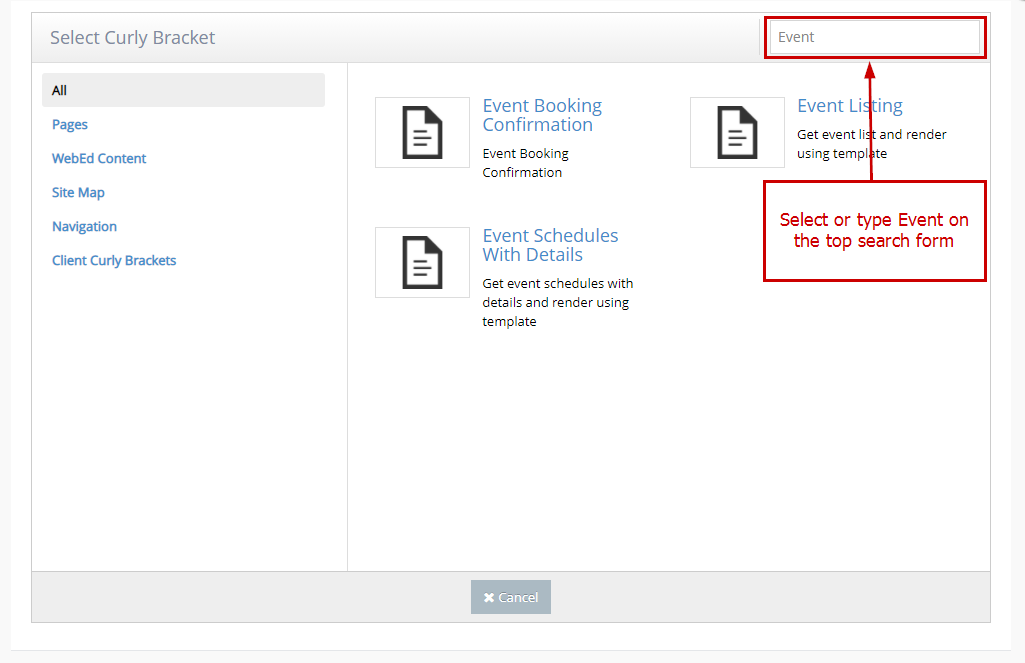
8Select or type Event on the top search form
-
9There are a few curly brackets you can use to add events created, please select one Event curly bracket - below are its descriptions :
- Event Listing - this curly bracket will help get and display all events and its event schedule using the event category filter
- Event Schedule With Details - this curly bracket will help get and display a specific event schedule along with its details
-
10Configure Event curly bracket selected
- Event Listing
- Category - select an event category
- Event - select an event listing
- Event Schedule - select event schedule
- Enable Booking on Multiple Events - tick this (optional) to enable booking on multiple events
- Enable Search/Filter - tick this (optional) to enable search/filter
- Template Name - select event listing template here, select how you would like the page layout would display
- Event Schedule With Details
- Events - select the event listing where the event schedule is added
- Event Schedule - select event schedule
- Template Name - select the event schedule template here, select how you would like the page layout would display
- Event Listing
-
11Click Insert
-
12Click OK to add the curly bracket on the page
-
13Go and click Advanced Settings at the bottom of the page editor
-
14Configure the page settings :
- Include In Site Navigation - Add this page to the site's main menu. Uncheck to remove from the main menu
- Disable Menu Cascade - Hide all child pages from the cascade menu. This will allow the current page to appear on the menu but not display the child pages on the menu
- Force load SSL - Force page to use SSL. (Note you must first have an SSL certificate configured on your site)
- HTML Title Tag - Sets the HTML title tag for the page. If left blank the page title will be used.
- Page Template - Set the master template for this page. Your site can have different master templates for different sections as defined by your designer
- Default Body Template - When new pages are made under this page, the default body template will populate the new page to give editors the default layout and content to work with. This helps keep sections consistent
- Make this page as a new body template - You can set this page as a new body template so other pages can use this content as a start point. Help keep sections consistent
- Add to Sitemap.xml - Controls if this page is shown on the Google XML sitemap (sitemap.xml) for the site.
-
15Click Create or Create and Continue Edit to apply changes
-
16A message will appear at the top of the dashboard that says ‘Page created successfully’ to confirm that the updates made are successfully done
 For more information, you can also check the Creating Page and Add Multiple Events WebEd user guide.