- Inserting Protected Documents
- Editing Protected Documents
- Making User Groups Protected Document Administrators
- Configuring File Extension Icons
- Defining the Protected Documents Start Folder
- Folder and Document Feedback
- Tracking Document Views
- Securing Folders
- Viewing Protected Documents
- Automated Publishing
Protected Documents
Protected Documents is a module that allows folders and files to be shown on your website. Folders can be protected at a group level which allows specific users to see only the folders their group has the right to view. The wholly protected documents folder structure can be displayed on a single page or individual folders inserted as needed into any web page. Each link to a document is generated for single use to ensure documents are protected.
It is necessary to protect and secure your website and files nowadays because there are hundreds of security risks from the internet. Using this module will help you keep your documents safe from hackers or online thieves. This module provides a complete solution to providing documents on your website and limiting access to authorised visitors.
Protected documents allow you to put all or part of a document's folder structure onto any page. The folders can then be secured for specific user groups, companies or company types.
Inserting Protected Documents
-
1Log in as an administrator and go to the page you want to insert your Protected Documents, and click the Edit icon on the right
Learn how to log in here → -
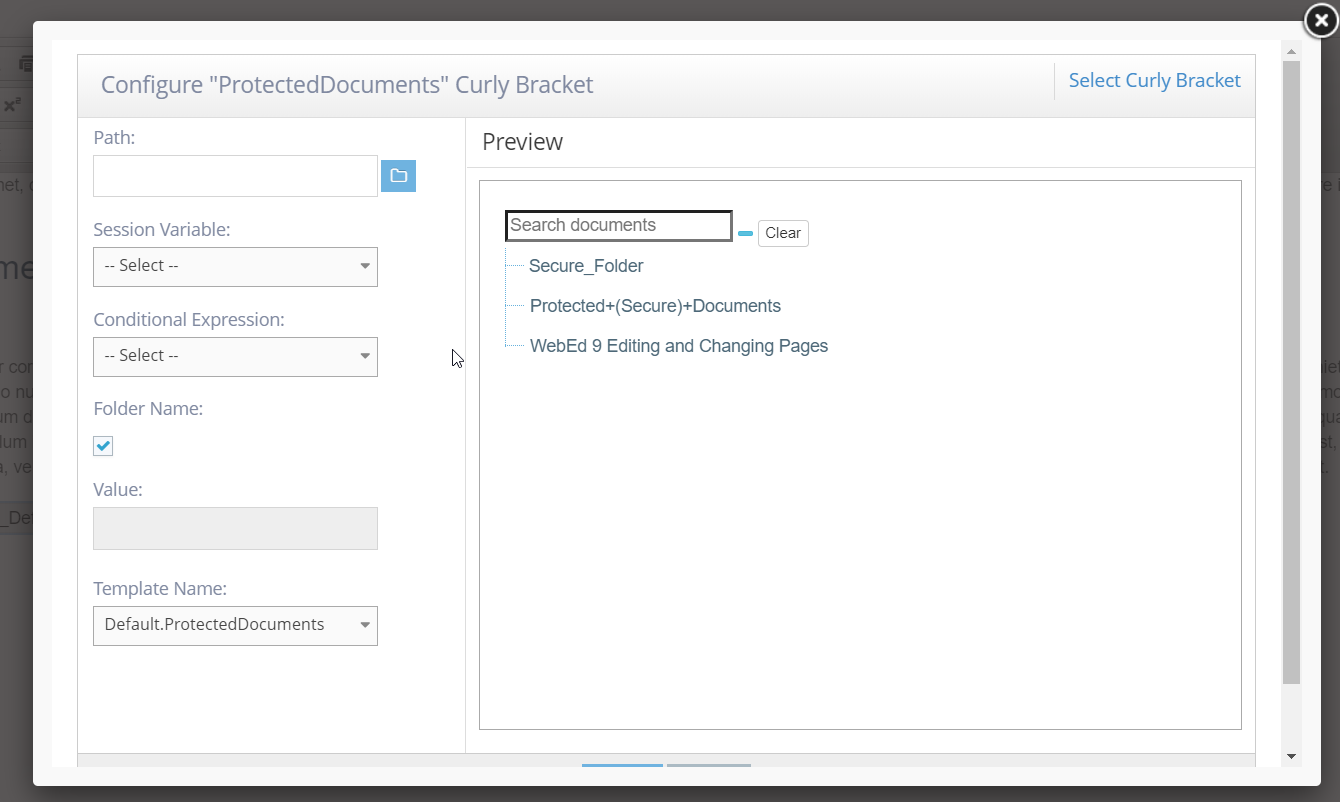
2Click configure button to insert the curly bracket.
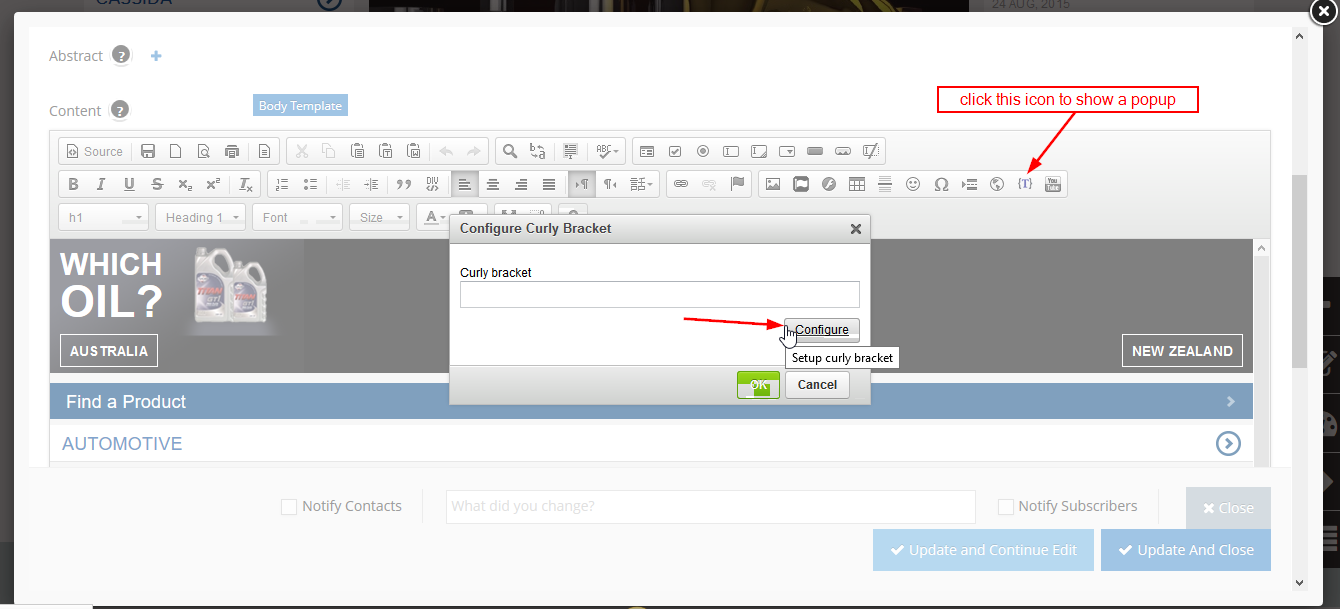
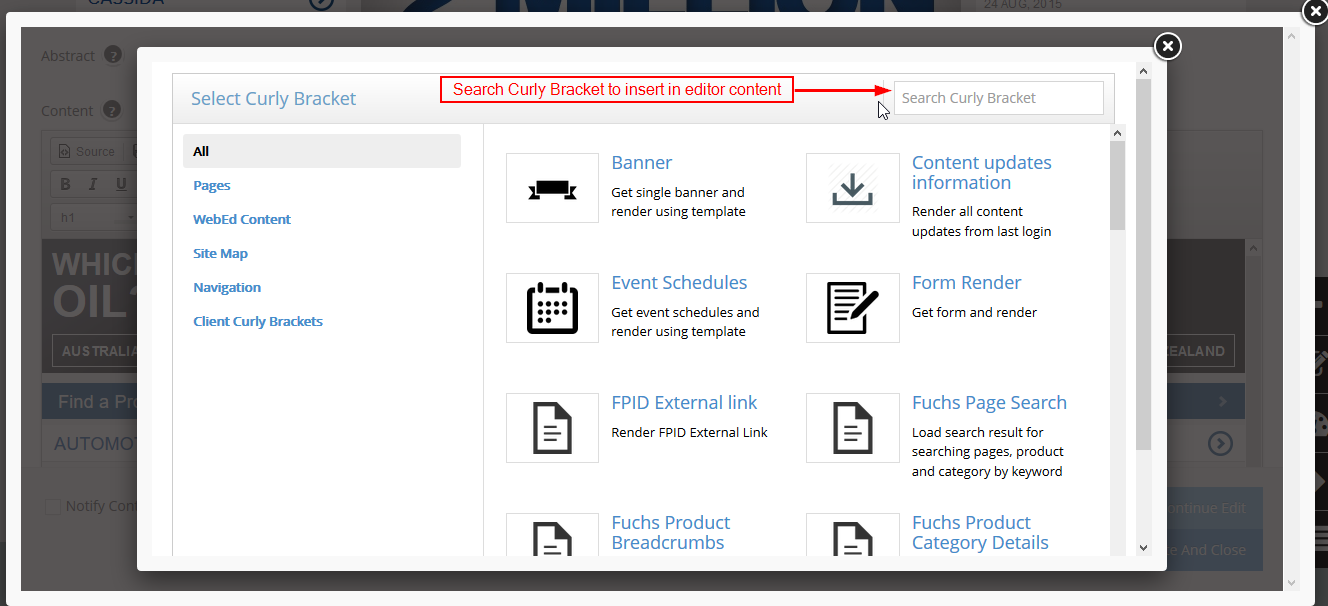
-
3Search for Protected Documents
-
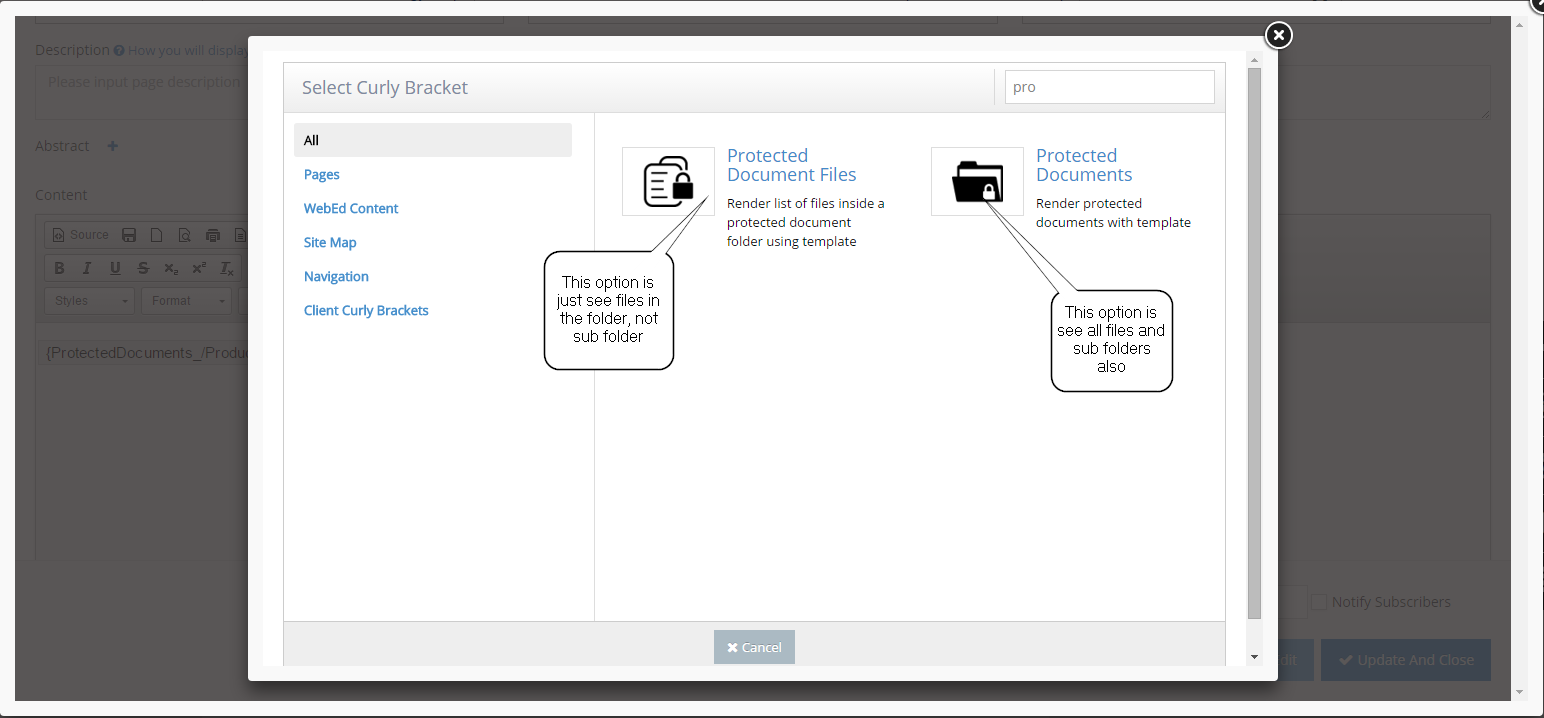
4You have 2 options to select the detail to show the visitor
- Protected Document Files: just see files in the folder, sub folders will disappear.
- Protected Documents: see all files and subfolders.
-
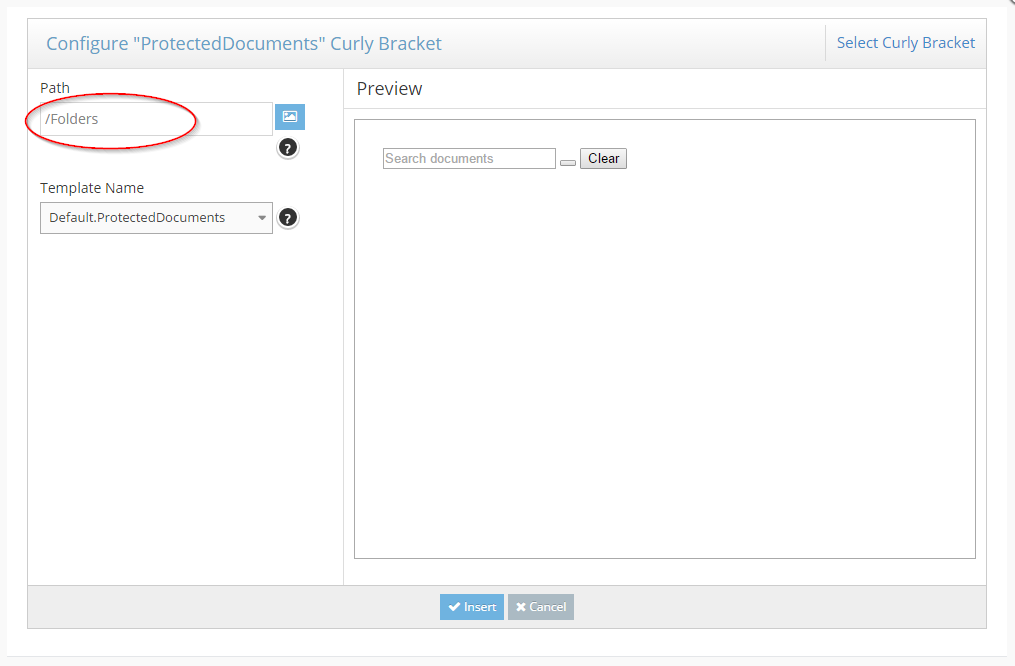
5Click on the folder to open the File Manager, and select the path which contains the documents to display

-
6Navigate through the folders and choose the correct path, then click select
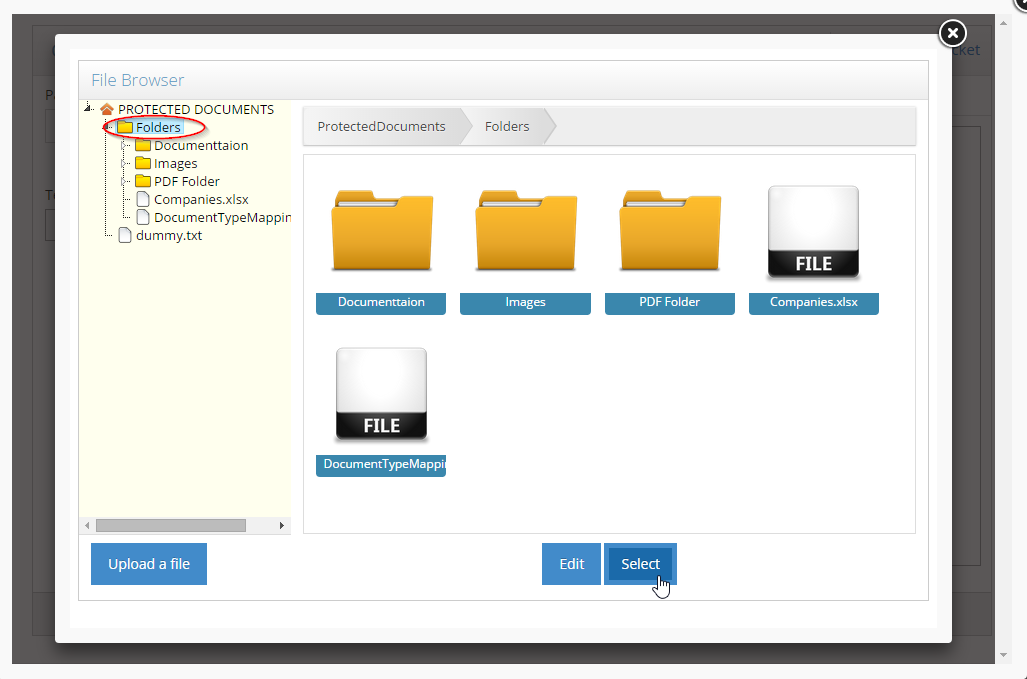
-
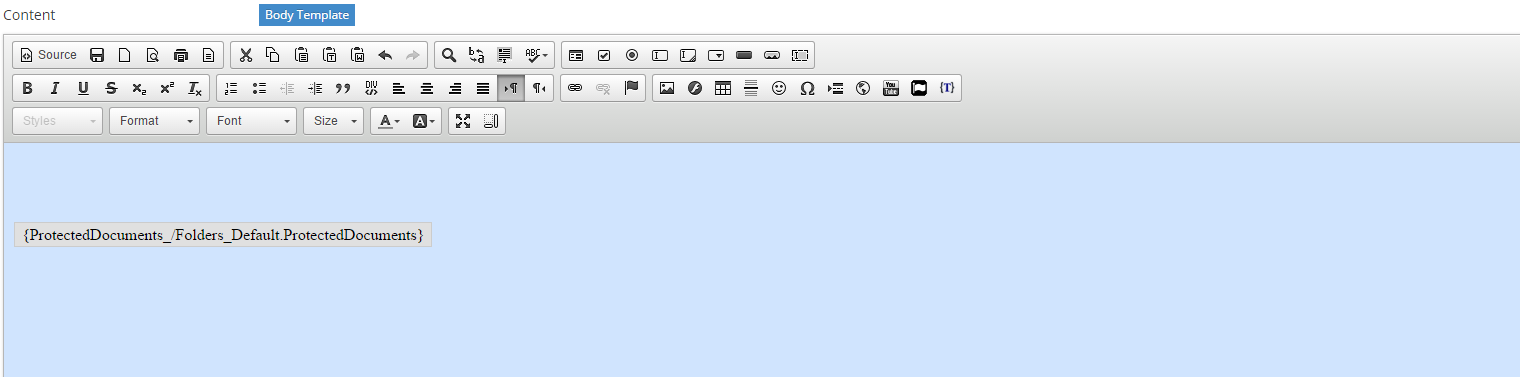
7The folder path will be defined and added into the 'Path' field, click Insert at the bottom to finish inserting the Protected Documents curly bracket
-
8The Protected Documents curly bracket is now inserted into the page content
Editing Protected Documents
-
1Log in as an administrator and go to the page where your Protected Documents are displayed
Learn how to log in here → -
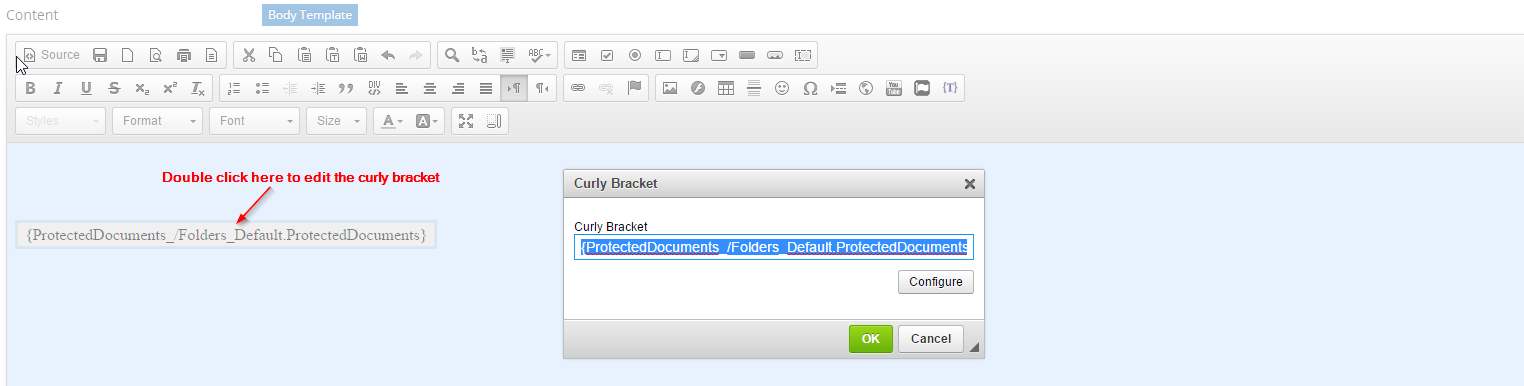
2Double-click on the Protected Documents curly bracket to edit
-
3Right-click and select the Edit Curly Bracket option on a Curly Bracket
-
4Click Update And Close the page and protected documents will appear as a folder tree on the page.
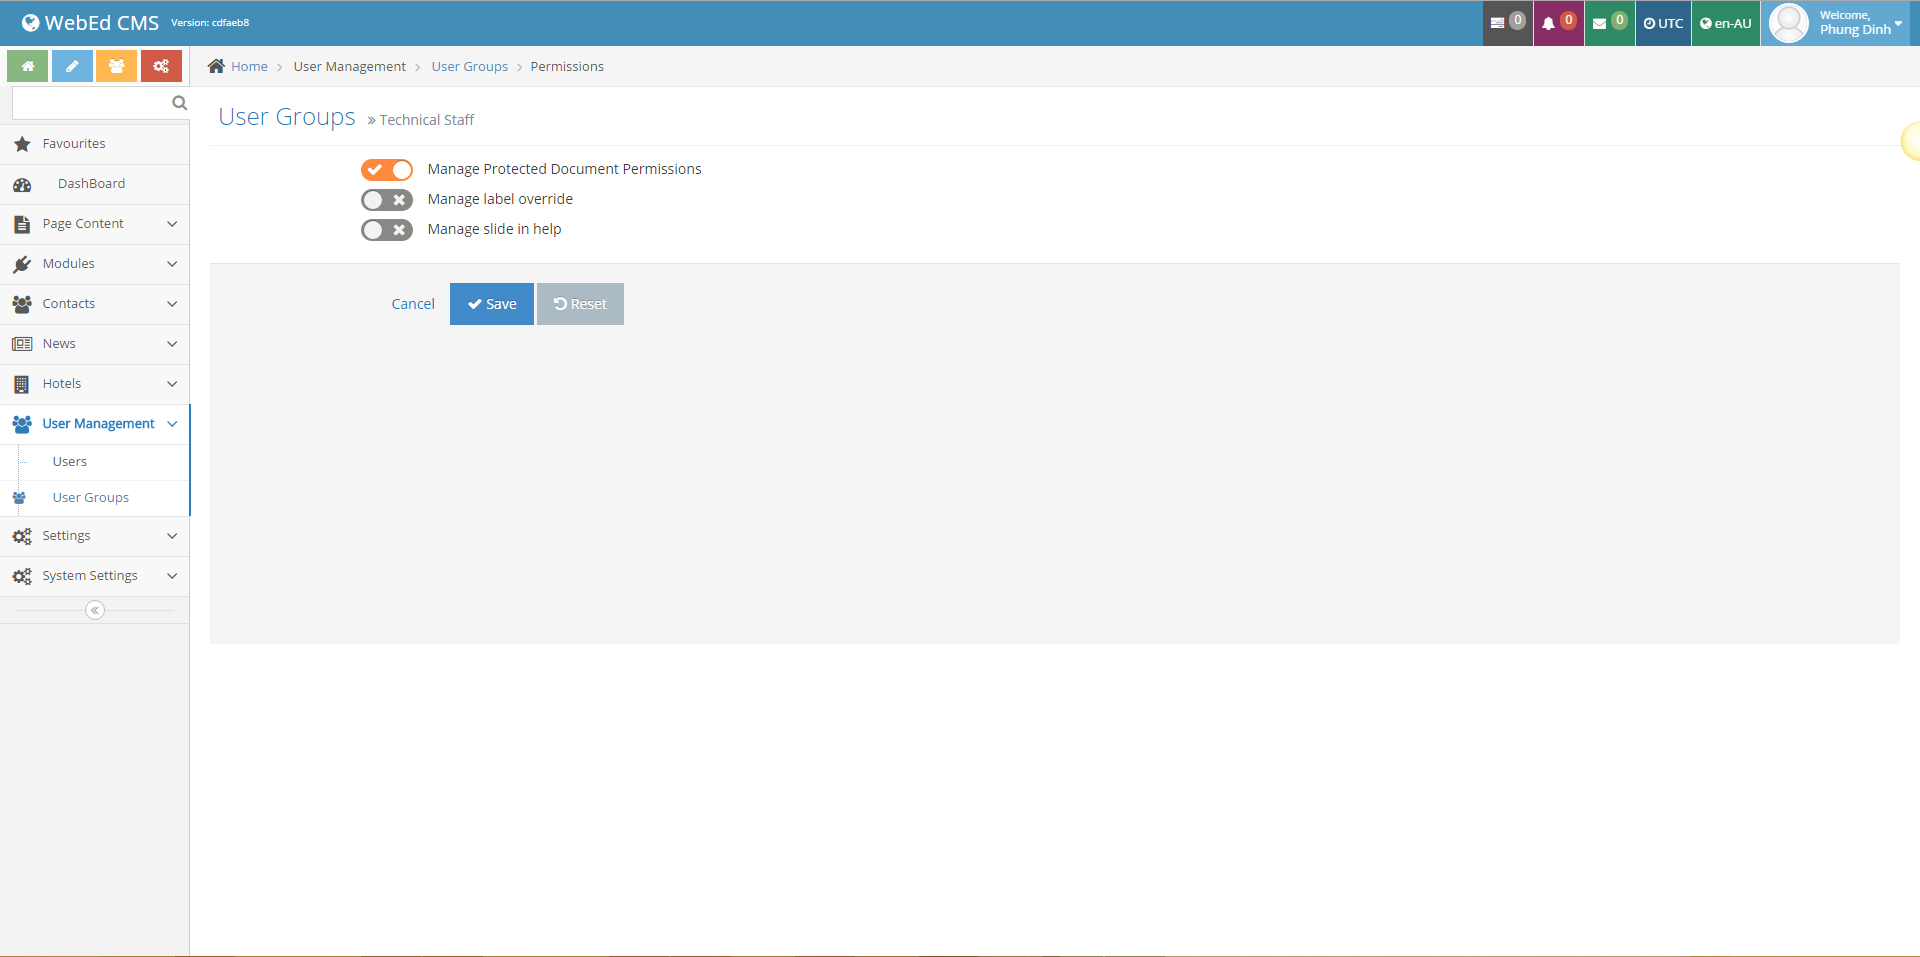
Making User Groups Protected Document Administrators
Make a New User Group
-
1Log in as an administrator and go to the Admin Dashboard.
Learn how to log in here → -
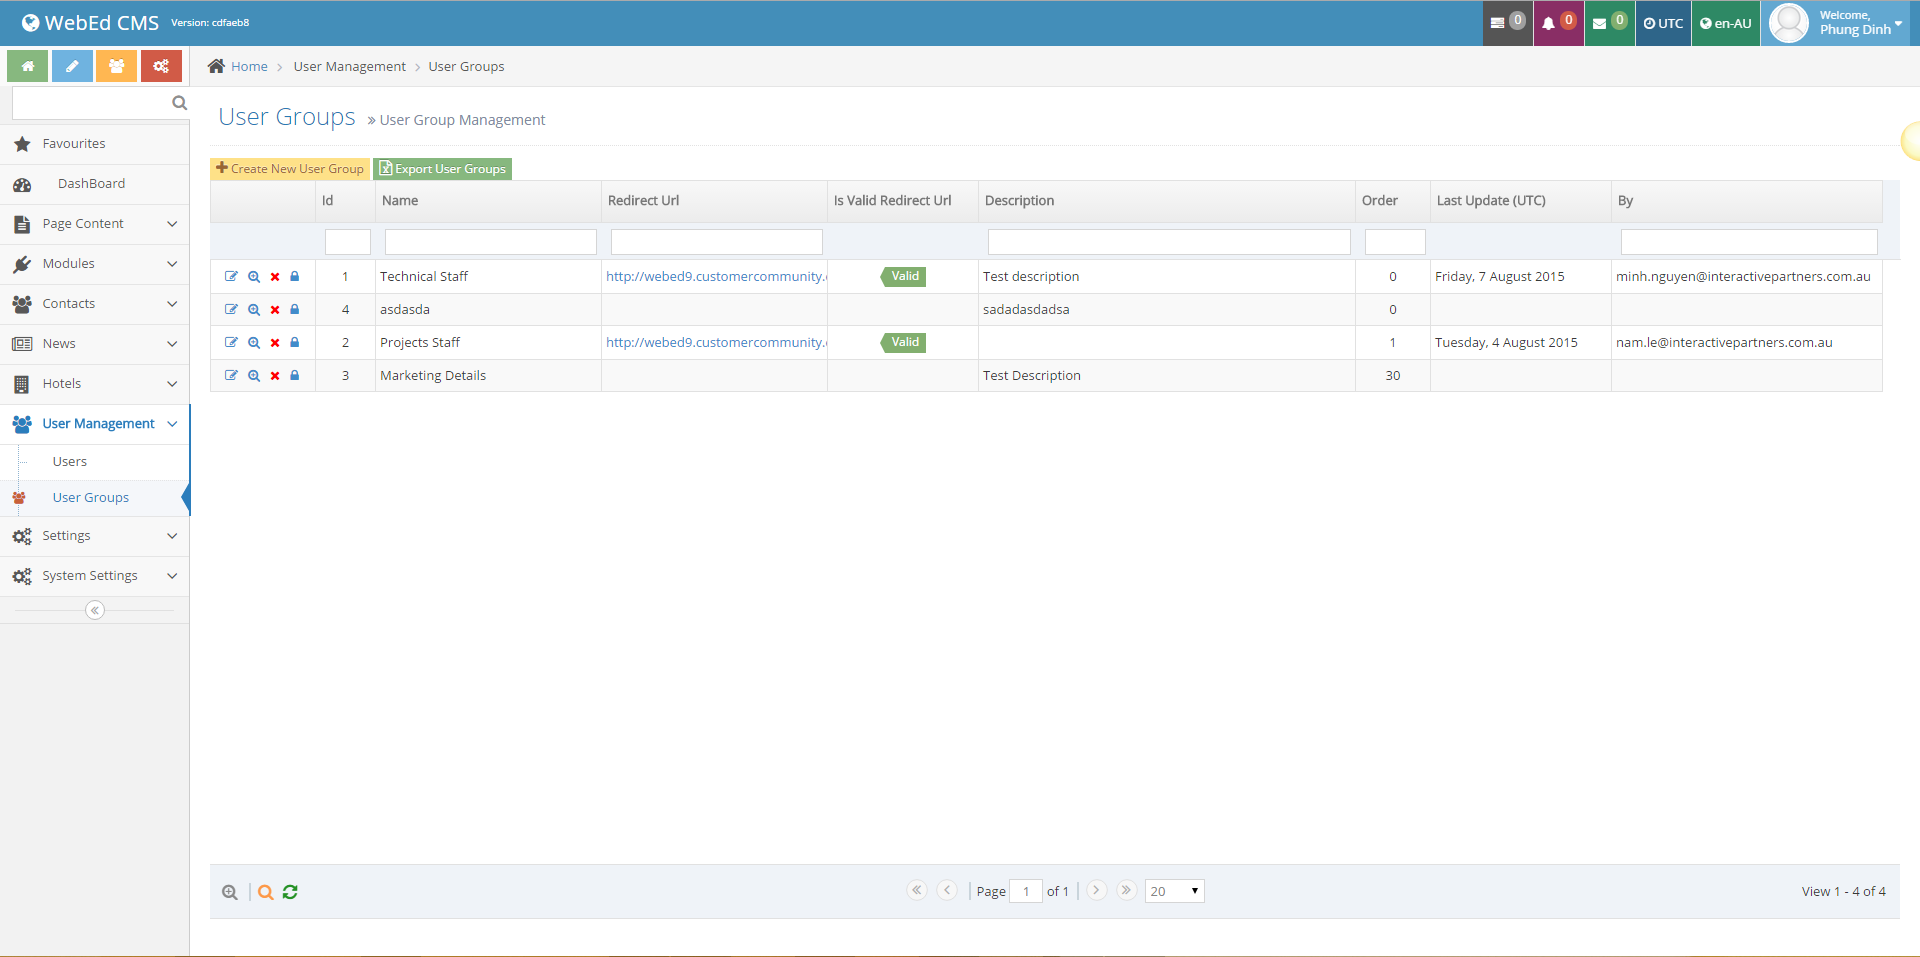
2Click on User management -> User Groups.
-
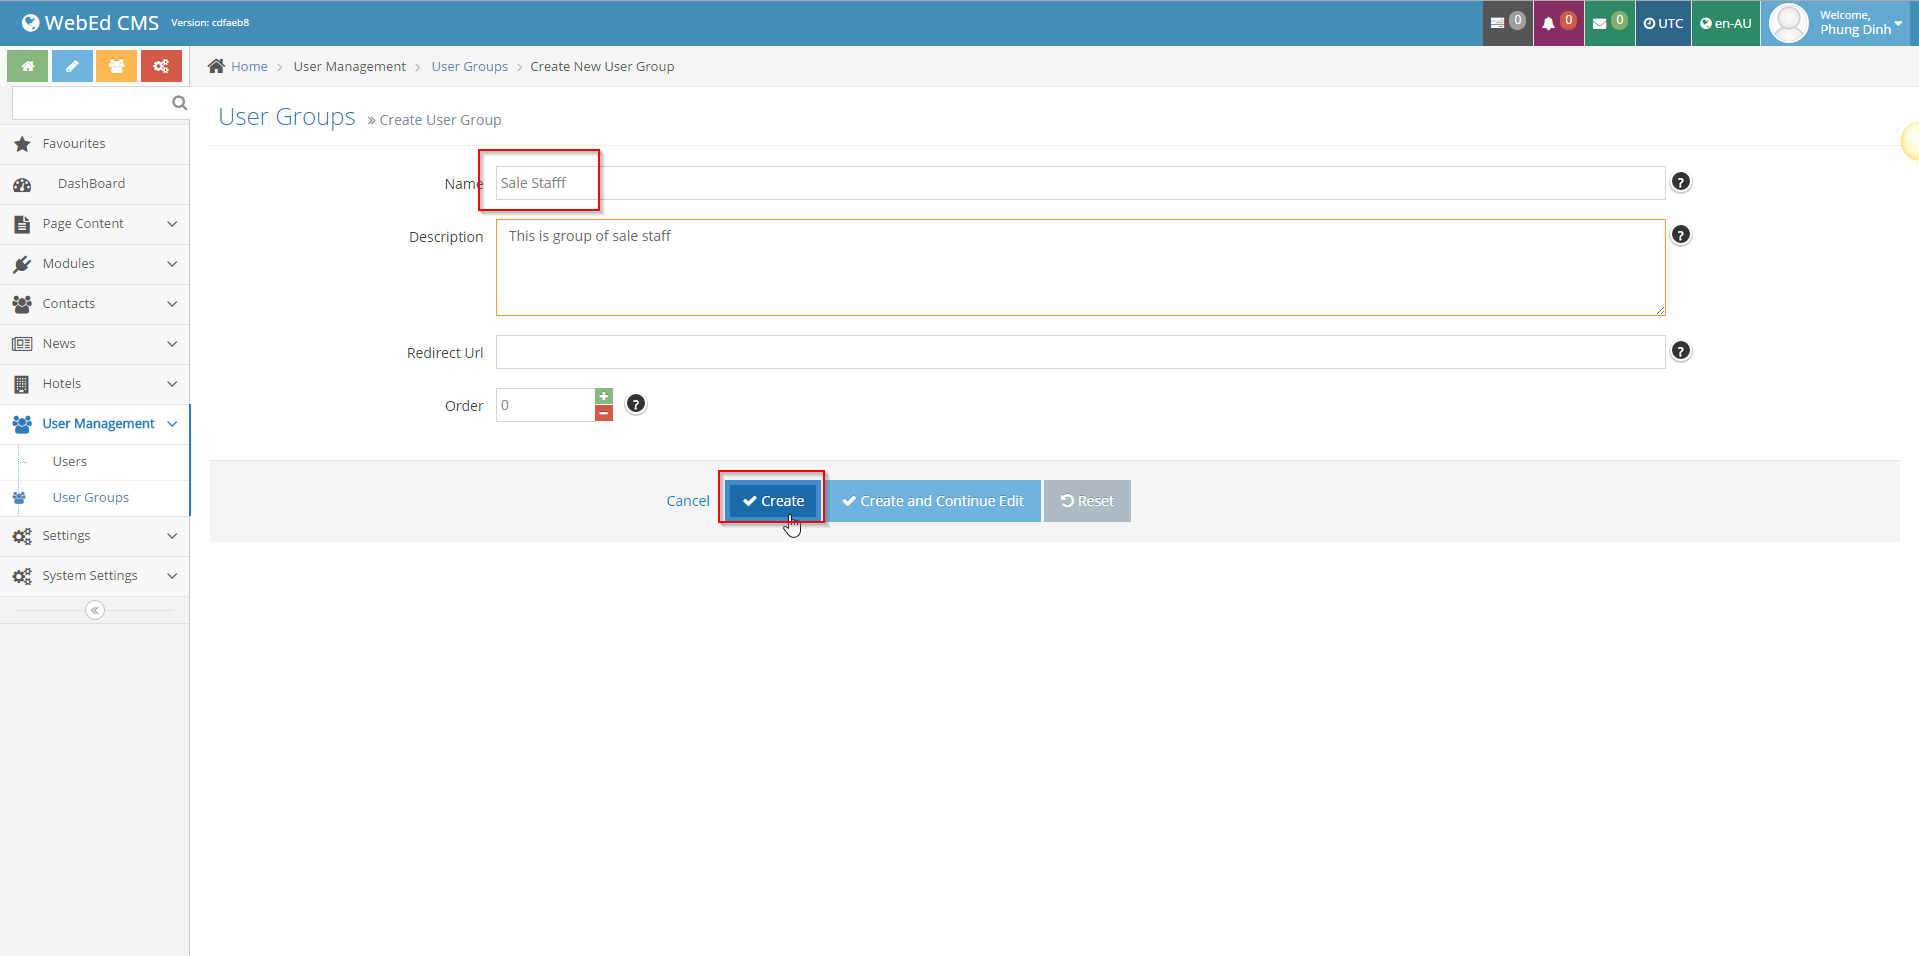
3Enter the Name and Description of the new group and click Save.
-
4In admin / User Management / User Groups, find the user group you wish to make into a protected document admin
-
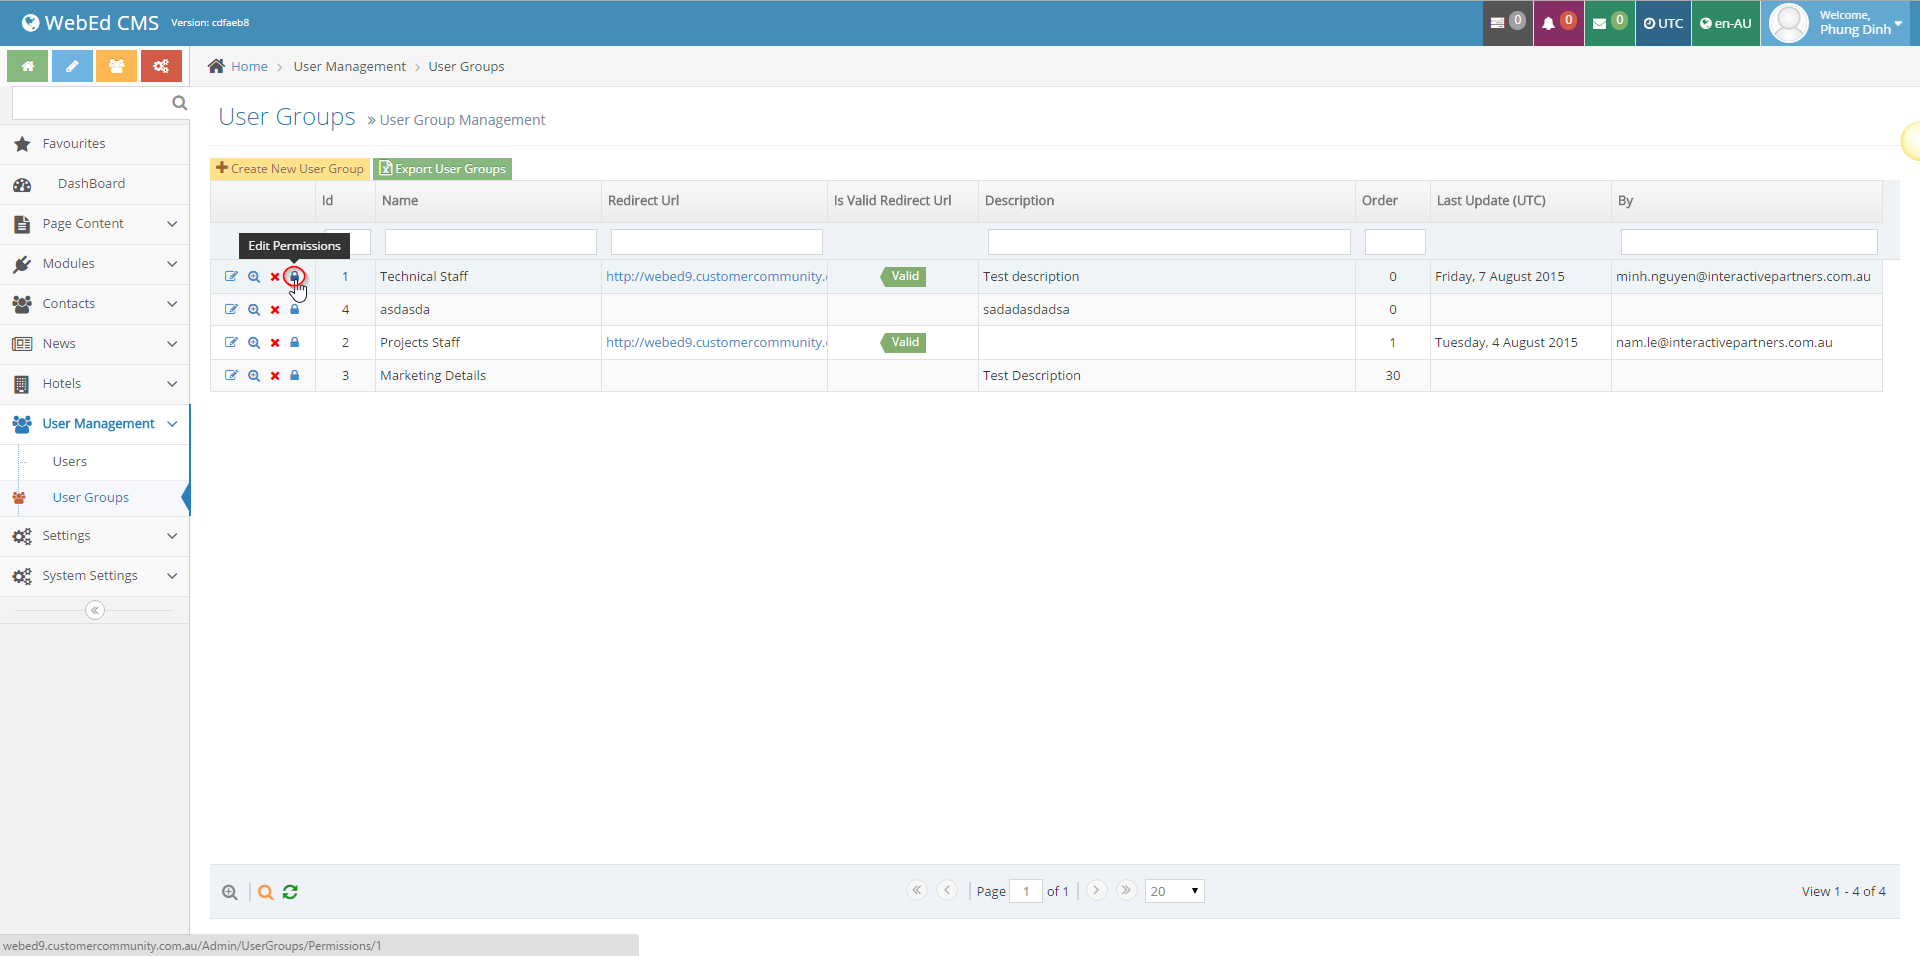
5Click on the Edit Permission icon
-
6The Edit Permission page will appear
-
7Select Manage Protected Document Permissions
-
8Click the Save button
-
9After updating the group's permissions, all users of the group will have the ability to administer view rights for protected document folders.
Adding extra security using Session Variables and Conditional Expressions
-
1Log in as an administrator and go to the Admin Dashboard.
Learn how to log in here → -
2To add extra security to your protected documents, with or without the User groups, you can use the Session Variables and Conditional Expressions. This setting may only work if the user is logged in or the session variables are set correctly.
- Session Variables - these are pieces of information stored using the login credentials of the user i.e FirstName, LastName or Email etc.
- Conditional Expression - the logic that will be used to show the Folder (Equal to/Not Equal to)
- Folder Name - we will show the folder if it matches the Sessions value OR;
- Set the value you want for the Session Variable selected.
Note: An example configuration would be: I selected Session Variable as "FirstName" and Conditional Expression as "Equals", unchecked Folder Name and set the Value to "Test". The output should only allow users with Firstname = Test to see the folder.
Configuring File Extension Icons
File extensions are hidden on the protected documents interface (see image below) and icons are used to indicate different file types. Example SomeFile.docx will be displayed as SomeFile with a word document icon
- Every effort has been made to ensure the common file extensions (doc, docx, xls, xlsx etc) are supported.
- At times, new file extensions appear in the workplace or you may want to customise the icons used
-
1Log in as an administrator and go to the Admin Dashboard.
Learn how to log in here → -
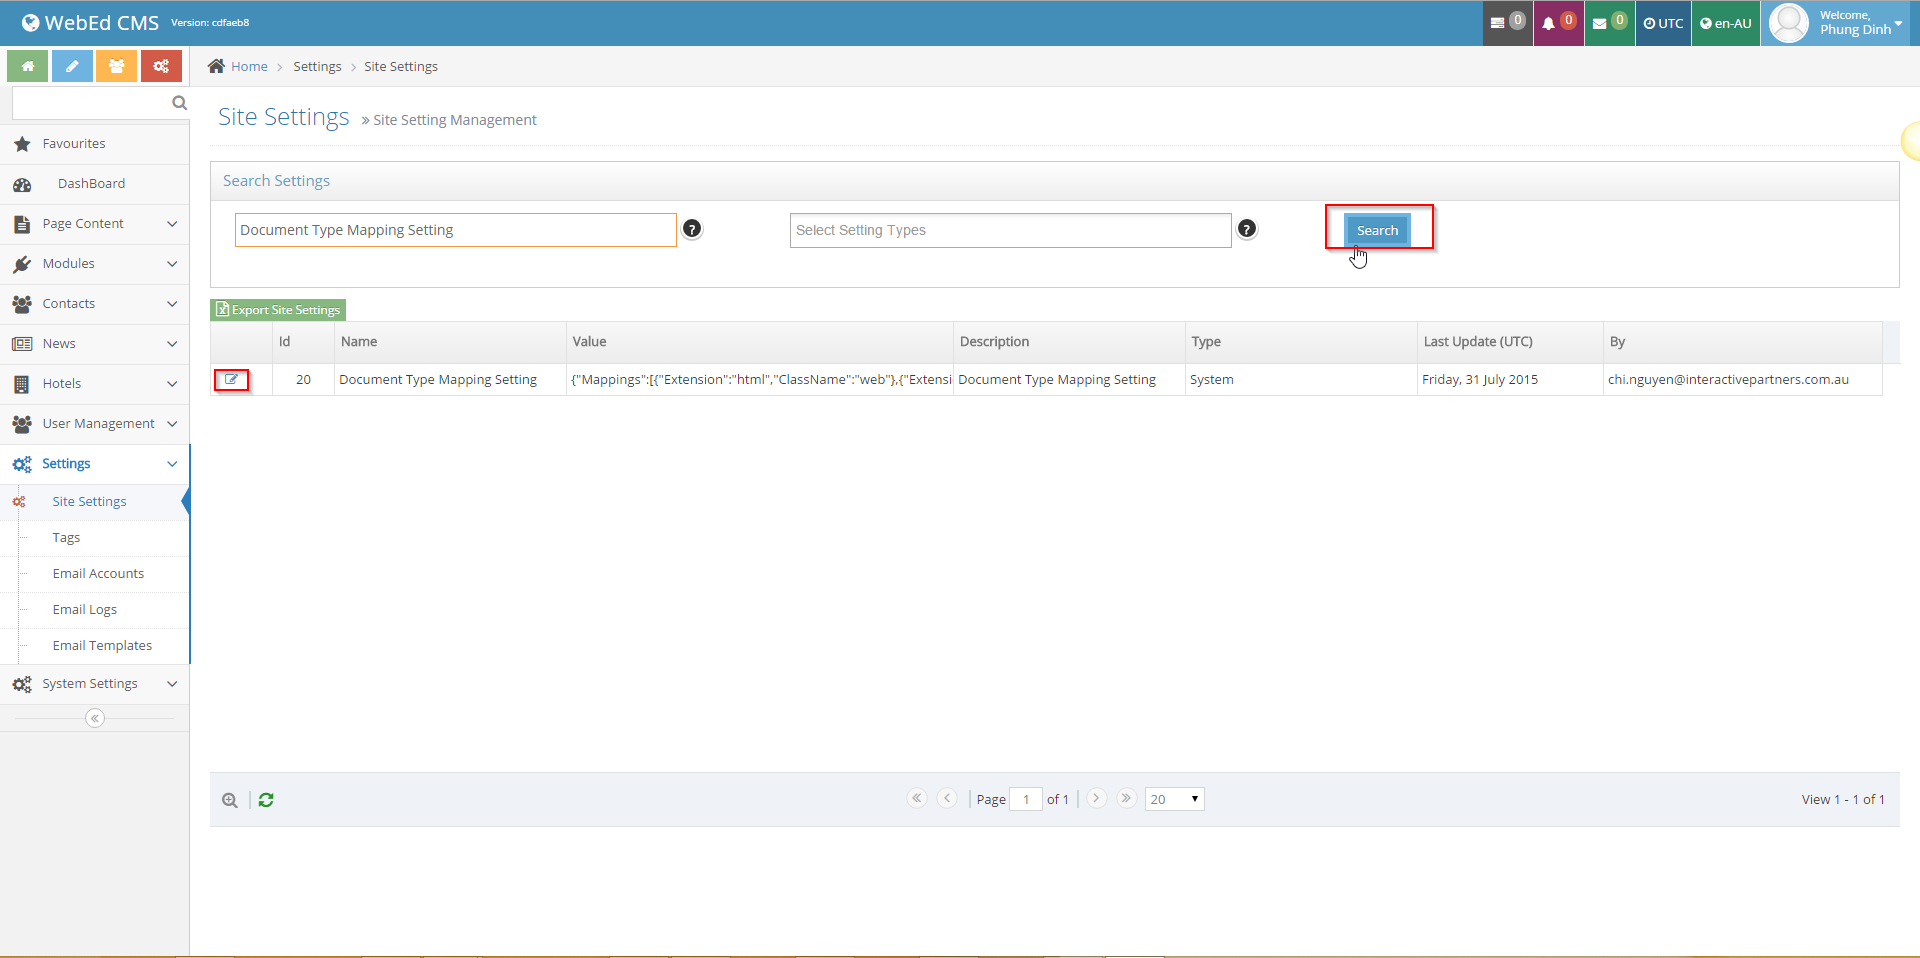
2In Admin, navigate to Configurations > Site Settings
-
3Enter Document Type Mapping Setting and click search
-
4Click on the edit icon
 Note: WebEd uses Font Awesome icons for documents, see the full list of available icons here
 -
5Just edit the CSS style on the document type to change the icon
-
6The style mapping for document and class shows the correct icon for each document type configured
(Here we are changing the icon for CSV files to be a Search Icon - CSS Class from fa fa-file to fa fa-search)
Example: change the icon from icon file .csv to icon-search.Note: WebEd uses Font Awesome icons for documents, see the full list of available icons here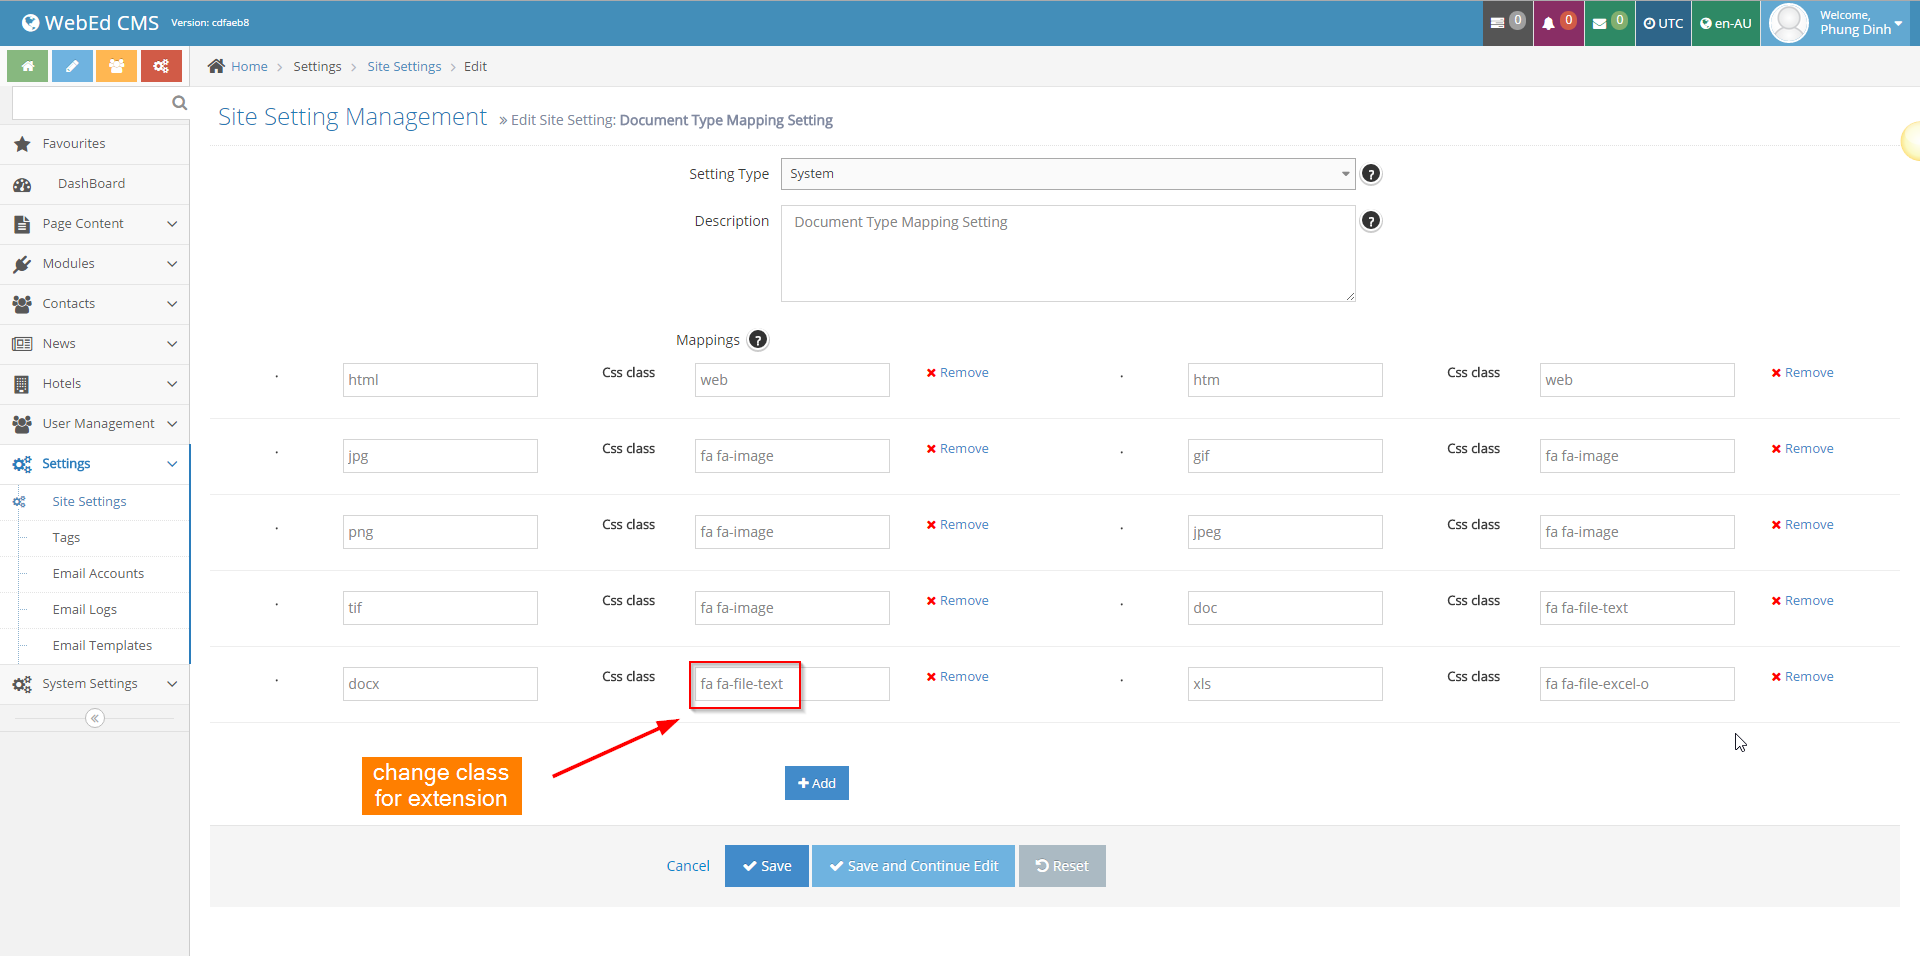
-
7Click Save and refresh your page to see the updated document tree.
-
8Click Save and refresh your page to see the updated document tree.
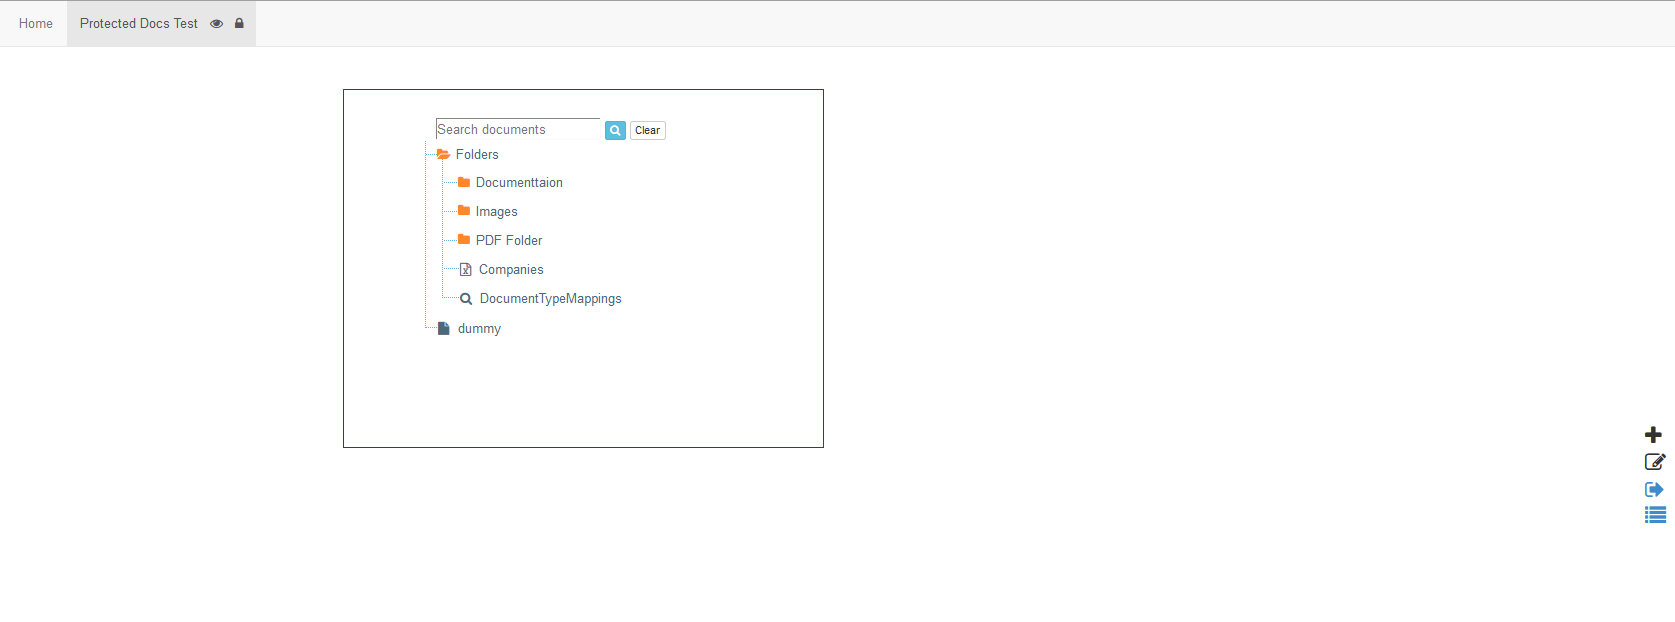
Defining the Protected Documents Start Folder
-
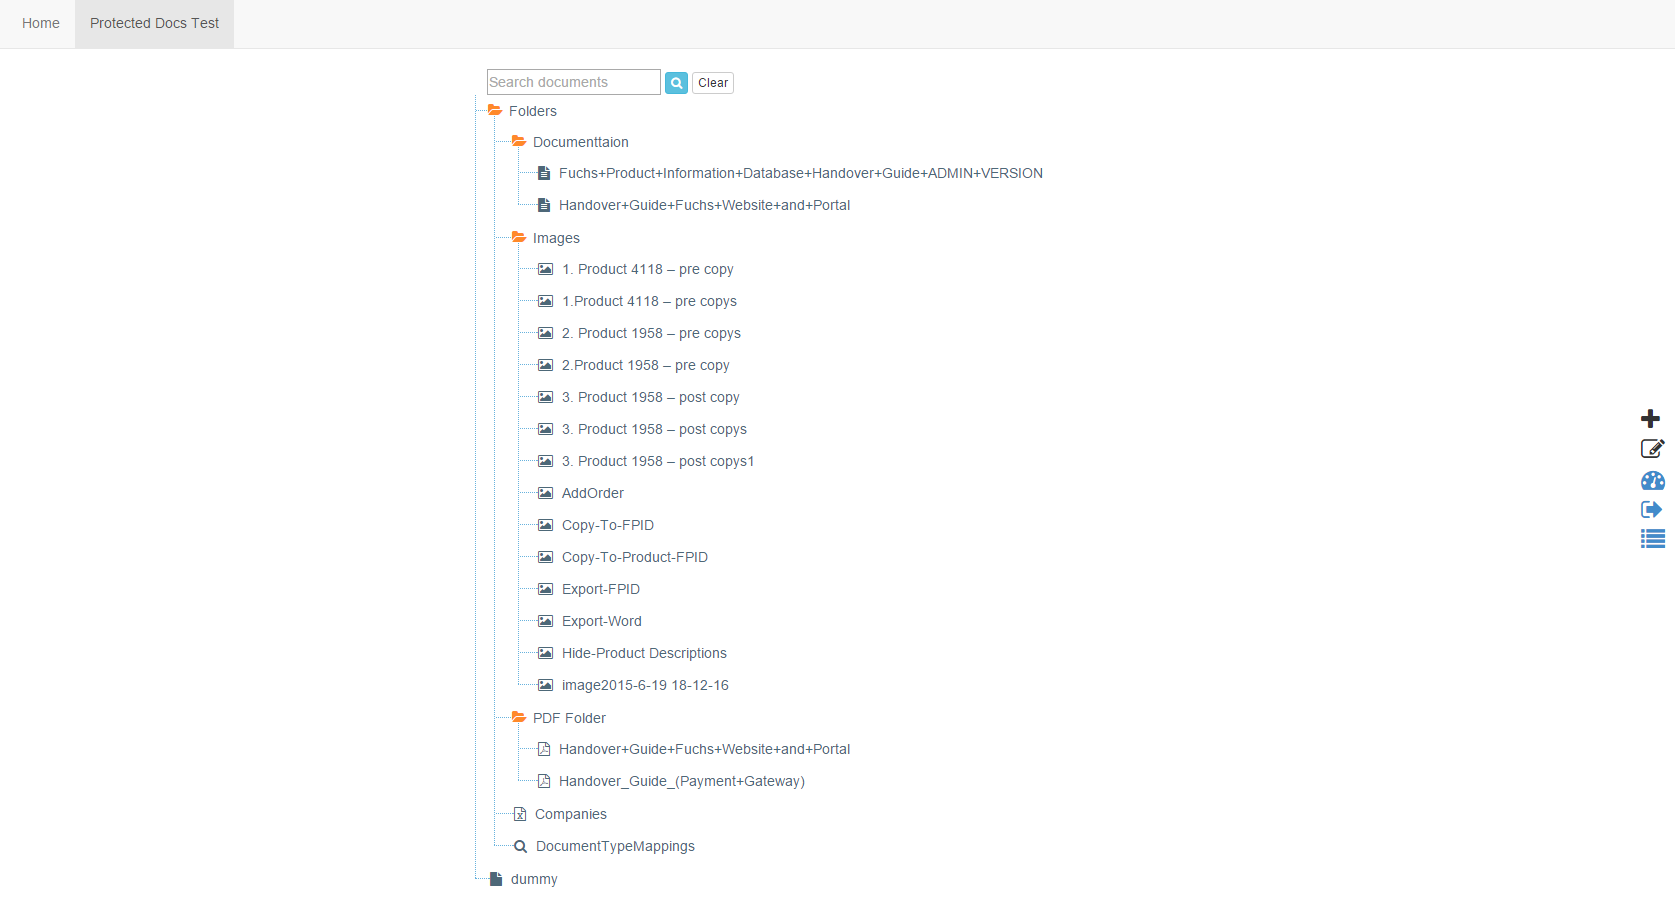
1If no StartFolder is defined in the curly bracket tag, the root of the ProtectedDocuments folder is used
-
2Look at the image above and you can see the folder structure includes a path Folders/Images
-
3Just replace the optional RelativePath setting with the location you wish to display, in this case, Folders/Images
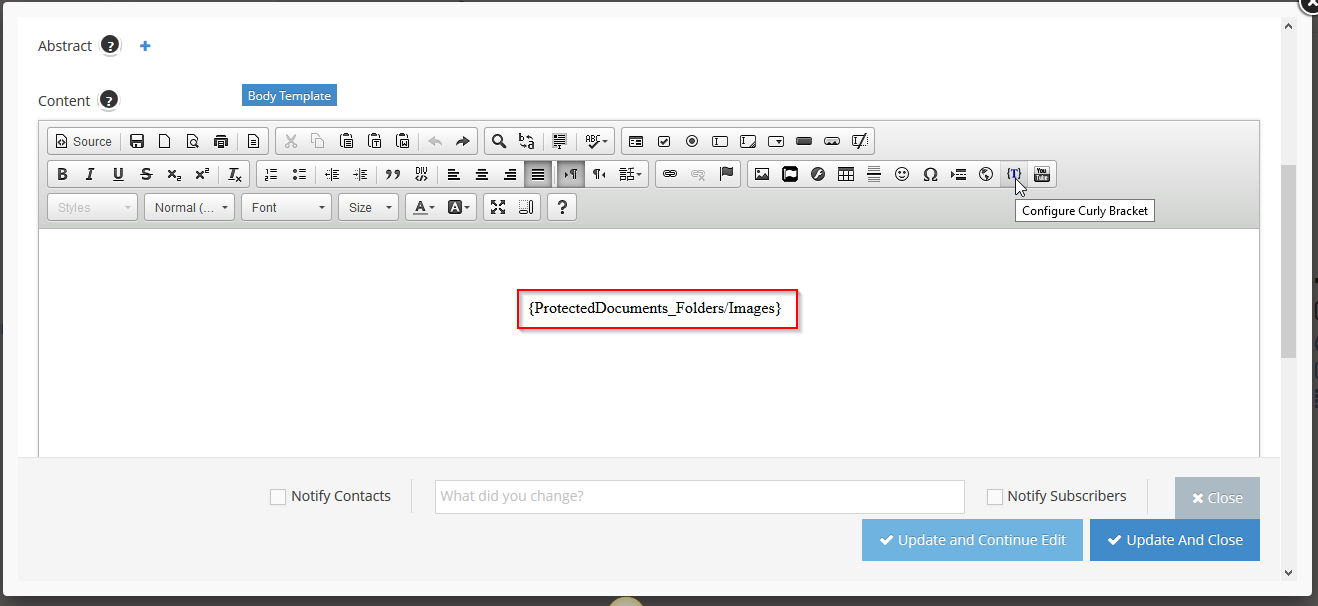
-
4Click the "Update And Close" button.
-
5Now Folders/Images are shown as the root location for the protected documents on this page
Folder and Document Feedback
A key feature of protected documents is the ability for users to provide feedback. Information entered is stored against the item (folder or document) and the contact record allowing administrators to quickly respond to user feedback requests. When a user submits feedback, an email is sent to the email address in the Site Setting for DocumentFeedback.
-
1Users can mouse over folders or file
-
2Icons will appear

-
3The user clicks the feedback icon
-
4Popup window appears
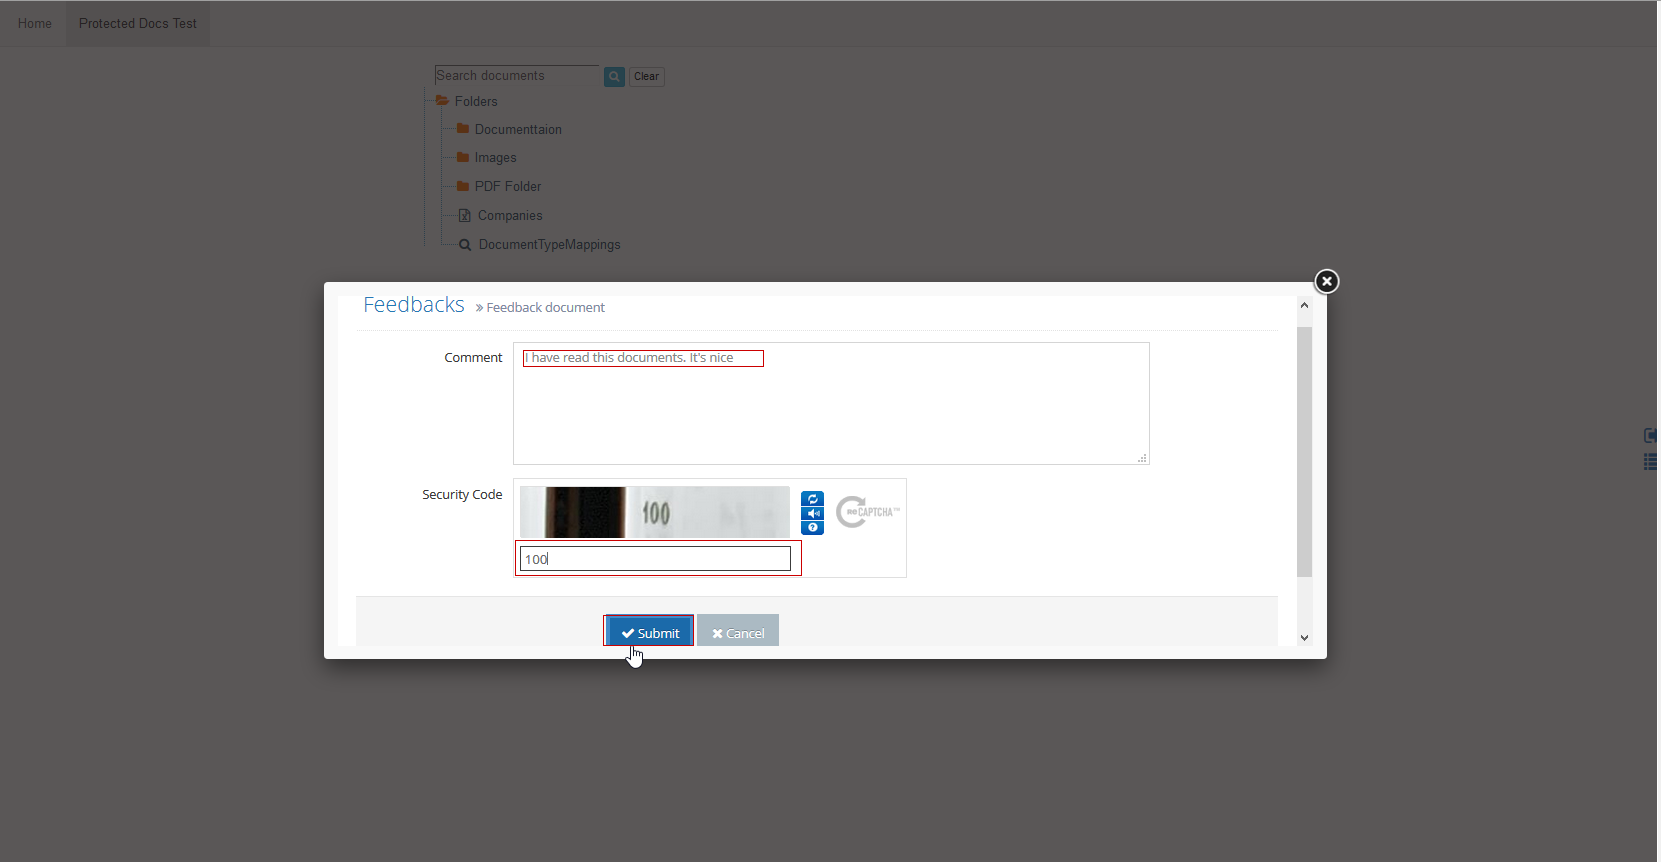
-
5The user is prompted for feedback
-
6The user responds to the captcha
-
7Email is sent to email address in site settings
- Email To is the value in Site Setting for DocumentFeedback
- From Address will be the user's email address for ease of replies
- The subject line will be the folder or document name
- The email Body will be the user's comments along with the date and time of submission
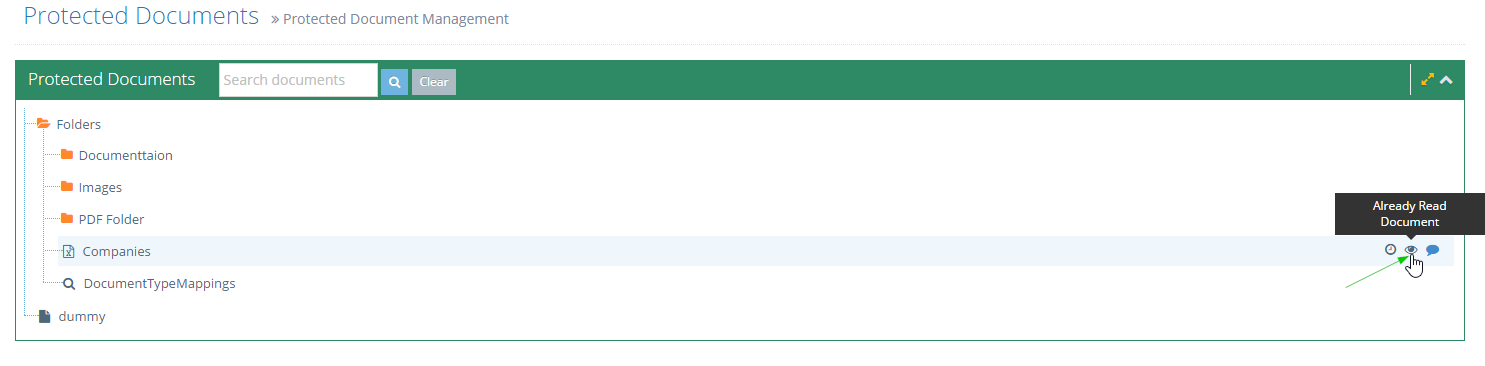
Tracking Document Views
Protected Documents tracks the views of documents by users
-
1Icons show when a document is unread and read
-
2This is done so users can quickly see documents they have not yet reviewed
-
3Look at any file in a folder list and find a document unread
-
4Open the document
-
5Refresh the page and you will see the icon has changed to read
-
6Sometimes users have previously read a document via some other source (email, web link etc)
-
7Users can then indicate they have read this document previously by clicking the Read Icon
Securing Folders
-
1By default, folders are hidden, hence the name-protected documents
-
2To make them viewable to certain users, you must enable view rights
-
3You can enable view access based on the users
- UserGroup
- Company
- Company Type
Viewing Protected Documents
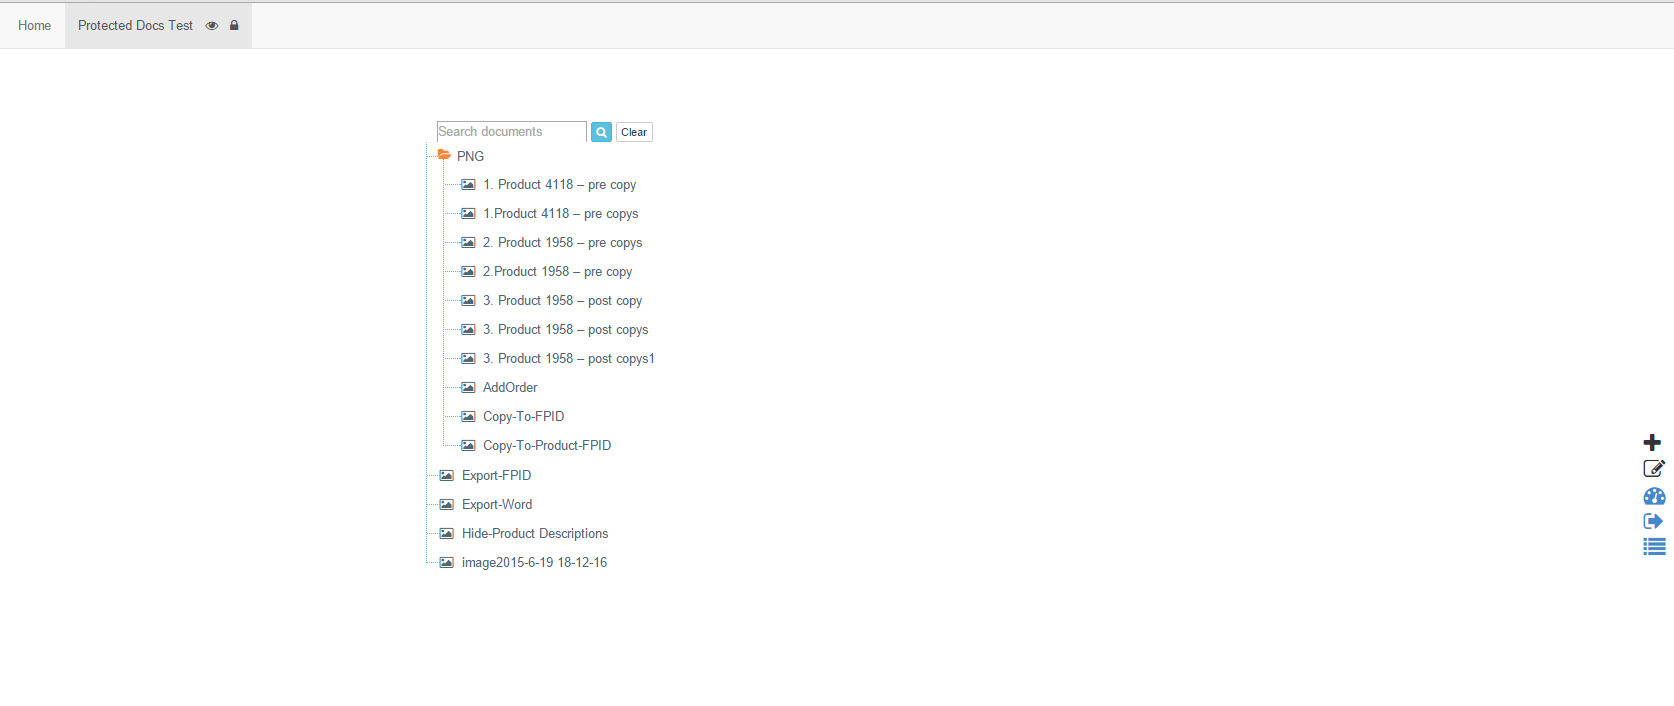
Viewing Folders
-
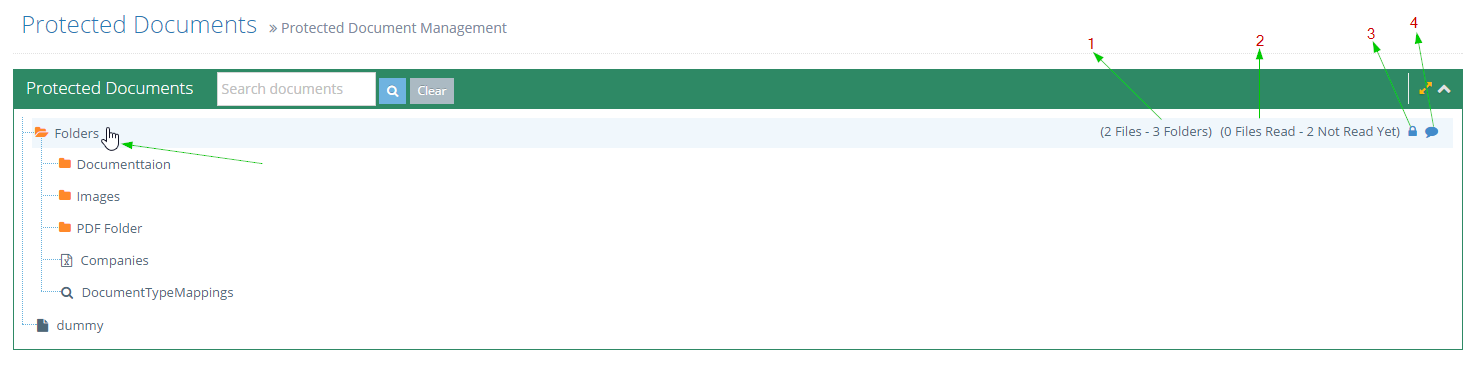
1Mouse over on folder and file to see more details (icons) about the folder
- Total number of Files - Folders (1): You can see the total number will be contained of documents files and folders.
- The total number of Files Read - Not Read Yet (2): You can see files read or not read yet in this folder of this user.
- The Lock icon (3): A lock icon will appear next to each folder. It will set limit view settings for a folder with permission.
- The Feedback icon (4): Feedback on the folder or files.
Viewing Files
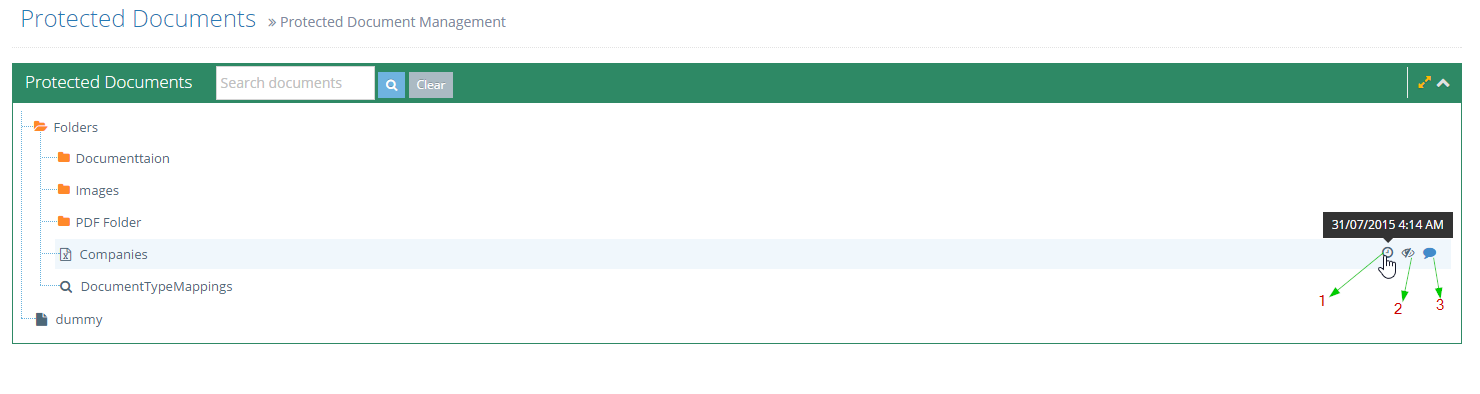
-
1Mouse over any Files
- The Date/Time the file is last modified
- The Read/Unread Icon shows the status or Read of Unread for this user
- The File Feedback Icon allows the user to provide feedback on the protected document.
Viewing Protected Documents as a valid user group
-
1The user is part of the group Technical Staff
-
2Protected Documents are viewable by group Technical Staff
-
3The user navigates to a page containing a Protected Document
-
4The folder structure is shown
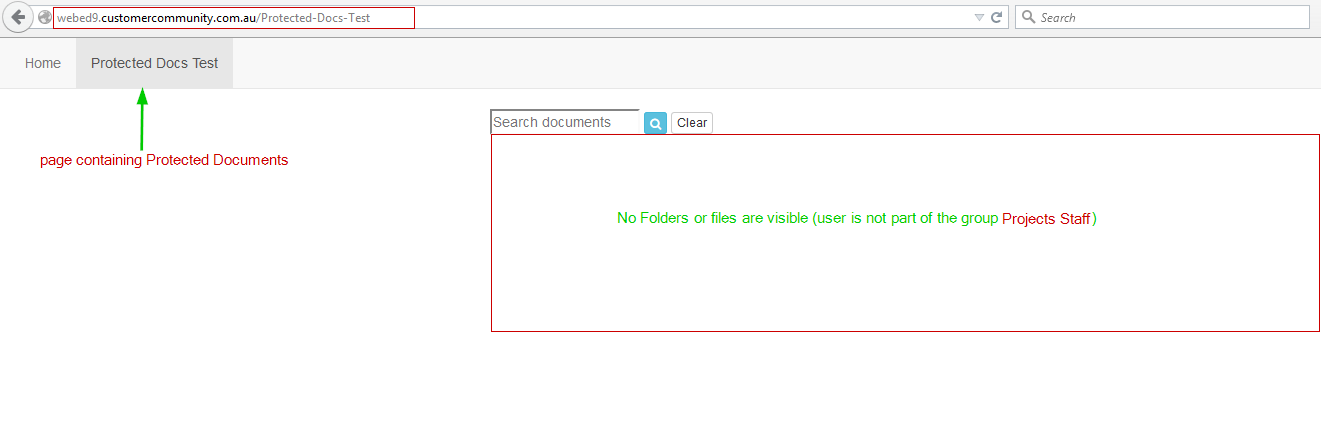
Viewing Protected Documents as an invalid user group
-
1The user is part of the group Projects Staff
-
2Protected Documents are viewable only by the group Technical Staff
-
3The user navigates to a page containing Protected Documents
-
4No Folders or files are visible (the user is not part of the group project Staff)
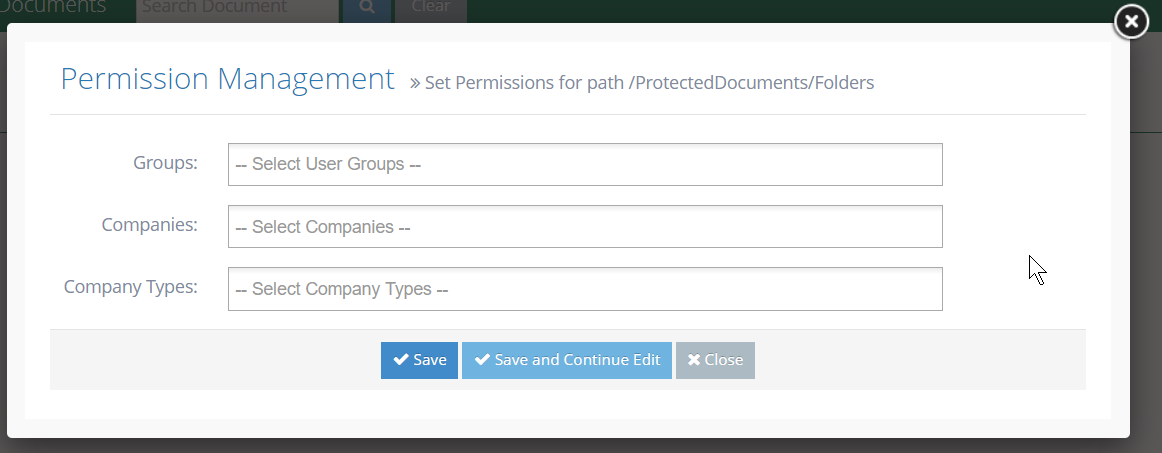
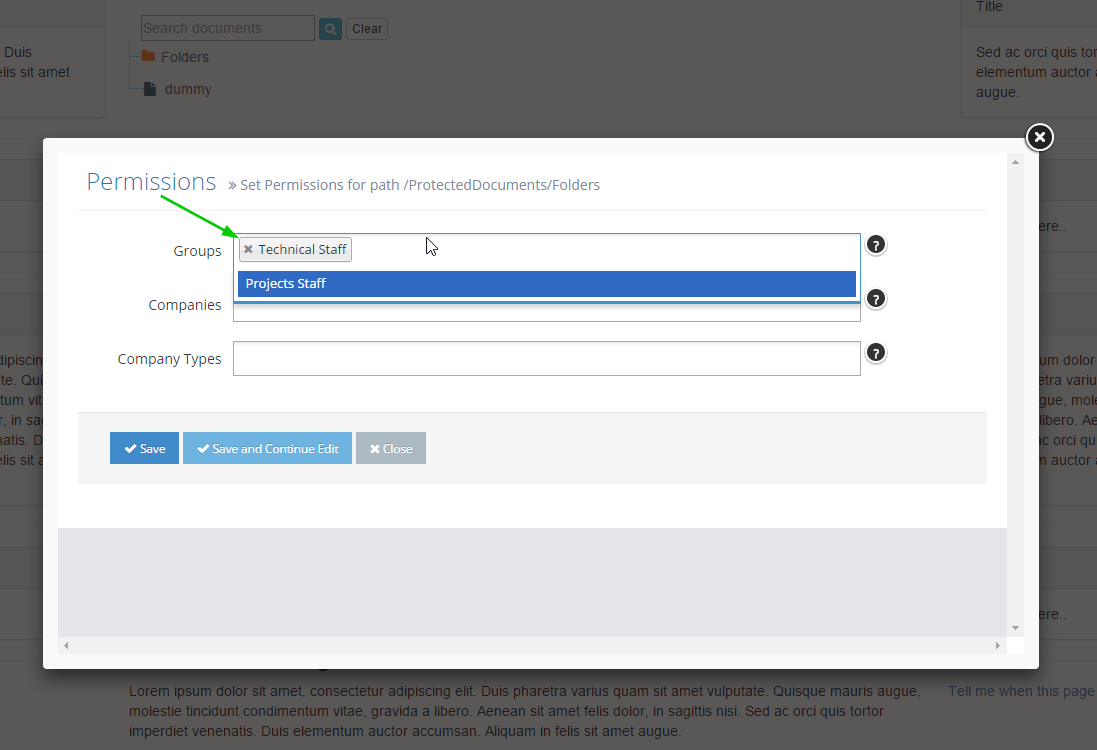
Setting View Rights for Protected Documents
From the web page
This can only be done if you are part of the group ProtectedDocumentAdmin or a full admin
-
1Log in as an administrator and go to the Admin Dashboard.
Learn how to log in here → -
2Browse to any page containing protected documents
-
3As a ProtectedDocumentAdmin, on mouse-over of a folder, the usual icons appear along with a Lock icon for managing access

-
4Clicking the lock icon opens a new window to set view permissions for the folder.
- Groups - the user group who can see these folders
- Companies - the company name that can see these folders (Company Names are part of the user's contact record)
- Company Types - company types who can view this folder
-
5Start typing the name of the group, company or company type to enable view rights to those users.
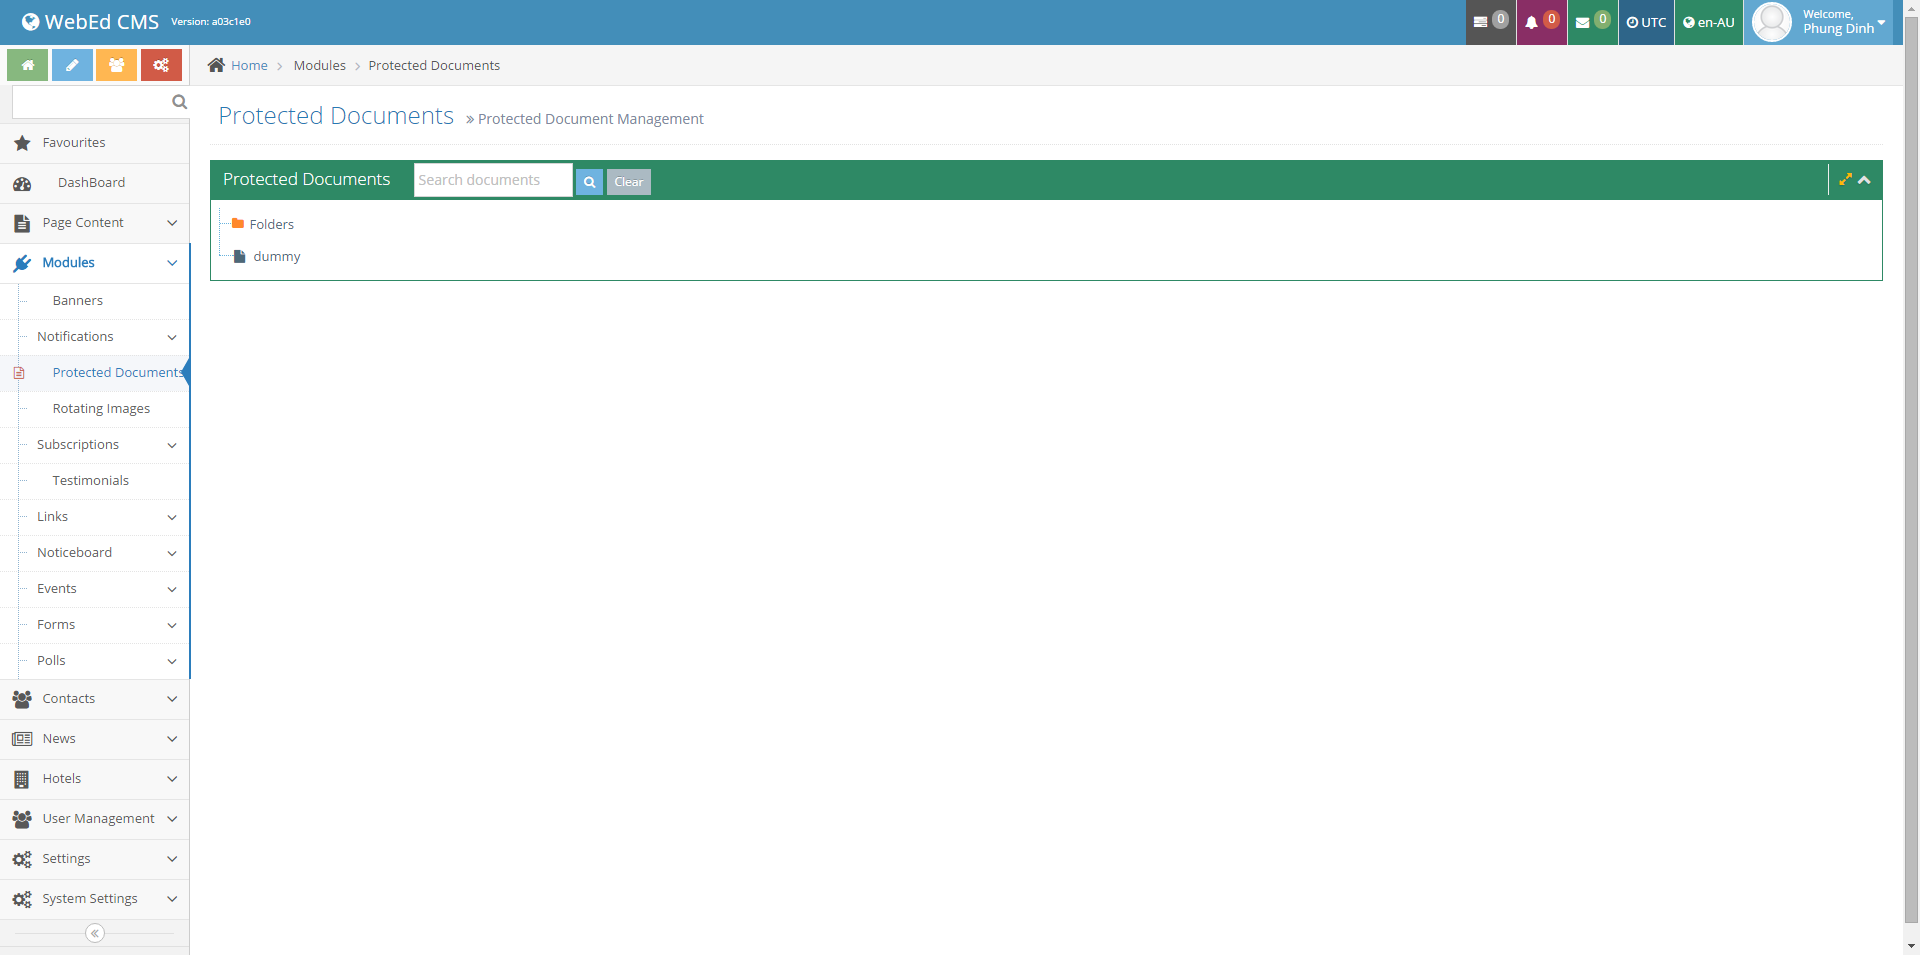
From the Admin Module
-
1When you click on Protected Documents, all folders will be shown
-
2Mouse over any folder to see the lock icon
-
3Click the lock icon (as shown above in web page access) to set the view rights for a folder
Automated Publishing
Automated publishing refers to the process of scheduling and managing the automatic release of content on a website. It allows for content to be uploaded, formatted, and published at pre-set times, eliminating the need for manual intervention. This is particularly useful for maintaining a consistent content flow, such as for news updates, blog posts, or product listings.
Automated publishing tools often integrate with content management systems (CMS), offering features like custom scheduling, content tracking, and content approvals. This streamlines the workflow, ensures timely publication, and reduces human error.
- The optional add-on module for protected documents can automate the publishing from your internal desktop or file server
- Just save files to your local file share and then an automated process will push them to the website
- The folder security on the website then limits visitor access to the secure folders