- Why you would use an Event Module?
- See the Events Module in action
- Basic Event Information
- Additional Event Information
- Event Flow Settings
- Event Notifications
- Adding Your New Event to a Website Page
- Event Categories
- Event Schedules
- Event Add-Ons
- Event Attendee Type
- Event Forms
- Event Booking
- Event Coupon
- Event PDF attachment on email
- Event Ticket Pool
- Event Email Processing
- Event Tips: Splitting Additional Info Data in Excel
Event Management
Why you would use an Event Module?
The importance of the Event Module is more than just a list of dates and event information, it tells a story of you or what is happening now in your organization. It also provides information for interested visitors or users in the web presence.
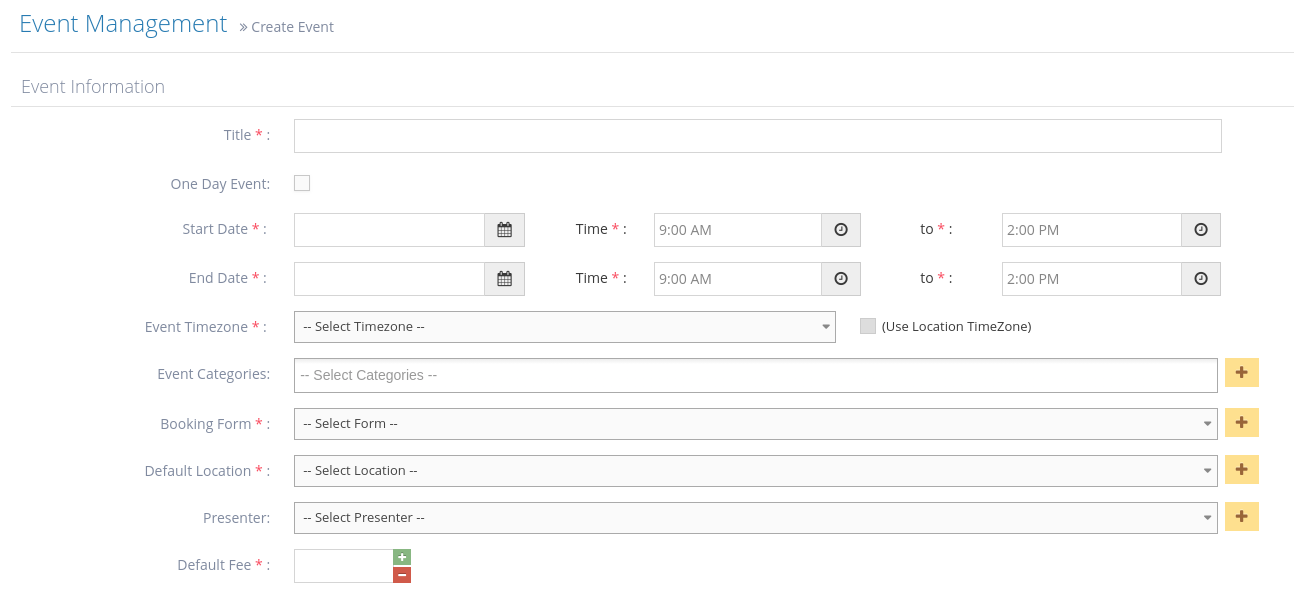
Basic Event Information
- Title - enter the Event title
- One-Day Event - put a check if the event is for one day only.
- Start Date - enter the first day of the event, including the start time and end time.
- End Date - enter the last day of the event, including the start time and end time.
- Event Timezone - select the correct time zone from the dropdown options, or you can tick the "Use Location Timezone" checkbox to have your event use the preferred location's timezone
- Event Categories - select the category of the event - the one created above/recently - from the options
- Booking Form - select the booking form of the event - the one created above/recently - from the options. This will serve as the form that the registrant will fill up their details with.
- Default Location (optional) - select the location of the event - the one created above/recently - from the options or click the to create a new one. This will serve as the DEFAULT location of all the event schedules that will be added. Learn how to create a new location here.
- Presenter (optional) - select the presenter of the event from the options or click the to create a new one. This will serve as the DEFAULT presenter of all the event schedules that will be added. Learn how to create a new presenter here.
- Default Fee - enter the DEFAULT price value for the event. This will serve as the DEFAULT fee for all the event schedules that will be added.
Why you would use an Event Module?
The importance of the Event Module is more than just a list of dates and event information, it tells a story of you or what is happening now in your organization. It also provides information for interested visitors or users in the web presence.
Basic Event Information
- Title - enter the Event title
- One-Day Event - put a check if the event is for one day only.
- Start Date - enter the first day of the event, including the start time and end time.
- End Date - enter the last day of the event, including the start time and end time.
- Event Timezone - select the correct time zone from the dropdown options, or you can tick the "Use Location Timezone" checkbox to have your event use the preferred location's timezone
- Event Categories - select the category of the event - the one created above/recently - from the options
- Booking Form - select the booking form of the event - the one created above/recently - from the options. This will serve as the form that the registrant will fill up their details with.
- Default Location (optional) - select the location of the event - the one created above/recently - from the options or click the to create a new one. This will serve as the DEFAULT location of all the event schedules that will be added. Learn how to create a new location here.
- Presenter (optional) - select the presenter of the event from the options or click the to create a new one. This will serve as the DEFAULT presenter of all the event schedules that will be added. Learn how to create a new presenter here.
- Default Fee - enter the DEFAULT price value for the event. This will serve as the DEFAULT fee for all the event schedules that will be added.
Additional Event Information
- Event Summary (Optional) - this is the summary of the event and is displayed in the event listing. If you don't enter a summary, only the event title will be displayed.
- Event Description (Optional) - this is where you enter the event's full details. This content is displayed when the user views the event. It does not appear in the event listing but does appear when the user clicks to display the event details. If you don't enter a description, only the event title and summary will be displayed.
- Registration Pre-Booking Confirmation (Optional) - enter pre-booking confirmation info here. Any content entered here will be presented to the visitor and they must accept it before proceeding to the booking form. If you include a checkbox tag {checkbox} in the content, the user will be forced to check before being able to proceed. This is useful for ensuring conditions are accepted before making a booking.
- Ticket Pool - if required, select from the ticket pool options or click
 to create a new one. Learn how to create a new ticket pool here.
 - Max Attendees -enter the maximum number of attendees for this event. If Max Attendees is set to 0, the max attendee is unlimited.
- Registration Full Text - a user can put a registration description with the full details here
- Allow Waitlist - check to allow a new registrant to opt to be included in the waiting list once the maximum number of attendees has been reached.
- Enable Quantity Textbox - check this box if you want your customer to book more than one ticket
- Disable Payment - check to disable payment for your event.
- Support Booking on Multiple Schedules for this event - check to enable booking on multiple schedulesNote: This disables the ability to limit bookings to single tickets only.
- Disable Payment - put a check to disable payment for the event.

Event Flow Settings
-
1Thank You page
- Select Thank you page
- If payment is disabled, the event will redirect to this page after a successful booking.
Important Note: If you do not already have a Thank You page, you will need to create one. This is a simple page called Thank You with whatever message, images and contact details you wish to include.
- If payment is disabled, the event will redirect to this page after a successful booking.
- Select Thank you page
-
2Payment page
- Select Payment page
- Important Note: This page is automatically created by the system (A Payment Gateway curly bracket is needed on the page for the payments to work).
- Select Payment page
-
3Booking Confirmation page
- Select Booking Confirmation page
- Important Note: This page is automatically created by the system. If payment is enabled and payment is successful, or not successful, customers are redirected to this page.
- Select Booking Confirmation page
-
4Wait List page
- Select the Wait List page
- If the event is already full and Allow waitlist is enabled, redirect to this page.
Important Note: A very simple waitlist page is automatically created by the system. If you wish to customise it, you can
- If the event is already full and Allow waitlist is enabled, redirect to this page.
- Select the Wait List page
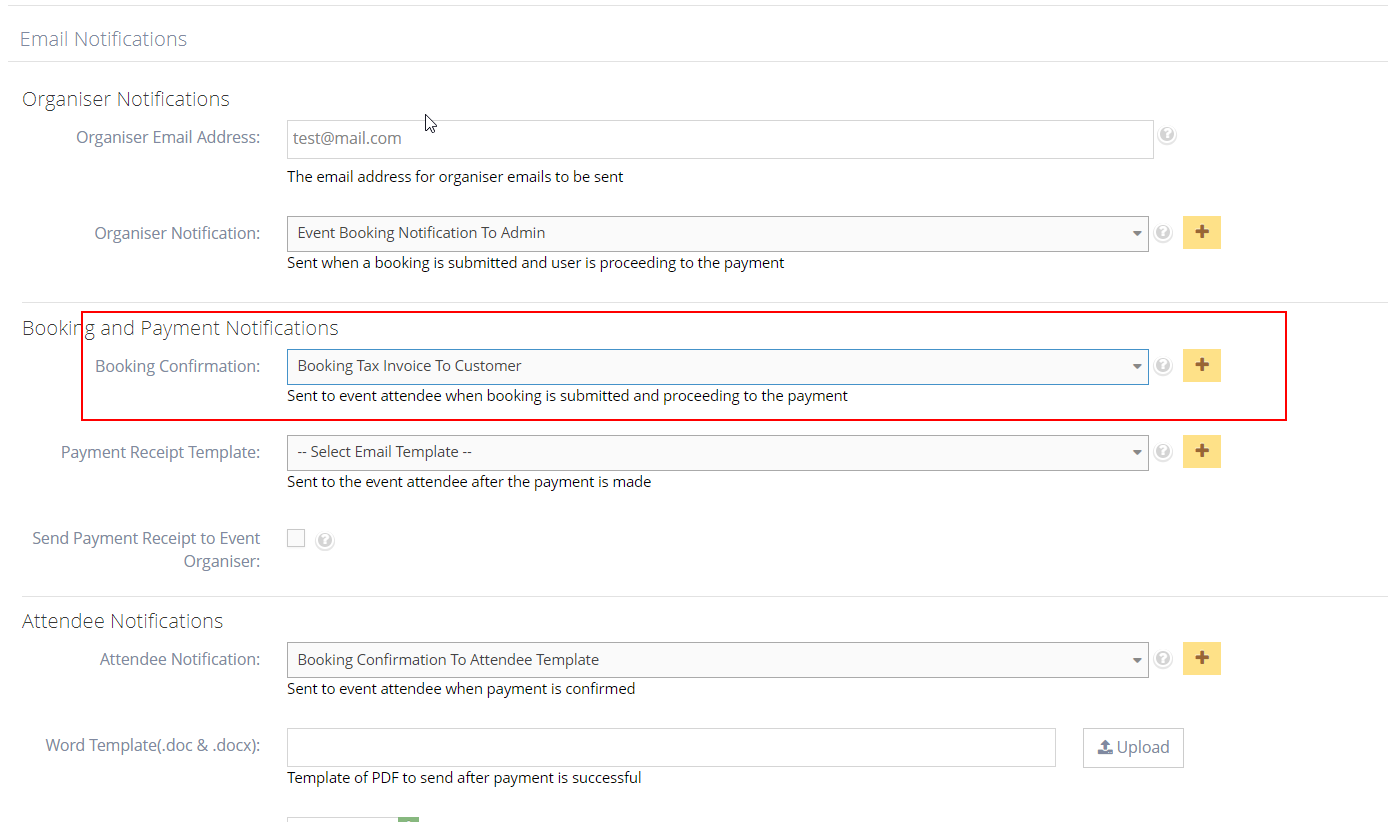
Event Notifications
-
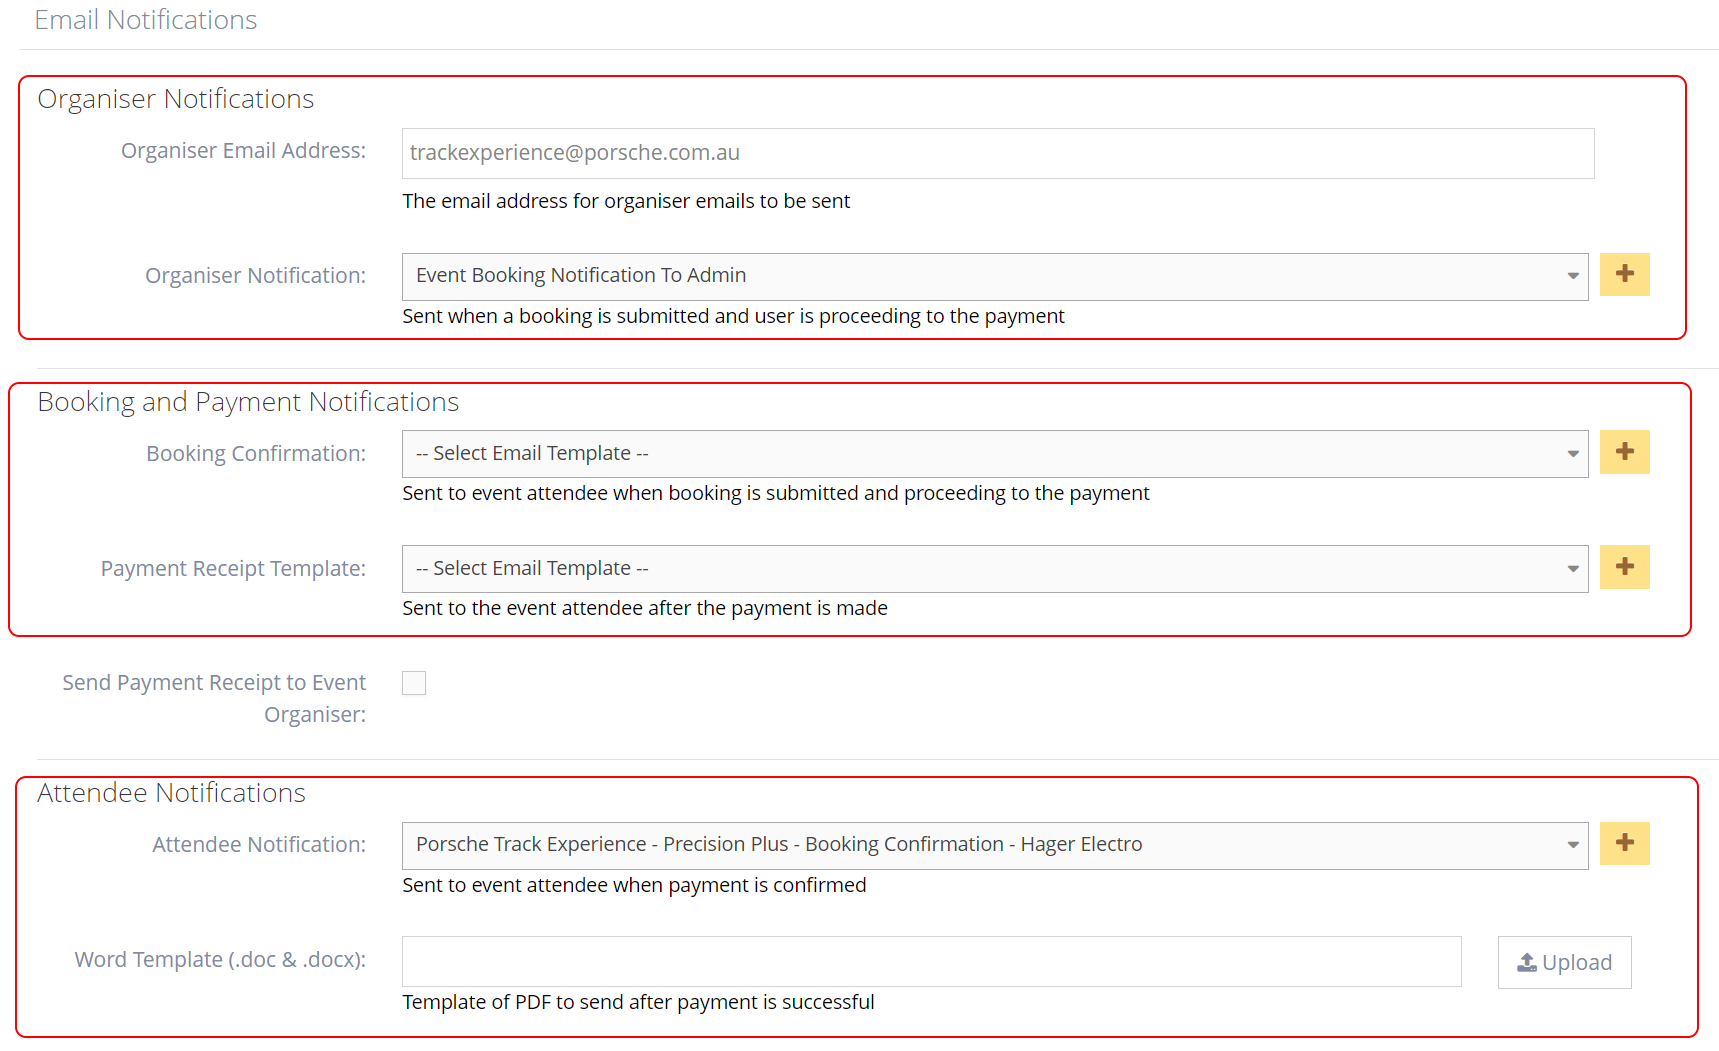
1Organiser Notifications
- Organiser Email Address - enter the email address where visitors can send enquiries, questions regarding the event, or ask for support.
- Organiser Notification - select a notification template from the options to send to the organiser when a booking has been made, or clickto create a new one. Leave as default if you don't want the organiser to receive an email notification.

-
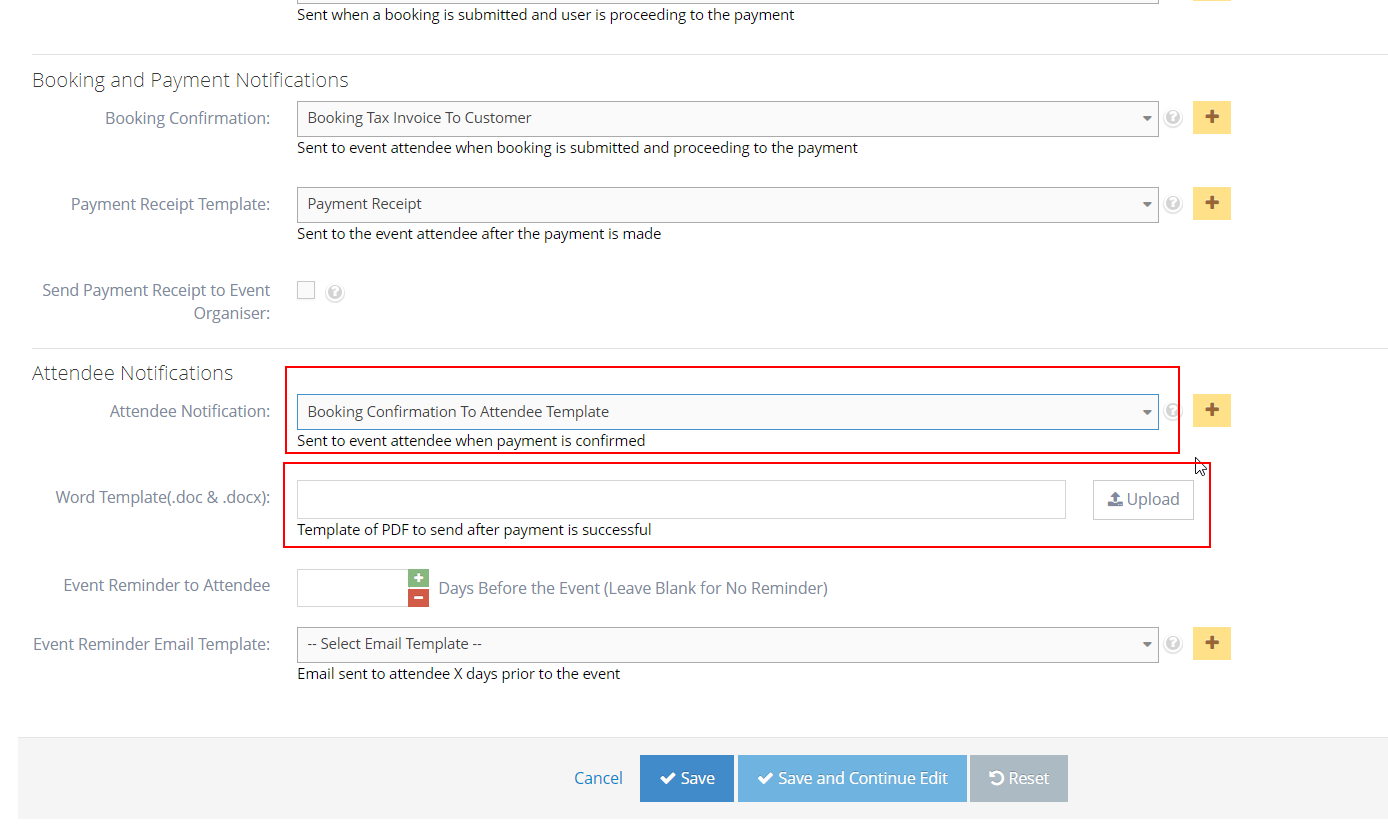
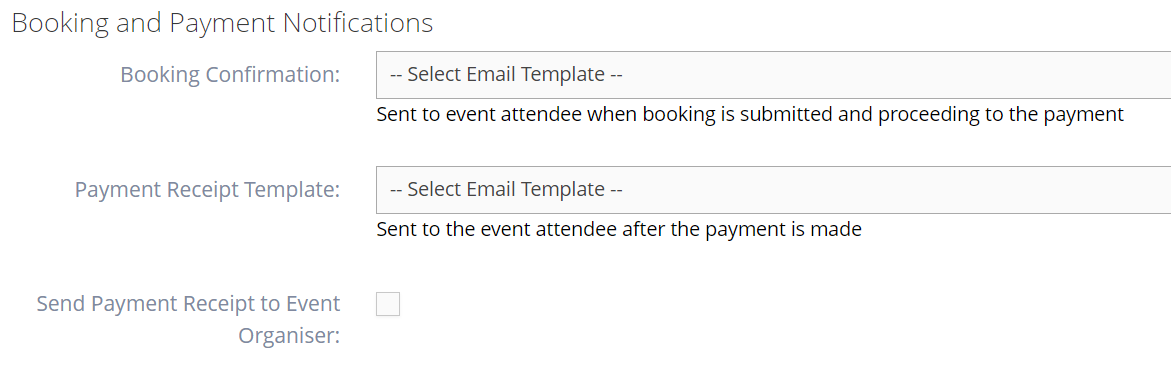
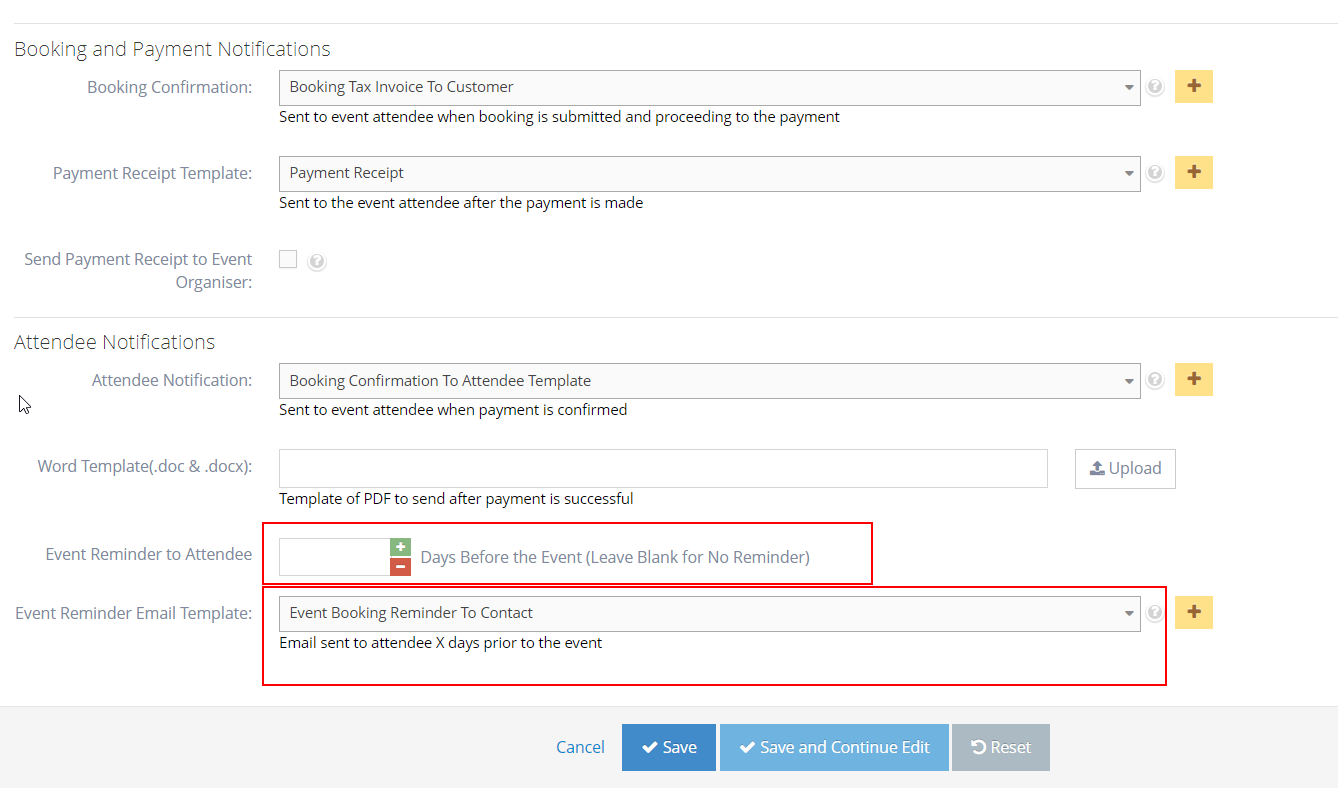
2Booking and Payment Notifications
- Booking Confirmation - select a template for the email sent once a booking has been made, or click the plus icon on the right side to create a new one.
Leave as default if you don't want to send a confirmation email to the attendee. - Payment Receipt Template - select a template for the receipt once the payment has been made, or click the to create a new one.
Leave it as default if you don't want to send an email notification to the attendee. - Send Payment Receipt to Event Organiser - check if you want to send a payment receipt notification to the event organiser once a booking has been made and payment has been received.

- Booking Confirmation - select a template for the email sent once a booking has been made, or click the plus icon on the right side to create a new one.
-
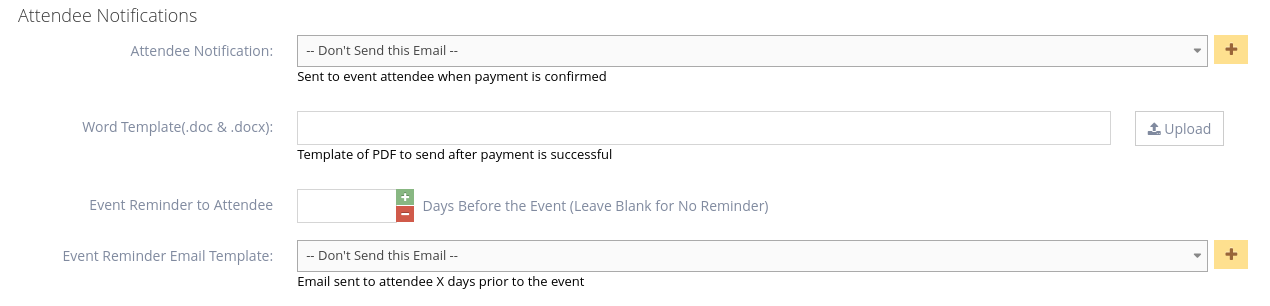
3Attendee Notifications
- Attendee Notification - select a template for the email sent once the booking has been made and payment has been received, or click the to create a new one. Leave it as default if you don't want to send an email notification to the attendee.
- Word Template (.doc & .docx) - upload the word template for the PDF creation here - the one created above/recently - After a customer successfully pays for an event he’ll receive a confirmation email with an attached PDF file with all the event details.
- Event Reminder to Attendee - enter the number of days before the event when you want the attendee to receive an event reminder. Leave blank if you don't want to send an event reminder.
- Event Reminder Email Template - select a template for the event reminder, or click theto create a new one. Leave it as default if you don't want to send an event reminder.
- Attendee Notification - select a template for the email sent once the booking has been made and payment has been received, or click the
-
4Save your event
- Click Create or Create and Continue Edit to apply changes
- A message will appear at the top of the dashboard saying ‘Event created successfully’ to confirm the updates are successful

- A message will appear at the top of the dashboard saying ‘Event created successfully’ to confirm the updates are successful
 Please Note: The system will not send ANY notification emails if there are NO email templates set up on any of the Organiser, Booking, Payment, and Attendee Notification sections. Please see the descriptions above when the email will be received.
Adding Your New Event to a Website Page
-
1Log in as an administrator and go to the Admin Dashboard.
Learn how to log in here → -
2If the page already exists, Edit the page and skip to step 7.
-
3If you want to create a new page, follow the next steps.
-
4In the Admin, on the left menu, click Pages, then select Pages
-
5Click the Create New Page button
Learn how to create a new page here → -
6In Content section, select Curly Bracket on the page editor.

-
7A modal window will pop up, select Configure Curly Bracket
-
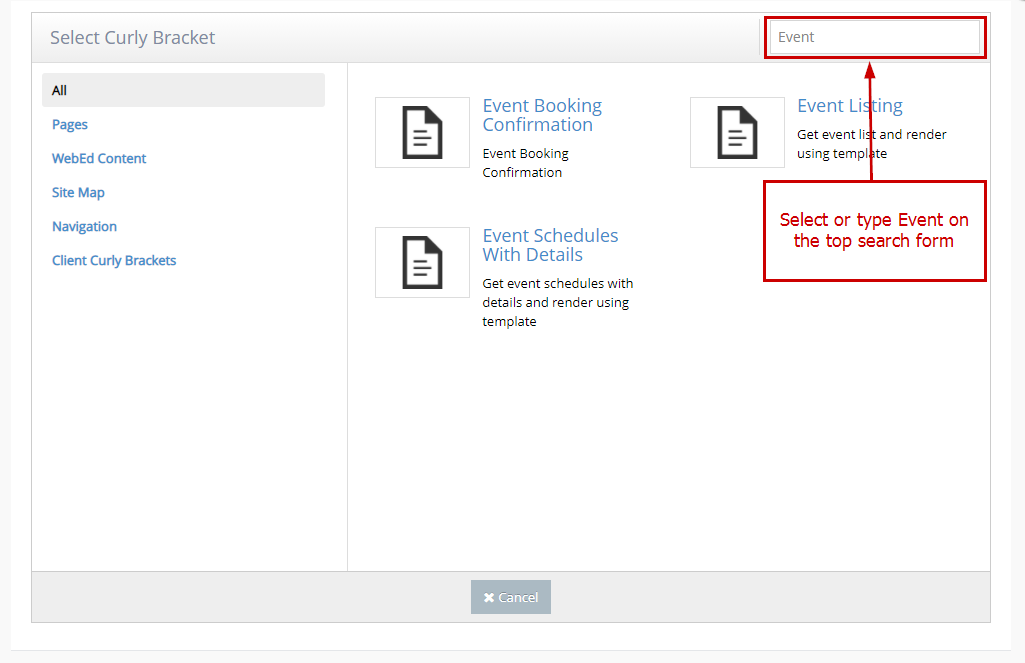
8Select or type Event on the top search form
-
9There are a few curly brackets you can use to add events created, please select one Event curly bracket - below are its descriptions :
- Event Listing - this curly bracket will help get and display all events and its event schedule using the event category filter
- Event Schedule With Details - this curly bracket will help get and display a specific event schedule along with its details
-
10Configure Event curly bracket selected
- Event Listing
- Category - select an event category
- Event - select an event listing
- Event Schedule - select event schedule
- Enable Booking on Multiple Events - tick this (optional) to enable booking on multiple events
- Enable Search/Filter - tick this (optional) to enable search/filter
- Template Name - select event listing template here, select how you would like the page layout would display
- Event Schedule With Details
- Events - select the event listing where the event schedule is added
- Event Schedule - select event schedule
- Template Name - select the event schedule template here, select how you would like the page layout would display
- Event Listing
-
11Click Insert
-
12Click OK to add the curly bracket on the page
-
13Go and click Advanced Settings at the bottom of the page editor
-
14Configure the page settings :
- Include In Site Navigation - Add this page to the site's main menu. Uncheck to remove from the main menu
- Disable Menu Cascade - Hide all child pages from the cascade menu. This will allow the current page to appear on the menu but not display the child pages on the menu
- Force load SSL - Force page to use SSL. (Note you must first have an SSL certificate configured on your site)
- HTML Title Tag - Sets the HTML title tag for the page. If left blank the page title will be used.
- Page Template - Set the master template for this page. Your site can have different master templates for different sections as defined by your designer
- Default Body Template - When new pages are made under this page, the default body template will populate the new page to give editors the default layout and content to work with. This helps keep sections consistent
- Make this page as a new body template - You can set this page as a new body template so other pages can use this content as a start point. Help keep sections consistent
- Add to Sitemap.xml - Controls if this page is shown on the Google XML sitemap (sitemap.xml) for the site.
-
15Click Create or Create and Continue Edit to apply changes
-
16A message will appear at the top of the dashboard that says ‘Page created successfully’ to confirm that the updates made are successfully done
 For more information, you can also check the Creating Page and Add Multiple Events WebEd user guide.
Event Categories
Why Use Event Categories?
An event Category is a group of events that share the same category. We can select an event category from the Event Category options when creating or editing events.
To have a division or group of events as having a particular shared classification.
Create New Event Categories
-
1Log in as an administrator and go to the Admin Dashboard.
Learn how to log in here → -
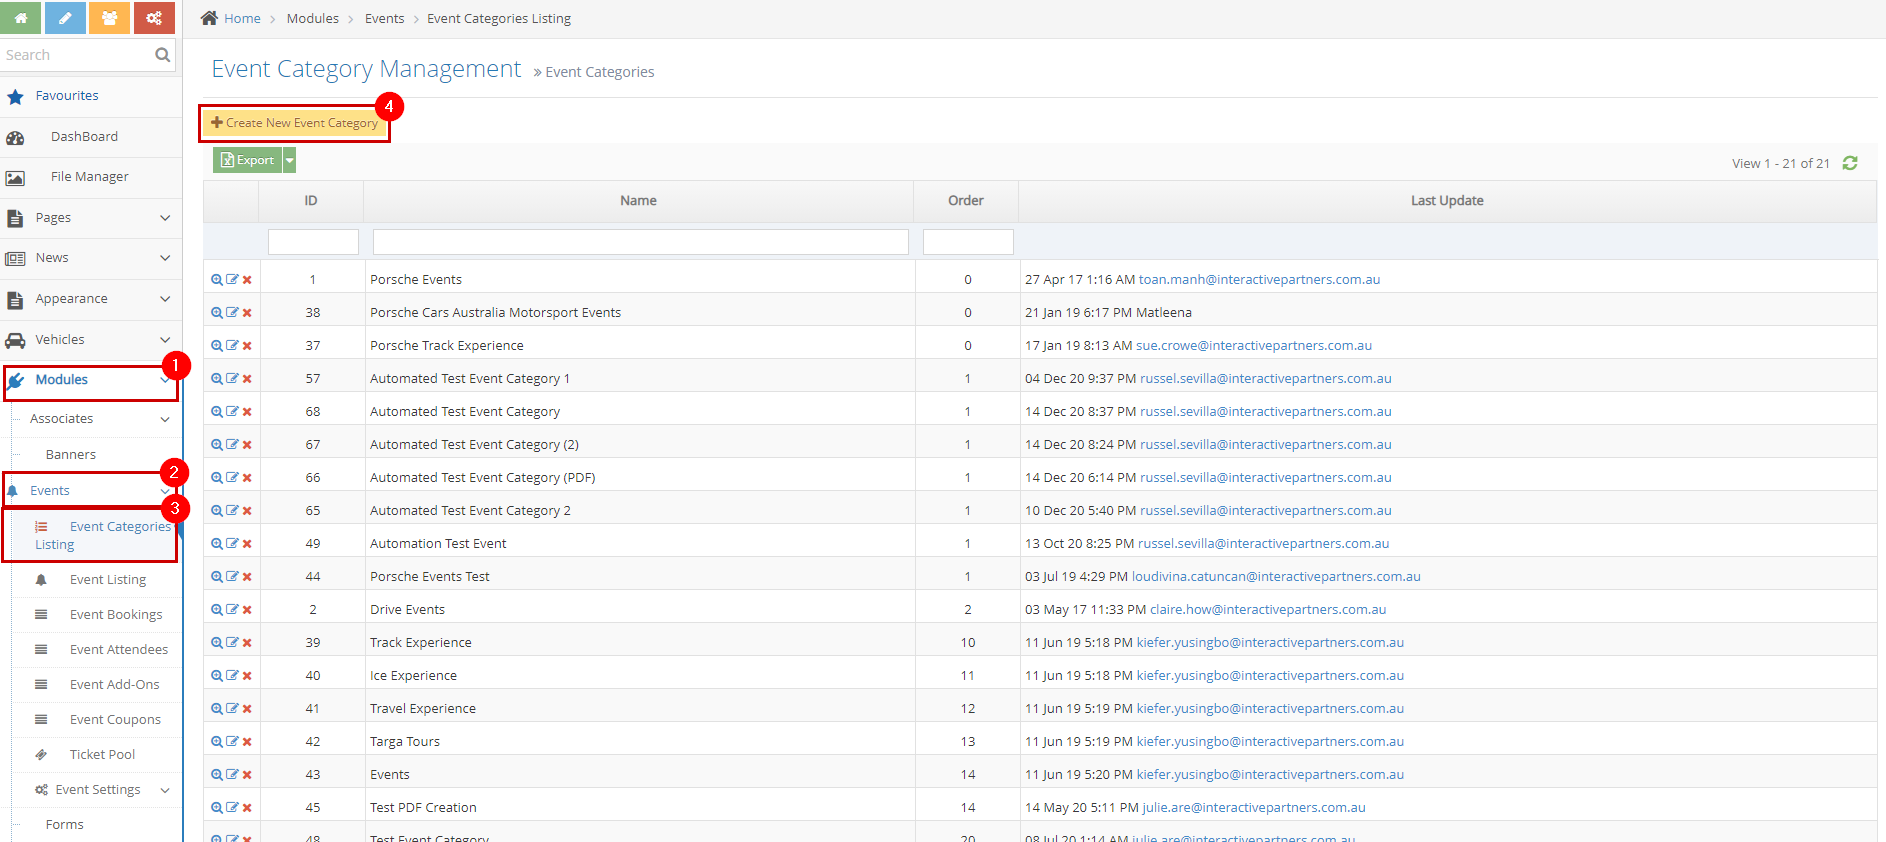
2Under ‘Modules’ on the left menu, click Events > Event Categories (or use the Search space at the top left)
-
3Click the Create New Event Category button
-
4Fill in the Event Category Information
- Category Name - this serves as the Event Category name/title
- Category Order - this serves as the Order of the event category
-
5Submit the new event category
- Create - click the 'Create' button to submit the new event category. This action creates your event category, closes the page and redirects you to the Event Category Listing page (see image below). On the Event Category Listing page, you will see a note "Event category created successfully".
- Create and Continue Edit - Click the 'Create and Continue Edit' button to submit the new event category. This action creates your event category but lets you stay on the page.
- Reset - click the 'Reset' button to start over. This action refreshes the page and shows a blank 'Create New Event Category' page. Your event category will not be saved/created.

-
6A message will appear at the top of the dashboard that says ‘Event category created successfully’ to confirm the updates have been successful.

Update or Add Event Category to Existing Event
-
1Log in as an administrator and go to the Admin Dashboard.
Learn how to log in here → -
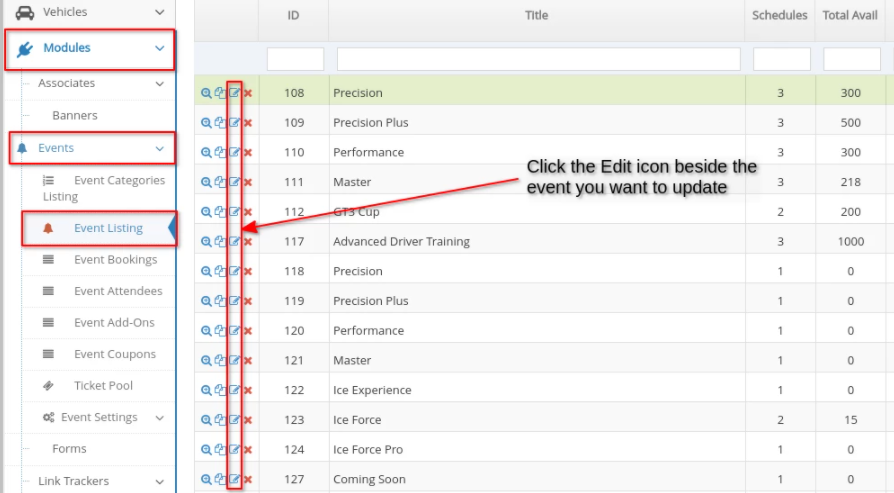
2Under Modules on the left menu, choose Events
-
3Click Event Listing
-
4Search for the Event Listing you wish to update
-
5Click the Edit icon beside the Event Listing

-
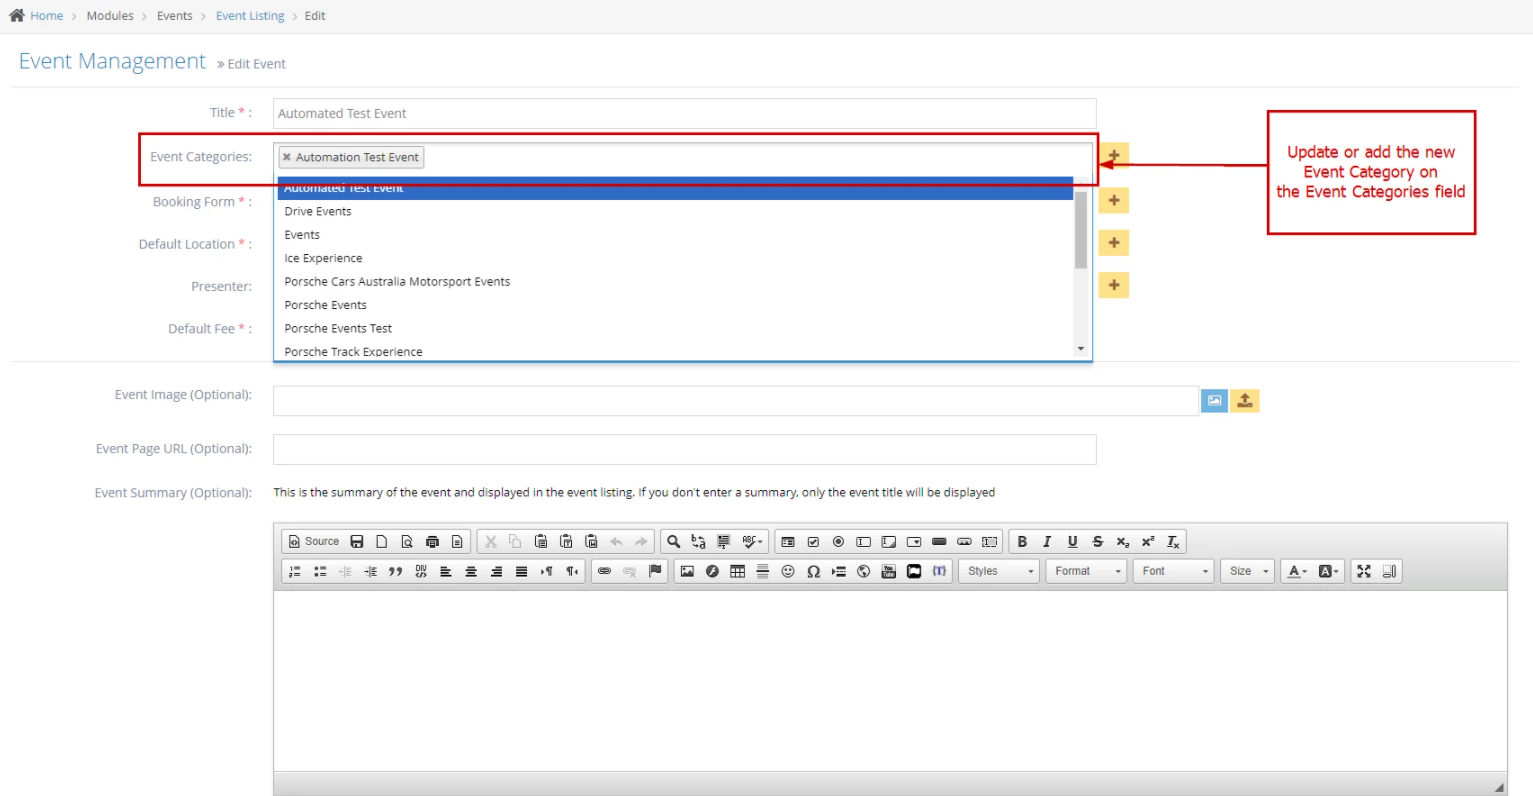
6Update or add the Event Category on the Event Categories field
-
7Once done, click the 'Save' button at the bottom of the page to apply changes.
-
8There will be a notification that your event has been updated successfully. You should now be able to see the Event Category in your event and every Event Category option.

Remove Event Category from Existing Event
-
1Log in as an administrator and go to the Admin Dashboard.
Learn how to log in here → -
2Under Modules on the left menu, choose Events
-
3Click Event Listing
-
4Search for the Event Listing you wish to update
-
5Click the Edit icon beside the Event Listing
-
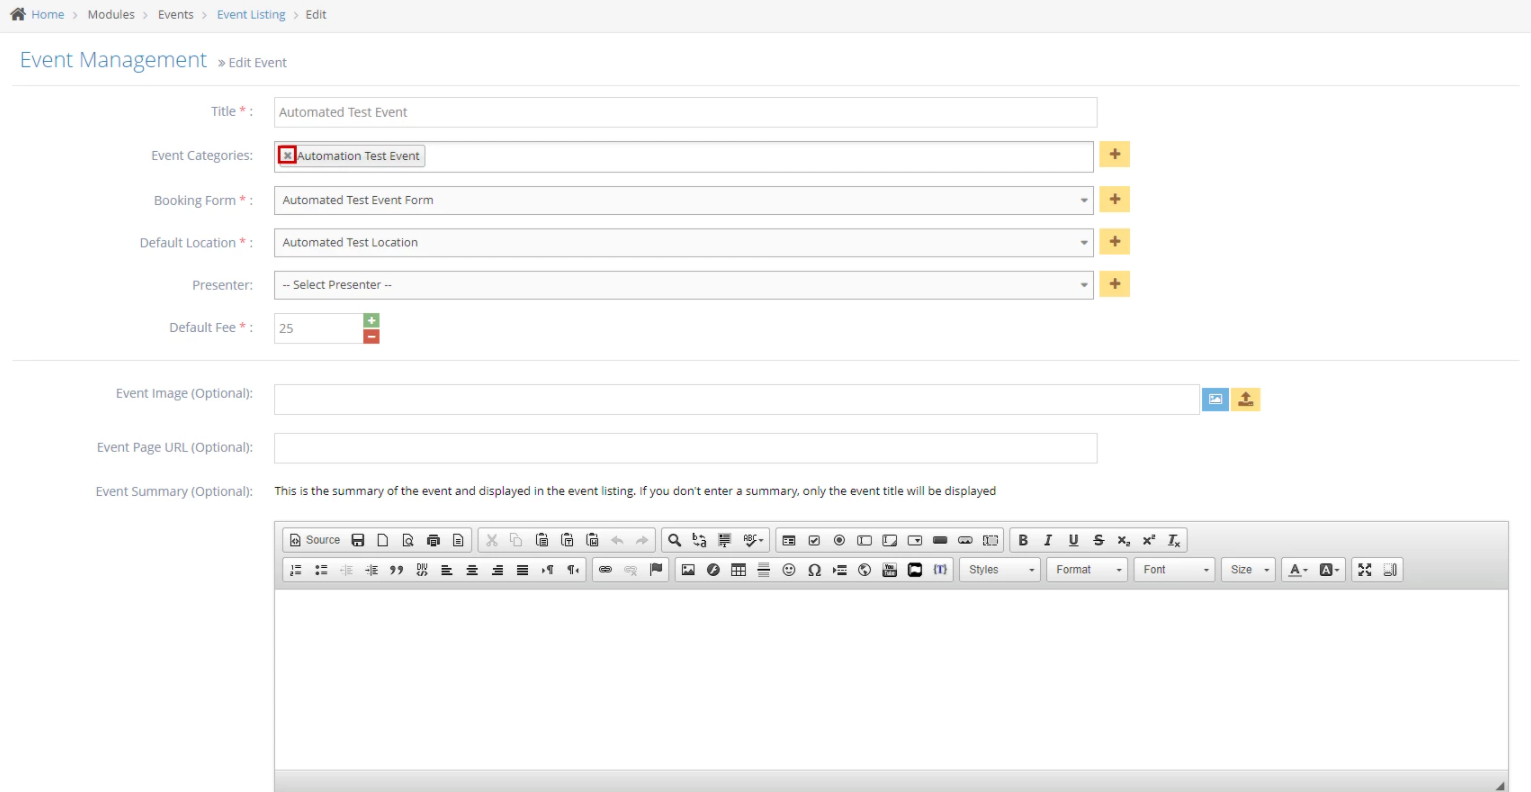
6Remove the category from the "Event categories" field.
-
7Scroll to the bottom and click "Save".
-
8There will be a notification that your event has been updated successfully.
-
9Congratulations! You have successfully managed the Event Category.
Event Schedules
Why you would use an Event Schedule Module
This documentation is to show information on managing event schedules in the events module. An event schedule has a start date and end date with a start time and end time for each date.
An event schedule contains the exact date and time (month, day, year) of a specific event.
Create a new Event Schedule
-
1Log in as an administrator and go to the Admin Dashboard.
Learn how to log in here → -
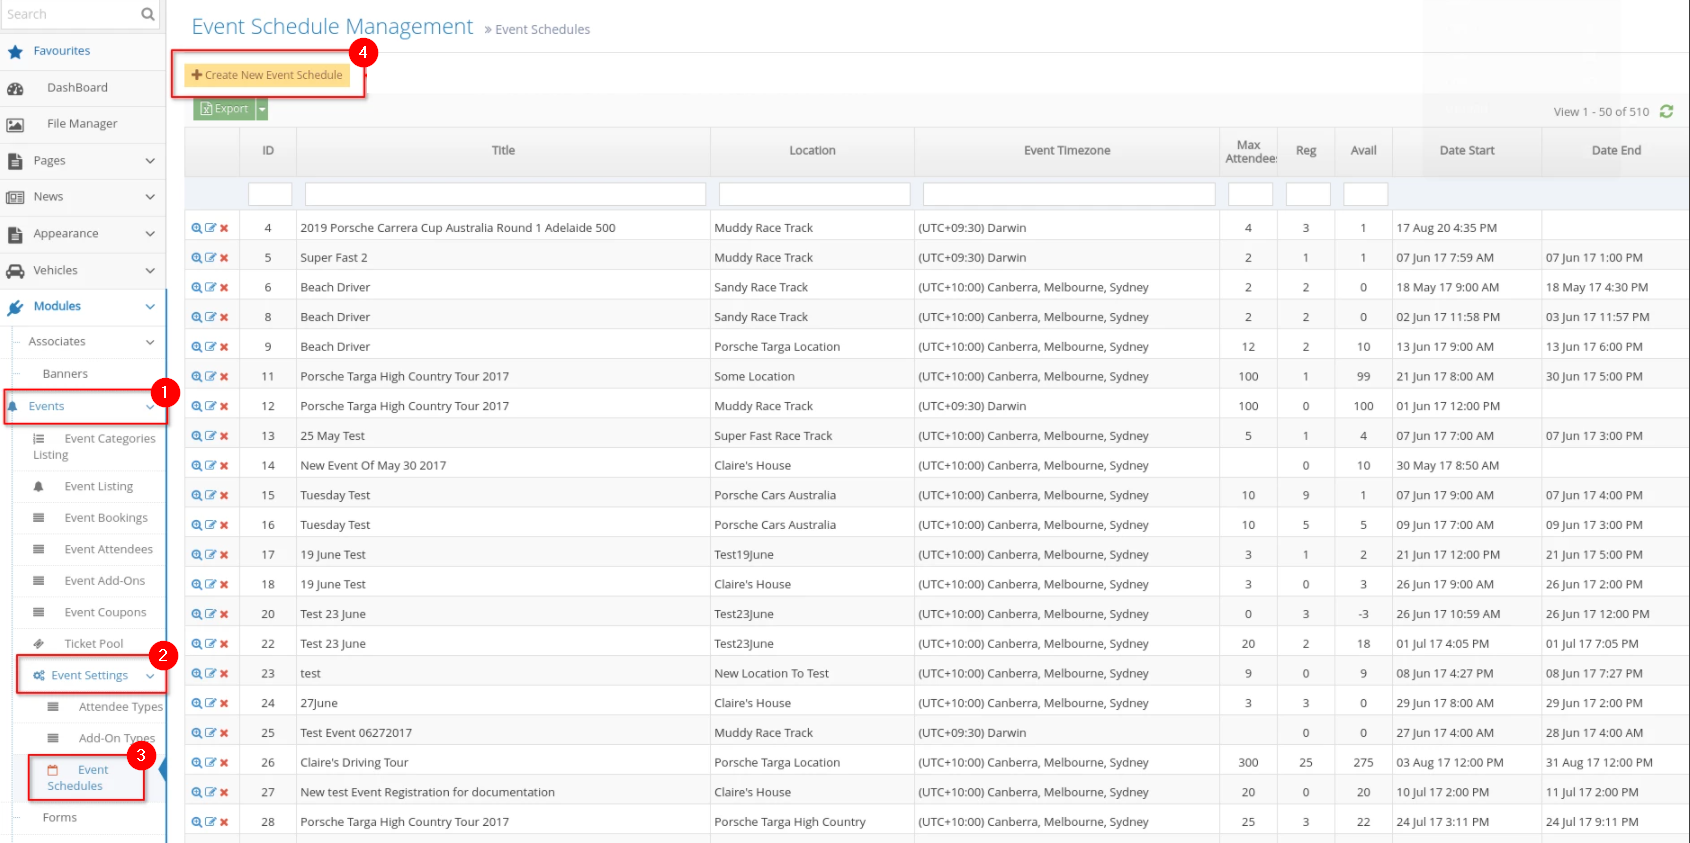
2Under Modules on the left menu, click the Events dropdown
-
3Select Event Schedules
-
4Click Create New Event Schedule
-
5Fill up the Event Schedule Information
- Event- select the event you are creating the schedule for - the event created above/recently - from the options.
- Title- enter the title of the event schedule.
- One-Day Event- put a check if the event is for one day only.
- Start Date- enter the first day of the event, including the start time and end time.
- End Date- enter the last day of the event, including the start time and end time.
- Event Timezone- select the correct time zone from the dropdown options, or you can tick the "Use Location Timezone" checkbox to have your event use the preferred location's timezone
- (Use Location TimeZone) - tick this (optional) if you wish to use the location timezone to create a new one.
-
6Click Create to create your new schedule
-
7A message will appear at the top of the dashboard saying ‘Event created successfully’ to confirm the updates are successful

Update the existing Event Schedules
-
1Log in as an administrator and go to the Admin Dashboard.
Learn how to log in here → -
2Under Modules on the left menu, choose Events > Event Settings
-
3Click Event Schedules
-
4From the Event Schedule listing, search for the event schedule you want to edit
-
5Click the
 "Edit" icon to edit the event schedule
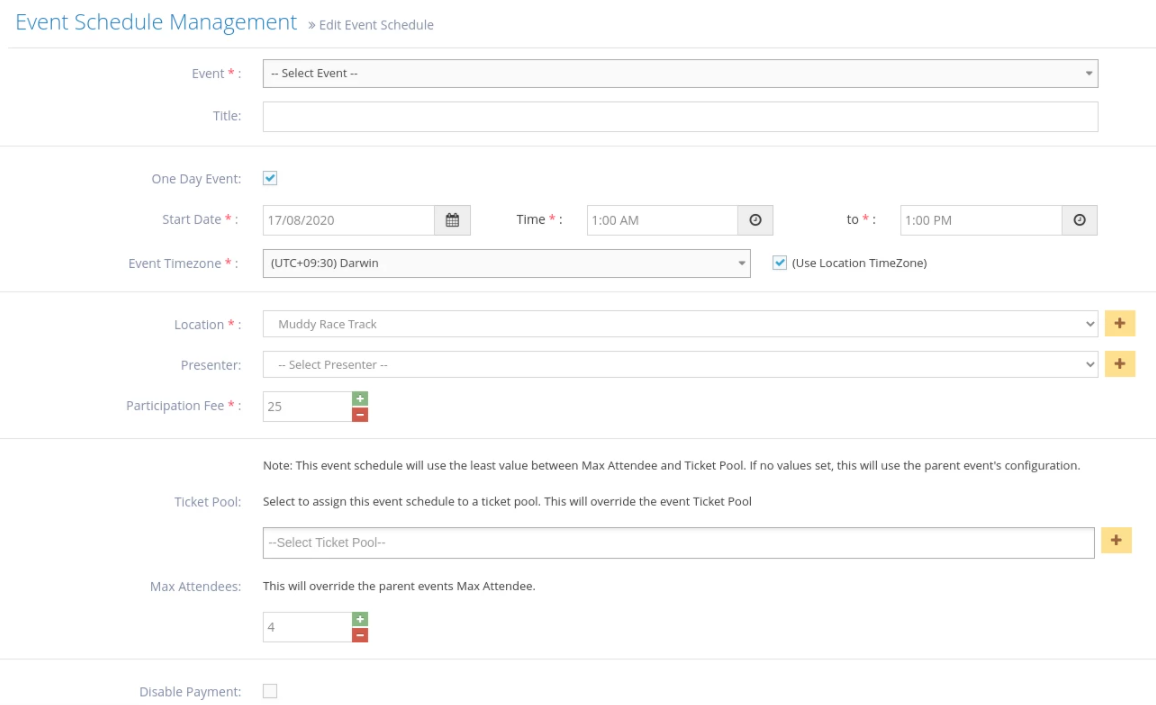

-
7Edit any or all items below:
- Event- select the event you are creating the schedule for - the event created above/recently - from the options.
- Title- enter the title of the event schedule.
- One-Day Event- put a check if the event is for one day only.
- Start Date- enter the first day of the event, including the start time and end time.
- End Date- enter the last day of the event, including the start time and end time.
- Event Timezone- select the correct time zone from the dropdown options, or you can tick the "Use Location Timezone" checkbox to have your event use the preferred location's timezone
- (Use Location TimeZone) - tick this (optional) if you wish to use the location
- Presenter - select the presenter of the event from the options or click the

- Participation Fee enter the price value for the event.
- Ticket Pool - select the ticket pool of the event from the options or click the to create a new one.
Learn how to create a new ticket pool here → - Max Attendees enter the maximum number of attendees for this event. If Max Attendees is set to 0, the max attendee is unlimited.
- Disable Payment put a check to disable payment for the event.
- Hide Schedule select to hide the event schedule if needed
-
8Once done, Save to update changes.
Delete An Event Schedule
-
1Log in as an administrator and go to the Admin Dashboard.
Learn how to log in here → -
2Under Modules on the left menu, choose Events > Event Settings
-
3Click Event Schedules
-
4From the Event Schedule listing, search for the event schedule you want to delete
-
5Click the
 "Delete" icon to delete the event. A popup will appear to confirm deleting the event.
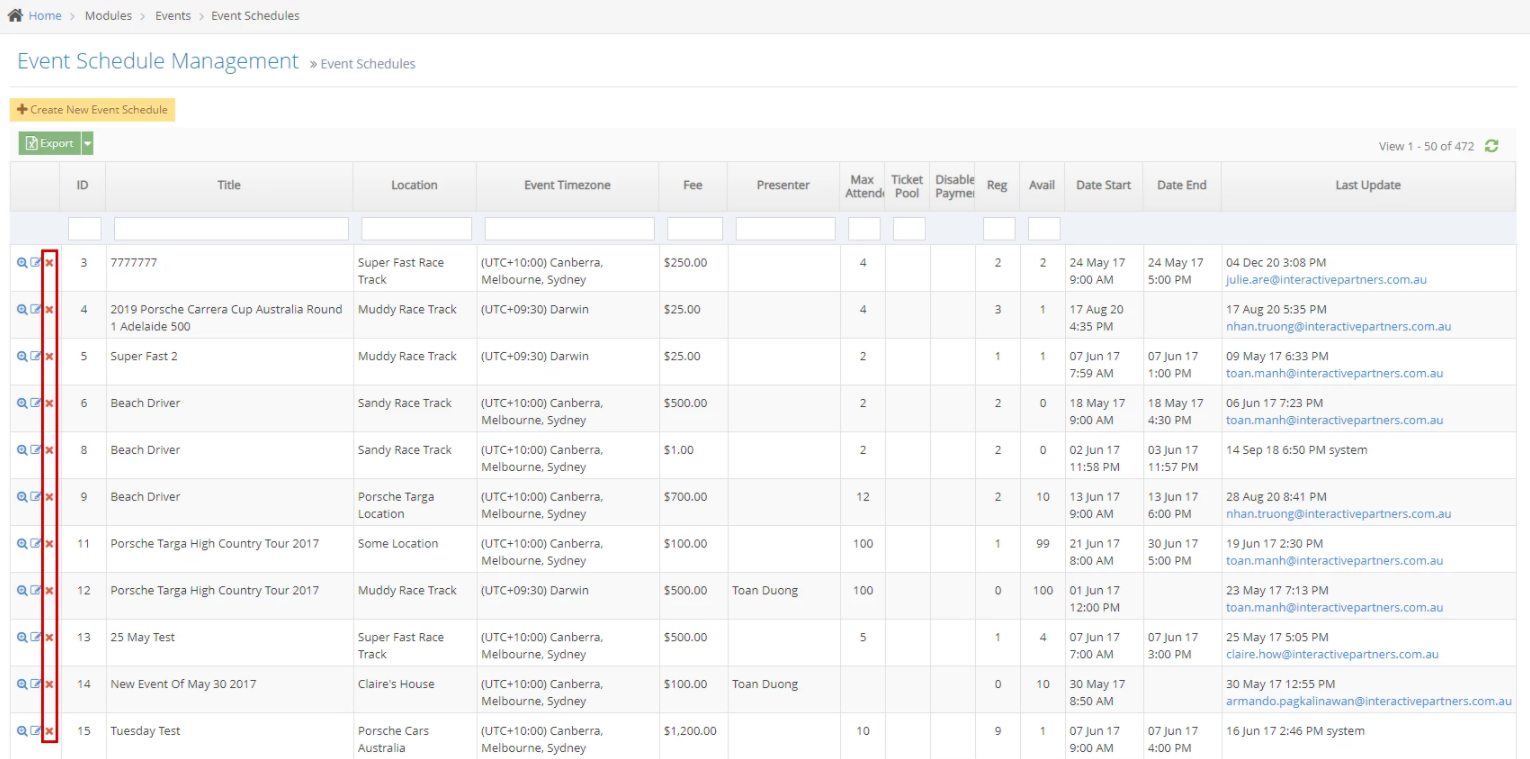
-
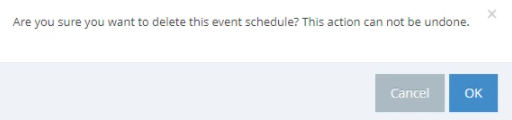
6Once clicked, a pop-up modal will show "Are you sure you want to delete this event schedule? This action can not be undone." with buttons.
- Cancel - clicking this button closes the pop-up and shows the event schedule details. You can still edit the event by clicking "Delete" on the top right corner of the page (shown below), and the same popup will appear for confirmation.
- OK - clicking this button deletes the event and shows a popup "Event schedule deleted successfully.". This action takes you back to the Event Listing.
Update An Event Schedule
-
Edit any or all items below:
- Event- select the event you are creating the schedule for - the event created above/recently - from the options.
- Title- enter the title of the event schedule.
- One-Day Event- put a check if the event is for one day only.
- Start Date- enter the first day of the event, including the start time and end time.
- End Date- enter the last day of the event, including the start time and end time.
- Event Timezone- select the correct time zone from the dropdown options, or you can tick the "Use Location Timezone" checkbox to have your event use the preferred location's timezone
- (Use Location TimeZone) - tick this (optional) if you wish to use the location timezone to create a new one. Learn how to create a new location here.
- Presenter - select the presenter of the event from the options or click the
- Participation Fee enter the price value for the event.
- Ticket Pool - select the ticket pool of the event from the options or click the to create a new one. Learn how to create a new ticket pool here.
- Max Attendees enter the maximum number of attendees for this event. If Max Attendees is set to 0, the max attendee is unlimited.
- Disable Payment put a check to disable payment for the event.
- Hide Schedule select to hide the event schedule if needed
Event Add-Ons
Why you would use an Event Add-On
Users can use Event Add-On in case there are additional packages or arrangements such as meals, seats, etc.
Create an Event Add-On Type
-
1Log in as an administrator and go to the Admin Dashboard.
Learn how to log in here → -
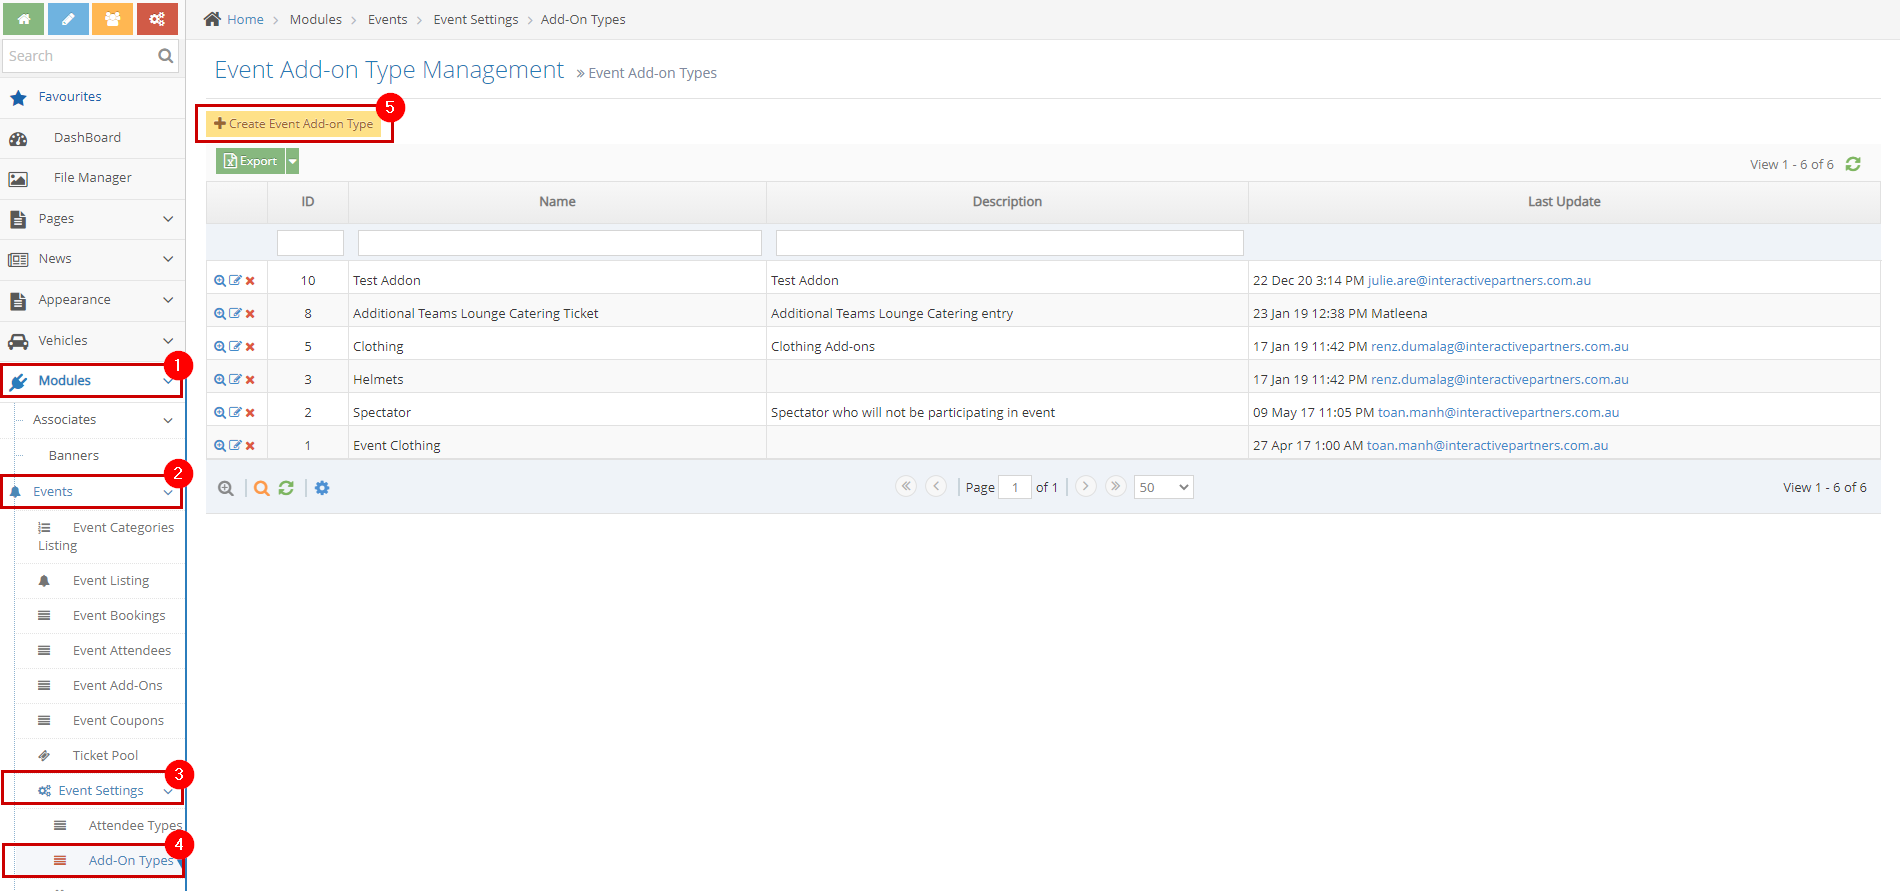
2Under Modules on the left menu, choose Events
-
3Click Event Settings
-
4Select Add-on Types
-
5Click the 'Create Event Add-on Type' button
-
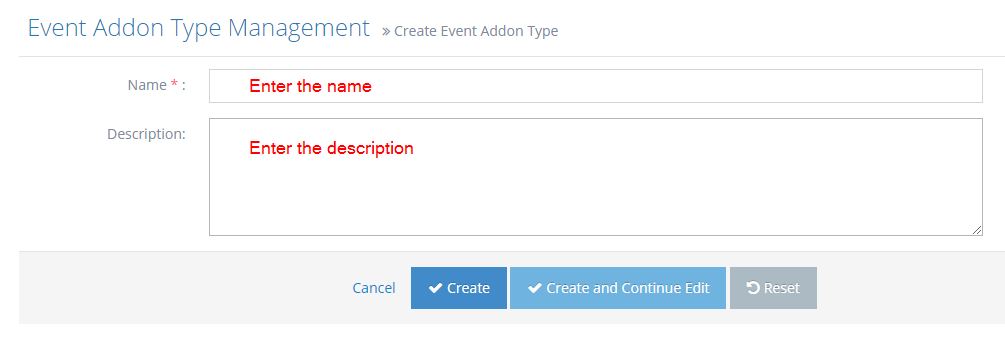
6Fill out the details:
- Name - enter the name of the add-on type.
- Description - a brief or short description of the add-on type.
-
7Click Create, Create and Continue Edit or Reset.
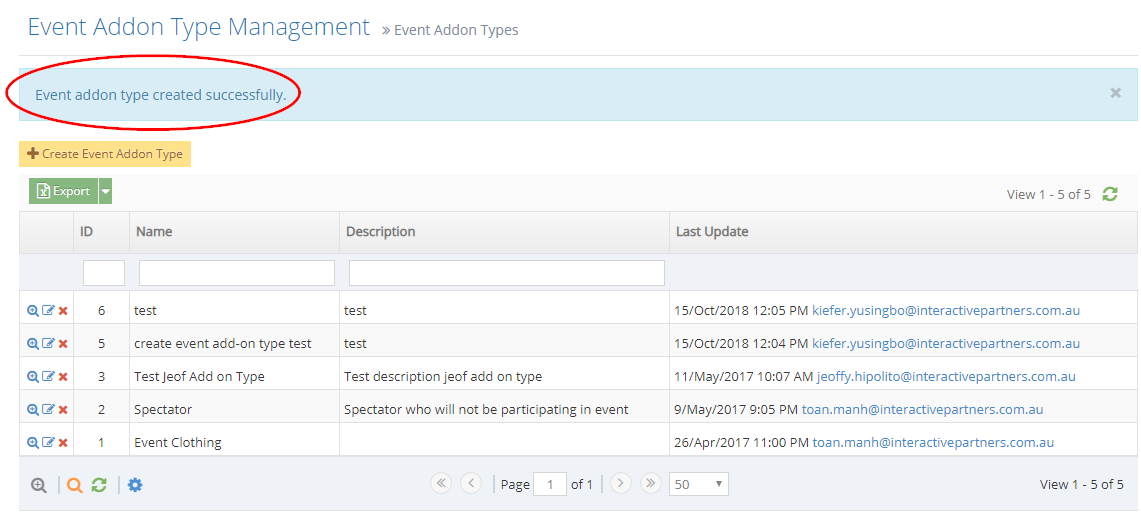
- Create - click the 'Create' button to submit the new add-on type. This action creates your add-on, closes the page and redirects you to the 'Event Add-on Type Management' page (see image below). On the Event Add-on Type Management, you will see a note "Event add-on type created successfully".
- Create and Continue Edit - Click the 'Create and Continue Edit' button to submit the new add-on type. This action creates your add-on type but lets you stay on the page.
- Reset - click the 'Reset' button to start over. This action refreshes the page and shows a blank 'Create Event Add-on Type' page. Your add-on type will not be saved/created.
Create an Event Add-On
-
1Log in as an administrator and go to the Admin Dashboard.
Learn how to log in here → -
2Under Modules on the left menu, choose Events
-
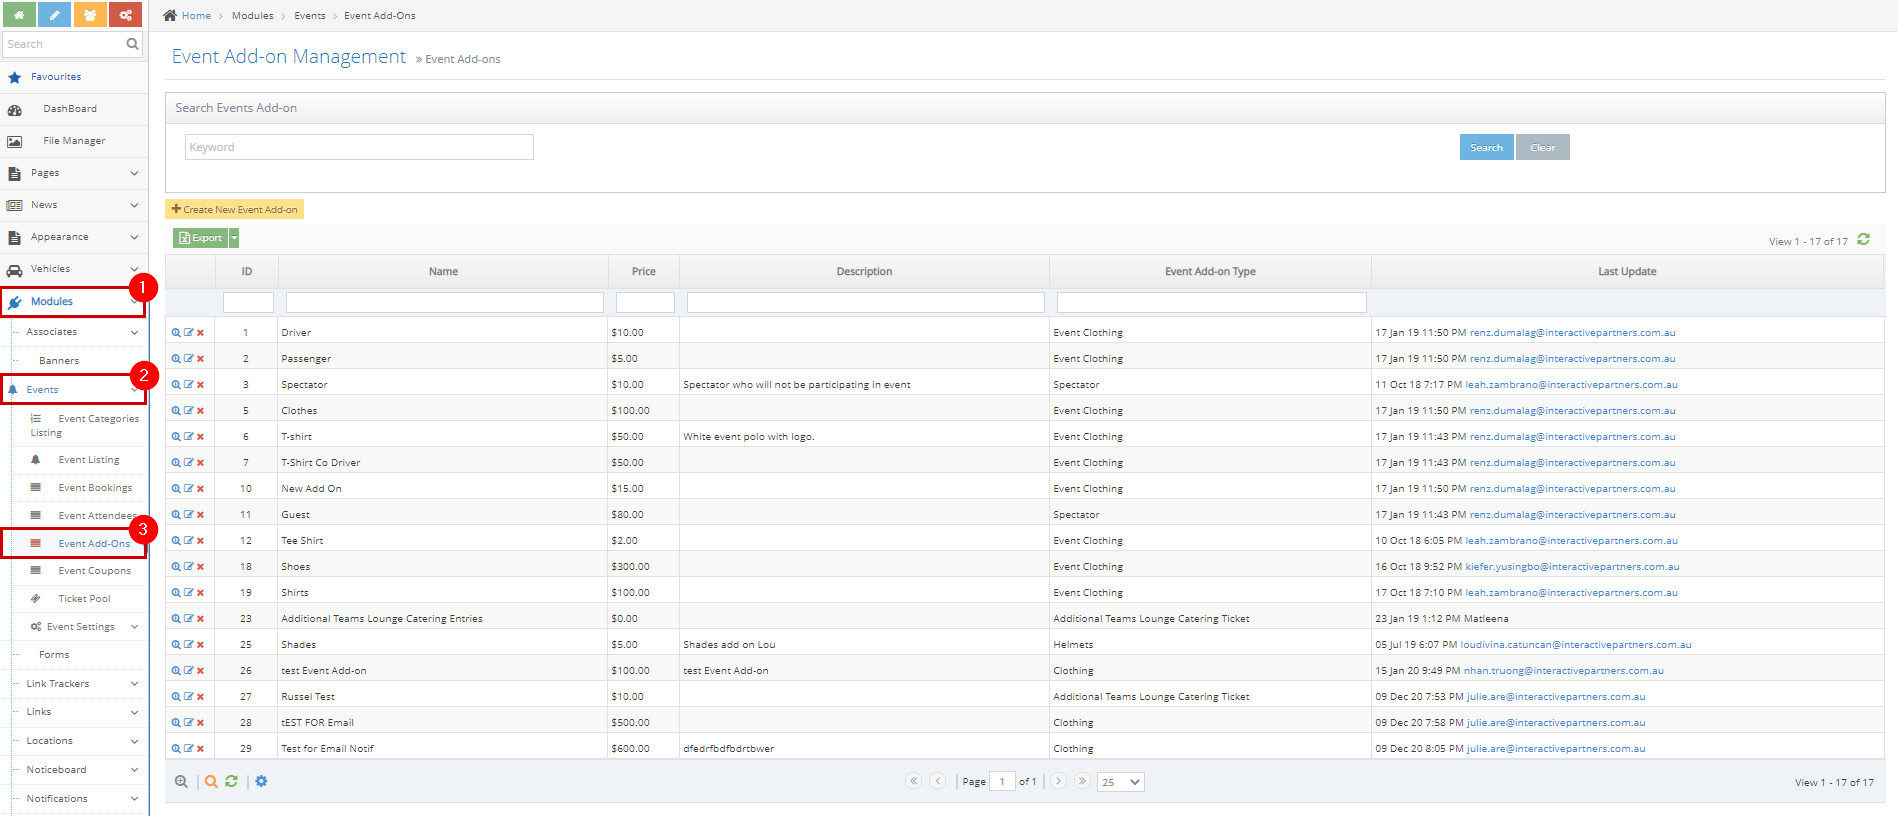
3Click Event Add-Ons
-
4Click the 'Create New Event Add-on' button
-
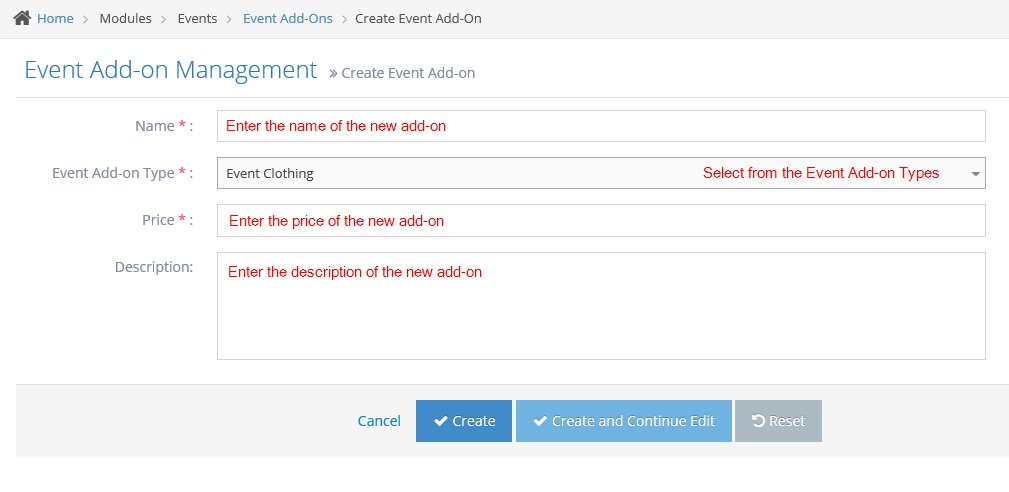
5Fill out the add-ons details:
- Name - enter the name of the new event add-on. This field is required.
- Event Add-on Type - select the add-on type from the options. This field is required.
- Learn how to create a new add-on type here.
- Price - enter the price for the new event add-on. This field is required.
- Description - enter the description of the new event add-on.
-
6Click Cancel, Create, Create and Continue Edit or Reset
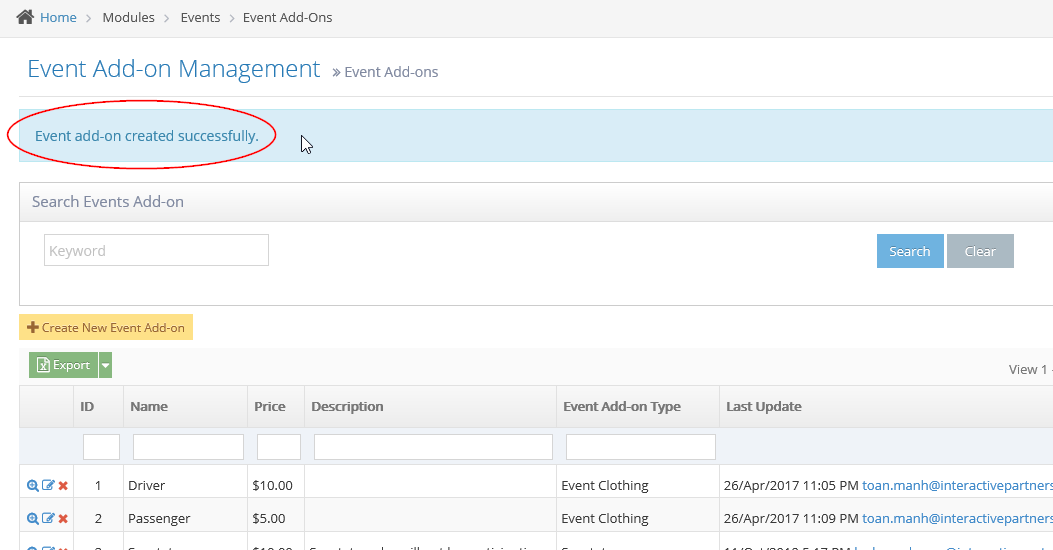
- Create - click the 'Create' button to submit the new add-on. This action creates your add-on, closes the page and redirects you to the Event Add-on Management (see image below). On the Event Add-on Management, you will see a note "Event add-on created successfully".
- Create and Continue Edit - Click the 'Create and Continue Edit' button to submit the new add-on. This action creates your add-on but lets you stay on the page.
- Reset - click the 'Reset' button to start over. This action refreshes the page and shows a blank 'Create Event Add-on' page. Your add-on will not be saved/created.
Add an Add-On to an Event
-
1Log in as an administrator and go to the Admin Dashboard.
Learn how to log in here → -
2Under Modules on the left menu, choose Events
-
3Click Event Listing
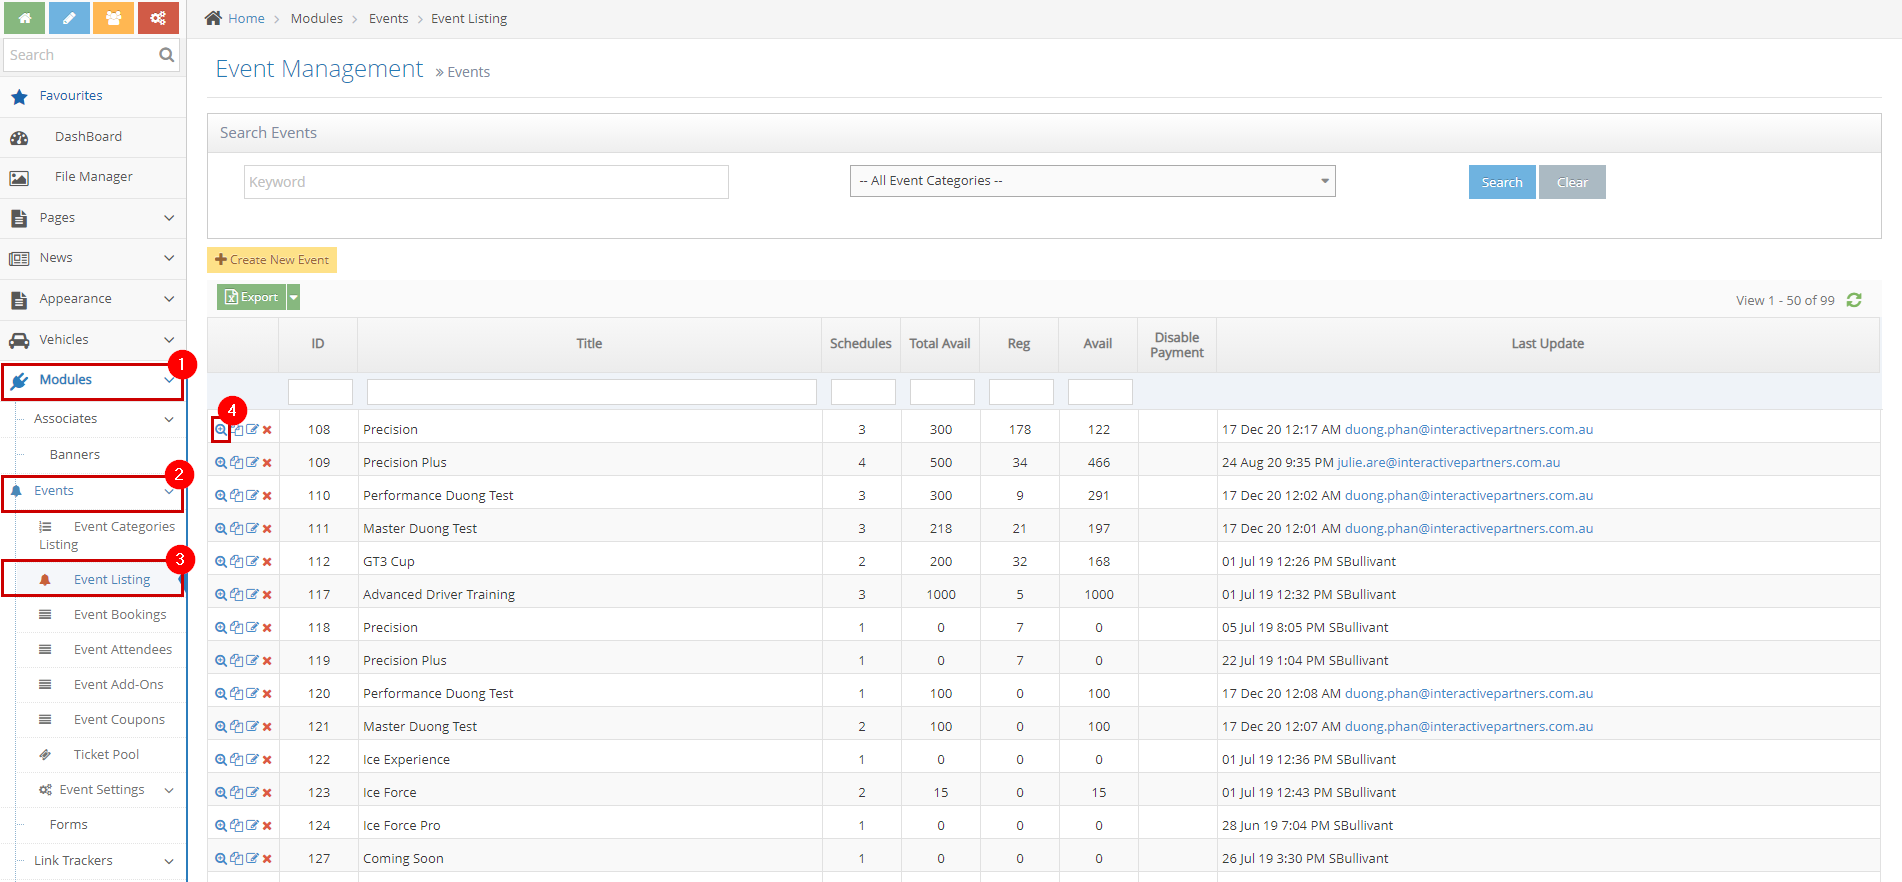
-
4Search for the Event you want to add an add-on
-
5Click the View Details icon

-
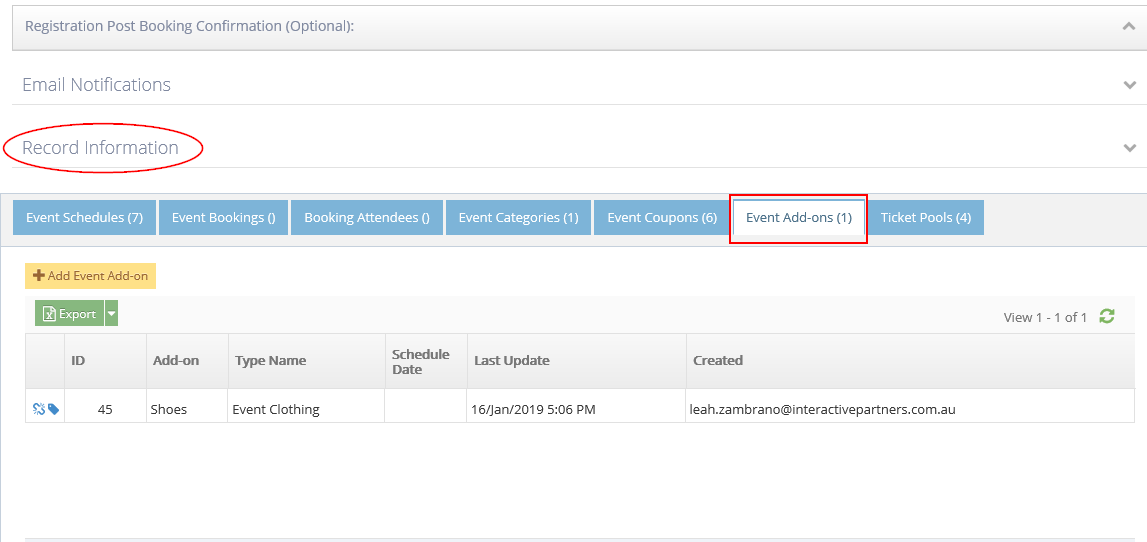
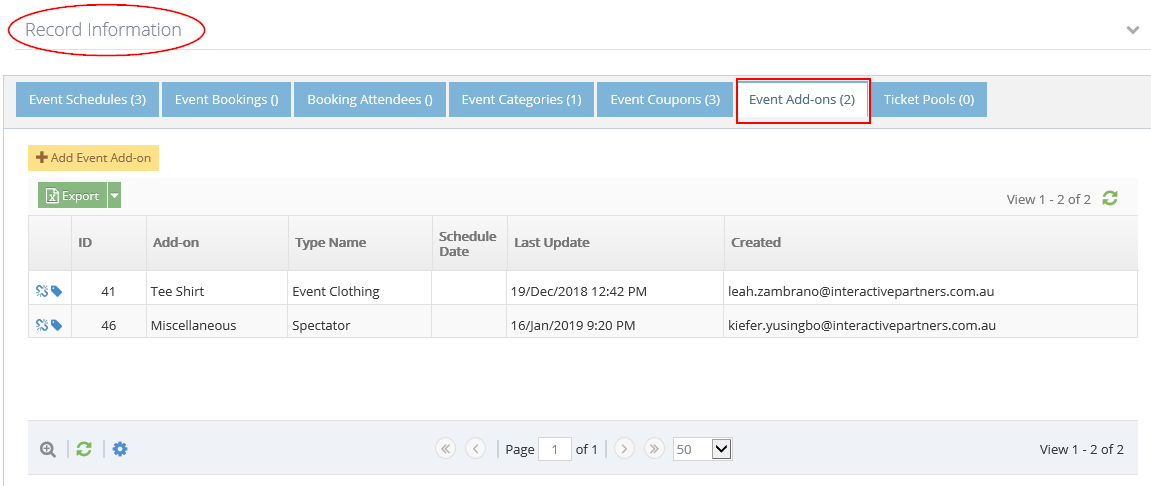
6Scroll down to see the tabs under the Record Information section
-
7Click the Event Add-ons tab
-
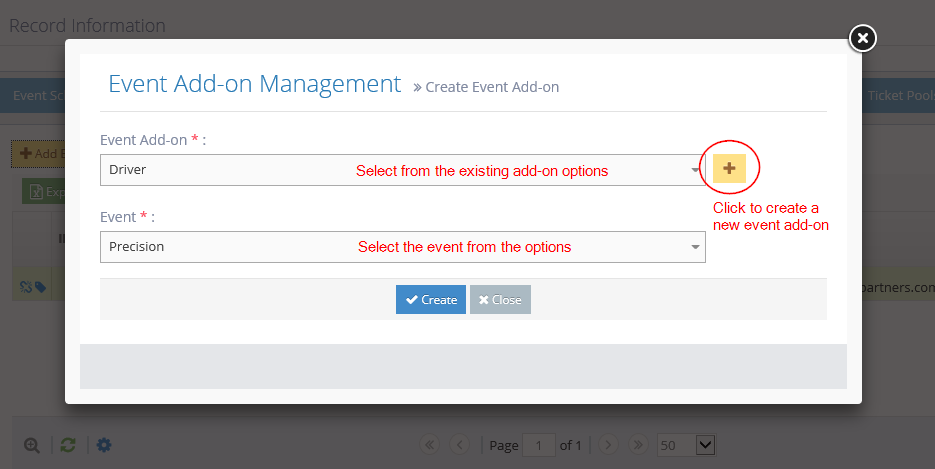
8Enter the Add-On information:
- Event Add-On - select an existing add-on from the options.
- Click the
 icon to the right of the Event Add-On field.
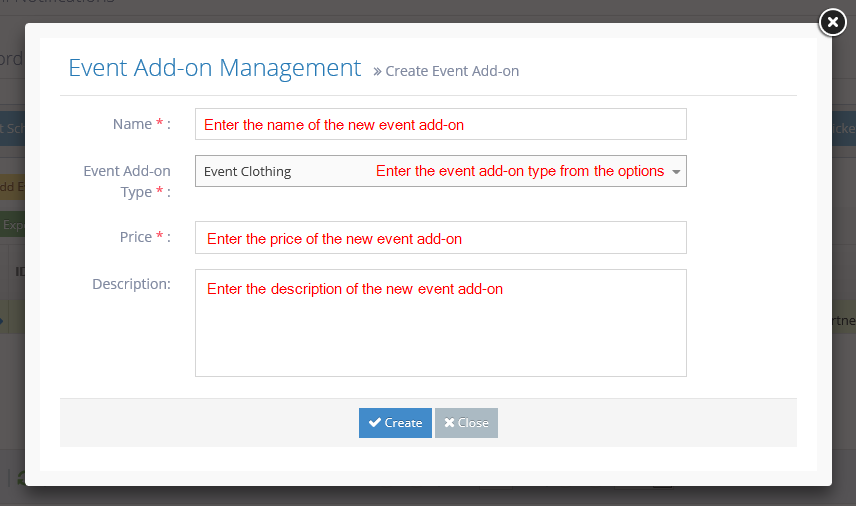
 - Enter the following information:
- Name - enter the name of the new add-on.
- Add-on Type - select the Add-on type from the options.
- Price - enter the price of the add-on.
- Description - enter a brief description of the add-on.
- Click "Create". You can also create a new Event Add-On from the Event Add-ons module here.
- Click the
- Event - by default, it is showing the event name you're into or you can select other events from the options.
 You should see the new add-on for the event on the listing under the "Event Add-Ons" tab now.
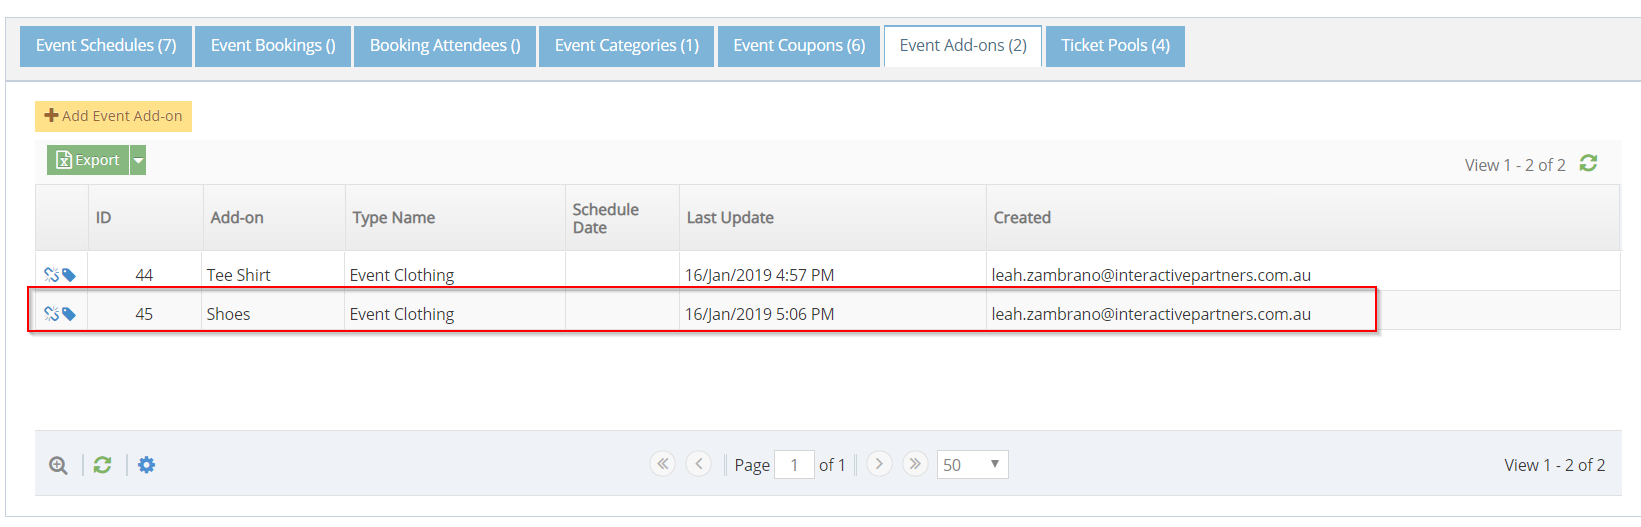
- Event Add-On - select an existing add-on from the options.
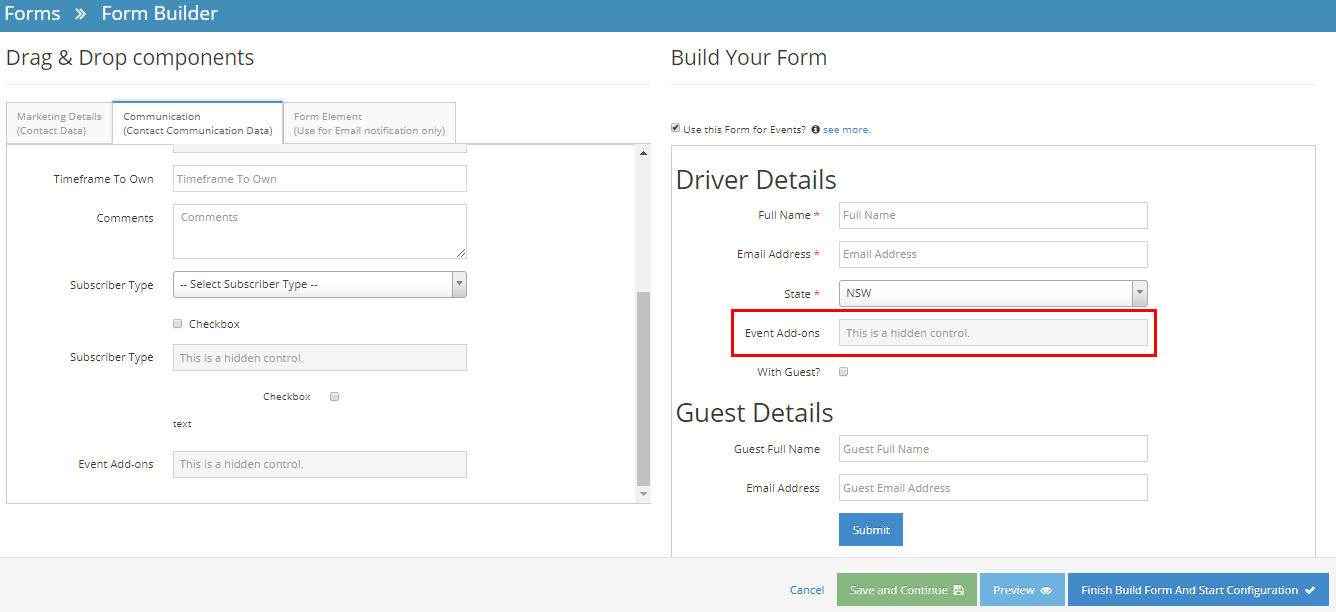
Place Add-Ons Anywhere in the Form
-
1Log in as an administrator and go to the Admin Dashboard.
Learn how to log in here → -
2Under Modules on the left menu
-
3Find and choose Forms
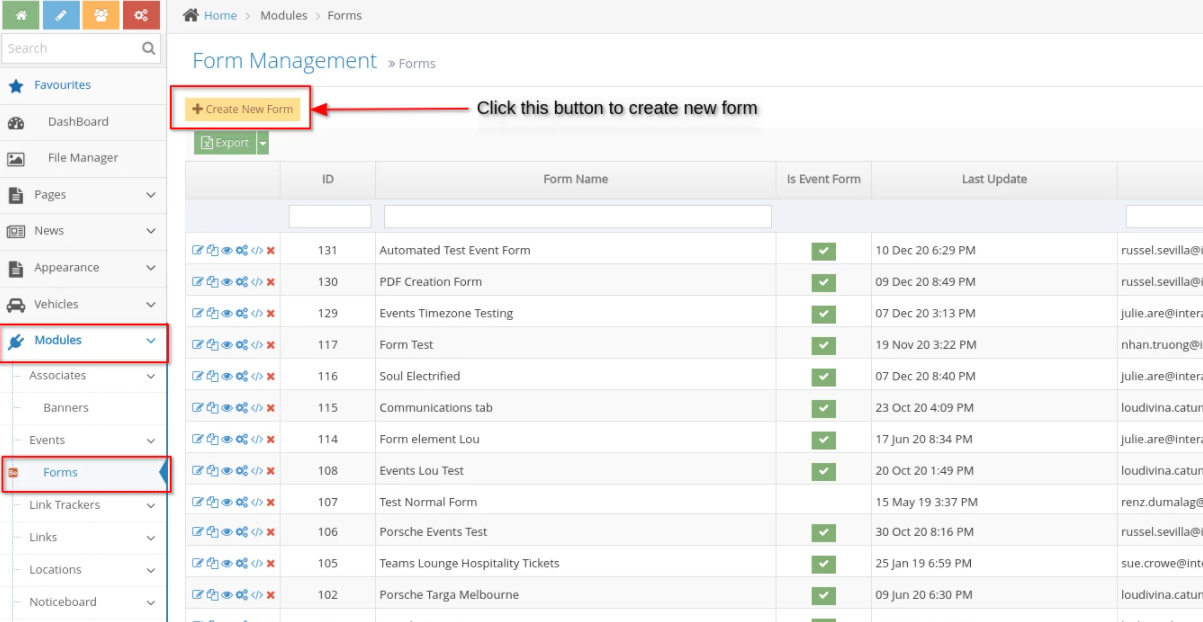
-
4Click ‘Create New Form’ on the top left of Form Management.
-
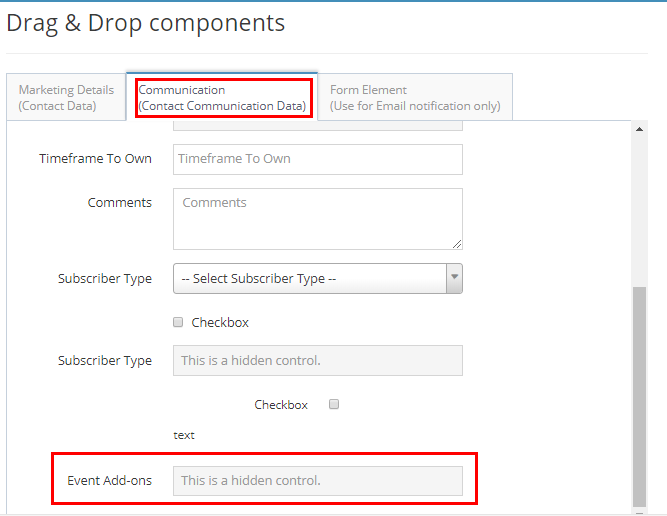
5Drag and drop the 'Event Add-Ons' field and place it anywhere you want it to display
-
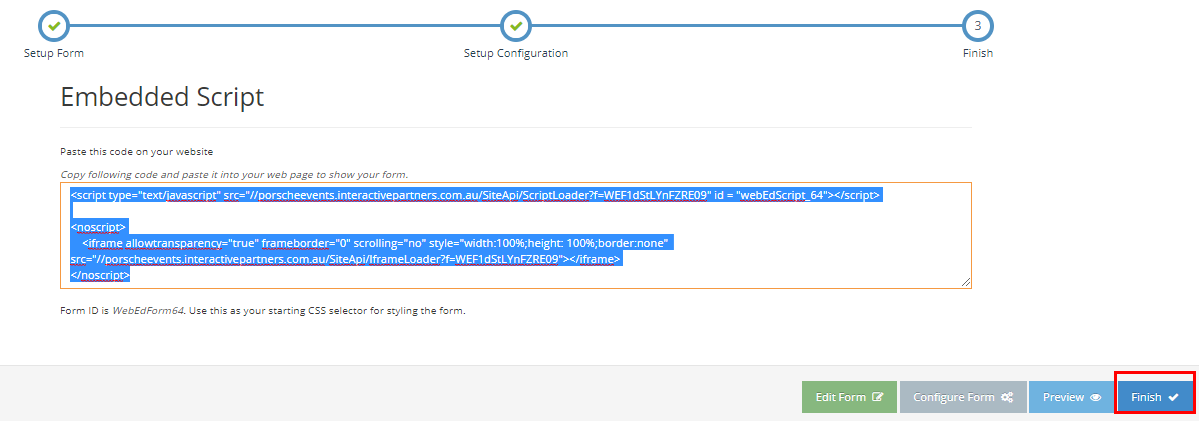
6You can 'Preview' your form and once you're all set, click 'Finish Build Form and Start Configuration' and then click 'Finish'
-
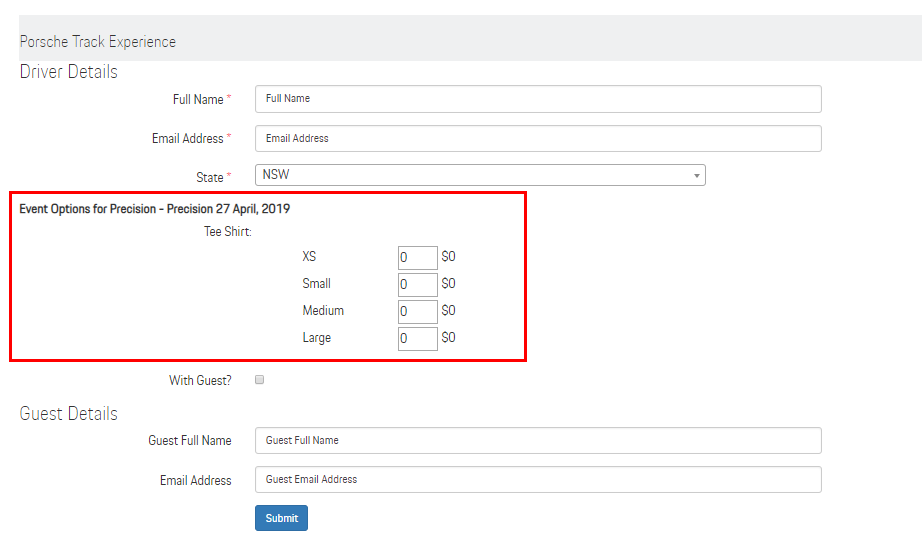
7You should now see the updated location of your event add-ons on the form.
-
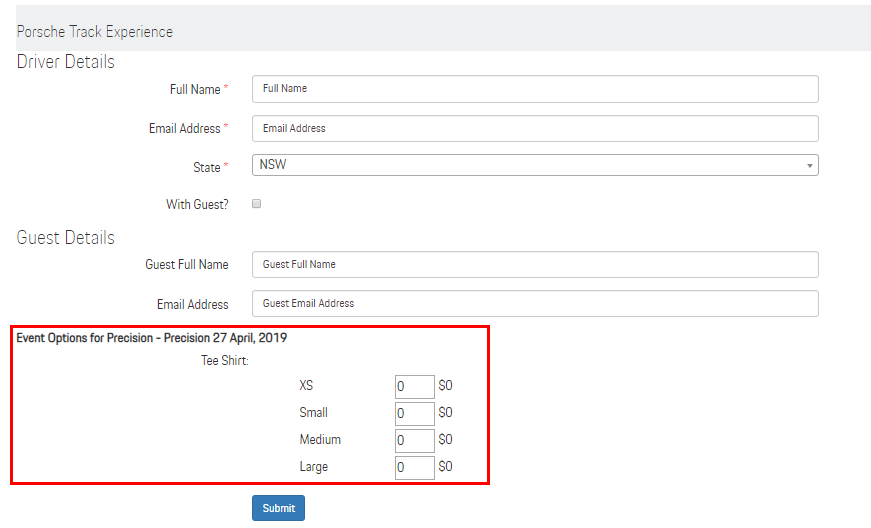
8If you have not set the 'Event Add-Ons' field on your form, the add-ons will still show but the location will be at the bottom of the form
-
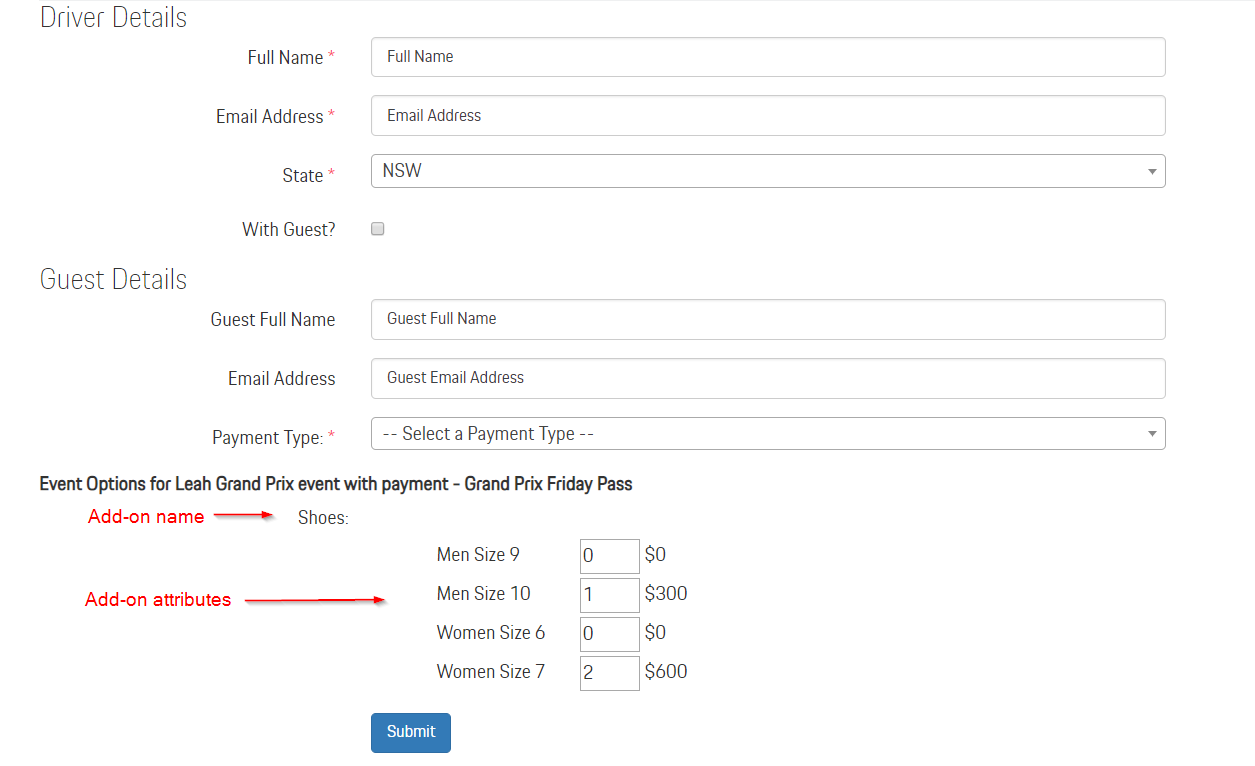
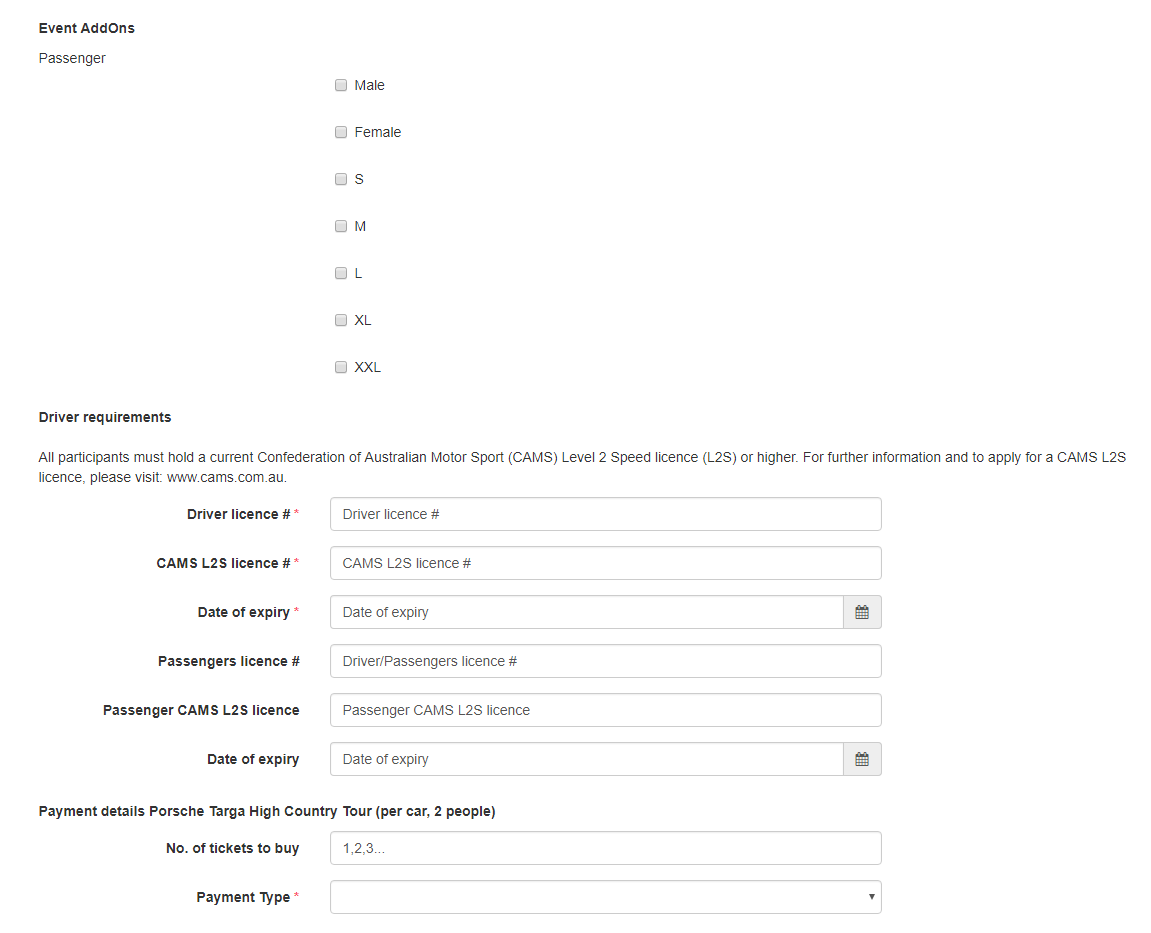
9Event Add-On on the Actual Event Page:
- By default, the add-on will be located at the bottom of your form (if you want to place it anywhere, click here)
- Users can input a quantity and will be calculated based on the price of the add-on
-
10Congratulations! You have successfully added Add-Ons to your Event.
Add Event Add-On Attribute to an Existing Event Add-On
-
1Log in as an administrator and go to the Admin Dashboard.
Learn how to log in here → -
2Under Modules on the left menu, choose Events
-
3Click Event Listing
-
4Search for the Event you want to add an add on
-
5Click theView Details icon

-
6Scroll down to see the tabs under the Record Information section
-
7Click the Event Add-ons tab
-
7Click the
 (Manage the Add-on attribute) icon of the add-on
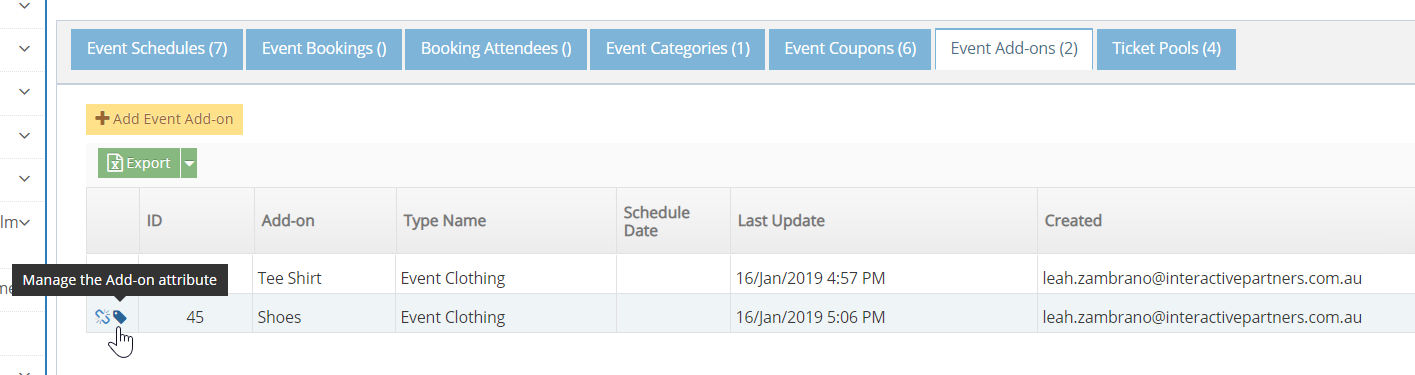
-
8Click 'Create Event Add-on Attribute'
-
9Input add-on attribute details, then click 'Create'.
-
10You should be able to see the new attribute for the add-on

Remove an Add-On from an Event
-
1Log in as an administrator and go to the Admin Dashboard.
Learn how to log in here → -
2Under Modules on the left menu, choose Events
-
3Click Event Listing
-
4From the Events listing, search for the event you want to add an add-on to
-
5Click the
 "View Details" icon to see the event's details
-
6Scroll down to see the tabs under the "Record Information" section
-
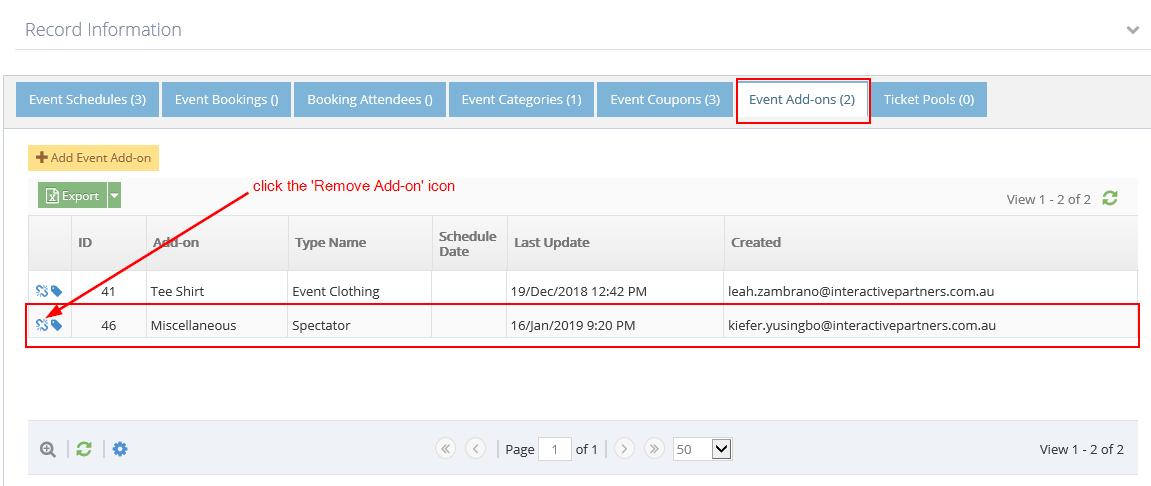
7Click the "Event Add-ons" tab
-
8Under the "Event Add-ons" tab, click the "Remove Add-on" icon.
-
9A popup will show for confirmation, click 'OK' if you want to continue removing the add-on from the event.
-
10Click 'Cancel' if you want to go back.
-
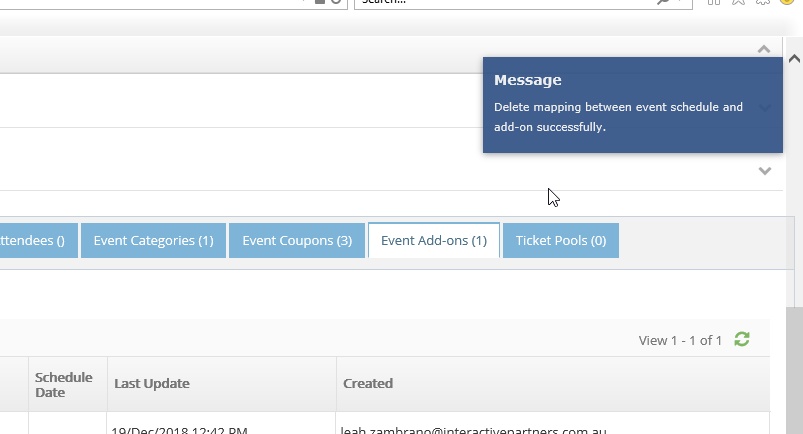
11You should be able to see a notification that you have successfully removed the add-on from the event.
Delete an Event Add-On
-
1Log in as an administrator and go to the Admin Dashboard.
Learn how to log in here → -
2Under Modules on the left menu, choose Events
-
3Click Event Add-Ons
-
4From the Event Add-Ons listing, search for the event add-on you want to delete
-
5Click the
 "Delete" icon to delete the add-on
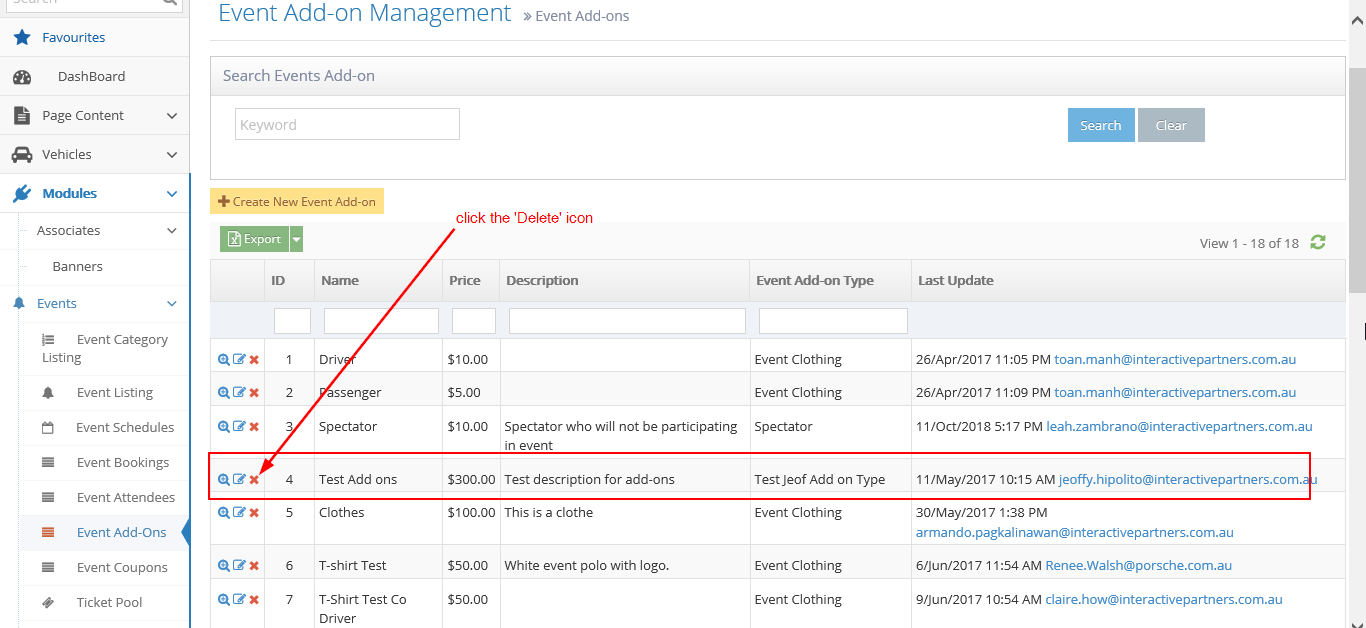
-
6A popup will appear to confirm deleting the event add-on.
-
7Click 'OK' if you want to continue deleting the add-on.
-
8Click 'Cancel' if you want to go back.
-
9You should be able to see a notification that you have deleted the add-on successfully.
-
10Congratulations! You have successfully managed the Event Add-Ons.
Event Attendee Type
Why you would use an Attendee Type?
This documentation will show information on managing attendees in the events module.
The reason why the attendee type is necessary is that the user or admin can specify the different types of people that will attend the event.
Create an Event Attendee Type
-
1Log in as an administrator and go to the Admin Dashboard.
Learn how to log in here → -
2Under Modules on the left menu, choose Events
-
3Click Event Settings
-
4Select Attendee Types
-
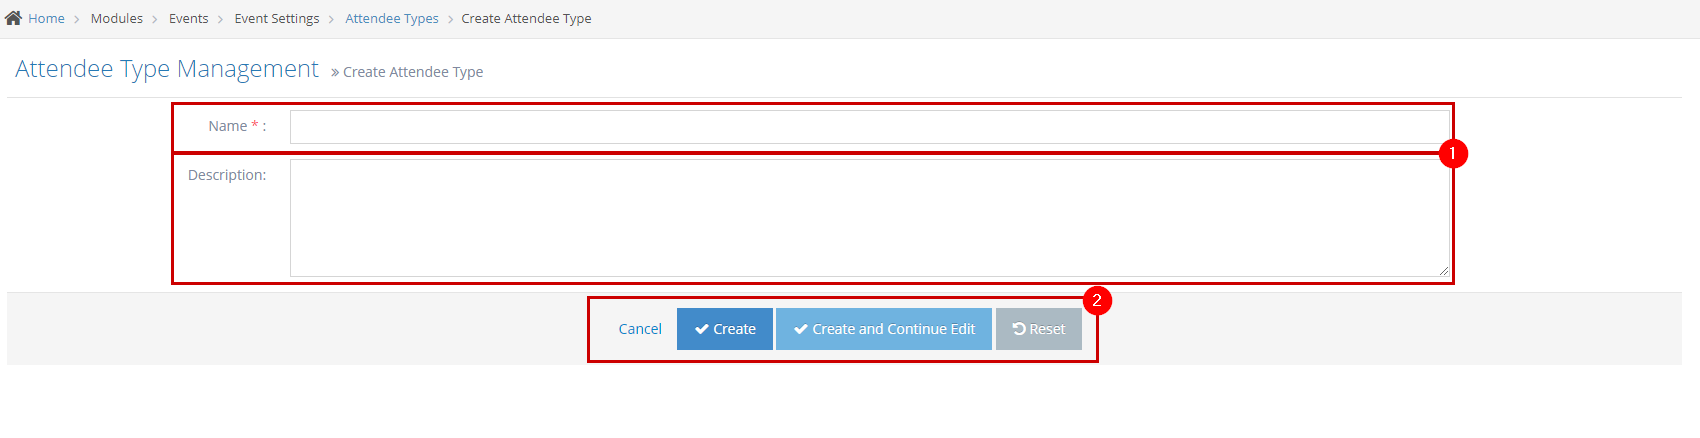
5Click the 'Create Attendee Type' button

-
6Fill out the details
- Name - enter the name of the attendee type.
- Description - a brief or short description of the attendee type.
-
7Click Create, Create and Continue Edit or Reset
- Create - click the 'Create' button to submit the new add-on type. This action creates your add-on, closes the page, and redirects you to the Attendee Type Management page (see image below). On the Event Attendee Type Management, you will see a note "Attendee type created successfully".
- Create and Continue Edit - Click the 'Create and Continue Edit' button to submit the new Attendee Type. This action creates your Attendee Type but lets you stay on the page.
- Reset - click the 'Reset' button to start over. This action refreshes the page and shows a blank fields page. Your Attendee Type will not be saved/created.
Update existing Event Attendee Type
-
1Log in as an administrator and go to the Admin Dashboard.
Learn how to log in here → -
2Under Modules on the left menu, choose Events
-
3Click Event Settings
-
4Select Attendee Types
-
5Click the Edit
 icon on the leftmost side of the Attendee Type you wish to update
-
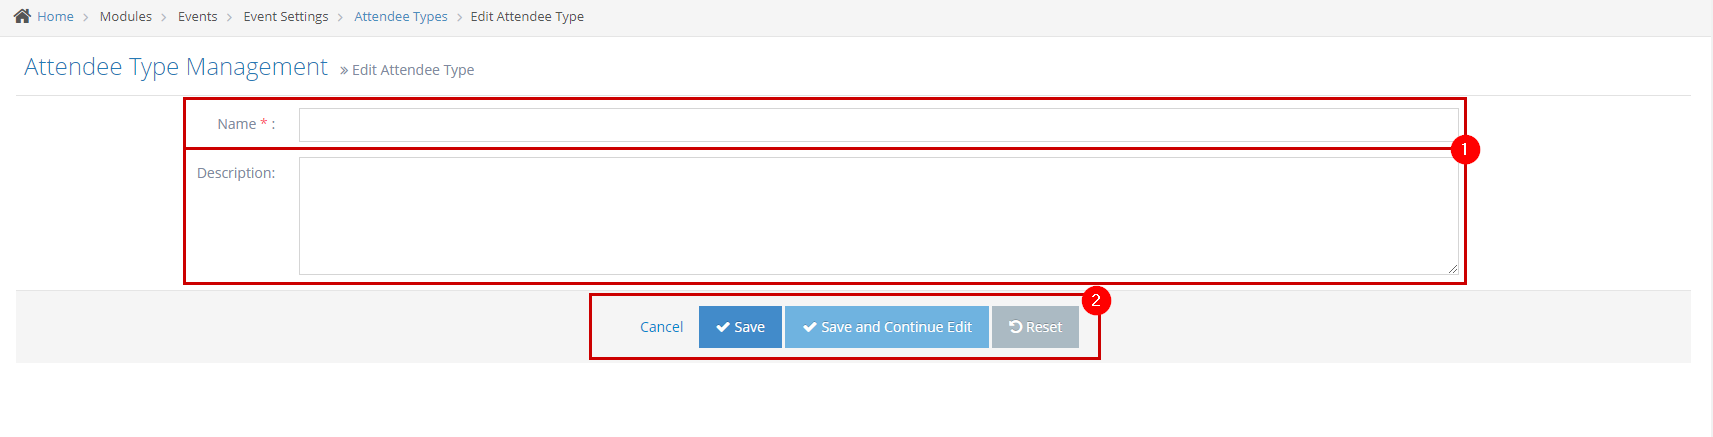
6Update the details
- Name - enter the name of the attendee type.
- Description - a brief or short description of the attendee type.
-
7Click Save, Save and Continue Edit or Reset
- Save - Click the 'Save' button to save the changes. This action saves the changes, closes the page, and redirects you to the listing page and you will see a note "Attendee type updated successfully."
- Save and Continue Edit - Click the 'Save and Continue Edit' button to save the changes. This action saves the changes but lets you stay on the page.
- Reset - click the 'Reset' button to start over. This action refreshes the page and shows a blank fields page. Your Attendee Type will not be saved/created.
Delete and Event Attendee Type
-
1Log in as an administrator and go to the Admin Dashboard.
Learn how to log in here → -
2Under Modules on the left menu, choose Events
-
3Click Event Settings
-
4Select Attendee Types
-
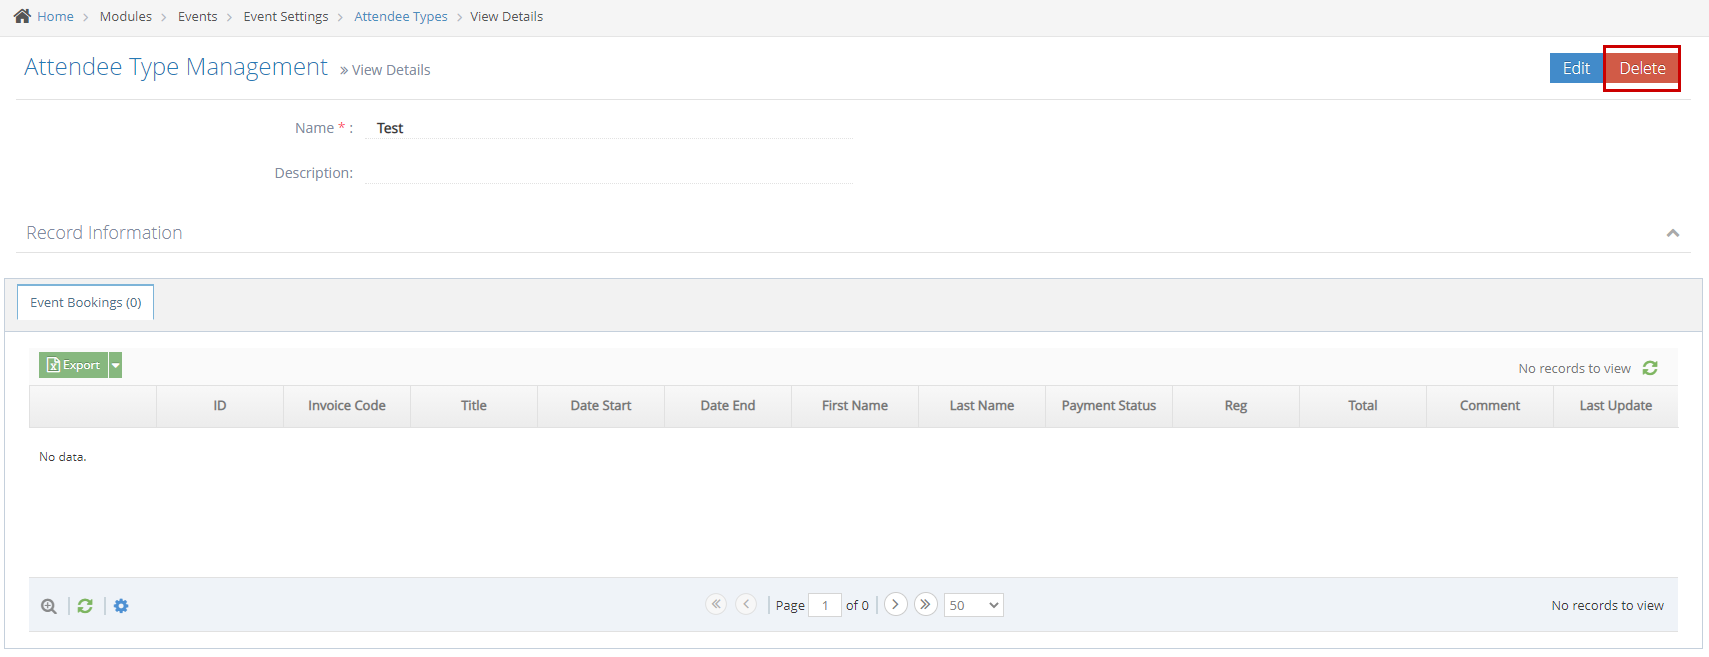
5Click the View Details
 icon on the leftmost side of the Attendee Type you wish to remove<
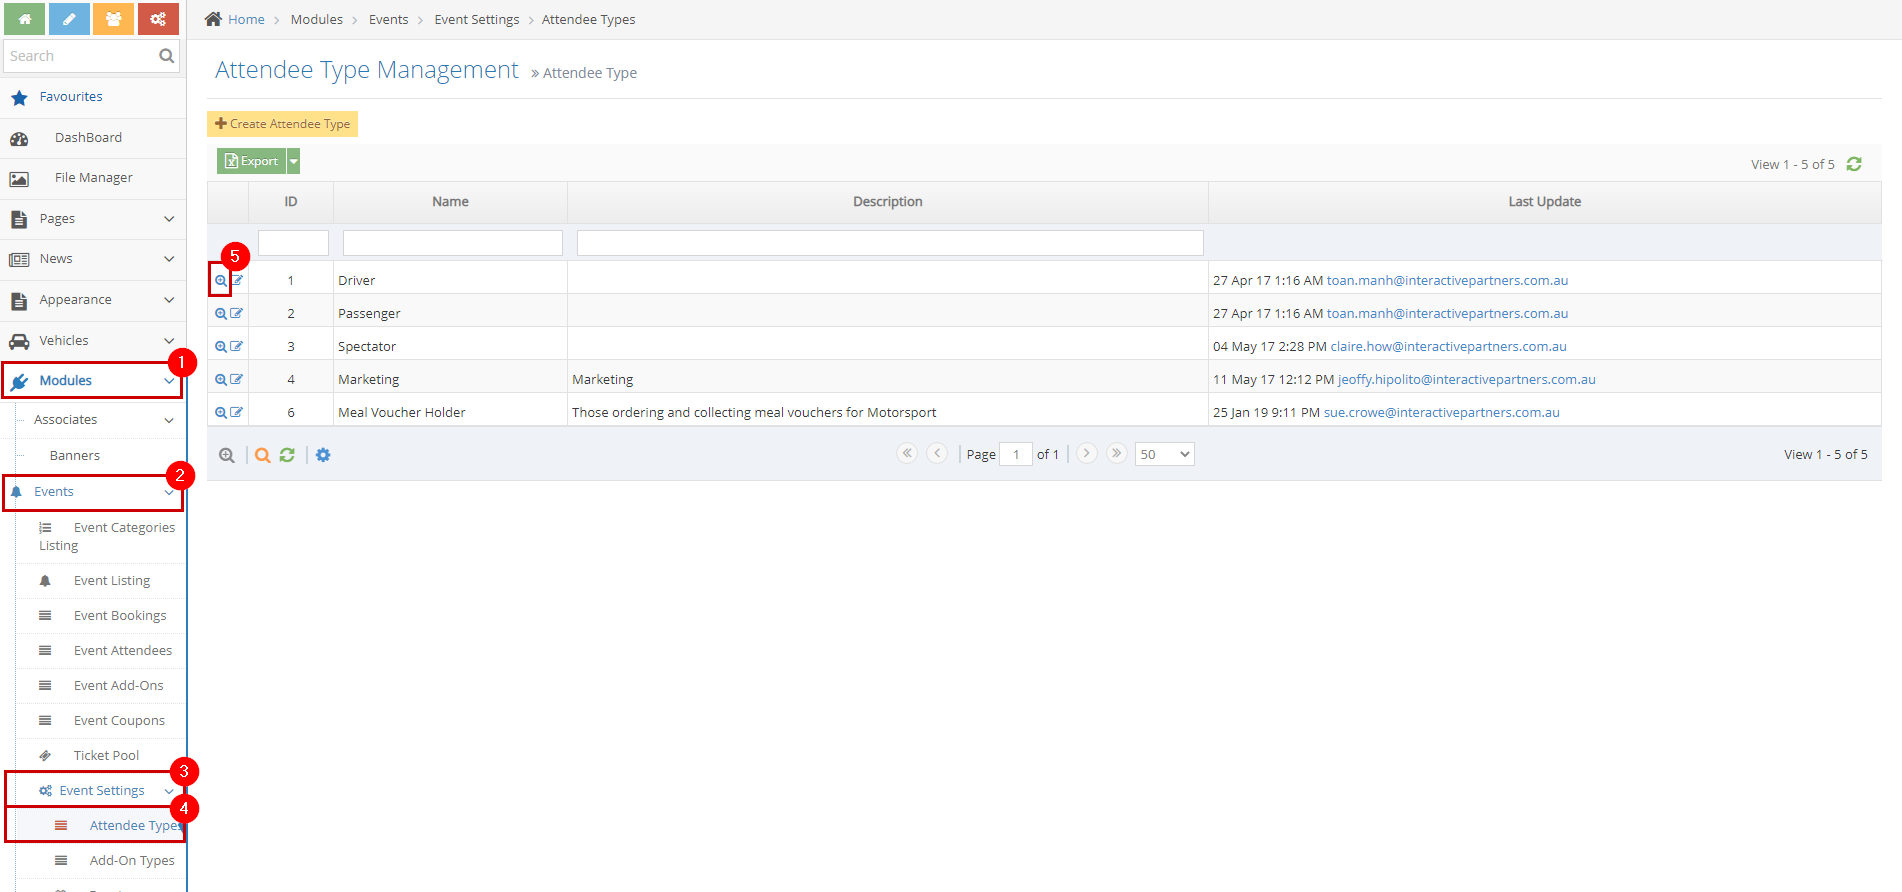
-
6Click the Delete button on the top right of the View Details page
-
7Click OK on the "Are you sure you want to delete this attendee type? This action cannot be undone." popup.
-
8Click OK on the "Attendee type deleted successfully." popup.
-
9Congratulations! You have successfully managed the Event Attendee type.
Event Forms
Creating an Event Form
The Event form serves as the booking form and includes information fields needed specifically for the Event.
Please note that for the attendee type, second drivers do not count as a participant - please use a simple text box and set the ID and label as Second Drivers
-
1Log in as an administrator and go to the Admin Dashboard.
Learn how to log in here → -
2Under Modules on the left menu, choose Events
-
3Click Event Listing
-
4Click the Create New Event button
-
5You will be redirected to the Event Management configuration page
-
6Click
 on the Booking Form
 -
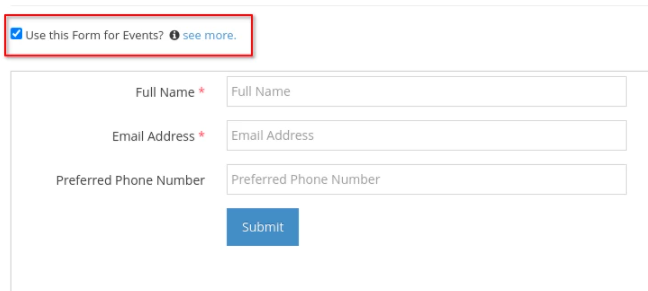
7On the Modal pop up Click the Use this Form for Events checkbox
-
8IMPORTANT: Make sure to tick the checkbox Use this Form for Events on the top of the form, otherwise, it will not show on the Events Management
-
9Add the required fields you want to appear in the form:
- First Name and Last Name or Full Name - this will show as the Booking Attendee
- Email Address
- Select Attendee Type of First Name or Full Name
- Add other desired fields on your event form then click ‘Finish Build Form and Start Configuration’
- Configure form email settings and the Thank You Message, then click ‘Finish Configuration’
-
10Once done, click Submit to save changes.
How to Create an Event Form from an Event
NB!:Try and use one form for many events. It is much easier to use an existing form than to keep building new ones. The system is designed to enable a single form to be used across multiple events. It makes set-up quicker and easier.
-
1Log in as an administrator and go to the Admin Dashboard.
Learn how to log in here → -
2Use ‘Search’ or look under ‘Modules’ on the left menu, find and choose Forms
-
3Click ‘Create New Form’ on the top left of Form Management
-
4You will be redirected to the Form configuration
-
5IMPORTANT: Make sure to tick the checkbox Use this Form for Events on the top of the form, otherwise, it will not show on the Events ManagementYou can copy an existing form if easier. Keep forms as simple as possible.
-
7Add the required fields you want to appear in the form:
- First Name and Last Name or Full Name - this will show as the Booking Attendee
- Email Address
- Select Attendee Type of First Name or Full Name
- Add other desired fields on your event form then click ‘Finish Build Form and Start Configuration’
- Configure form email settings and the Thank You Message, then click ‘Finish Configuration’.
Important Tips to Remember in Creating an Event Form
There are 3 tabs in Form creation:
- Marketing Details (Contact Data)
These are your most important details - First Name / Last Name / Email / Address etc.
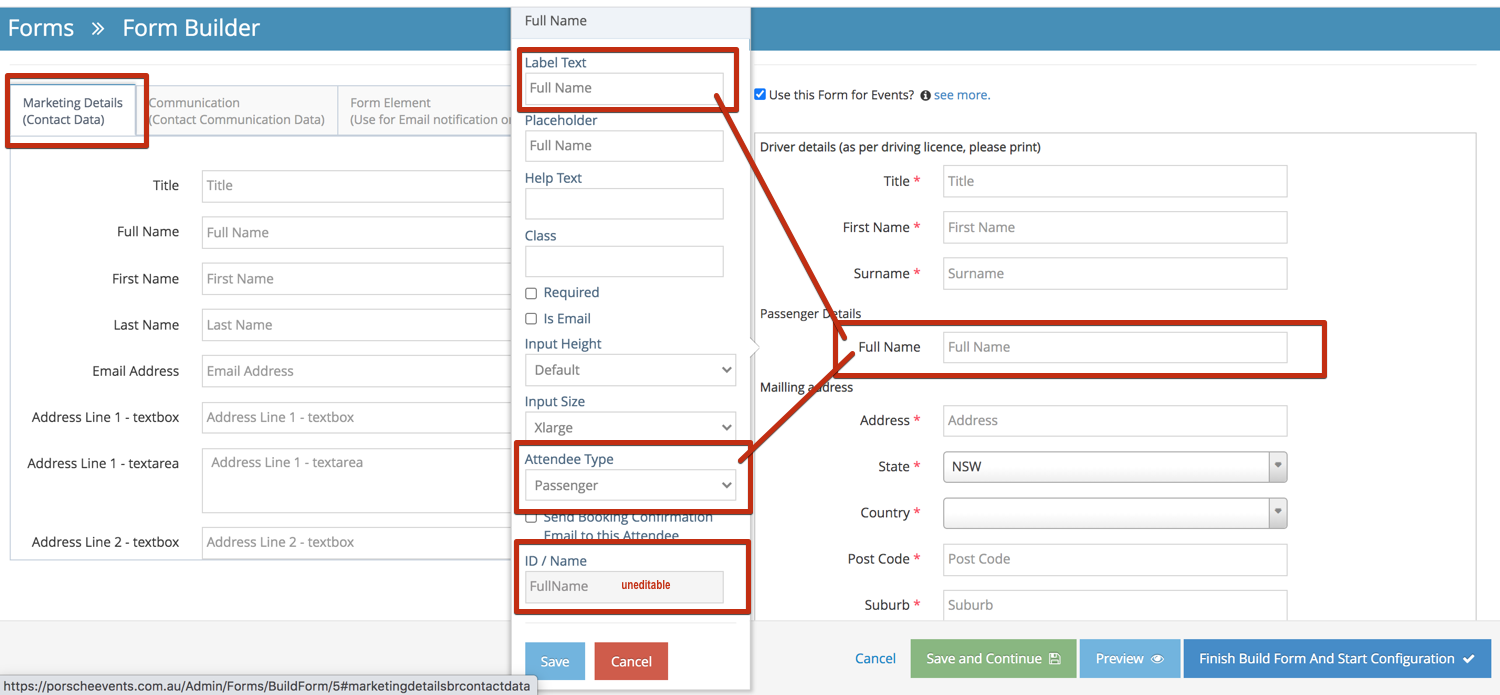
The ID/Name of these fields cannot be changed ... and you ought only to use them once in a form. Names are an exception to the rule because you have different options for Attendee types (Driver / Passenger etc.) and this allows the field to be used more than once.
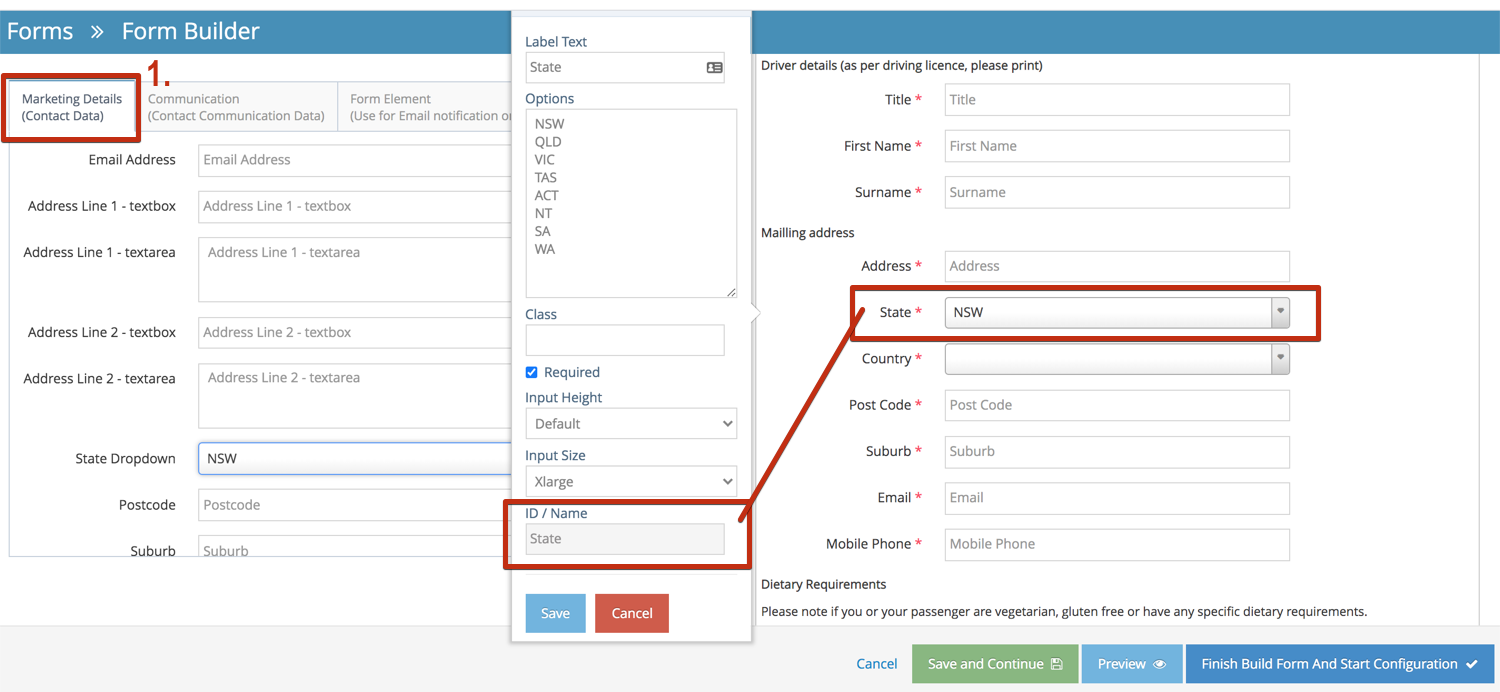
The general rule is - If you cannot edit the ID/Name, please only use it once (unless it is a name)
Always use an Attendee type to differentiate your contact's details
When it comes to fields like 'State' - You are able to change the LABEL (not the ID/Name field and also adjust the States you need to use. This needs to be flexible to allow you to use multiple options.
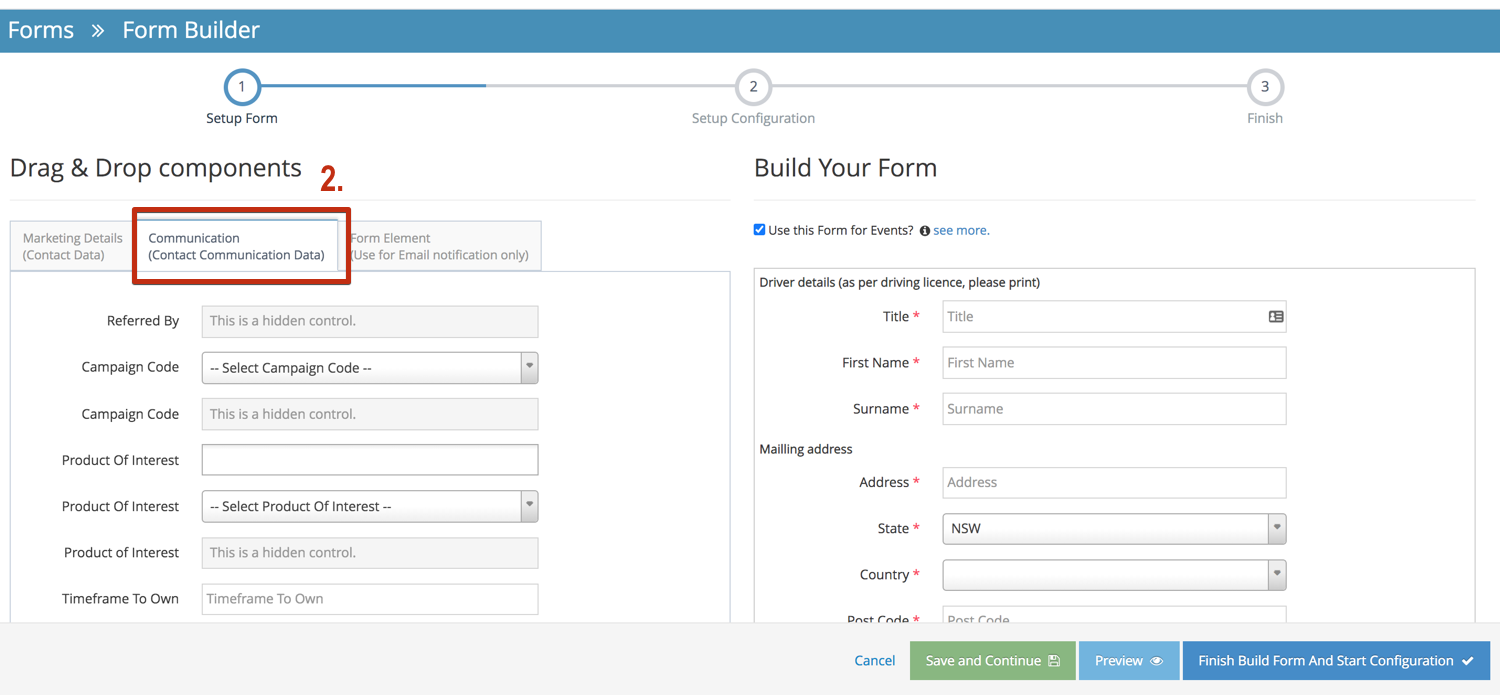
- Communication (Contact communication Data)
These fields enable you to track contacts who fill out the forms. Whilst this is automatically covered for an event on your own website - if you wanted to place the form on someone else's website and be able to track where contacts came from - you might add a 'Referred by' field. In this way, you can separate different areas (when & If required).
- Form Element
You will need to use these whenever you want to include additional fields. They can be used over and over again. These fields can be renamed & the ID/Name field changed. This ensures recovering the additional data is easy. There are drop-downs and other options which provide flexibility within your form
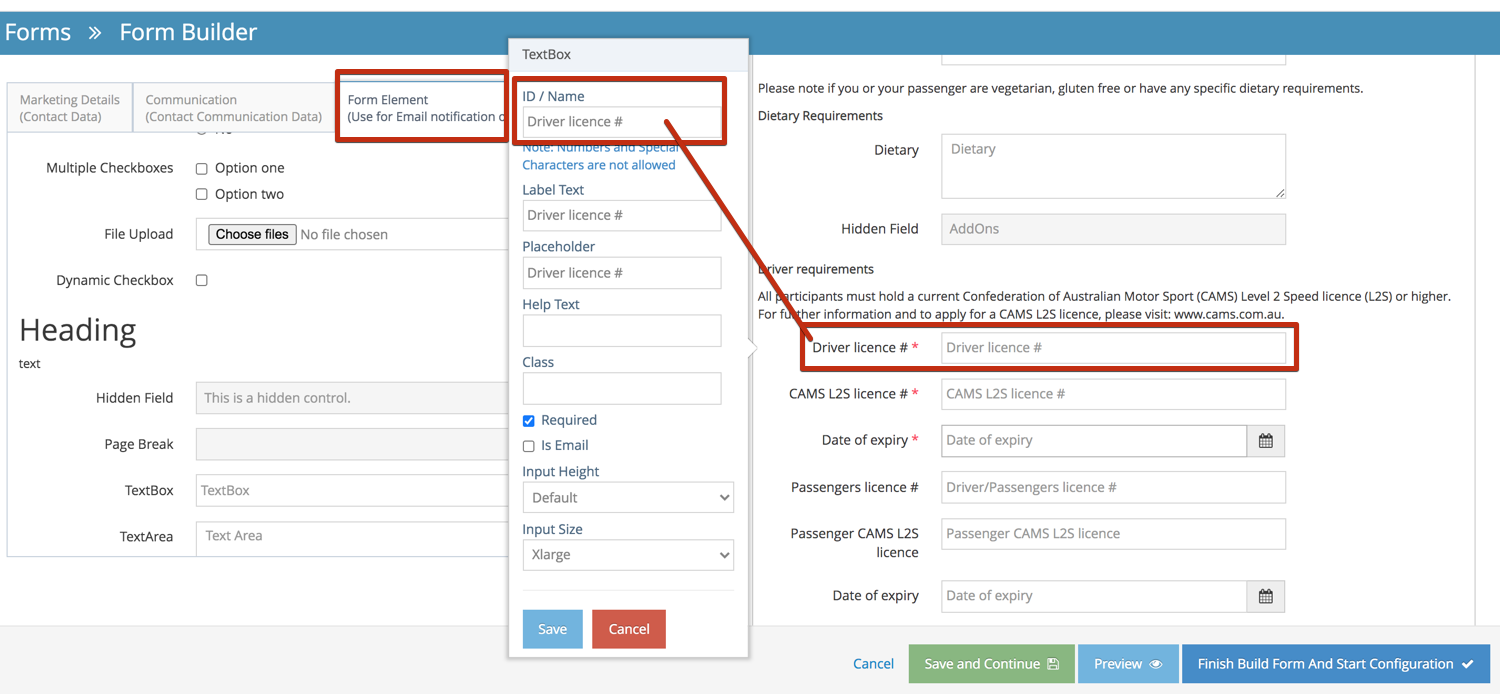
NB! Always use Form Elements for additional data and Marketing Details for essential
Update the Event Form on an existing event
-
1Log in as an administrator and go to the Admin Dashboard.
Learn how to log in here → -
2Under Modules on the left menu, choose Events
-
3Click Event Listing
-
4From the Event Listing, search for the event you want to edit
-
5Click the
 "Edit" icon to edit the event
 -
6Select the new Booking Form on the list

-
7Click Save to apply changes
Advanced Form Options
Auto Responders (Editing your Auto Responder)
You can also send autoresponders and notifications to other parties using the advanced options
-
1Scroll down and click on Advanced Options. You can edit the text in the Auto Response Body field (as shown below)
-
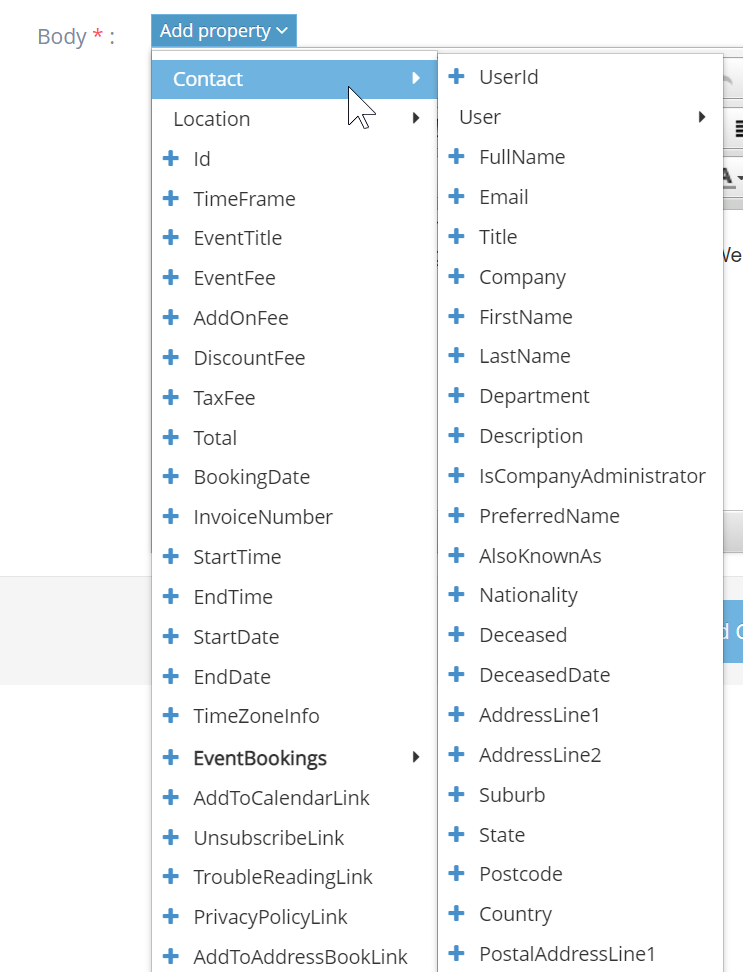
2You can use the property drop-down to customise the message using the data supplied from the form
-
3Any field you add to the form will be available
Notification Email
-
1Check the box Send Notification Email
-
2Then configure the email to send using the properties
-
3Properties can also be used in the subject line allowing a great deal of creativity and flexibility
- Email to will send a formatted email to the address you configure
- A notification email will allow you to send the same information submitted to someone else using a completely different formatting
- You may want to use it for notifying your sales team, or perhaps an external provider for catering or any other reason you can think of
Ajax Submit
- Submits the form without refreshing the page
- Generally, this is the best way for forms to work and you should usually ensure this setting is set
Pre-populate the form with User's previously submitted data
- Once a user re-visits the form they’ve submitted, their stored information will automatically be populated on the form fields.
Event Booking
Booking an Event
What is Event Booking
This documentation shows how a user can book a particular event schedule
Event booking is when a user wants to join a particular event that will happen in a particular event schedule for the user to be allowed to join, he/she must first book.
How to Book an Event
-
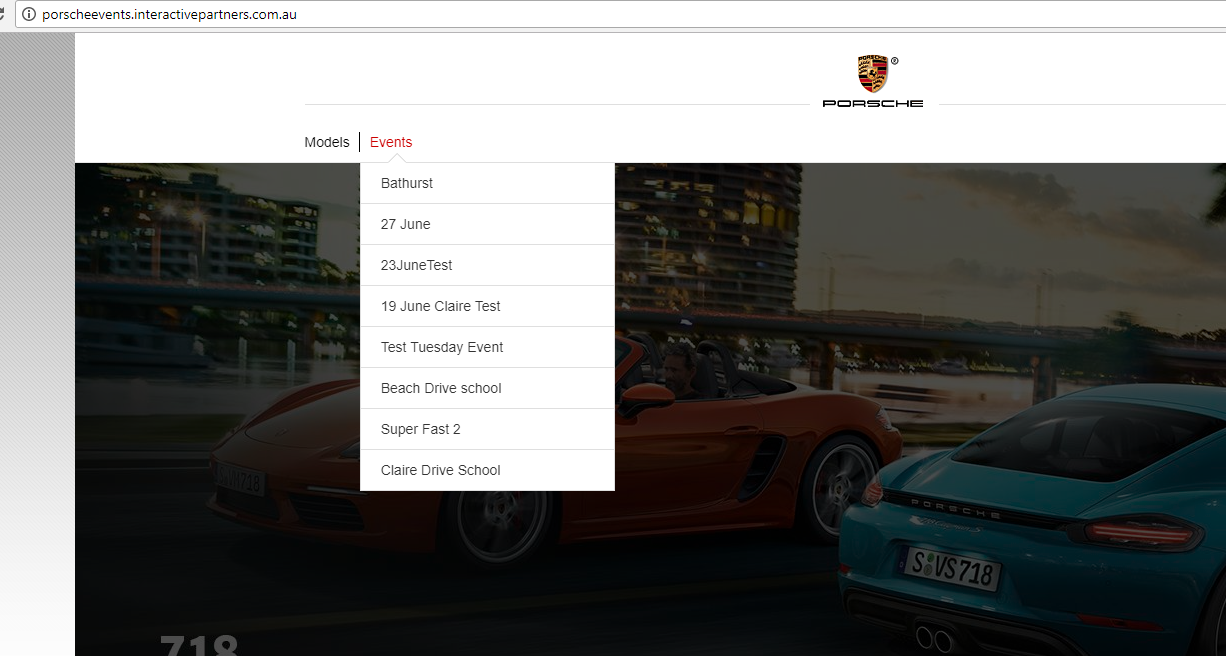
1Go to Events Events Page
-
2Choose the event that you want to attend
-
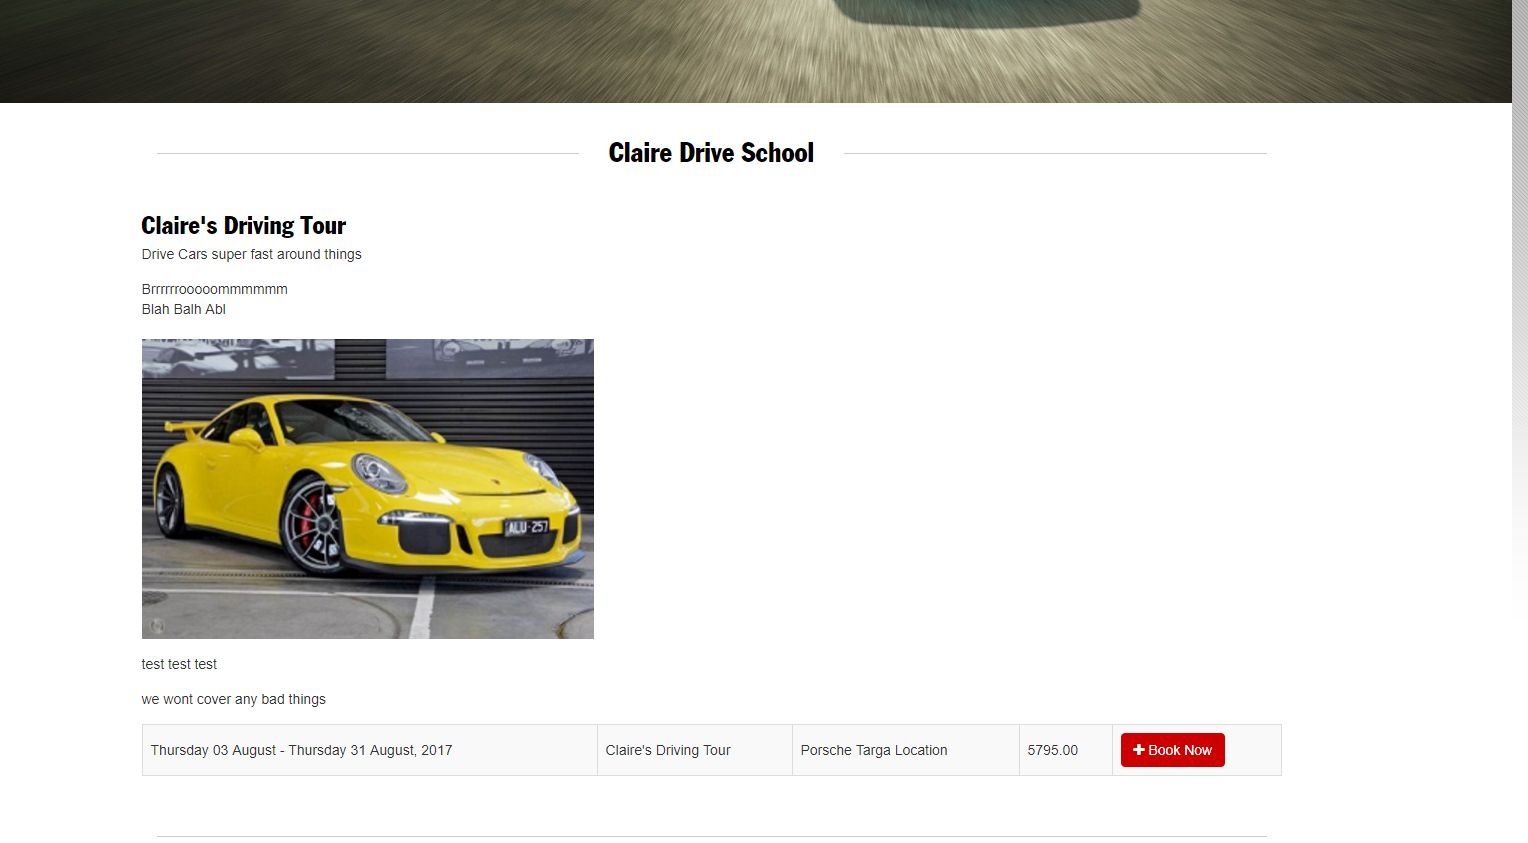
3Scroll down to see if there's an available event schedule, if there is no list then there is no event schedule available for the chosen event
-
4Click the "Book Now" button on your chosen event schedule
-
5Fill out all required fields and other information
-
6Click the "Submit" button if finished
-
7If "No. of tickets to buy" were left blank then it will assume that the user will just buy 1 ticket

-
8Fill out your Credit Card Information if you have chosen "Pay online by credit card" on "Payment Type"
-
9Click "Pay Now"
-
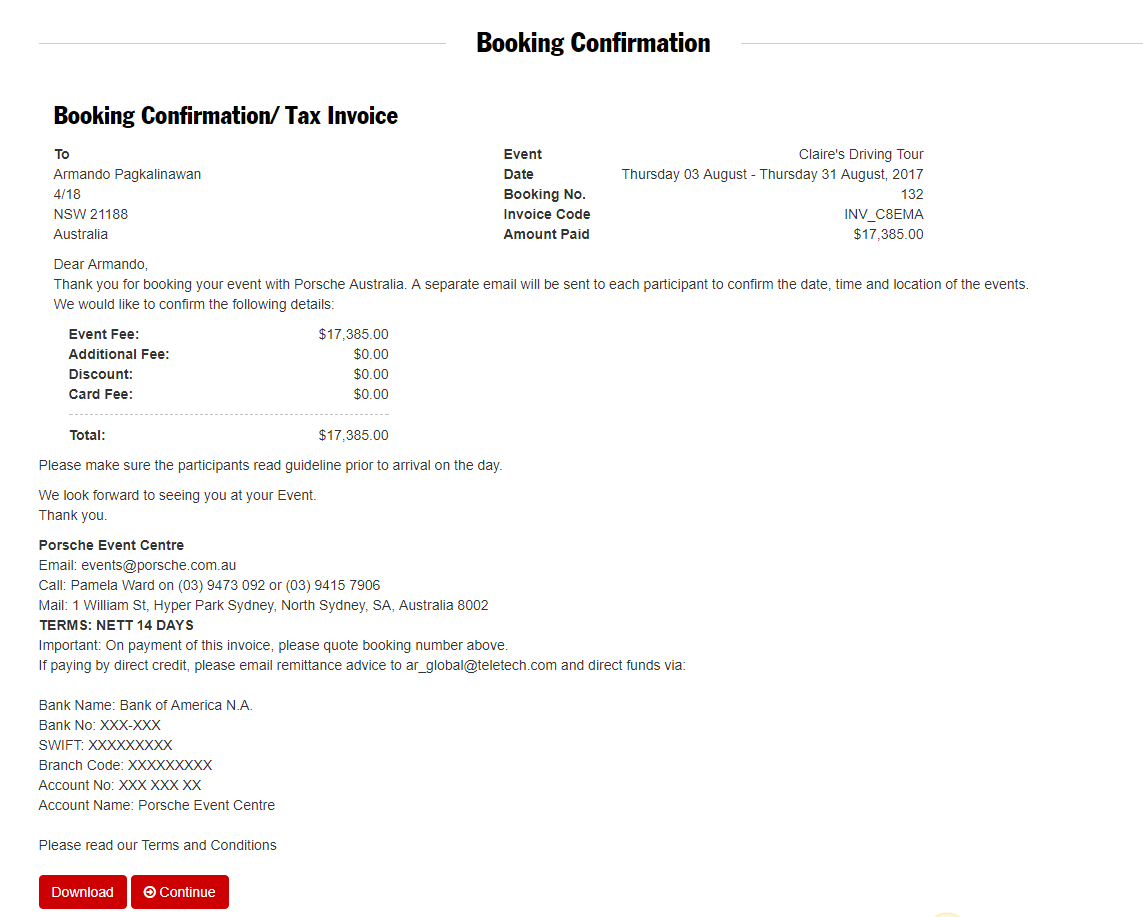
10See Booking Confirmation
-
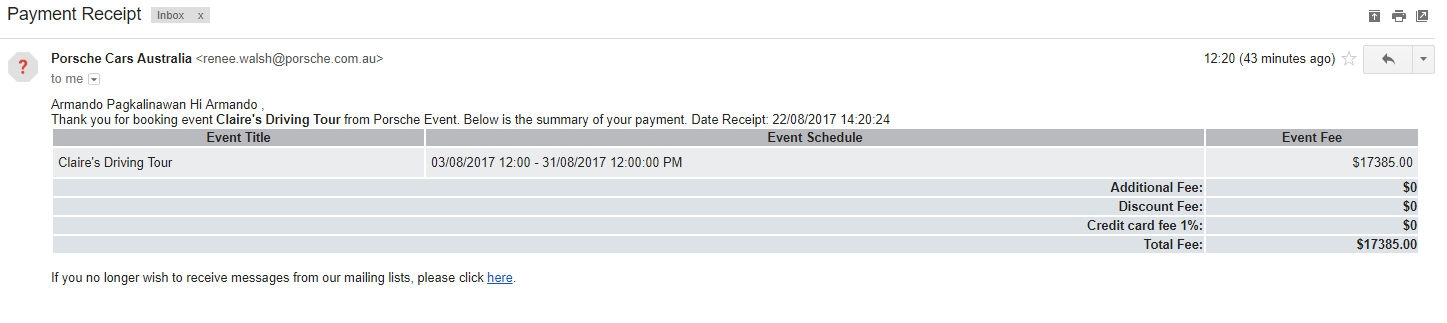
11See Payment Receipt Email
-
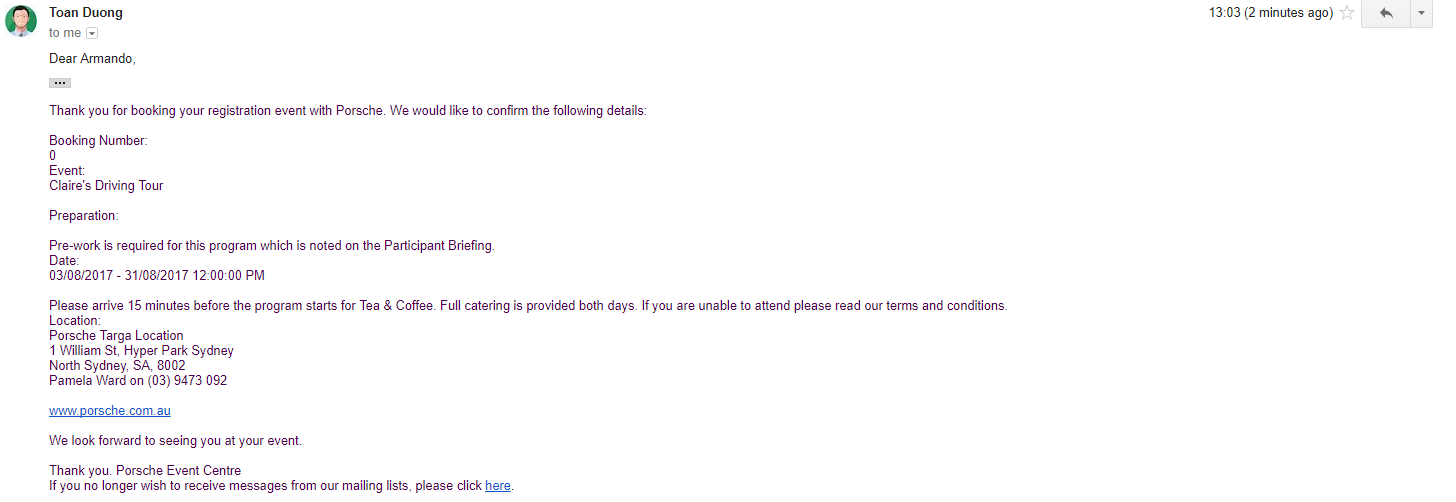
12See Booking Confirmation Email
-
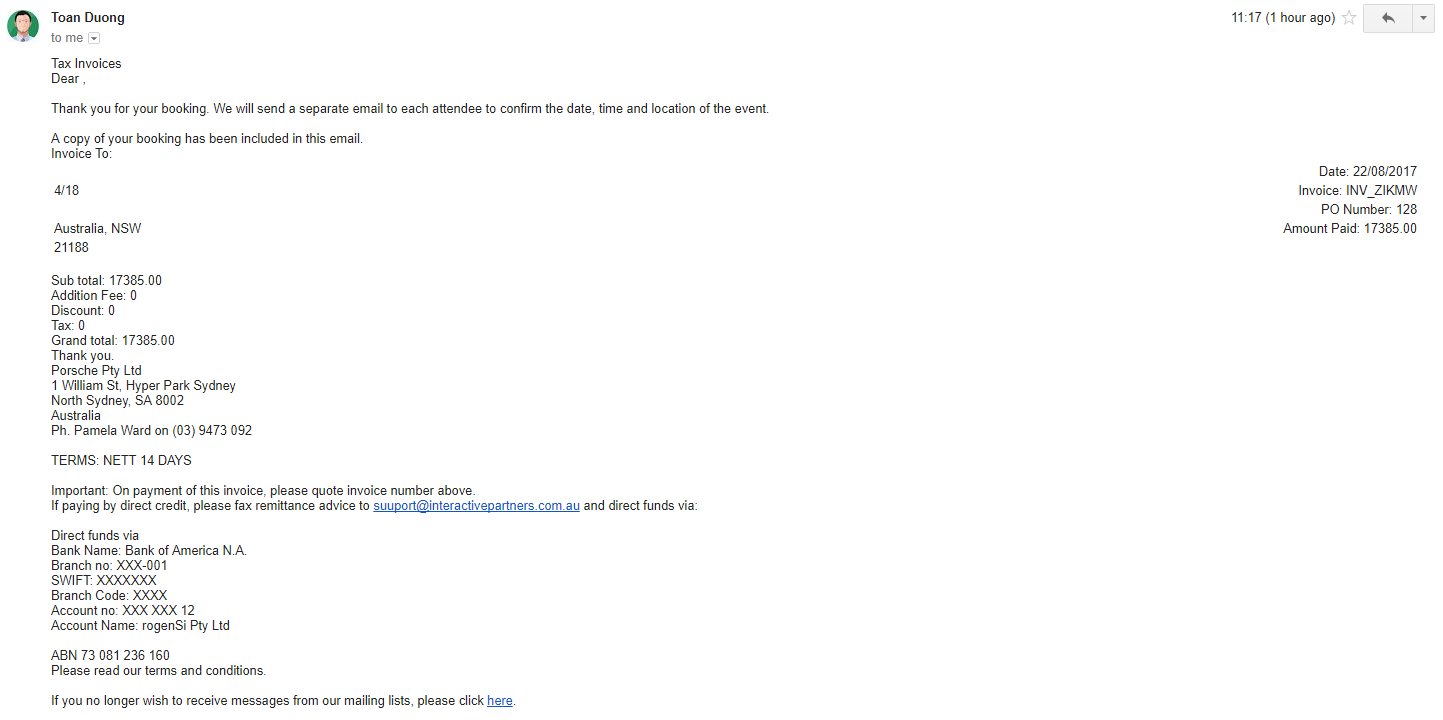
13See Tax Invoice Email
-
14Congratulations! You've completed booking an event.
Updating Payment/Booking Status
-
1Log in as an administrator and go to the Admin Dashboard.
Learn how to log in here → -
2Under Modules on the left menu, choose Events
-
3Click Event Bookings
-
4Under the column, First Name and/or Last Name, enter the user's details accordingly.
-
5Click on the Update Booking Status
 icon on the left<
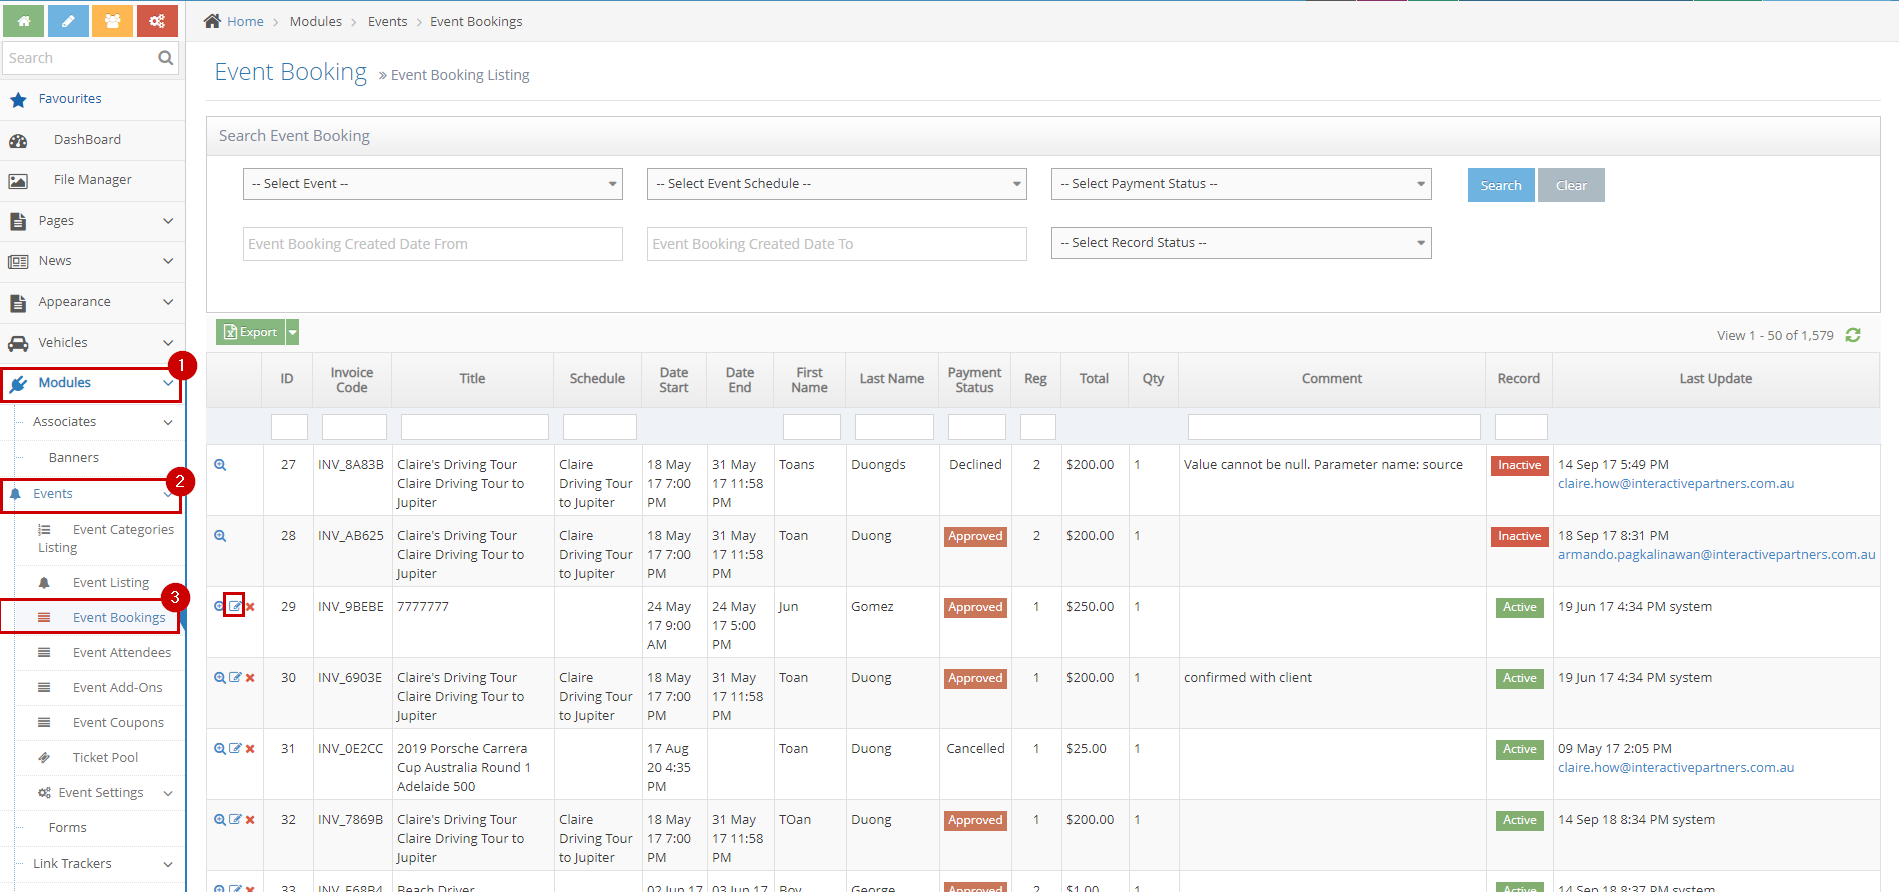
-
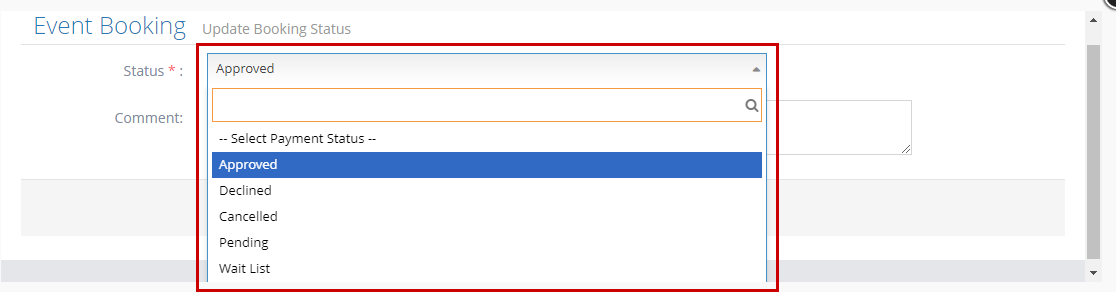
6Select the booking status from the options
- Approved - When the user booked and finished the process until payment
- Declined - When the user booked and finished the process until payment but the payment is invalid
- Cancelled - When the user booked and finished the process until payment then cancelled the booking
- Pending - When the user booked but did not finish the process with the payment
- Waitlist - When the user booked and the event is currently sold out but allow wait list
-
7Put a comment (optional)
-
8Click Save or Save and Continue Edit to apply changes
-
9Click Close if you want to cancel the update and close the box

Exporting Event Booking Registered Data
-
1Log in as an administrator and go to the Admin Dashboard.
Learn how to log in here → -
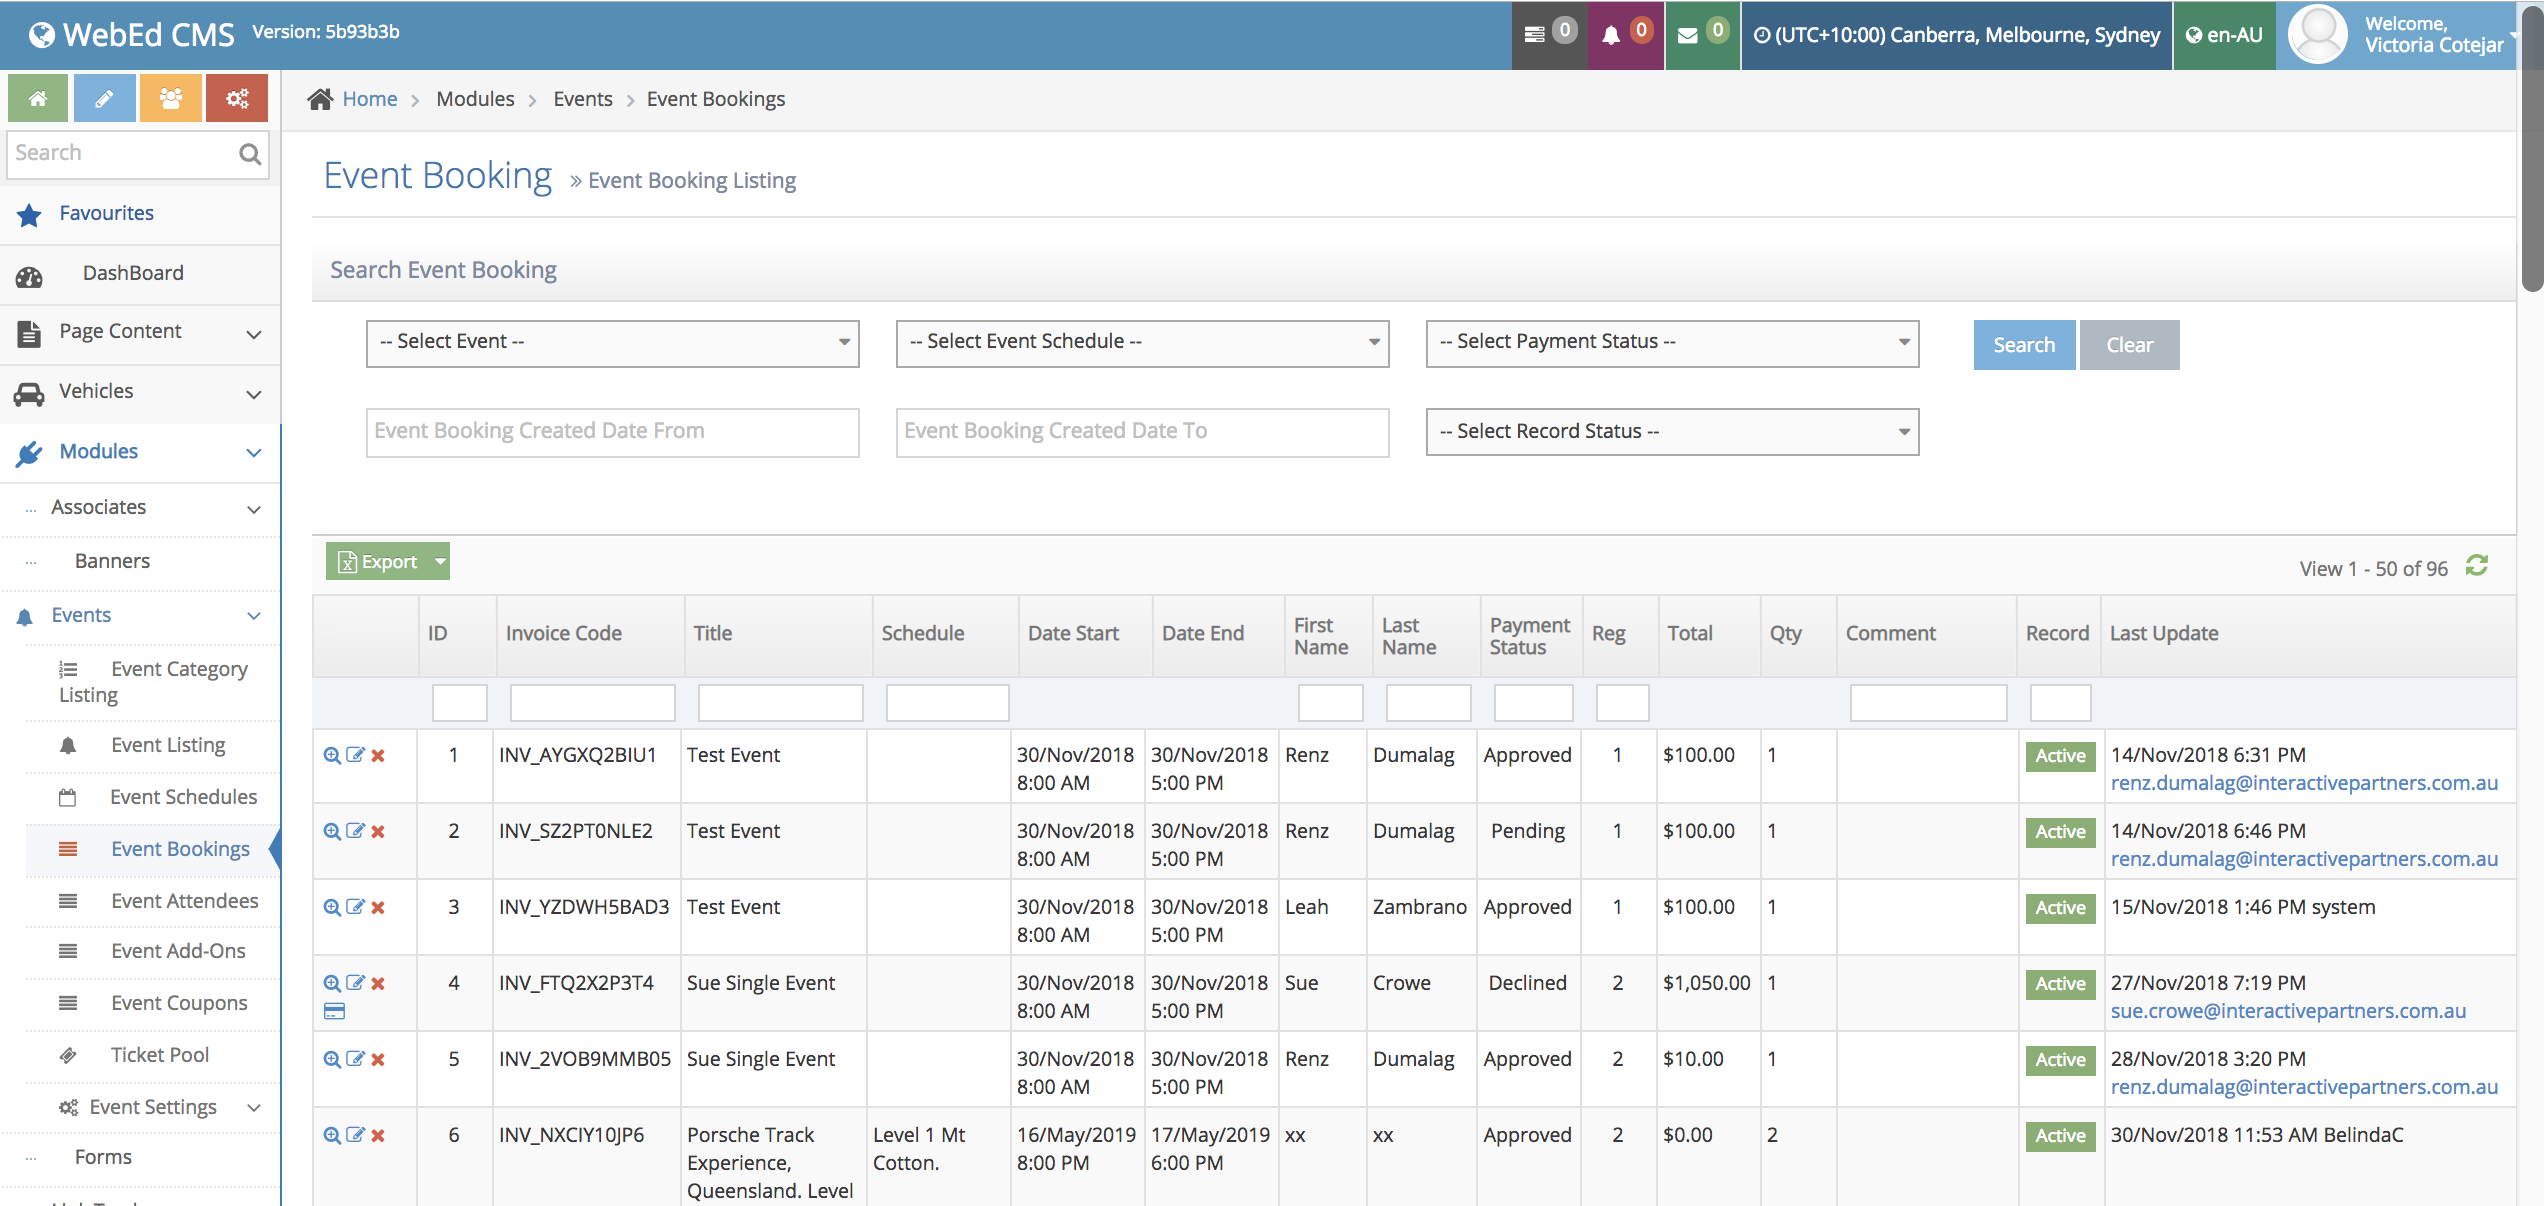
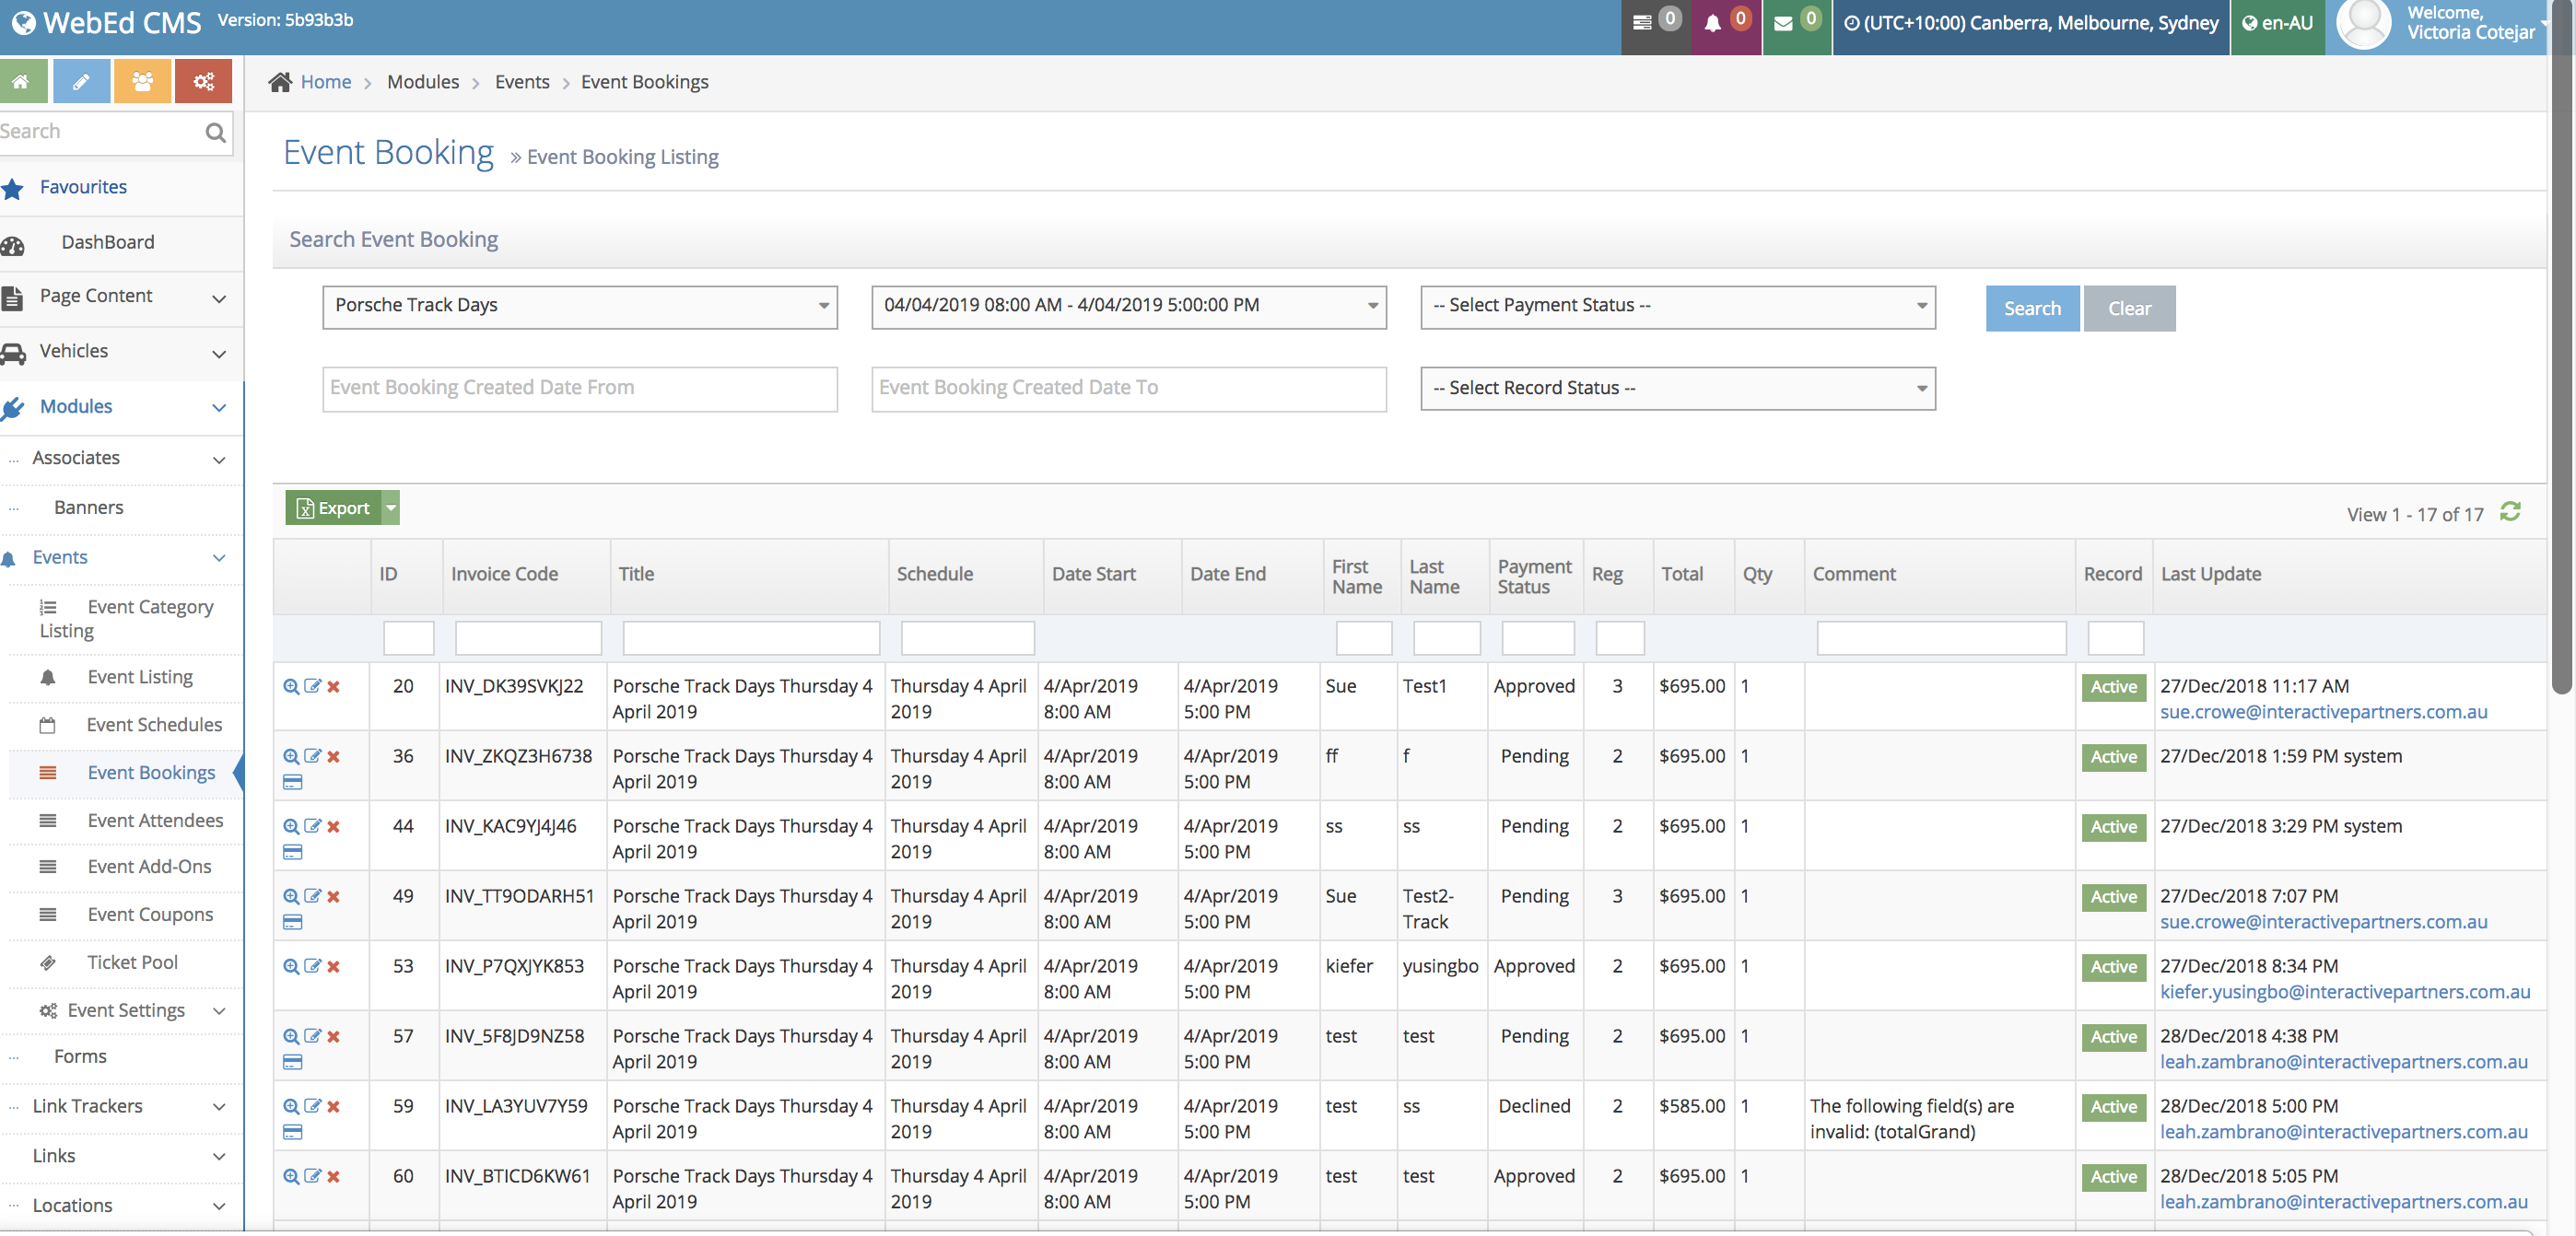
2Go to Events > Event Bookings
-
3A list of registered participants/leads will show.
-
4Filter through the leads by selecting your event from the Select Event drop-down, then click Select Event Schedule.
-
5Note: You can also filter through Select Payment Status and/or Select Record status.
-
6Once Filtered a list of all the leads will come out. Then click on the Export button. All the leads on there will automatically be downloaded and exported into an excel sheet.
Event Coupon
What is an Event Coupon
An event coupon is a promotional tool that can be redeemed for a discount when registering in an event.
Event coupons allow the event owner to provide discount options for specific events or event schedules or to set a discounted rate for a specific range of dates on an event.
- Coupon codes can be optionally set for a specific date range.
- Coupons can be made active or inactive.
- Coupons can be set to be unlimited or a limited number for each event or event schedule.
Why Use an Event Coupon?
Event coupon is necessary for sales promotion techniques to attract existing and new customer.
Creating an Event Coupon
-
1Log in as an administrator and go to the Admin Dashboard.
Learn how to log in here → -
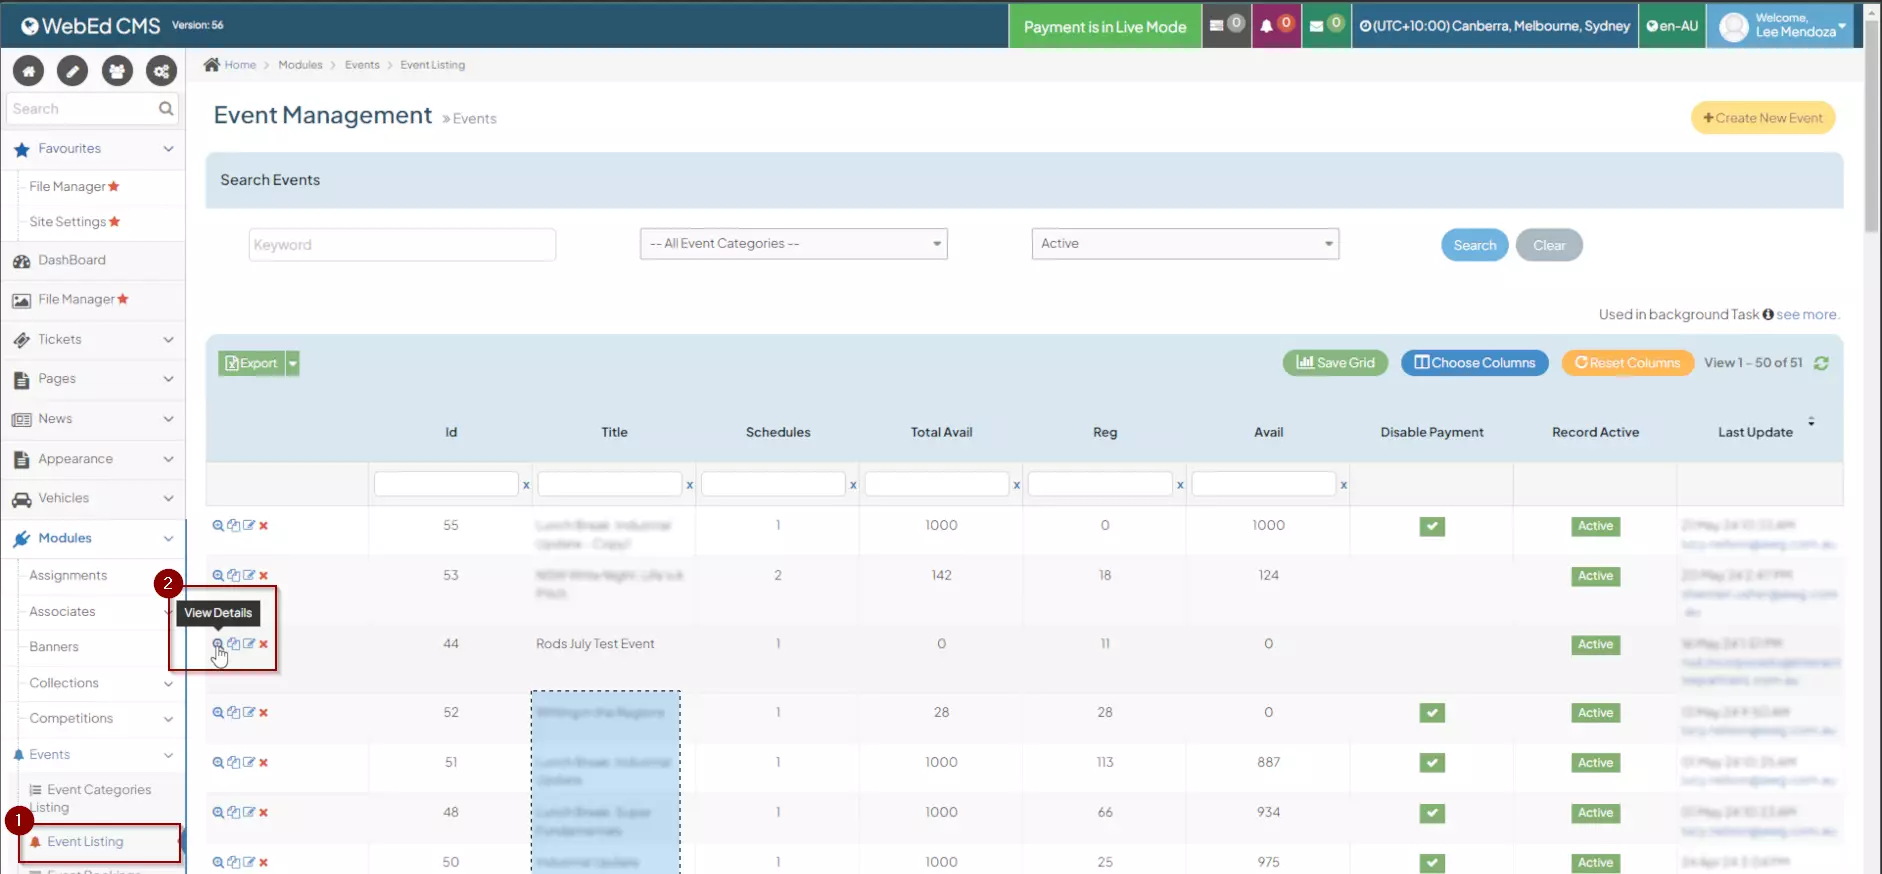
2Under Modules on the left menu, search or choose Events > Event Listing
-
3Select the Event Listing where you want to add coupon
-
4Click the View Details button
-
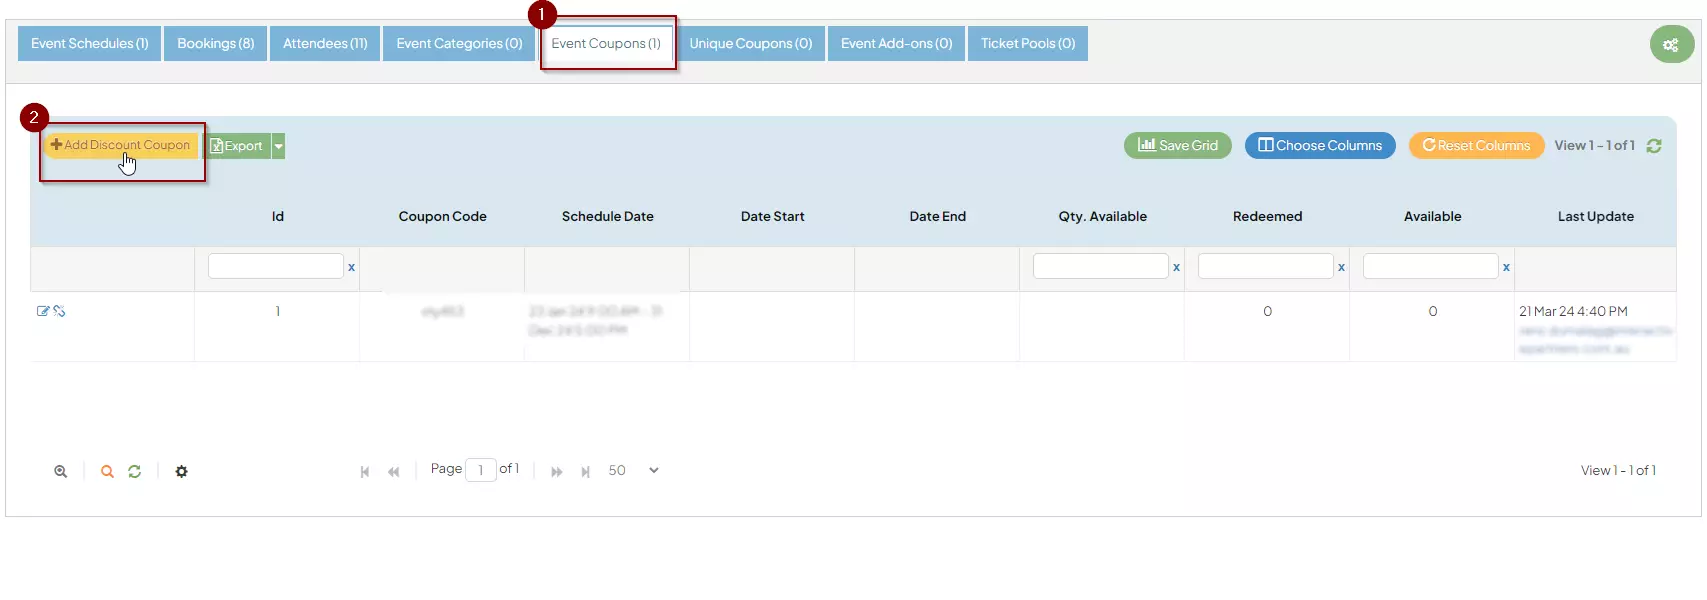
5On the Events Management page, go to the Event Coupons tab
-
6Click the Add Discount Coupon button
-
6
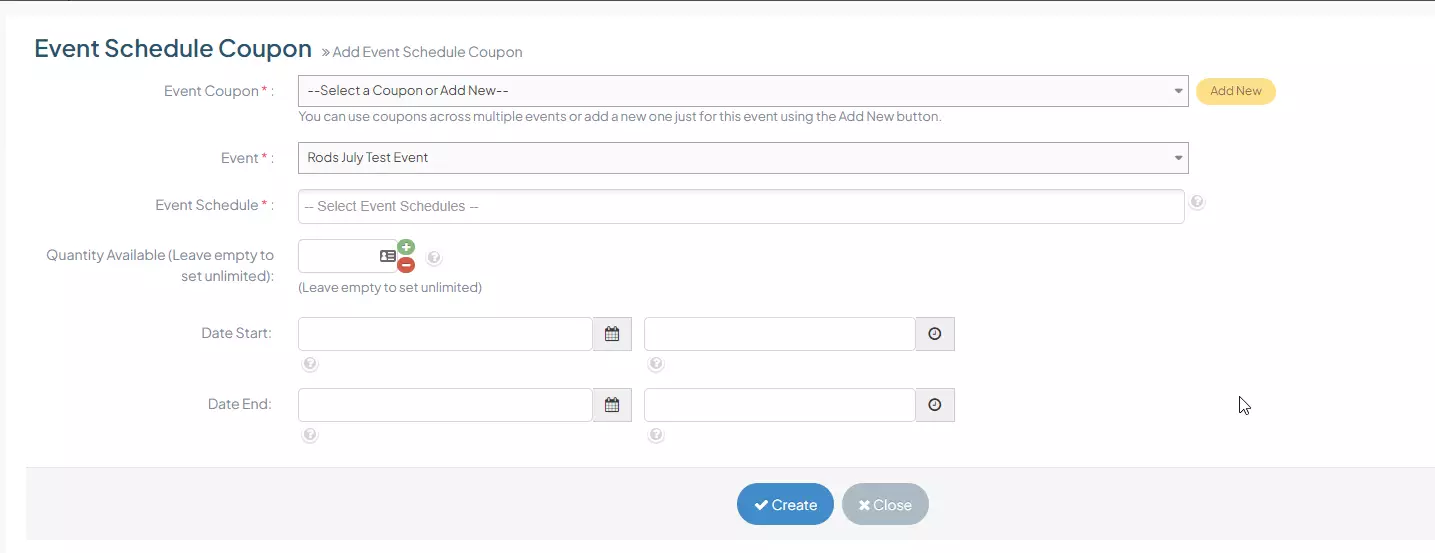 Enter Coupon details:
- Event Coupon - the name of the event coupon
- Event - Event listing where you want to add the coupon
- Event Schedule - Event schedule where you want to apply the coupon
- Quantity Available (Leave empty to set unlimited) - number or quantity of coupons to be made, leaving it empty will create unlimited quantity
- Date Start with Time - availability date of the coupon
- Date End with Time - expiration date of the coupon
-
8When you are done with the details you can click on the Create button to apply changes made
Configure Coupon Code Case Sensitivity
The steps below show how to configure the case sensitivity of coupon codes.
Case Sensitivity for Event Coupon Codes
-
1Log in as an administrator and go to the Admin Dashboard.
Learn how to log in here → -
2From the left navigation, click “Settings”, then click “Site Settings”
-
3Search for the Keyword "Case Sensitive Coupon Codes"
Update Coupon Code Case Sensitivity
-
1Click the 'Edit'
 icon on the left
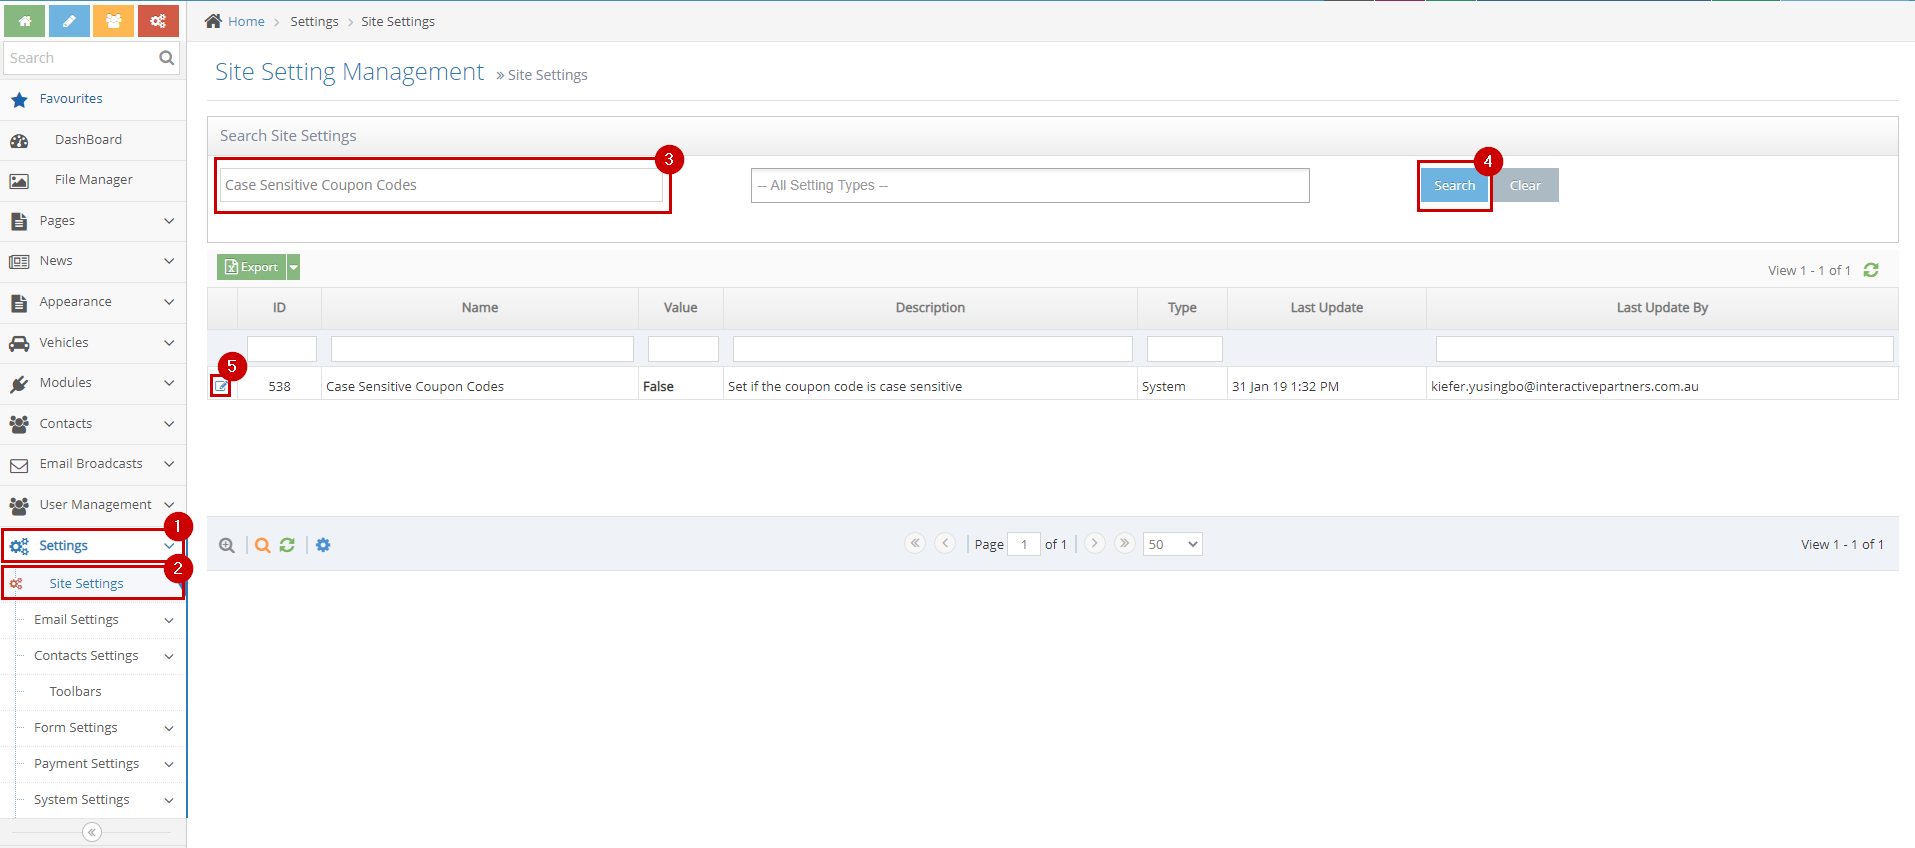
-
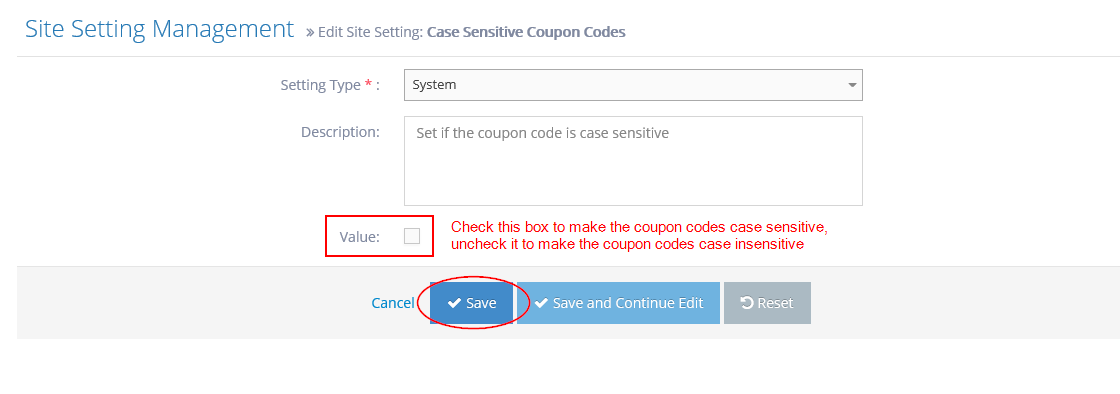
2The 'Value' checkbox determines the case sensitivity of coupon codes, setting it to true makes the coupon codes sensitive.
-
3For example, the coupon code "FREE" written as "free", "fRee" or "Free" would still be accepted if the coupon codes are set to be case insensitive. Setting the coupon codes case sensitive, makes the system accept "FREE" only.
- Check this box to make the coupon codes case-sensitive
- Uncheck this box to make the coupon codes case-sensitive
-
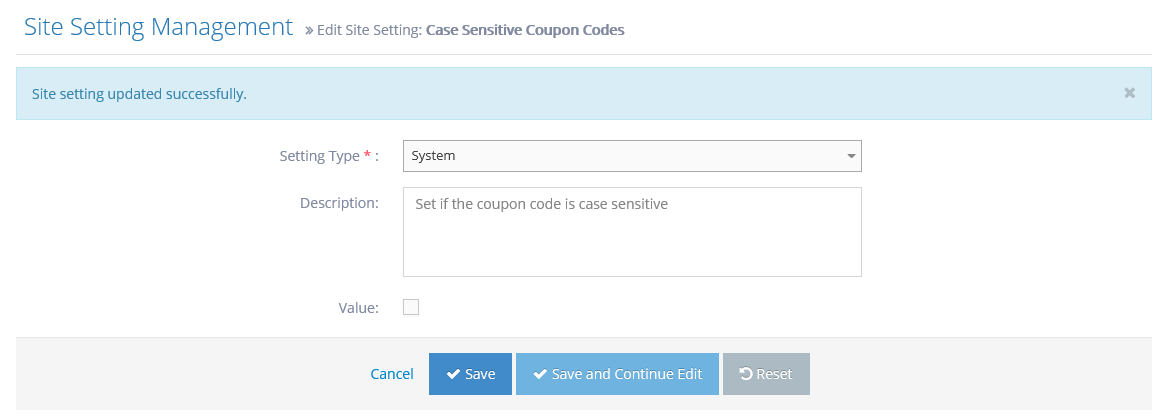
4A notification on top "Site setting updated successfully." should show after saving the changes.
-
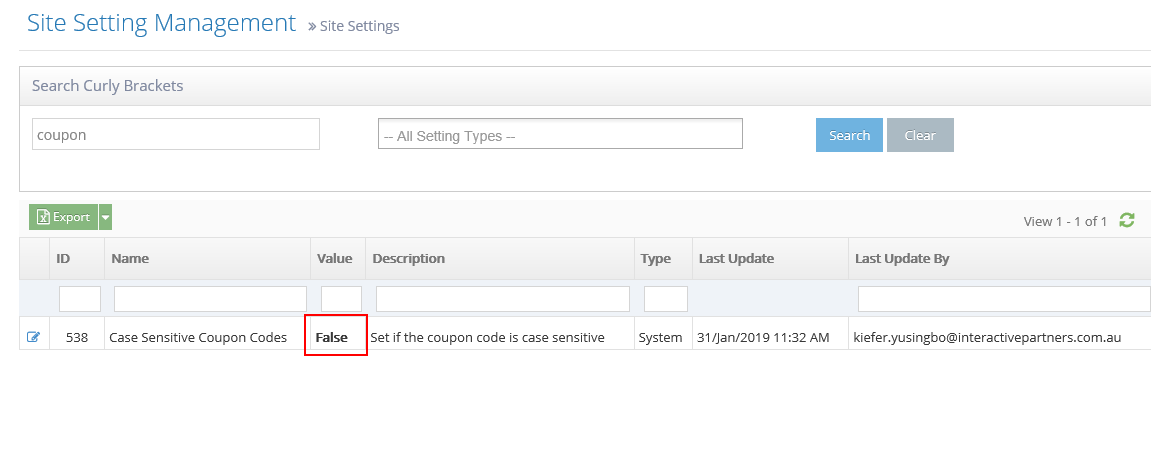
5If you go back to the site settings listing, you will see the value for the coupon codes case sensitivity under the column 'Value'.
- False - means the coupon codes are case insensitive
- True - means the coupon codes are case sensitive
Event Ticket Pool
Why you would use an Event Ticket Pool module
A Ticket Pool module lets users manage the ticket pools which will then be linked to an event/event booking.
Creating an Event Ticket Pool
-
1Log in as an administrator and go to the Admin Dashboard.
Learn how to log in here → -
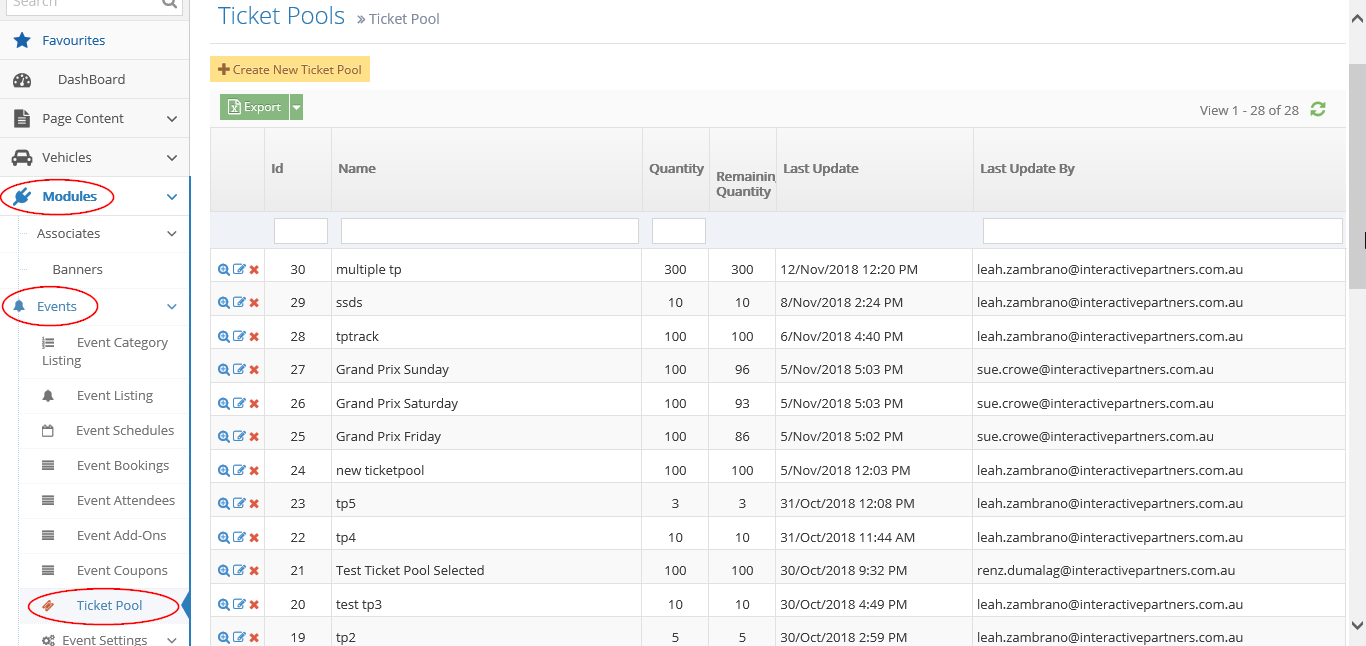
2Go to Admin > Modules > Events
-
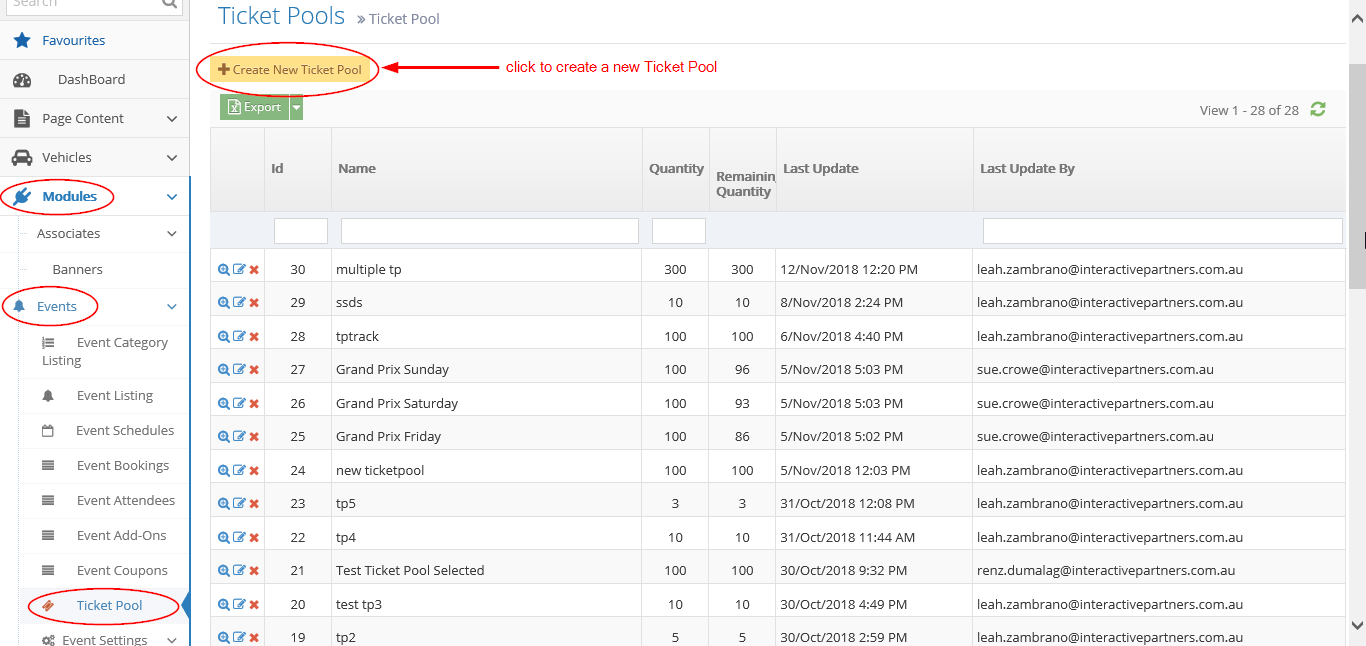
3Select 'Ticket Pool'
-
4Click the 'Create New Ticket Pool' button
-
5Fill up the Ticket Pool Information
- Name - enter the name of the new ticket pool. This field is required.
- Quantity - enter a number for how many attendees will be attending a specific event. This field is required.

-
6Submit the new ticket pool
- Create - click the 'Create' button to submit the new ticket pool. This action creates your ticket pool, closes the page and redirects you to the Ticket pools page (see the image below). On the Ticket Pools page, you will see a note "Ticket Pool created successfully".
- Create and Continue Edit - Click the 'Create and Continue Edit' button to submit the new ticket pool. This action creates your ticket pool but lets you stay on the page.
- Reset - click the 'Reset' button to start over. This action refreshes the page and shows a blank 'Create Ticket Pool' page. Your ticket pool will not be saved/created.

Events and Schedules linked to a Ticket Pool
-
1Log in as an administrator and go to the Admin Dashboard.
Learn how to log in here → -
2Go to Admin > Modules > Events
-
3Select 'Ticket Pool'

-
4From the Ticket Pool listing, search for the ticket pool you want to edit
-
5Click the
 "View Details" icon to see the ticket pool's details
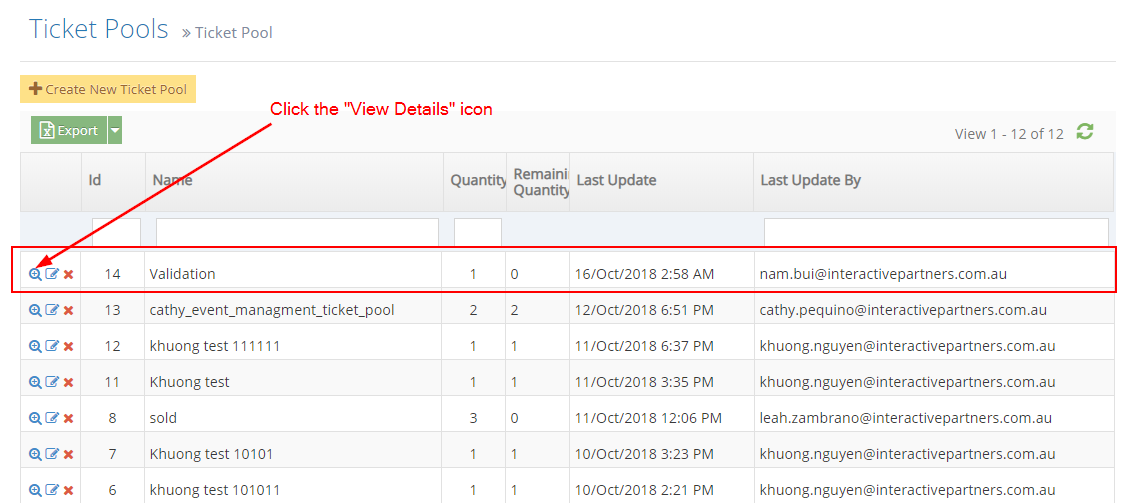
-
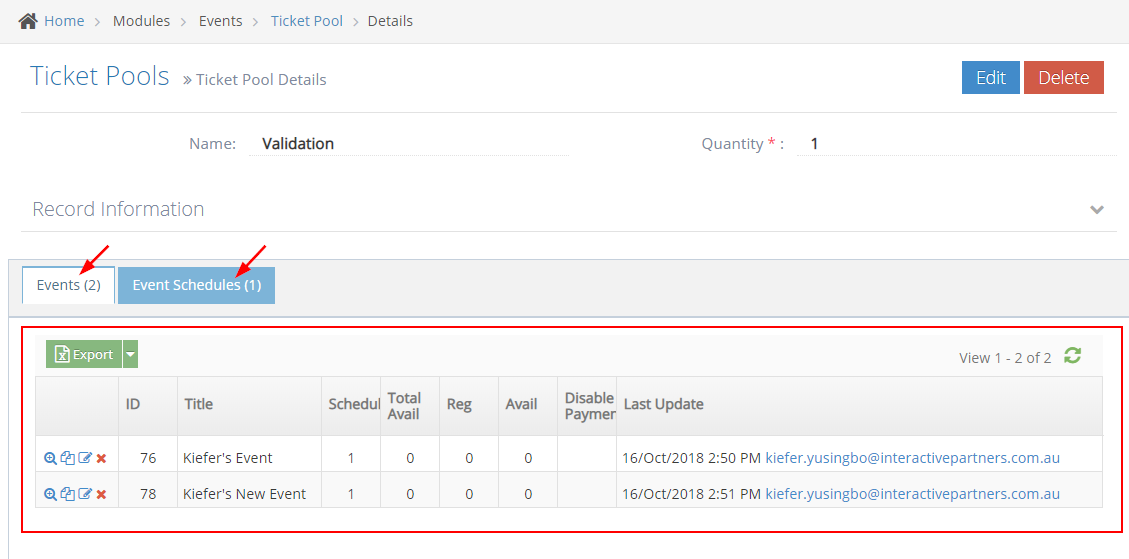
6Navigate to "Events" or "Event Schedules"
-
7Under "Record Information", select the tab you want to check
- Events - select the "Events" tab to see the events using the ticket pool
- Event Schedules - select the "Event Schedules" tab to see the event schedules are associated with the ticket pool
- The events and event schedules will be displayed in a listing as shown below:
Editing a Ticket Pool
-
1Log in as an administrator and go to the Admin Dashboard.
Learn how to log in here → -
2Go to Admin > Modules > Events
-
3Select 'Ticket Pool'
-
4From the Ticket Pool listing, search for the ticket pool you want to edit
-
5Click the
 "Edit" icon to edit the ticket pool
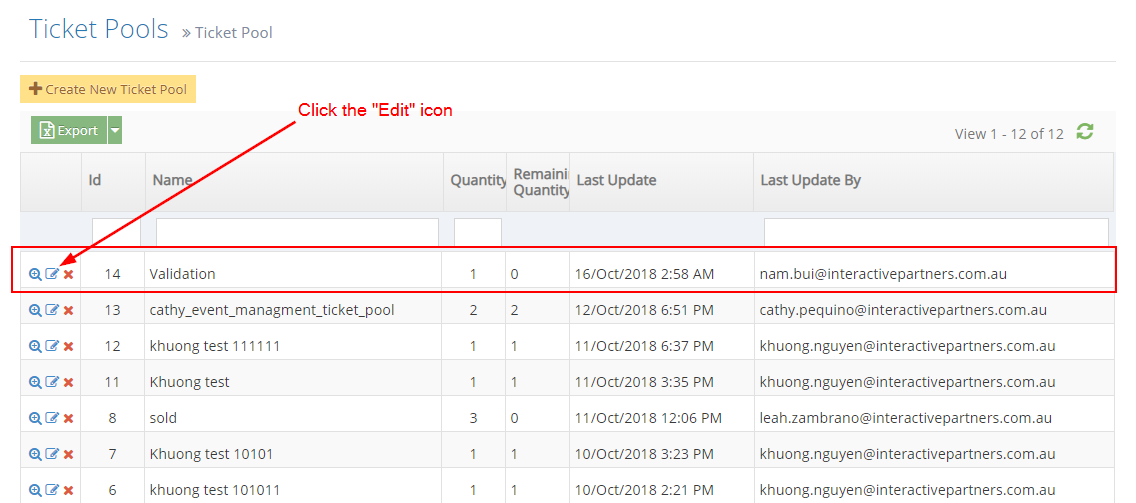
-
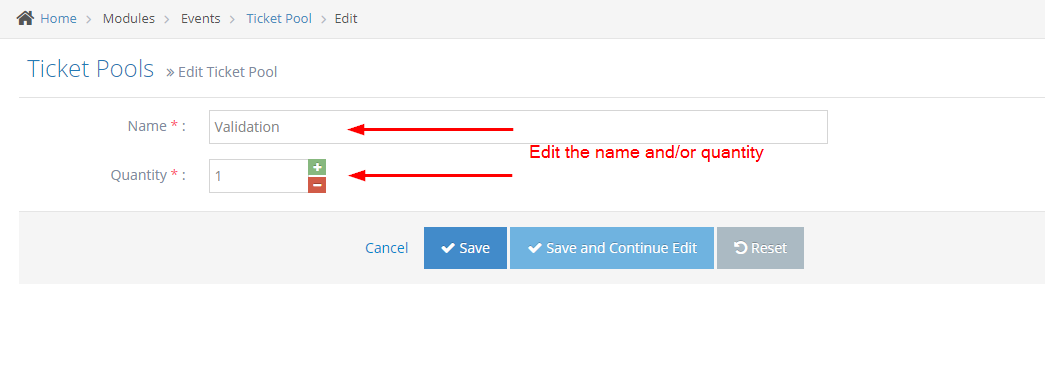
6Update the information
- Name - current ticket pool name is displayed, enter new information here.
- Quantity - current ticket pool quantity is displayed, enter the new quantity here.
-
7Save the changes
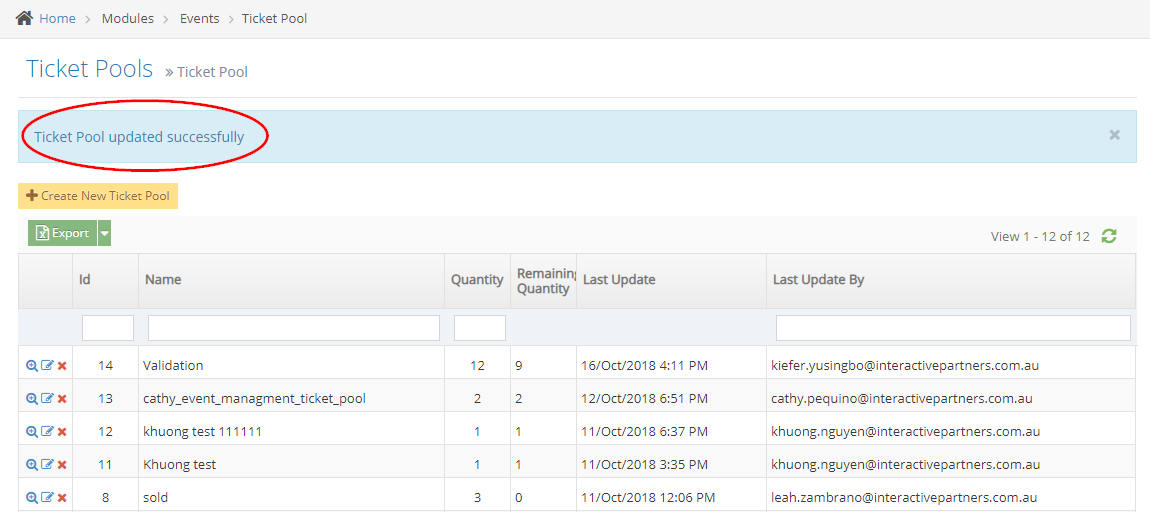
- Save - click the 'Save' button to save your changes. This action saves the new information, closes the page and redirects you to the Ticket Pools page (see the image below). On the Ticket Pools page, you will see a note "Ticket Pool updated successfully".
- Create and Continue Edit - Click the 'Create and Continue Edit' button to save your changes. This action saves the new information but lets you stay on the page.
- Reset - click the 'Reset' button to start over. This action refreshes the page and shows the current information.
Deleting a Ticket Pool
-
1Log in as an administrator and go to the Admin Dashboard.
Learn how to log in here → -
2Go to Admin > Modules > Events
-
3Select 'Ticket Pool'
-
4From the Ticket Pool listing, search for the ticket pool you want to delete
-
5Click the
 'Delete' icon to delete the ticket pool
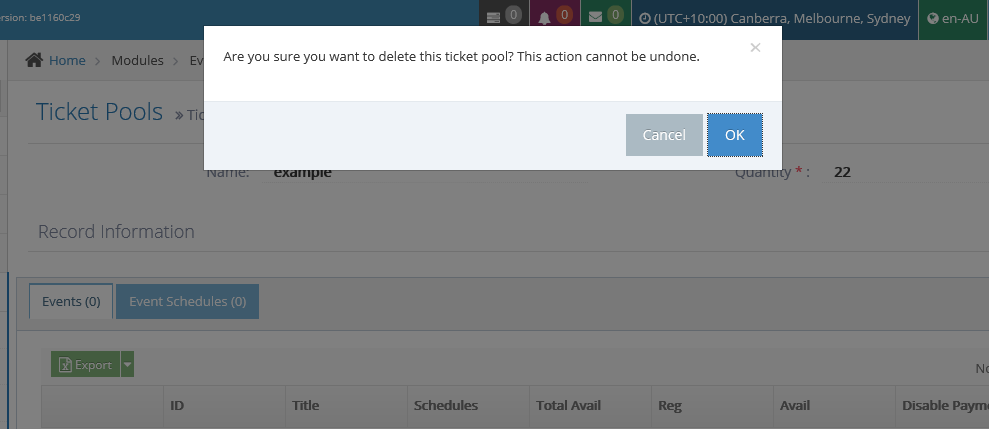
-
6Click 'OK' to delete the ticket pool.
-
7Click 'Cancel' if you want to cancel.
-
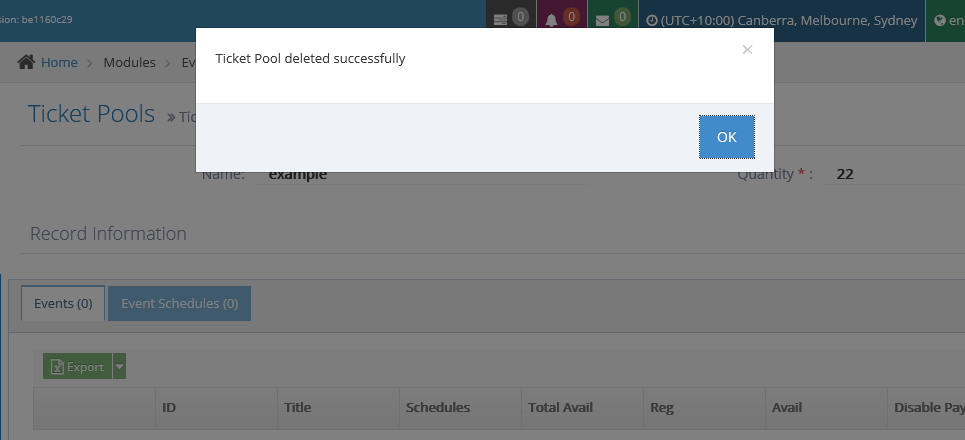
8Click 'OK' to go back to the Ticket Pool listing.
Event Email Processing
Event Sign Up and Payment
At various steps of the event process, emails are automatically generated and sent to attendees and organisers.
Attendee Notifications
- Attendee Notification: This email is sent to the attendee/s after they have successfully booked and paid for the event.
- Word Template is a PDF file is optionally added to the email if a word template is uploaded to serve as a printable copy of the booking confirmation or payment receipt.
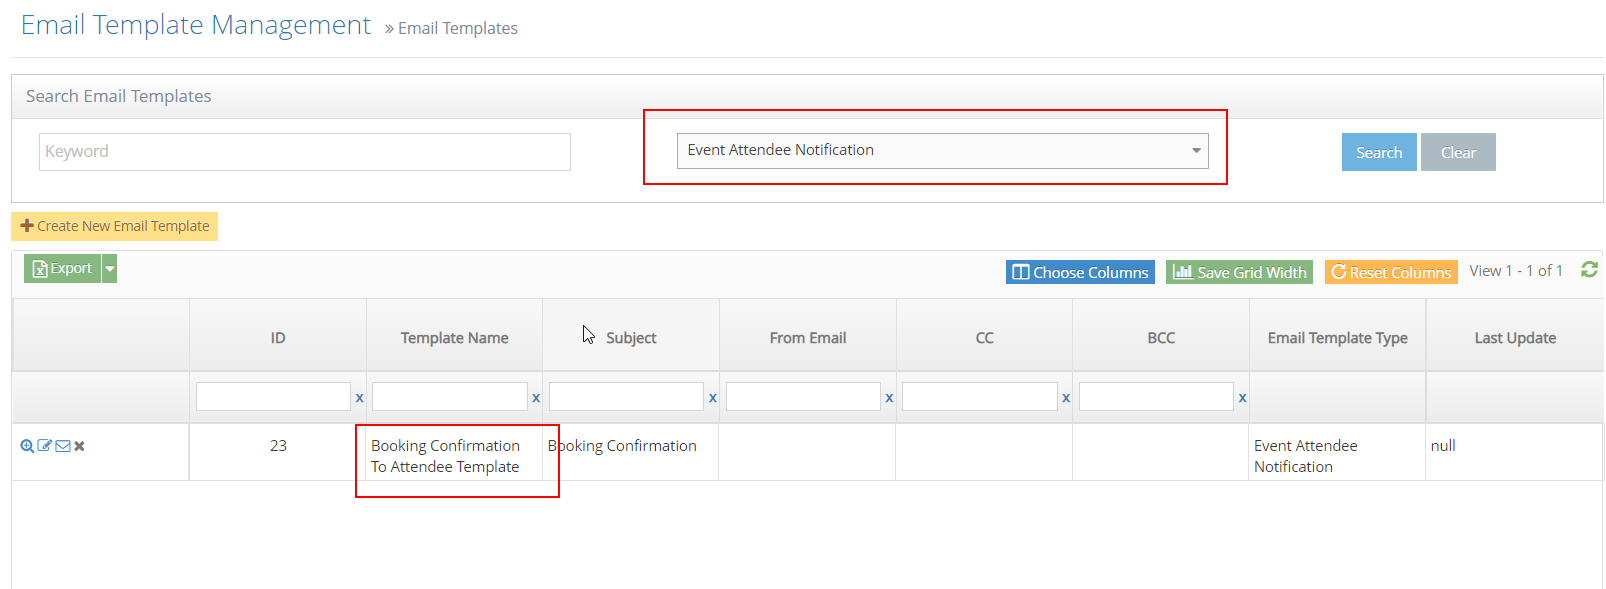
- The default Email Template Type for the Attendee Notification is “Event Attendee Notification”
- and the default Email Template Name is “Booking Confirmation To Attendee Template”
Booking Notification Emails
Attendee enters their details into the booking form and submits
-
1“Event Organiser Notification” Email is sent to the Organiser.
Note: If the organiser's email or email template is not set, it will not send an email.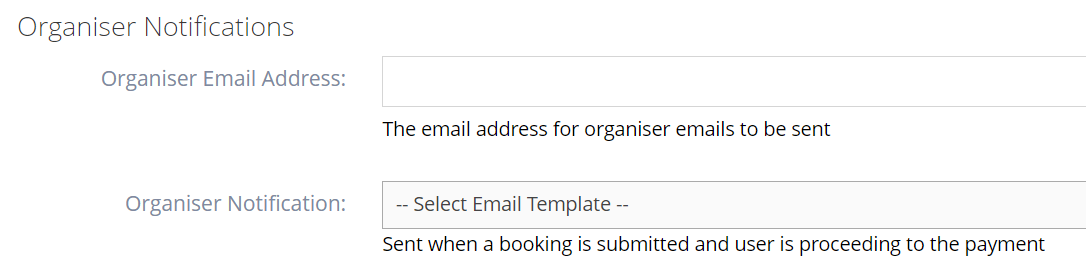
-
2“Event Booking Confirmation” Email is sent to the Attendee

Attendee is prompted for payment, on success;
-
1Event Attendee Notification is sent to the attendee
Note: If there is a word document template, we will also include a PDF attachment of the payment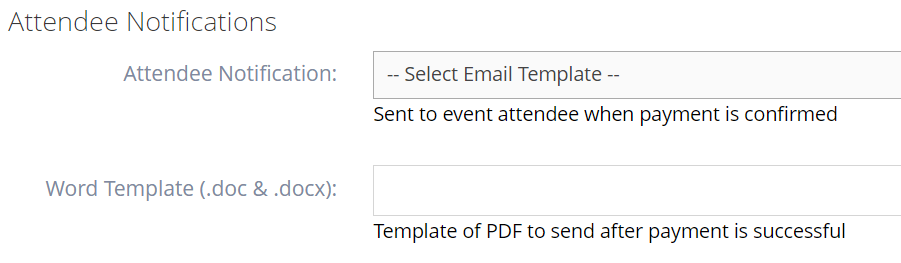
-
2Event Payment Receipt is sent to the Attendee and optionally sent to the Organiser
Event Reminders
Each event has a setting for optional event reminders to attendees. The event reminder to attendees sets the number of days before the event to remind attendees and also the template to use for the email reminder.

Booking Confirmation
- Booking Confirmation: This is the email sent to the event attendees (primary contact) after they book and have not paid yet
- The default Email Template Type for Booking confirmation is “Event Booking Confirmation”
- and the default Email Template Name is “Booking Tax Invoice To Customer”
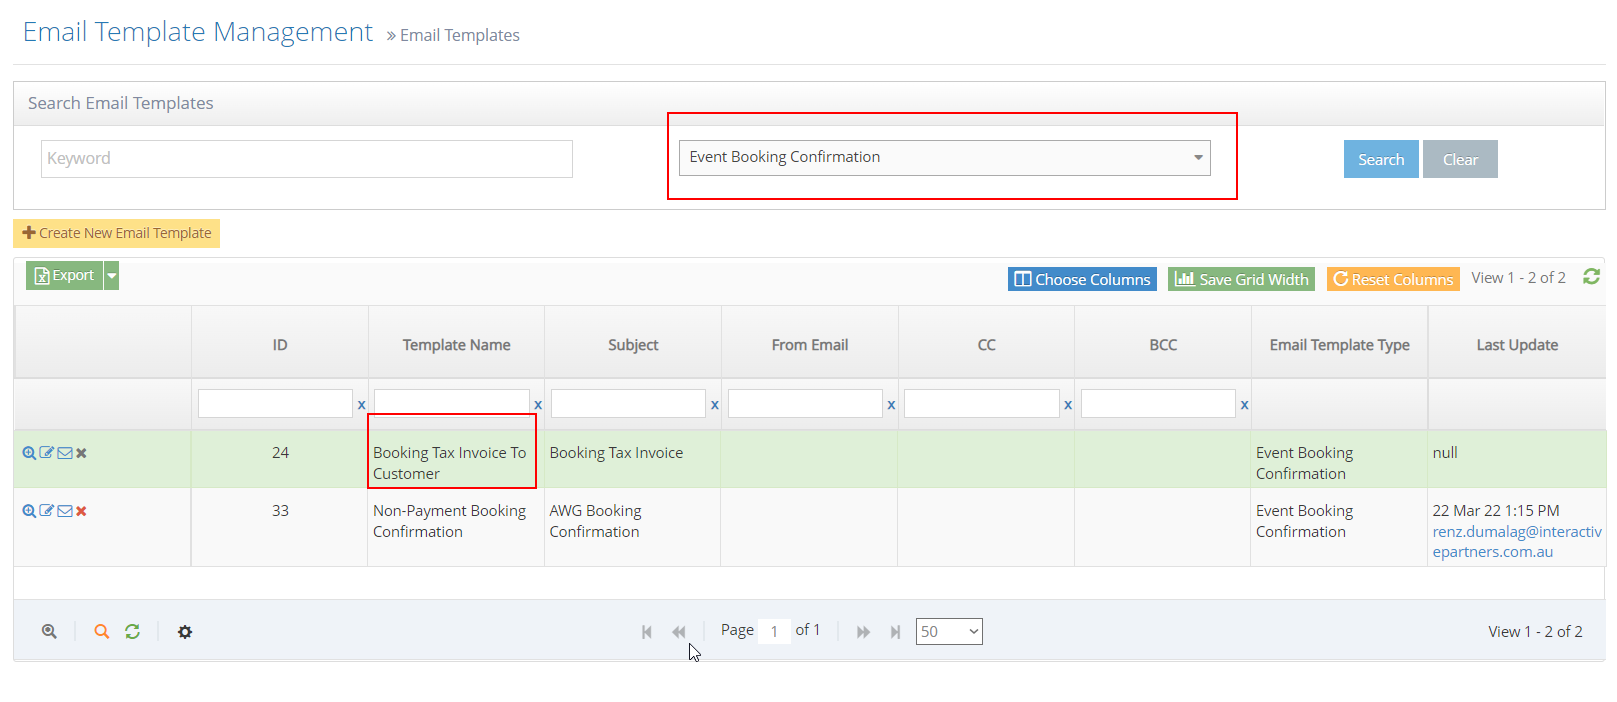
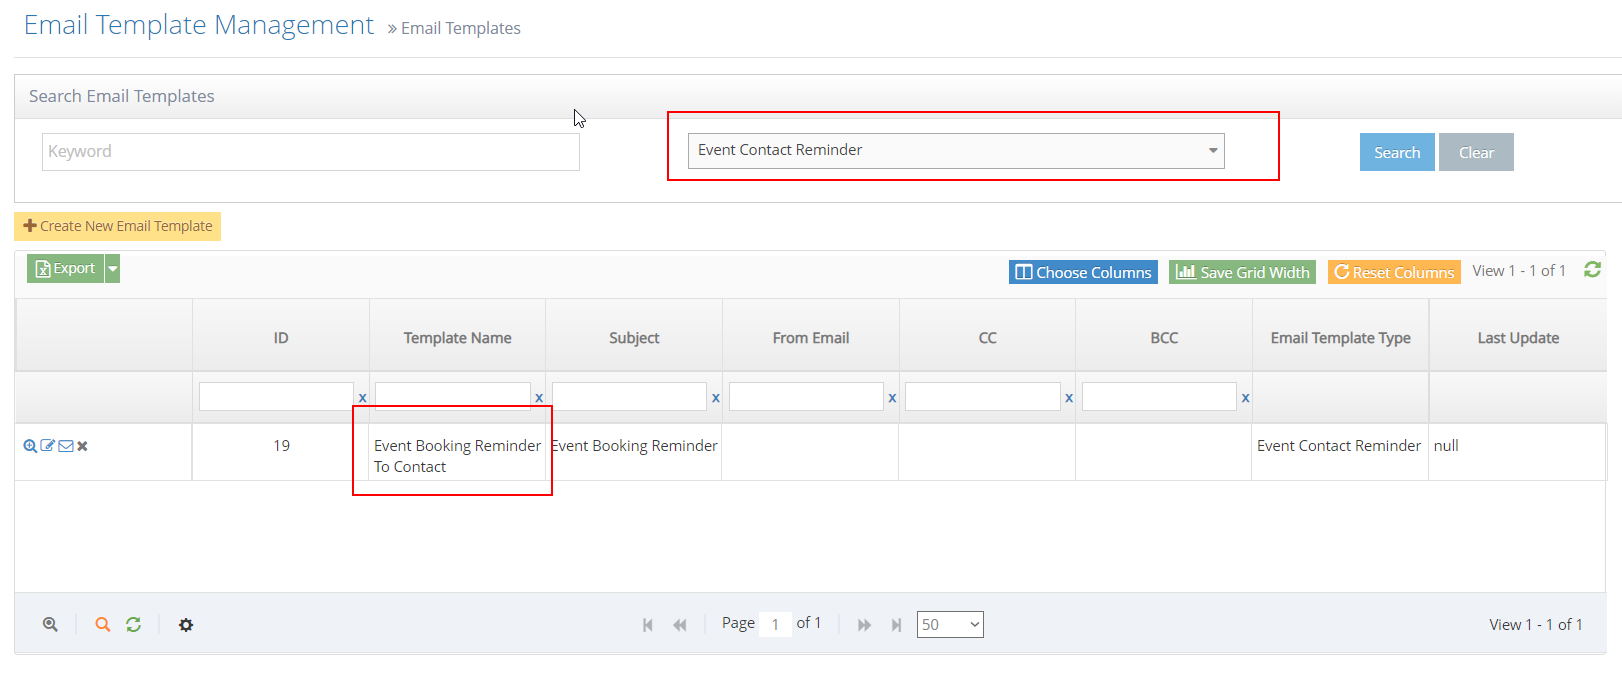
Managing Email Templates
The templates are managed through the Admin/Email Templates. You can filter for each of the template types.
Event Email Template Properties
Each template can use data properties to dynamically replace details in the email template. Simple uses include adding the attendee's first and last name. More complex allows you to include any other attributes.
Ideally there only needs to be one or two of each type that can be used for any event. This allows for a limited number of email templates across a wide range of different events.
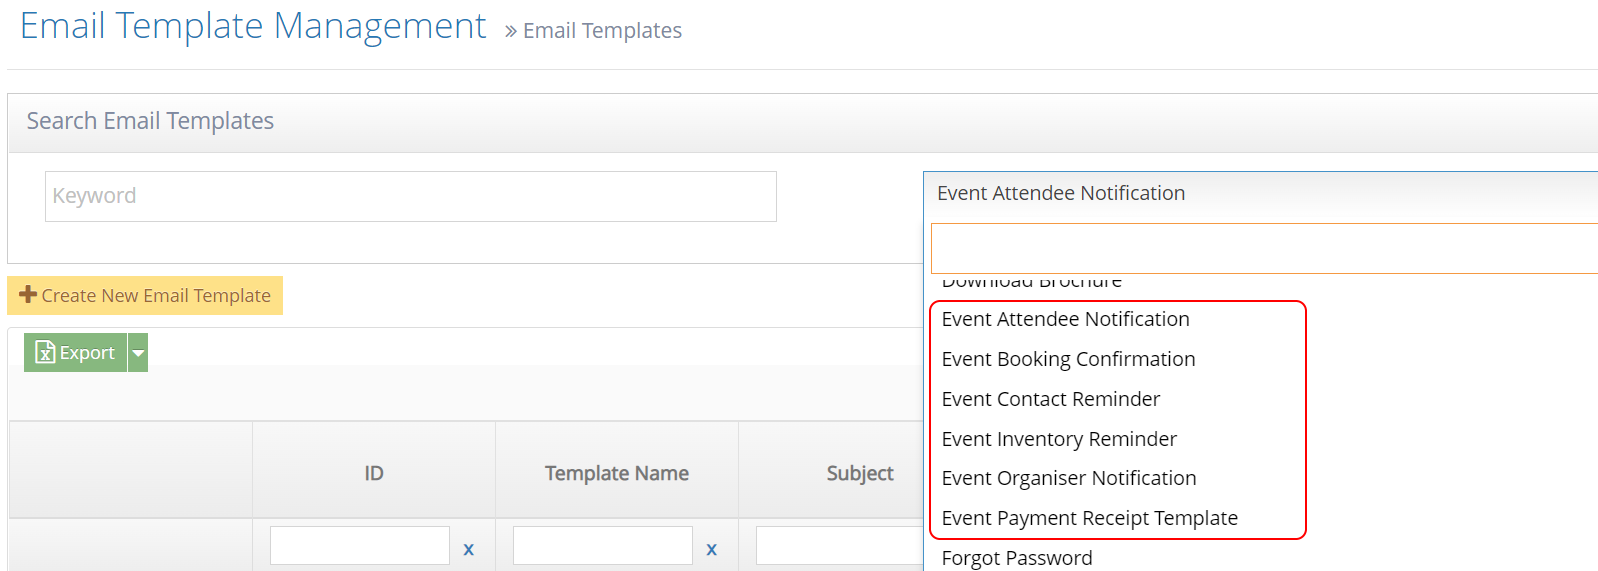
Email Templates and Types
The email templates are managed in the “Email Templates” menu. If the user wants to create or update a template, they can just go to this menu item. Event emails are using 5 different types of templates for different situations.
Event Reminder Email
- Event Reminder to Attendee: This email gets sent to the attendee depending on the days set before the event
- Event Reminder count field: This number field sets the number of days when the Event Reminder email will be sent to the attendee; i.e. "3" - means that it will send an email 3 days before the event.
- Event Reminder Email Template: This email template to be used that will be sent to the attendee
- Important Note: The contact record will only be sent 1 email and after that, it will be marked as sent
- The default Email Template Type of the Event Reminder Email is “Event Contact Reminder”
- and the default Email Template Name is “Event Booking Reminder To Contact”
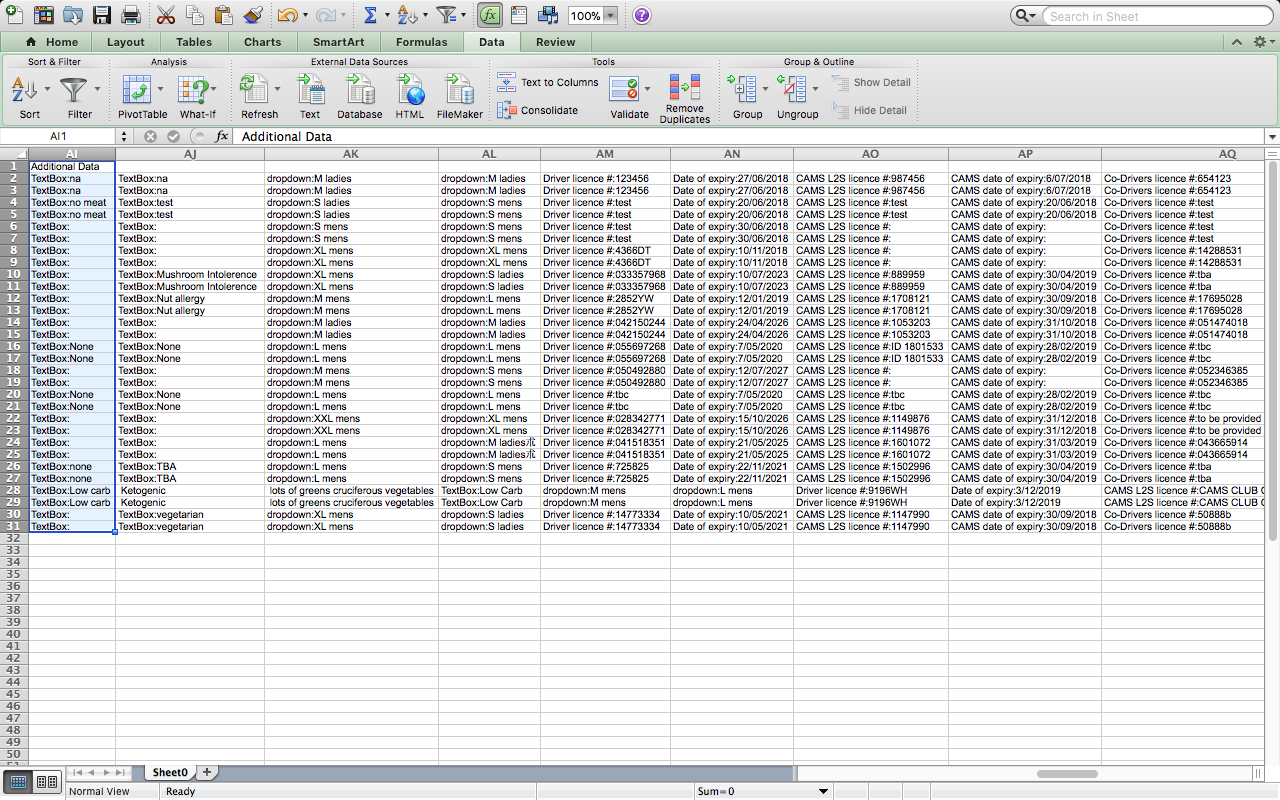
Event Tips: Splitting Additional Info Data in Excel
This article will help show to split the Additional Info/Data on Excel after exporting data from Events in WebEd.
-
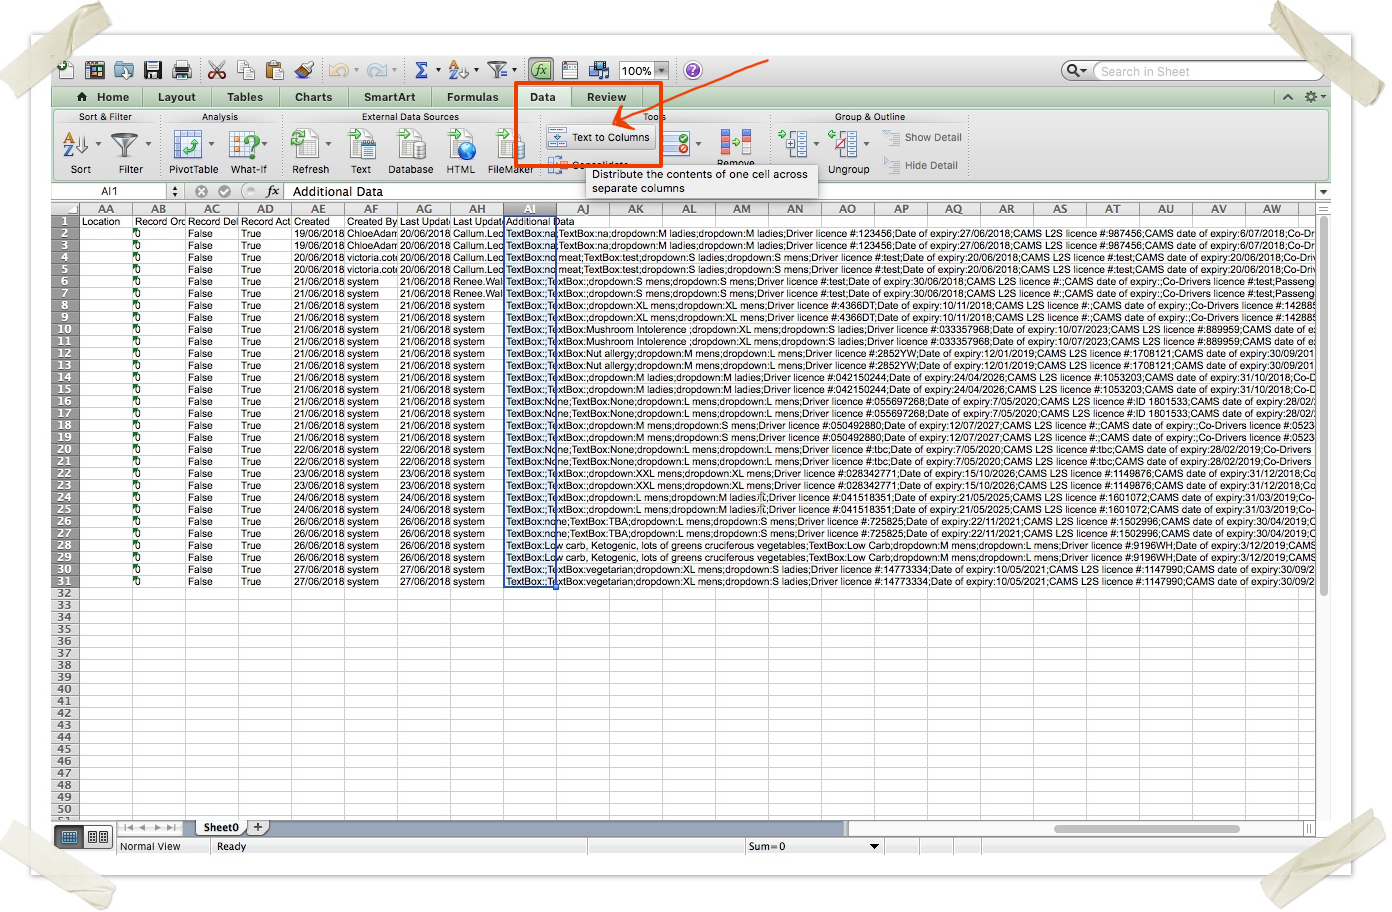
1Open the newly exported Excel file > Go to the Additional Data Column > Highlight the entire column
-
2Click on Data at the top menu

-
3Click on the Text to Columns button/option on the top menu panel
-
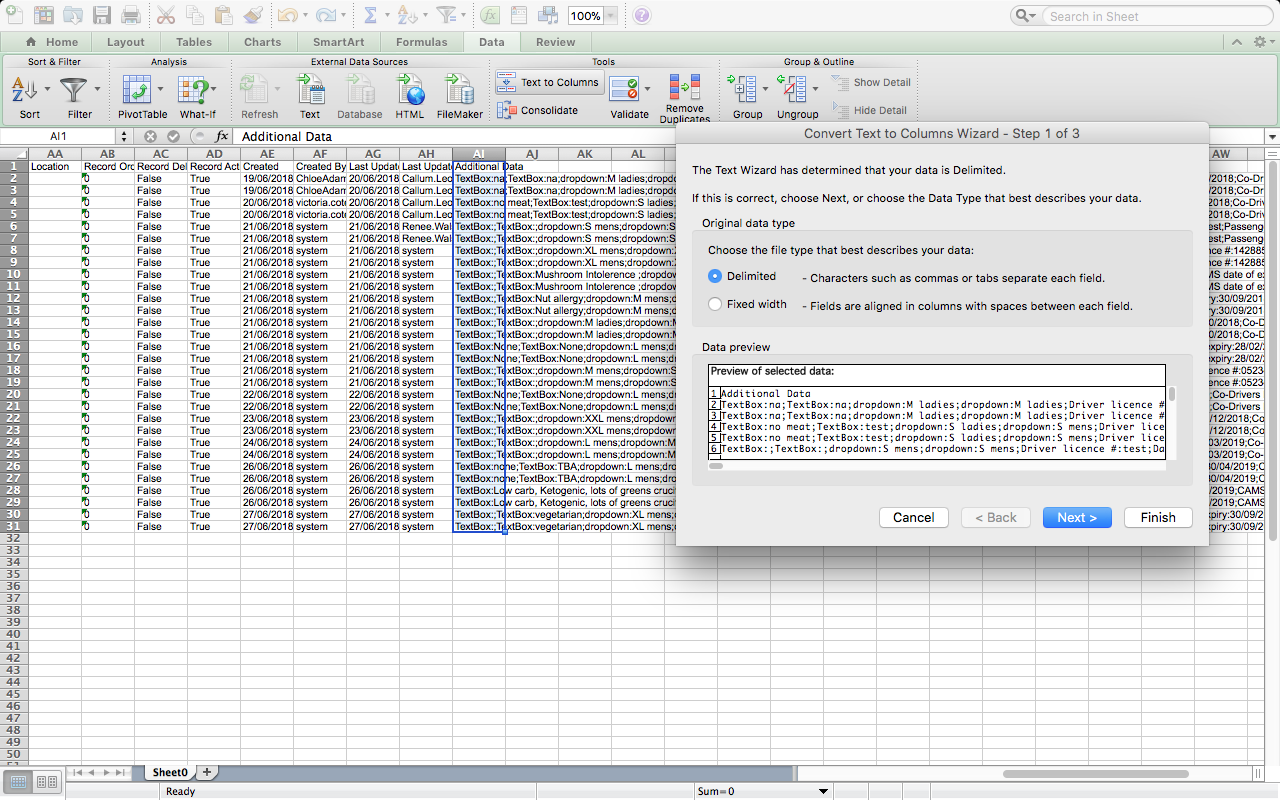
4A Pop up will appear for the settings.
-
5Click on the Delimited option > Click Next.
-
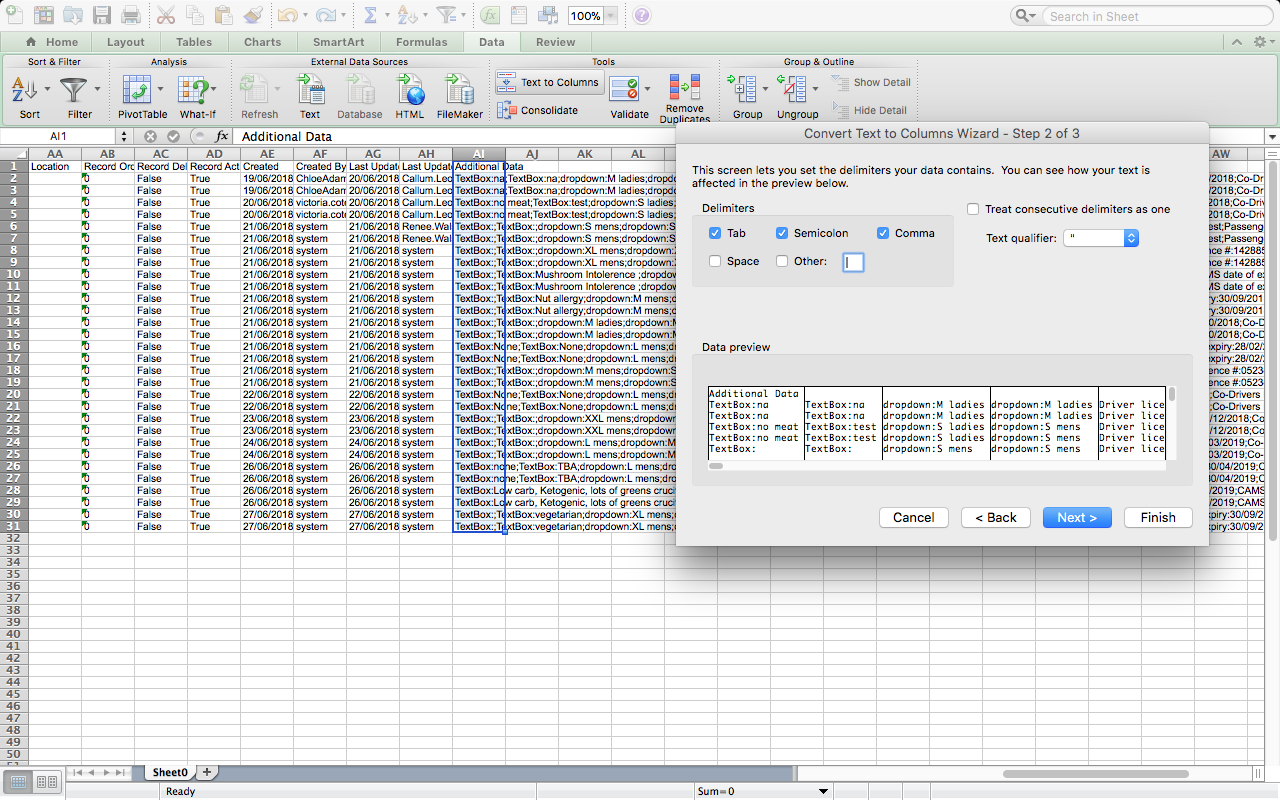
6Under Delimiters, tick on Tab, Semicolon, and Comma. Then click Next.
-
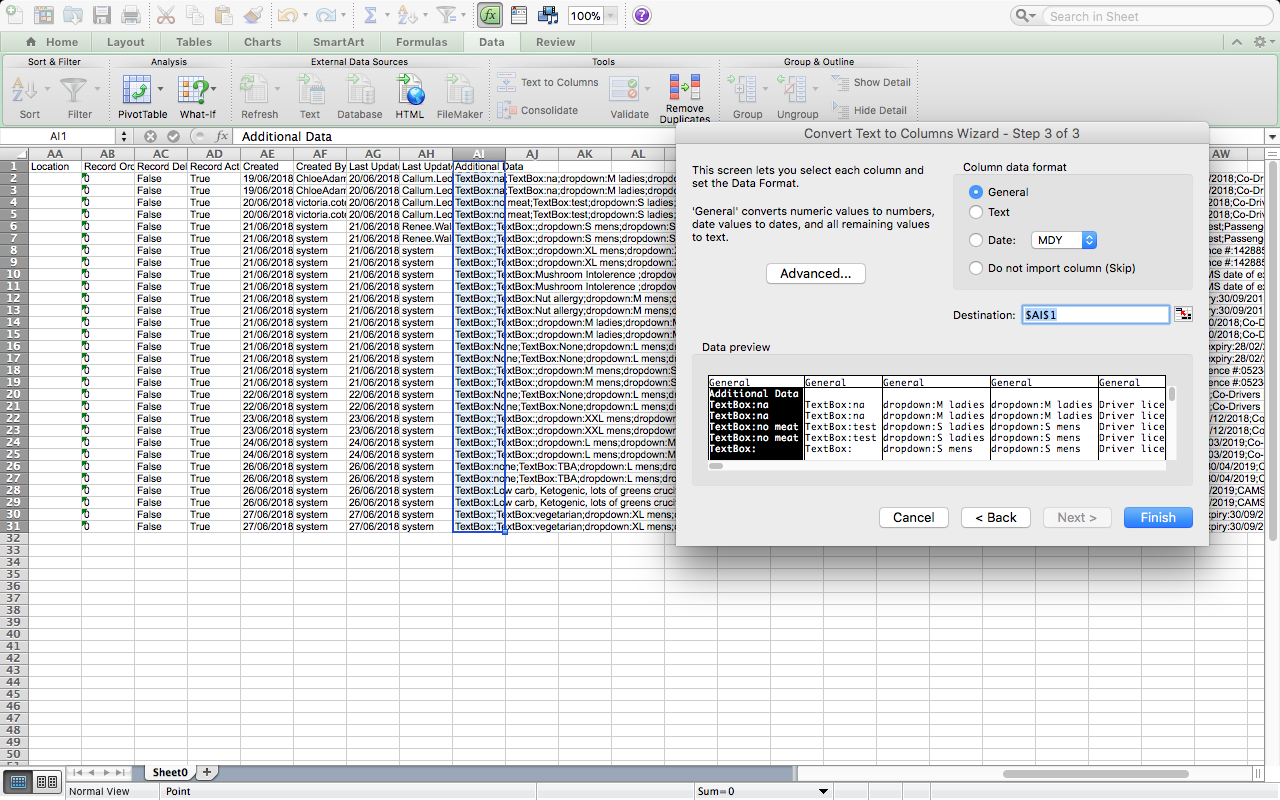
7Under Column data format click on General then click on Finish.
-
8The Data under Additional Data should now be split into different columns.