How To Manage Workflow Engine Mailbox
How to create new mailbox
-
1Go to Settings > Workflow Engines > Workflow Engines Mailboxes
-
2Click Create New Workflow Engine Mailbox
-
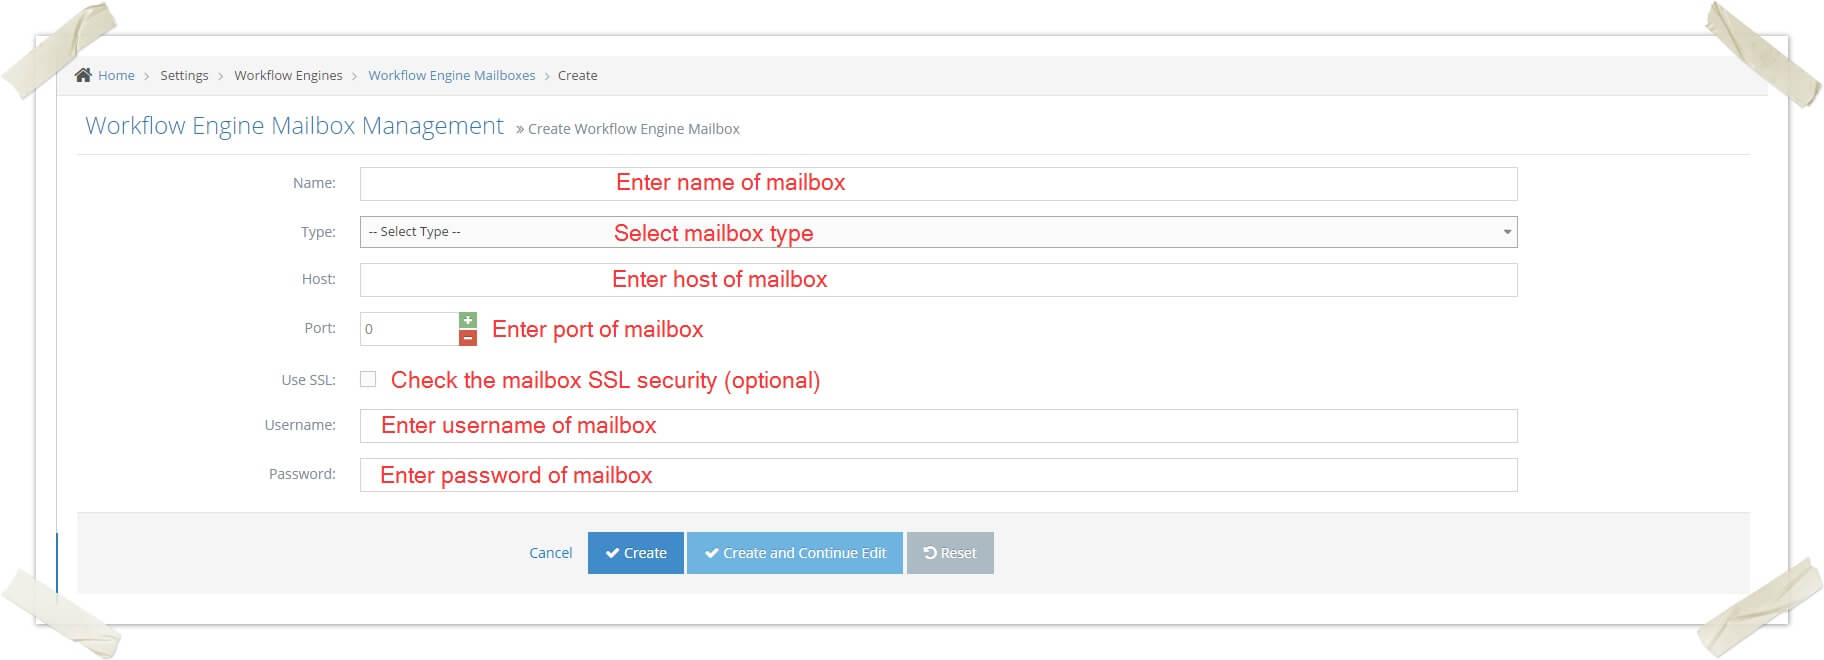
3Enter name, select type, enter host, port, check user SSL(optional), enter the username and password
-
4Click Create
-
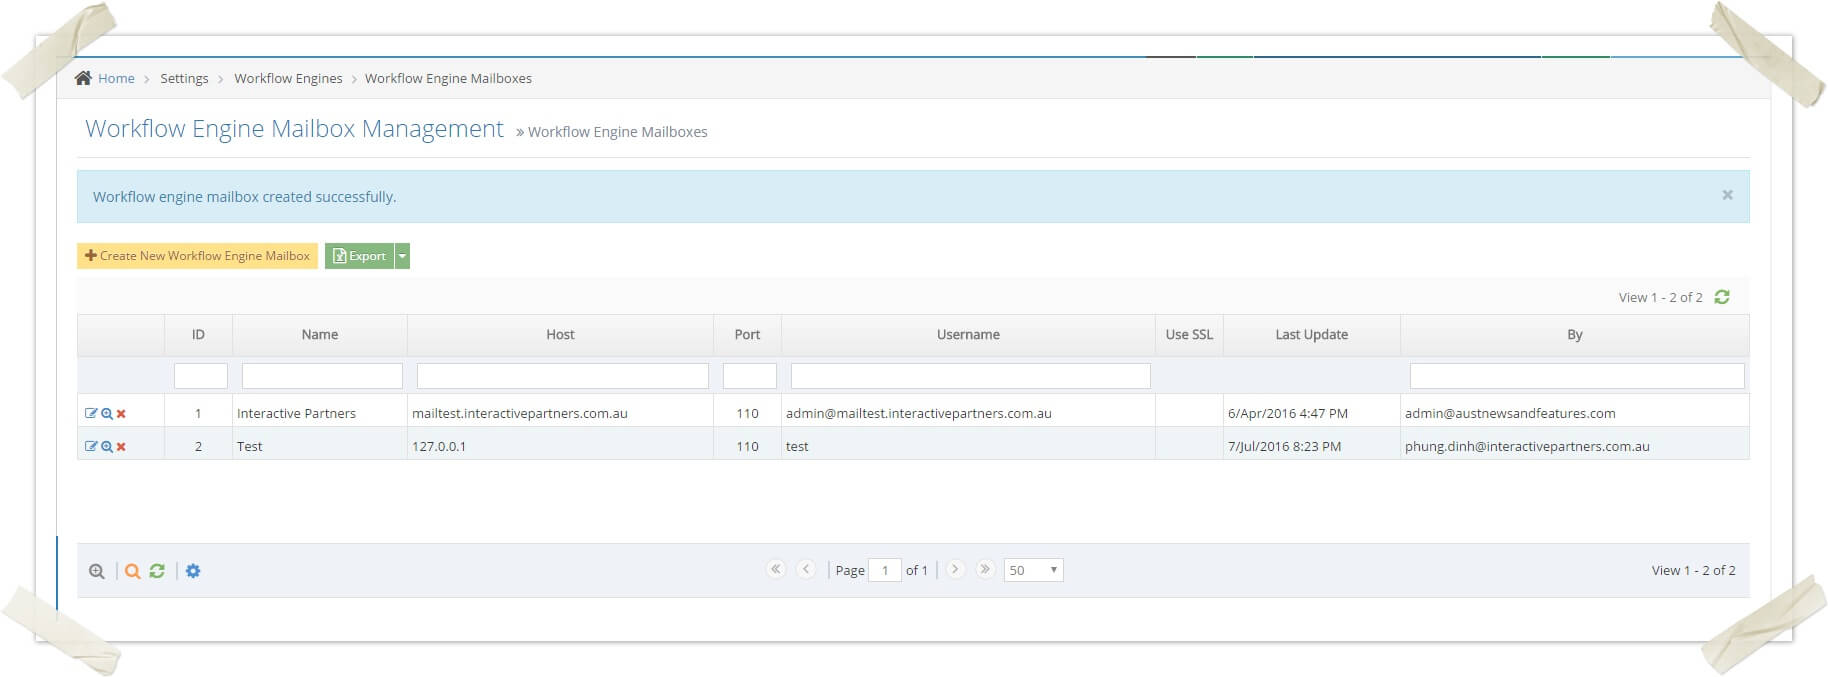
5A new workflow engine mailbox is created
57 - Test plan manage the mail box (PASS)
Target Release | 9.0 |
Epic | |
JIRA issue | |
Document status | DRAFT |
Document owner | Phung Dinh (Unlicensed) |
Developers | Minh Nguyen (Unlicensed) |
Enter your name | Belinda Sharp (Unlicensed) |
(Use @ above to add someone by name)
What are we testing
- Testing for managing the mailbox
Assumptions
- Login as CRM admin successfully
Requirements
# | Test Steps | Expected Result | Actual Result | Test By (use @) | Date | Notes |
---|---|---|---|---|---|---|
1 | Go to Settings >> WorkflowEngines >> Workflow Engines Mailboxes |
List of mailboxes appears |
Pass |
Belinda Sharp (Unlicensed) |
06 Aug 2016 |
|
2 | Click Create New Workflow Engine Mailbox |
Create screen for mailbox appears |
Pass |
Belinda Sharp (Unlicensed) |
06 Aug 2016 |
|
4 |
Enter name, select type, enter host, port, check user SSL(optional), enter the username, password |
Create successfully |
Pass |
Belinda Sharp (Unlicensed) |
06 Aug 2016 |
|
5 |
Click the Edit icon on a row in the list of mailbox |
Edit screen appears |
Pass |
Belinda Sharp (Unlicensed) |
06 Aug 2016 |
|
6 | Click Save |
Update mailbox successfully |
Pass |
Belinda Sharp (Unlicensed) |
06 Aug 2016 |
|
7 |
Click the View Details icon on a row in the list of mailbox |
The Details screen appears correctly |
Pass |
Belinda Sharp (Unlicensed) |
06 Aug 2016 |
|
8 |
Click the Delete icon on a row in the list of mailbox |
Details screen appears with a message to confirm deleting |
Pass |
Belinda Sharp (Unlicensed) |
06 Aug 2016 |
|
9 | Click OK |
If the mailbox doesn't have related data => Delete successfully If the mailbox has related data => Show an error message |
Pass |
Belinda Sharp (Unlicensed) |
06 Aug 2016 |
How To Manage Workflow Engine Type
How to create a new mailbox
-
1Go to Settings >> WorkflowEngines >> Workflow Engines Types
-
2Click Create New Workflow Engine Type
-
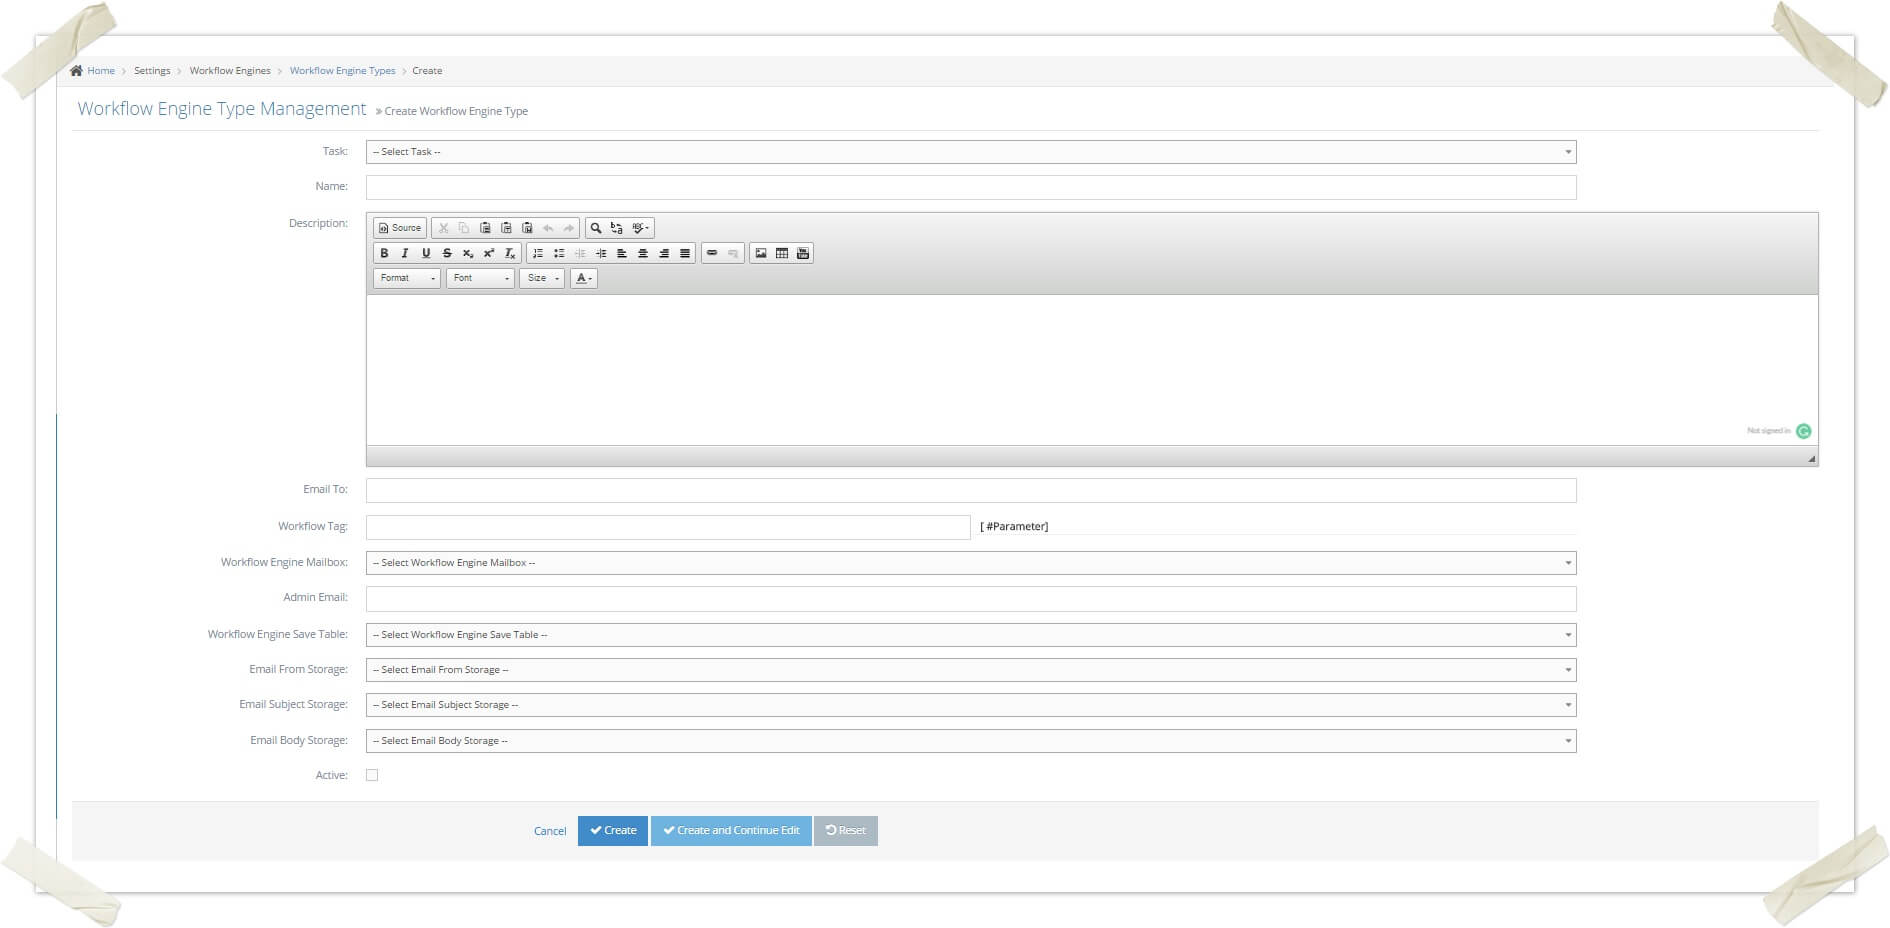
3Select the task, enter a name, enter a description, enter the email toe
-
4Enter the workflow tag, select the mailbox, enter the email forward, select the workflow engine save table to store the workflow engine information
-
5Select an email from storage, select email subject storage, select email body storage, and check active(optional)
-
6New workflow engine type created
How to edit/view details/delete a workflow engine type
-
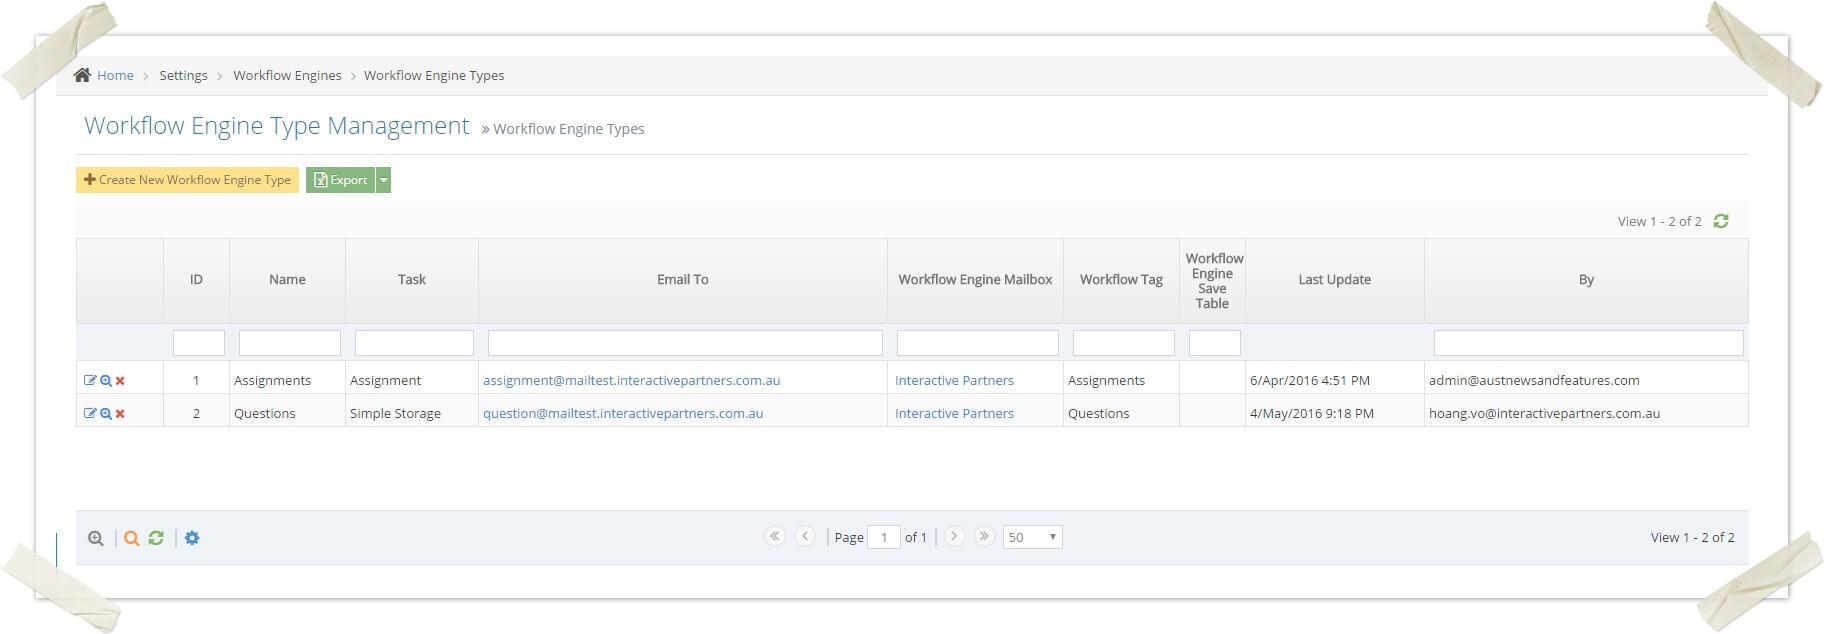
1Go to Settings >> WorkflowEngines >> Workflow Engines Types
-
2Click the Edit/View Details/Delete button on the row you want
How to assign Workflow Engine to Course
-
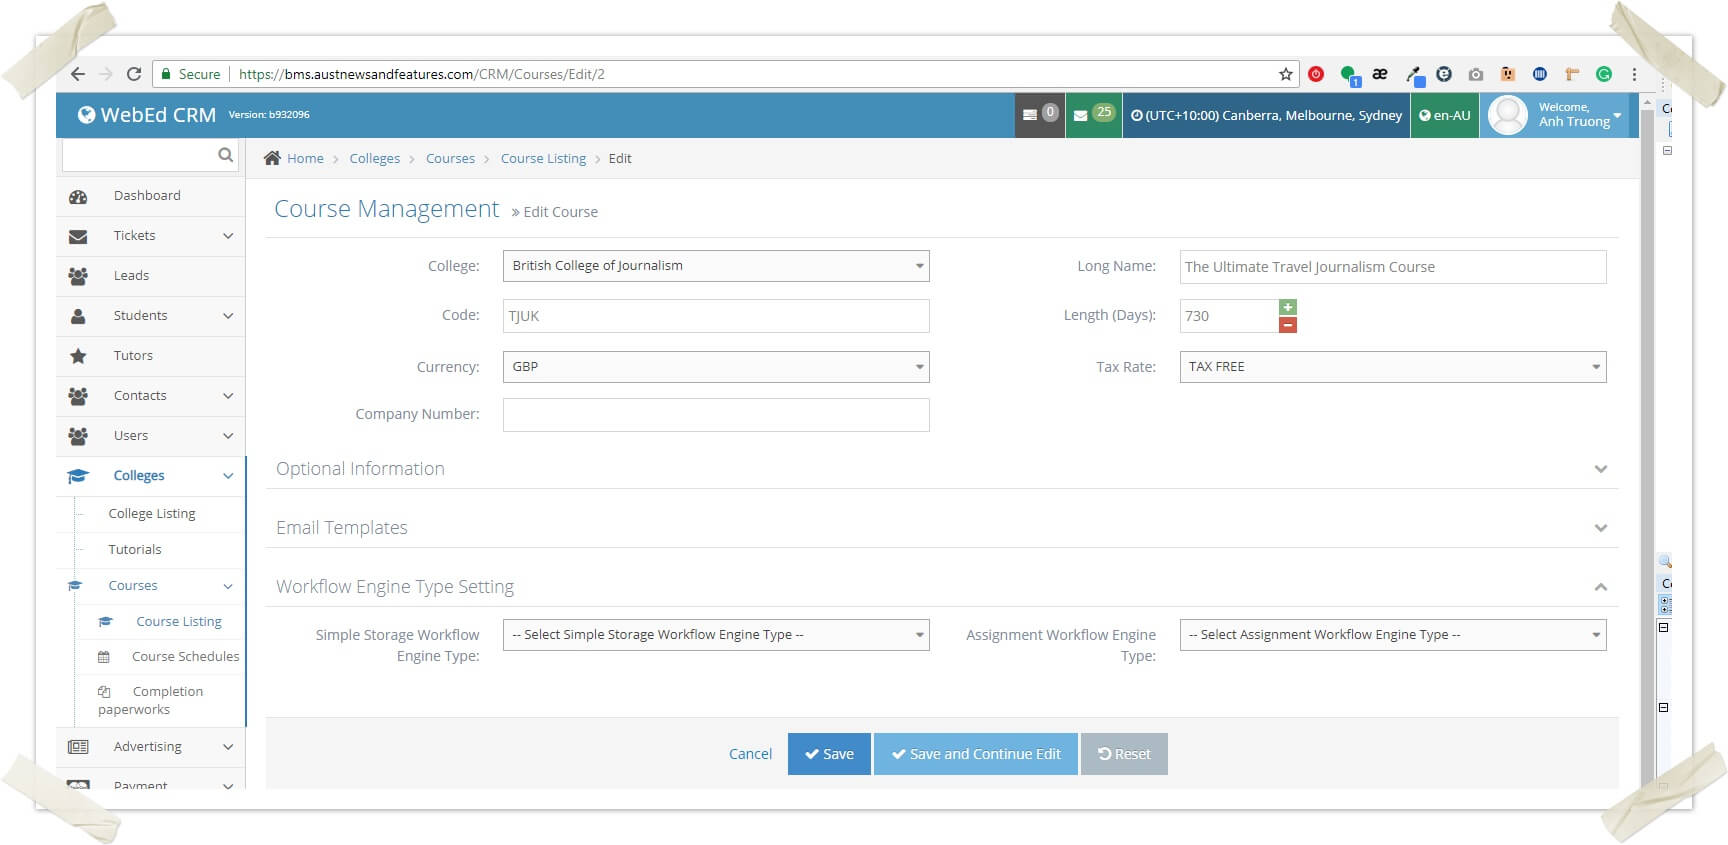
1Open Edit Course in BMS
-
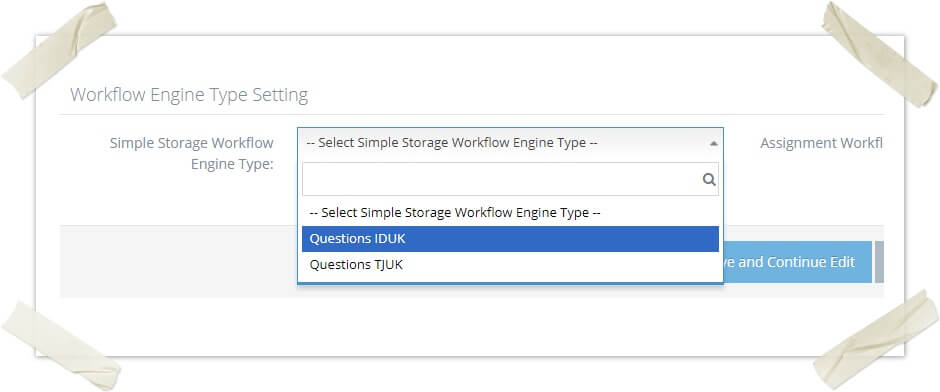
2Select the type of Workflow Engine Type for Simple Storage (Questions) and Assignment.
55 - Test plan manage the workflow engine type (PASS)
Target release | 9.0 |
---|---|
Epic | |
JIRA issue | |
Document status |
DRAFT |
Document owner |
Phung Dinh (Unlicensed) |
Developers |
Minh Nguyen (Unlicensed) |
Enter your name |
(Use @ above to add someone by name)
What are we testing
- Testing for managing workflow engine type
Assumptions
- Login as CRM admin successfully
Requirements
# | Test Steps | Expected Result | Actual Result | Test By (use @) | Date | Notes |
---|---|---|---|---|---|---|
1 | Go to Settings >> WorkflowEngines >> Workflow Engines Types |
List of workflow engine types appears |
Pass | Belinda Sharp (Unlicensed) |
01 Feb 2017 |
|
2 | Click Create New Workflow Engine Type |
Create screen for type appears |
Pass | Belinda Sharp (Unlicensed) |
01 Feb 2017 |
|
4 |
|
Create successfully |
Pass | Belinda Sharp (Unlicensed) |
01 Feb 2017 |
|
5 |
Click the Edit icon on a row in the list of mailbox |
Edit screen appears |
Pass | Belinda Sharp (Unlicensed) |
01 Feb 2017 |
|
6 | Click Save |
Update workflow engine type successfully |
Pass | Belinda Sharp (Unlicensed) |
01 Feb 2017 |
|
7 |
Click the View Details icon on a row in the list of workflow engine type |
The details screen appears correctly |
Pass | Belinda Sharp (Unlicensed) |
01 Feb 2017 |
|
8 |
Click the Delete icon on a row in the list of workflow engine type |
Details screen appears with a message to confirm deleting |
Pass |
01 Feb 2017 |
||
9 | Click OK |
If workflow engine type doesn't have related data => Delete successfully If workflow engine type has related data => Show error message |
Pass | Belinda Sharp (Unlicensed) | 01 Feb 2017 |
How To Manage Workflow Engine Ticket
How to view the tickets list and search for tickets
-
1Go to CRM Portal>> Tickets >> Ticket Listing
List all the tickets that are created on CRM/Student/Tutor portal or come or the emails that are sent to Assignments & Questions workflow engine types
-
2In the Search region >> You can search Tickets by
- Keyword (Contact Name/Email contains the keyword)
- Workflow engine type
- Status (Resolved or Not) - Unresolved is the default
How to view detail of a ticket
-
1Go to CRM Portal >> Tickets >> Ticket Listing
-
2Click on the View Details icon to the left of a ticket
-
3Two situations that can happen:
- If the ticket is an assignment >> go to the CRM/Student assignment details page
- If not, go to the ticket details page
-
4Ticket info on the top
-
5Next to ticket logs
- The last log is open as default
- Click on the log subject to open or close a log
-
6Per the ticket log, the admin will receive will have two button reply and forward
How to reply to a ticket
-
1Go to CRM Portal >> Tickets >> Ticket Listing
-
2Click on the Reply icon to the left of a ticket
-
3You can only reply to question tickets
-
4Go to the ticket details page and automatically scroll to the bottom
-
5Click on the ticket log item that the admin received and click on the Reply button
-
6Compose the ticket content
-
7You can use the pre-defined Canned Responses on the right
-
8You can also add a ticket content to canned responses for further use by checking on Add To Canned Responses check box and choosing the Canned Response Type
-
9And click on the Reply button
How to forward a ticket
-
1Go to CRM Portal >> Tickets >> Ticket Listing
-
2Click the View Details icon
-
3Click on the Question Subject that has the received icon >> Click the Forward button to open the forward modal window
-
4Select the Tutor, enter the message if the message that admin received from a student
-
5Preselect the Student, enter the message that the admin received from the tutor.
-
6Click Send
How to delete a ticket
-
1Go to CRM Portal >> Ticket Listing
-
2Two situations can happen:
- If the ticket has an assignment type:
- If this assignment has only one history (is very after submitted by the student) >> Go to /wiki/spaces/ANFBMS/pages/28737748 (the ticket will also be deleted)
- If the assignment has more than one history
>> A tooltip is shown when hovering on the delete icon and cannot delete the assignment
- If not:
- If the ticket has more than one logs
>> A tooltip is shown when hovering on the delete icon and cannot delete the ticket
- If the ticket has more than one logs
- If the ticket has only one log
>> Go to ticket detail page and a popup message will be displayed
- If the ticket has an assignment type:
-
3Click on the OK button on the pop-up to confirm delete
-
4You can also click on the Delete button on the top right corner of the ticket details page to delete a ticket
How to reassign a ticket
-
1Log in as an administrator and go to the Admin Dashboard.
Learn how to log in here → -
2Go to CRM Portal >> Ticket Listing
-
3You can only reassign a ticket if the ticket has only one log.
-
4Click on the Reassign icon to the left of a ticket
-
5The assigned ticket pop-up is open
-
6Select the workflow engine type
-
7Click on the Assign/Question button to reassign
-
8You can also click on the Reassign button on the top right corner of the ticket details page to reassign it. This button is only displayed if the ticket can be reassigned
How to mark a ticket as resolved or reopen it
-
1Log in as an administrator and go to the Admin Dashboard.
Learn how to log in here → -
2Go to CRM Portal >> Ticket Listing
-
3Click on Mark as Resolved icon to the left of a ticket that is open in order to resolve it.
-
4Click on Reopen icon to the left of a ticket that is already resolved to reopen it.
-
5You can also click on the Mark as resolved/Reopen button on the top right corner of the ticket details page to resolve/reopen it.
-
6Select the workflow engine type
-
7Click on the Assign/Question button to reassign
-
8You can also click on the Reassign button on the top right corner of the ticket details page to reassign it. This button is only displayed if the ticket can be reassigned
How to merge tickets
-
1Log in as an administrator and go to the Admin Dashboard.
Learn how to log in here → -
2Go to CRM Portal>> Ticket Listing
-
3Click on the Merge to existing ticket icon to the left of a ticket
-
4The condition for merging:
- The source and the target tickets must have the same type (or the source ticket has NO type - in this case, it can be merged into a ticket with any type)
- Both tickets are NOT assignments. If you want to merge assignments please follow How to Add or Replace Assignment
- Both must belong to the same Contact
- And certainly, they have different IDs
-
5The merge ticket popup will be displayed
-
6Enter something about the ID, ticket subject or contact email of a ticket to filter the tickets and pick a target ticket
-
7Click on the Merge button to merge the source ticket with the target ticket
-
8After merging the target ticket will contain all logs of both tickets and the source ticket is deleted
How to lock a ticket
This function is to prevent multiple staff working on a ticket on the CRM portal simultaneously.
When a ticket is reviewing (go to ticket details page) by a staff, on the listing page there is a lock icon displayed on the left of the ticket, other function ions are hidden except detail icon
And when going to the detail page of this ticket, you cannot do anything with the ticket. On the top right corner of the details page, the message "Ticket is reviewed by ..." is displayed instead of function buttons
How To Manage Canned Response
Who needs this documentation?
This how-to is for a staff (admin) who wants to manage (CRUD) the Canned Response
How to view the Canned response list
-
1Log in as an administrator and go to the Admin Dashboard.
Learn how to log in here → -
2Go to CRM Portal>> Canned Responses
How to create a new Canned Response
-
1Log in as an administrator and go to the Admin Dashboard.
Learn how to log in here → -
2Go to CRM Portal >> Canned Responses
-
3Click on Create New Canned Response button
-
4Enter the Content (Required)
-
5Select Canned response type (Optional)
-
6And click on Create button
-
7The new Canned Response is created successfully
How to Edit/View Detail/Delete a Canned response
-
1Log in as an administrator and go to the Admin Dashboard.
Learn how to log in here → -
2Go to CRM Portal>> Canned Responses
-
3Click on Edit/View Detail/Delete icon to the left of a canned response
61 - Test Plan Merge Workflow Engine Ticket (PASS)
Target release | |
---|---|
Epic | |
JIRA issue | |
Document status | LIVE |
Document owner | Sang Nguyen (Unlicensed) |
Developers | Sang Nguyen (Unlicensed) |
Enter your name |
(Use @ above to add someone by name)
What are we testing
- Testing the Merging Workflow engine ticket function
Background and strategic fit
- Merge a source ticket with a target ticket
- Both do NOT have assignment type
Assumptions
- Log in as administrator successfully
- Go to CRM portal >> Ticket listing page
Requirements
Test the merging function
Description | Test Steps | Expected Result | Notes | Actual Result | Test By (use @) | Date | Notes |
---|---|---|---|---|---|---|---|
1 | Test the merge icon is displayed correctly | On the ticket listing page |
The merge icon is only displayed to the left of a ticket if that ticket is NOT assignment |
Pass |
Belinda Sharp (Unlicensed) |
04 Aug 2016 |
|
2 | Test the merging pop-up | On the ticket listing page >> Click on a Merge to existing Ticket icon of a source ticket |
The Merge ticket pop-up is displayed
|
Pass |
Belinda Sharp (Unlicensed) |
04 Aug 2016 |
Pass to: #1 Fail: #2 - contradicts above - should not appear assignment type ticket. Fail: #3 can not create a ticket with no type to test? --------- Hi, Belinda Sharp (Unlicensed), About #2, now we do NOT allow creating assignment tickets anymore. And we also update the merge function, now we cannot merge assignment tickets. About #3, when a NON-student sends an email to the assignment mailbox, the created ticket will have NO type. Hope to see your response soon. Thanks! All looking good thanks,Toan Duong Manh (Unlicensed). What was the reason that the merge was moved from assignment tickets? What if a student sends their assignments across two emails? Sorry, I am struggling to recall or find the history of this. Thanks, Bee Hi, Belinda Sharp (Unlicensed), For the assignment, we have a merge assignment function. You can see more here: /wiki/spaces/ANFBMS/pages/28737748 Thanks! |
3 | Test the choosing target ticket |
On the merge ticket pop-up >> click on the To Ticket field >> Enter the Id or the ticket subject or the ticket contact email to |
If there are any tickets contain the Id or the subject or have the contact email and satisfy the condition:
They will be showed |
Pass |
Belinda Sharp (Unlicensed) |
04 Aug 2016 | This works well - thanks. |
4 | Test the merging function |
Pick a target ticket from the list above Click on the Merge button on the pop-up |
|
Pass |
Belinda Sharp (Unlicensed) |
04 Aug 2016 | |
5 | Test the target ticket after merging | On the ticket listing page >> Click on the View Details icon of the target ticket |
|
Pass |
Belinda Sharp (Unlicensed) |
04 Aug 2016 |
Test Plan (Lock Tickets Which Are Reviewed) (PASS)
Target release | |
Epic | |
JIRA issue | ANFBMS-617 - JIRA project doesn't exist or you don't have permission to view it. |
Document status | LIVE |
Document owner | Hoang Vo (Unlicensed) |
Developers | Hoang Vo (Unlicensed) |
Enter your name |
(Use @ above to add someone by name)
What are we testing
- With a team of people working on a list of tickets, there is a chance 2 people may both work on the same ticket at the same time.
- If a ticket is reviewed, then it cannot be edited by a second person.
Assumptions
- Tester has 2 admin accounts for testing (if you just have one account then log in with a second account by [email protected] and pass: 12345678)
- Login as administrator successfully by using the first account.
Requirements
Lock Tickets Which Are Reviewed
Test Steps (Step by Step keystrokes of the actual test) | Expected Result | Actual Result | Test By (use @) | Date | Notes | |
---|---|---|---|---|---|---|
1 | Go to Tickets > Ticket Listing | List of tickets appears |
Pass Pass |
Louise Williams (Unlicensed) |
23 Jul 2016 |
|
2 |
Go to details of a ticket which type in question |
Details screen appears |
Pass Pass |
Louise Williams (Unlicensed) |
23 Jul 2016 |
Details screen appears in NEW tab - which is great! |
3 |
User another browser (or use a new incognito window) Log in to the CRM portal by using your second admin accounts |
Login successfully |
Pass Pass |
Louise Williams (Unlicensed) |
23 Jul 2016 |
|
4 | Go to Tickets > Ticket Listing | List of tickets appears |
? Pass |
Louise Williams (Unlicensed) Belinda Sharp (Unlicensed) |
23 Jul 2016 26 Jul 2016 |
Unable to replicate the issue with multiple browsers - must have been a connection issue but we will keep a close eye on this. |
5 | Find the ticket which is reviewed by the contact in step 2 |
This ticket appears in the grid with the lock icon |
Pass Pass |
Louise Williams (Unlicensed) Belinda Sharp (Unlicensed) |
23 Jul 2016 26 Jul 2016 |
|
6 |
Hover to lock icon |
A message appears to inform this ticket is reviewed by another person |
Pass |
Louise Williams (Unlicensed) Belinda Sharp (Unlicensed) |
23 Jul 2016 26 Jul 2016 |
Yes, it tells you that the ticket is being reviewed by someone else - but it tells you the wrong person - I was logged in as "Louise Williams" and I opened the ticked - I then used another browser to log in as "Trowbridge" and as Trowbridge, it told me that a student was reviewing the ticket.
|
7 |
Click the lock icon |
Open in a new tab the details page of the contact who is reviewing this ticket | Pass |
Belinda Sharp (Unlicensed) |
26 Jul 2016 |
|
8 |
Go to details of this ticket |
A text is displayed to inform ticket is reviewed. Can not reply, delete, merge etc..., just be able to view. |
Pass |
Belinda Sharp (Unlicensed) |
26 Jul 2016 |
Release Tickets After Reviewing
(Step by Step keystrokes of the actual test) | Expected Result | Actual Result | Test By (use @) | Date | Notes | |
---|---|---|---|---|---|---|
1 |
Use the browser which is using your first account to login to CRM (the account which is reviewing tickets) Close all browser tab which is reviewing the ticket |
Close the browser tab which is reviewing the ticket successfully | Pass |
Belinda Sharp (Unlicensed) |
24 Jul 2016 |
|
2 |
Use the browser which is using your first account to login to CRM Go to Tickets > Ticket Listing |
The List of tickets appears | Pass |
Belinda Sharp (Unlicensed) |
24 Jul 2016 |
|
3 |
Find the ticket which is used for testing |
This ticket appears in the grid without a lock icon |
Pass |
Belinda Sharp (Unlicensed) |
24 Jul 2016 |
For some unexpected reasons, you need to wait about 1 or 2 minutes to release the ticket. Louise Williams (Unlicensed),, in most instances person who has a locked ticket, will be marked as resolved anyway so won't appear back in the list if has been completed. Will only be an issue if being passed on to someone else for further review. I think it is okay so long as we are aware of system timing so we know what is going on. What do you think? |
4 | Go to the details page of this ticket | Can reply, delete, merge etc... | Pass |
Belinda Sharp (Unlicensed) |
24 Jul 2016 |
Test Plan Reopen/Resolve the ticket (PASS)
Target release | |
Epic | |
JIRA issue | |
Document status | LIVE |
Document owner | Phung Dinh (Unlicensed) |
Developers | Phung Dinh (Unlicensed) |
Enter your name |
(Use @ above to add someone by name)
What are we testing
- Testing for mark as resolved the ticket
- Testing for reopening the ticket
Assumptions
- Login as administrator successfully
Requirements
Testing for mark as resolved the ticket
Test Steps (Step by Step keystrokes of the actual test) | Expected Result | Actual Result | Test By (use @) | Date | Notes | |
---|---|---|---|---|---|---|
1 | Go to Tickets > Ticket Listing | The ticket listing appears | Pass | Louise Williams (Unlicensed) |
07 Jul 2016 |
|
2 |
Click on the Mark as Resolved icon |
The message confirm appears | Pass | Louise Williams (Unlicensed) |
07 Jul 2016 |
|
3 | Click OK |
|
Pass | Louise Williams (Unlicensed) |
07 Jul 2016 |
Testing for reopening the ticket
Test Steps (Step by Step keystrokes of the actual test) | Expected Result | Actual Result | Test By (use @) | Date | Notes | |
---|---|---|---|---|---|---|
1 | Go to Tickets > Ticket Listing | The ticket listing appears | Pass | Louise Williams (Unlicensed) |
07 Jul 2016 |
|
2 | On the search ticket > filter resolved | The ticket listing with resolved appears | Pass | Louise Williams (Unlicensed) |
07 Jul 2016 |
|
3 |
Click on the reopen icon |
The message confirm appears |
Pass | Louise Williams (Unlicensed) |
07 Jul 2016 |
|
4 | Click OK |
|
Pass | Louise Williams (Unlicensed) |
07 Jul 2016 |