- What Image Types Can I use?
- Image Dimensions
- Image Uploaded Converting to WebP format
- How will images convert to WebP?
- WebP advantages
- Image Quality
- Upload images directly on the page/page content
- Upload images to my website using File Manager
- Update existing images on the page/page content
- Check Image Size
- Check the Image size on each page separately
- Resizing Images
- Updating a Photo Gallery
- Remove an image on the page/page content
- Editing a Banner Image
- Creating a Photo Gallery on a Page
- Adding a Popup Lightbox Effect on an Image
- Troubleshooting Tips for Image Loading Problems
Managing Images
What Image Types Can I use?
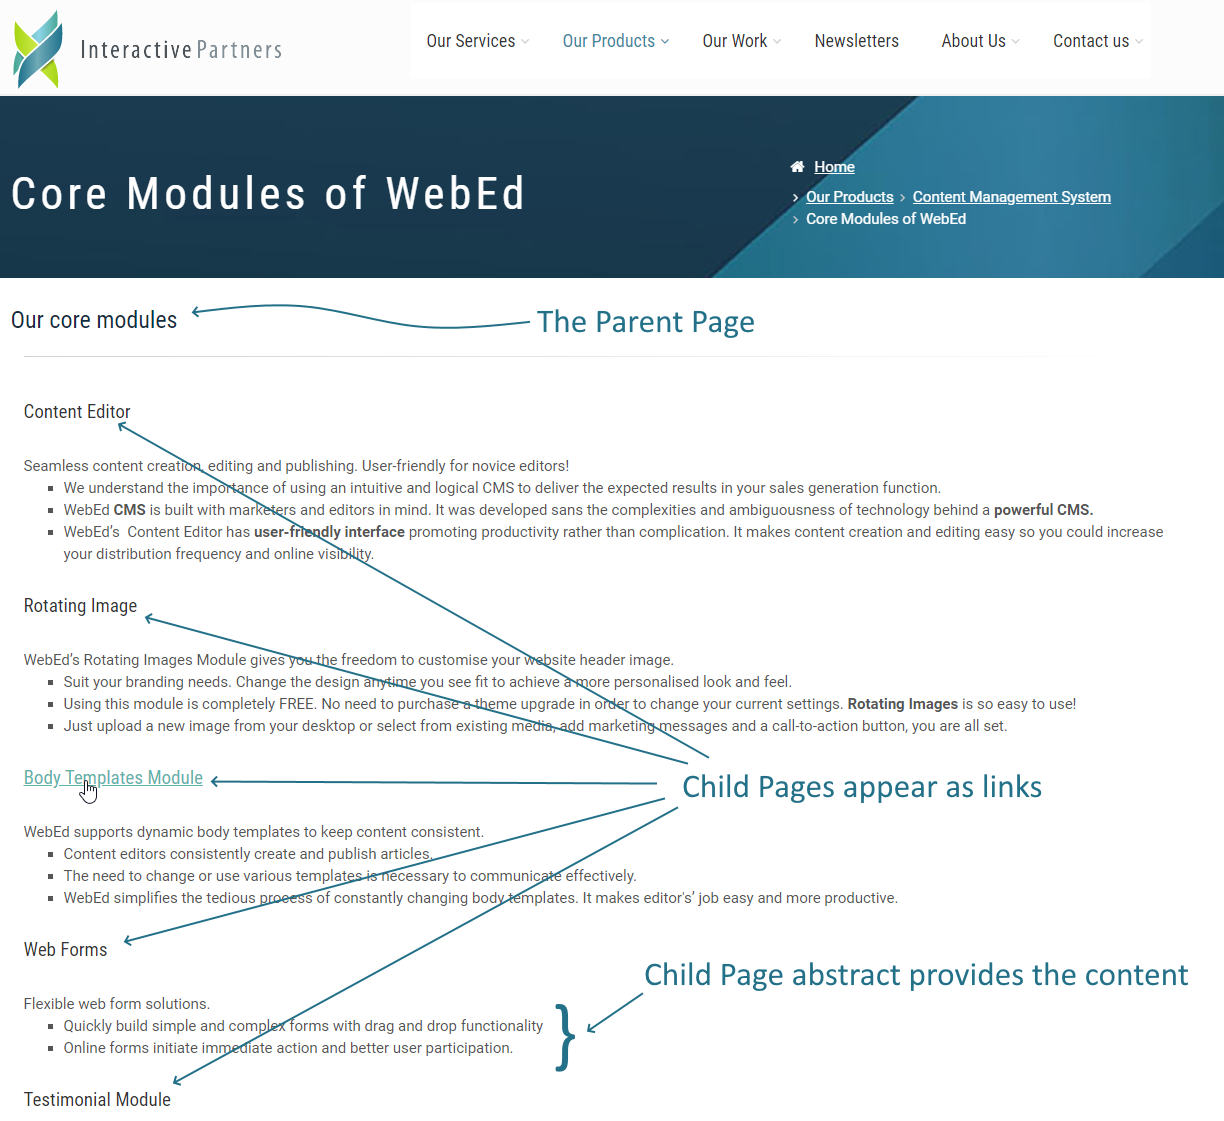
This can be of any size at all. It doesn't need to be a BLOCK OF TEXT.
You need to have an image ready before you add it to your template or article. You can use any image software program such as Photoshop or Paint Shop Pro to create, resize, crop, colour etc. your image as required. Save it to your desktop.
Image files can only be in the form of JPEG, GIF or PNG.
This is the abstract for this page.
The Page Abstract displays under the Heading
- You need to have an image ready before you add it to your template or article. You can use any image software program such as Photoshop or Paint Shop Pro to create, resize, crop, colour etc. your image as required. Save it to your desktop.
Image files can only be in the form of JPEG, GIF or PNG.
Image Dimensions
- Although images have a strong visual impact and are powerful communication devices, it is advisable to keep image sizes (width, height & file size) to a minimum. The larger the image and the higher the quality, the larger the size of the file, and the longer it takes your page to download.
- NOTE: There is the option to resize images in the Image Dialog box, we do advise that you don't use this option. Even though the image looks smaller on the page, you are not changing the size of the image but merely changing the space your Web browser allocates for the image. The browser still has to download a large file. If you resize to the correct size in a graphics program prior to uploading you'll change both the image's dimensions and its file size.
- The maximum size of any media asset (image, PDF, video etc) that can be uploaded through WebEd is 10MB, images with a file size above 10MB will need to be uploaded by FTP (File Transfer Protocol) to your website. 10MB is a substantial size for an image and it is unlikely that you will be required to do this.
Image Uploaded Converting to WebP format
We added this function to our system as WebP is an emerging image format put out by Google. It’s designed to use a more aggressive and better-optimized compression algorithm than JPG and PNG with the objective of reducing file sizes with minimal quality loss.
How will images convert to WebP?
Understand the process of converting images to WebP format in WebEd9. Learn how this format improves load times and quality for your website.
- You upload the images on the File Manager
- The original file formats (JPEG and PNG) will remain and the system will AUTOMATICALLY convert and create a WebP file. No updates are needed for users.
- The images will display as WebP on the website pages
NOTE: Images that are uploaded via FTP (File Transfer Protocol) are not converting to WebP. And the system doesn't convert GIF and WebP images.
WebP advantages
- WebP is much smaller compared to traditional image file formats ( JPEG and PNG ).
- Google boasts that it is 25% to 35% smaller compared to a JPEG and PNG image.
- The smaller size means a faster website.
- A faster website equals better SEO.
Image Quality
- All images published in digital media will render at the standard screen resolution of 72dpi. As such, images do not require a higher resolution than this to be published. Larger dpi will only result in unnecessarily large image file sizes.
- Though your Web browser is capable of scaling photos to make them bigger or smaller, it's not very good at it. A graphics editor like Photoshop or Paint Shop will do a much better job. Resizing the image before uploading ensures the browser will load the smaller file, the area it occupies will be smaller and the whole page will load faster for visitors.
Upload images directly on the page/page content
-
1Log in as an administrator and go to the Admin Dashboard.
Learn how to log in here → -
2In the Admin, on the left menu, click Pages, then select Pages
-
3Click the Create New Page button or select the page where you want to insert an image
Learn how to create a new page here → -
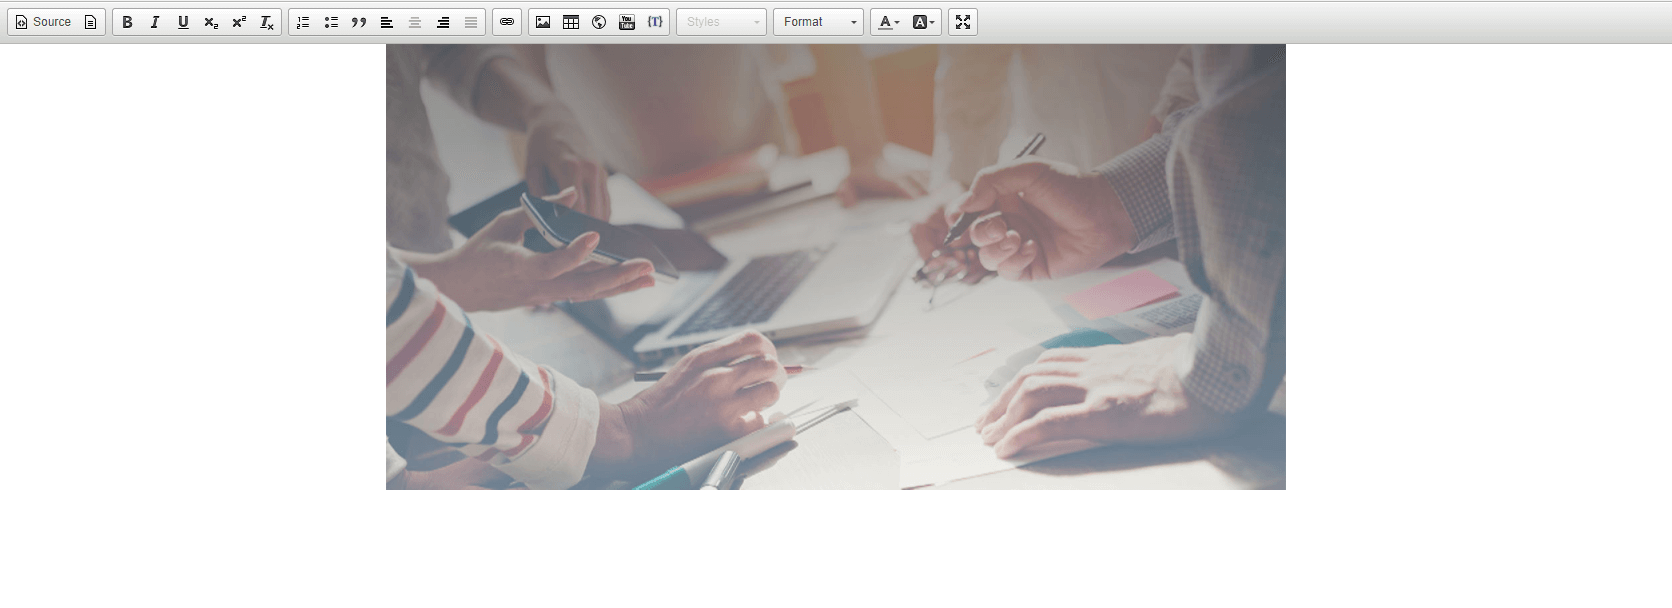
4In the Content section, Click the Image icon on the page editor Editor toolbar


-
5On the File Manager popup:
- Select the folder
- Upload an image to the folder (will AUTOMATICALLY convert and create a WebP file)
- Click the image uploaded
- Check the details if correct and Update if needed
- Title - The image title text attribute is an attribute that is used to provide additional information about the image.
- Alt - The image ALT text describes the image textually so that search engines and screen readers (software used by the visually impaired) can understand what the image is.
- Description - The image description gives more details than alt text and allows someone to learn more about what is in an image that goes beyond alt text.
- Click Select to add the image
-
6If you wish to update image properties, double-click the image
-
7On the Image Properties window, you can update the below:
- Image Info
- Image URL
- ALT Text
- The width of the image
- The height of the image
- Image preview
- Image Border
- Image HSpace
- Image VSpace
- Image Alignment
- Link
- Image Link URL
- Target
- Advanced
- ID
- Language Direction
- Language Code
- Long Description URL
- Stylesheet Classes
- Advisory Title
- Style
- Image Info
-
8Click OK to add the image to the page content
Upload images to my website using File Manager
-
1Log in as an administrator and go to the Admin Dashboard.
Learn how to log in here → -
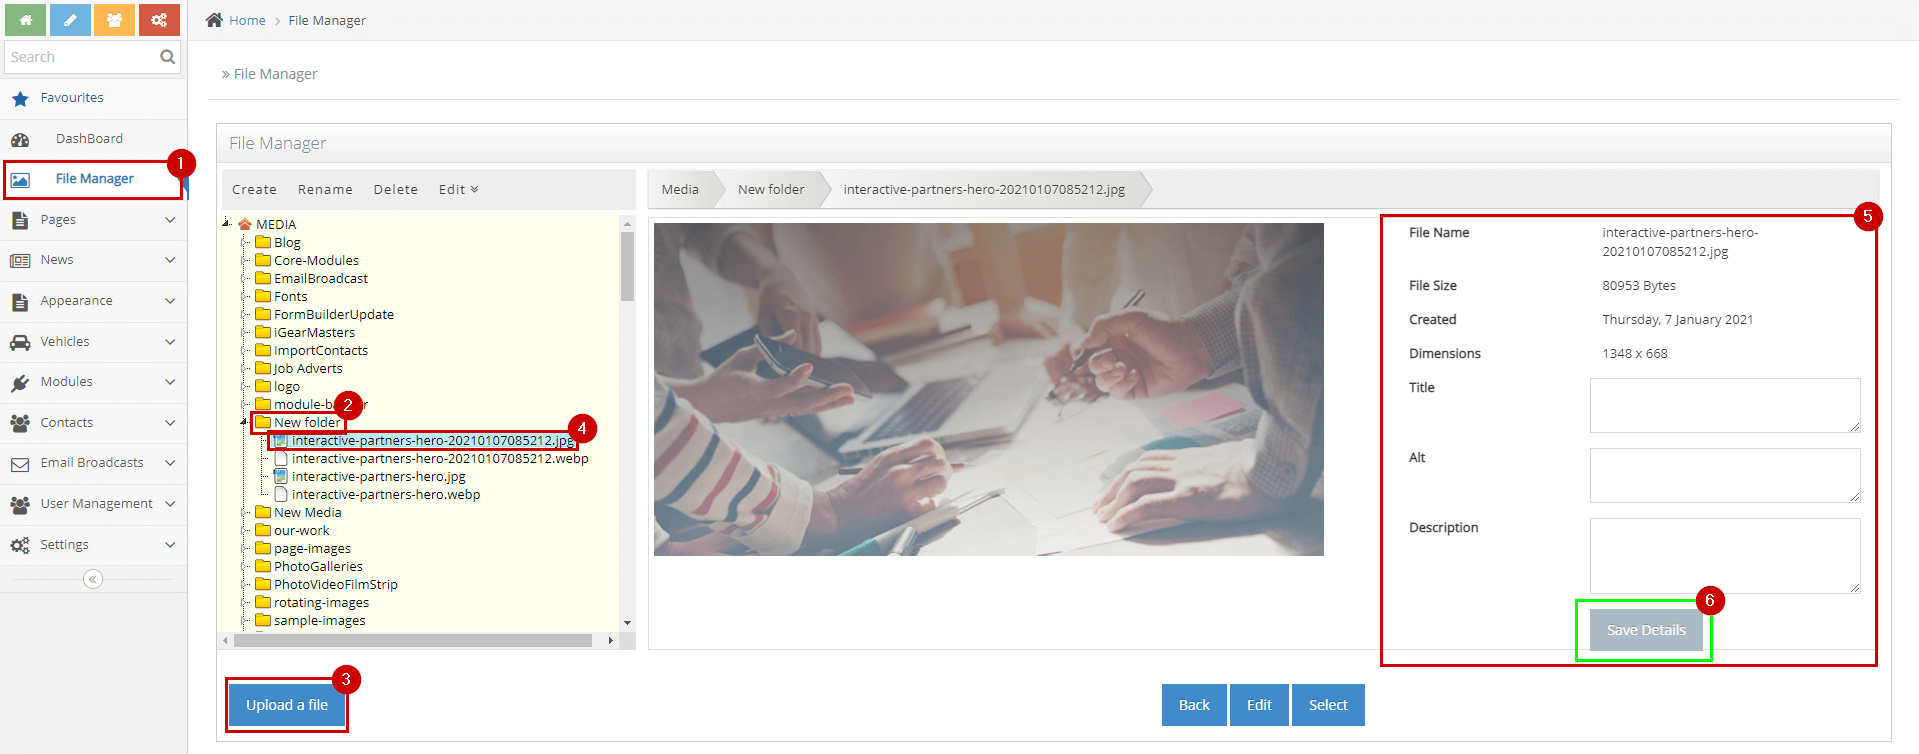
2In the Admin, on the left menu, click File Manager
-
3On the File Manager/Medi dashboard, Select the folder
-
4Upload an image to the folder (will AUTOMATICALLY convert and create a WebP file)
-
5Click the image uploaded
-
6Check the details if correct and Update if needed
- Title - The image title text attribute is an attribute that is used to provide additional information about the image.
- Alt - The image ALT text describes the image textually so that search engines and screen readers (software used by the visually impaired) can understand what the image is.
- Description - The image description gives more details than alt text and allows someone to learn more about what is in an image that goes beyond alt text.
-
7If the details changed, Click the Save Details button and you have successfully uploaded the image.
Update existing images on the page/page content
-
1Log in as an administrator and go to the Admin Dashboard.
Learn how to log in here → -
2In the Admin Module, on the left menu, click Pages, then select Pages and Edit the page you wish to update or
-
3Edit directly the page you wish to Update
-
4Click the Image you will update on the page editor
- Copy and Move
- There are 2 ways to move images within a page
- Drag the image to a new location using your mouse
- Copy (or CTRL-C) your image and then Paste (ctrl-v) into the new location
-
Replace the image
- Ensure you have the new image ready to go
- Delete the old image
- Position your cursor and click the 'Image Icon' on the toolbar -

- Select the new image from the ones available on the server or upload the image
- Copy and Move
-
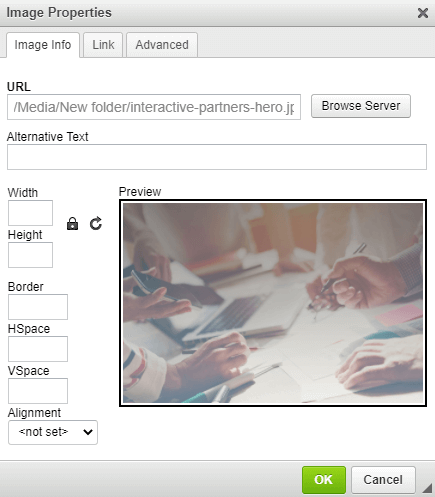
5Or Double Click the Image you will update on the page editor
-
6On the Image Properties window, you can update the below:
- Image Info
- Image URL
- ALT Text
- The width of the image
- The height of the image
- Image preview
- Image Border
- Image HSpace
- Image VSpace
- Image Alignment
- Link
- Image Link URL
- Target
- Advanced
- ID
- Language Direction
- Language Code
- Long Description URL
- Stylesheet Classes
- Advisory Title
- Style
- Image Info
Check Image Size
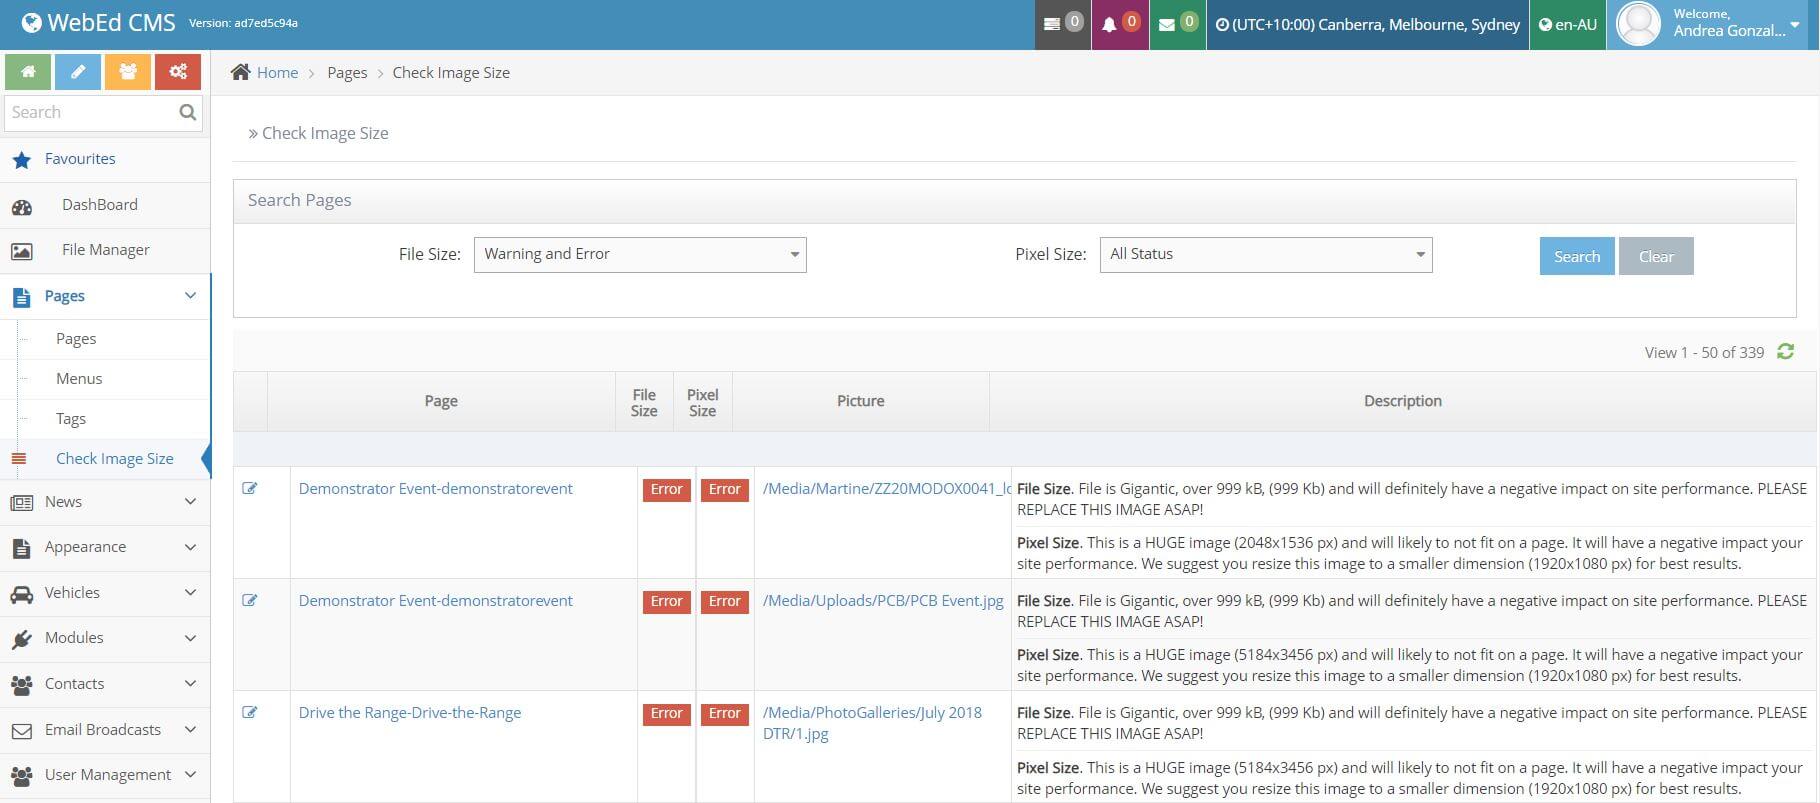
The Check Image Size module is the module you go to when you need to check the dimensions and file sizes of any image on your site. You can use this module to identify those which might cause performance problems and bottlenecks, then you can edit them accordingly for improved site performance.
Check Image Size Overview
The Check Image Size module is the module you go to when you need to check the dimensions and file sizes of any image on your site. You can use this module to identify those which might cause performance problems and bottlenecks, then you can edit them accordingly for improved site performance.
Check Image Size Filters
There are 5 filters:
- All Status - shows all images with every label
- Warning and Error - shows images with Warning and Error labels
- Warning - shows images with Warning labels only
- Error - shows images with Error label only
- Normal - shows all images with Normal label only
File Size Checker
The file size checks for how many pixels the image contains in bytes. For example, an image of 2,340,000 pixels has a file size of 2,340,000 bytes or about 2.34 MB (this is because there are 1024 bytes in a kilobyte and 1024 kilobytes in an MB).
The recommended file size of images is less than 100 kilobytes for a fairly small image, and within 200 kilobytes for banners and large images.
Labels
- OK - Image is optimised and doesn’t impact site performance
- Warning - You should take a look at this image and make the necessary adjustments
- Error - This image needs to be replaced or readjusted, it has a very negative impact on site performance
Managing Check Image Sizes
-
1Log in as an administrator and go to the Admin Dashboard.
Learn how to log in here → -
2After logging in, once you’re in the Admin, navigate to Page Content
-
3Under Page Content, click on Check Image Size
-
4Select the preferred filters for the File Size and Pixel Size
-
5Click the “Search” button
-
6The Module will display all images on that website and show their status (using labels), location and give you a brief description of the problem/status
-
7Provided description can help you identify the problem, and suggests necessary actions that one can take to resolve the problem.
-
8It’s suggested that you address all images With Warning and Error labels
-
9Grid Legend:
- Edit Page link
- File size and Pixel size columns with Labels
- Picture URL
- Short description of the status/problem

Check the Image size on each page separately
We also included checking all images on each site separately
This is useful for example when you draft pages, and you are worried about performance
-
1Log in as an administrator and go to the Admin Dashboard.
Learn how to log in here → -
2On the Edit Page screen, click the “Check Image Size” button, and the script will run for the selected page

Resizing Images
When should I resize my images?
Unsure when to resize your images? Learn the best practices for resizing images to optimize website performance and user experience. Find out when resizing is necessary and how to do it effectively.
Resizing images is crucial for maintaining optimal website performance and user experience. This article explores the scenarios where image resizing is necessary, the benefits of proper image dimensions, and provides practical advice on how to resize your images without compromising quality.
- This is a common question
- There is no doubt resizing the image before uploading gives the best results.
- If you don't have any desktop imaging software, we use and recommend paint.net (free)
- This will prevent users from resizing the images in the content
- See the guide below on how to resize images using the image editor in our software
Resizing Image Tips
Proper image resizing is key to maintaining quality across various platforms and devices. This guide offers practical tips on resizing images, ensuring that they look great while also optimizing for speed and performance. Whether you're working with large photos or small icons, you'll find the right approach here.
Resizing Images Overview
- Images create a great visual impact on a page, they are an effective way to present a product or service.
- The problem with images is that they are most often the cause of slow-loading pages because they are not always being optimised for screen resolution.
- We have put together some tips for resizing and saving your images for your website and newsletter.
Best Image Resolution, Size, and DPI
- The problem with images is that they are most often the cause of slow-loading pages - because they are not always being optimised for the best screen resolution. Larger-sized images slow down the load time of your page and worse still frustrate users.
- Scanned images, or stills from a camera, are by default saved at the print resolution which is double or triple the size of screen resolution, which means they need to be resized before they are uploaded to the WebEd Editor and thus to your web pages.
- Here are some tips for preparing images to be web-ready. Any basic image editing software will allow you to edit image size.
- Image size is made up of two components:
- the first being resolution or DPI (dots per inch),
- the second being the dimensions height by width.
- Images should be saved to the exact size you want them to be viewed on the web.
Understanding and Setting DPI
DPI (Dots Per Inch) is a critical factor in determining the quality of printed images. This article explains what DPI is, how it affects image clarity and print results, and provides guidance on selecting the appropriate DPI settings for various uses. Enhance your understanding of DPI to improve both digital and print image quality.
- DPI means Dots Per Inch
- The recommended DPI for images is 72 DPI
- Check your desktop image editing software help to be sure you are saving 72 DPI
- If you don't the image may become distorted and will increase the load time of the page.
JPEG, GIF or PNG?
PNG is generally the best format to use
- JPEG
- JPG files are best for photographs or artwork with gradient tints because they support thousands of colours. JPG files are easily compressed but drop photo quality easily,
- GIF
- GIF images are best for line art or artwork with flat areas of colour such as text rendered as an image.
- GIF images are compressed by removing colours from its palette of 256.
- GIF images support transparency.
- GIF is an older file format that is being superseded by PNGs.
- PNG
- PNGs provide all the advantages of GIFs with a greater colour range support
- They compress much better than GIFs
- PNG images support transparency
Always provide an Image Title
- The image dialogue window asks for a Title for your image, otherwise known as an image ALT tag.
- You should always include a brief description of the image, this is important for search engine optimisation.
- The image title should be relevant to the flow of content on your page and possibly contain a keyword.
Your image size is still too large?
- There is a general rule of thumb that no element on your page should be over 30kb.
- Although this is not as pressing with faster internet connections, we still get surprised at how many sites are using images over 200kb.
- If you have Abode Photoshop or Photoshop Elements ensure you select the "Save For Web & Devices" tool to minimise the size without minimising quality
Resizing Images in Media Manager
-
1We have a tool in the media manager that we use for image resizing.
-
2You can access it by clicking the image icon in the toolbar.

-
3Navigate to an image and click the Edit button
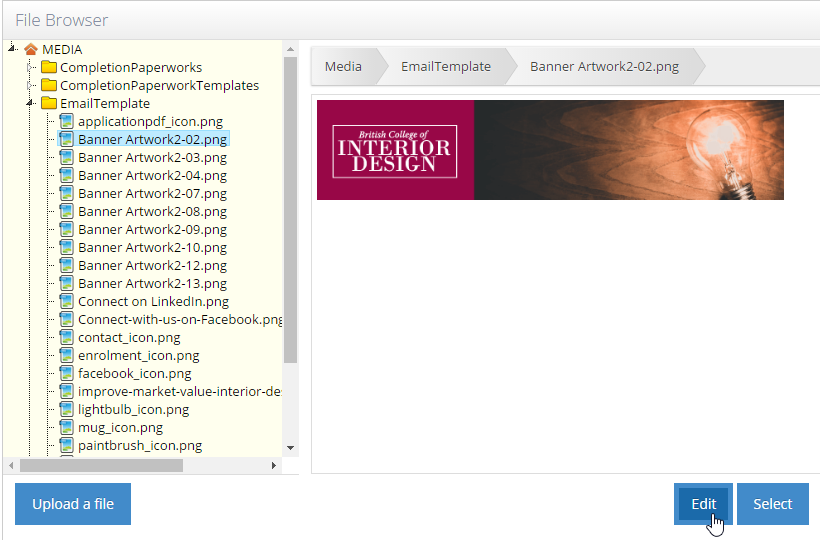
-
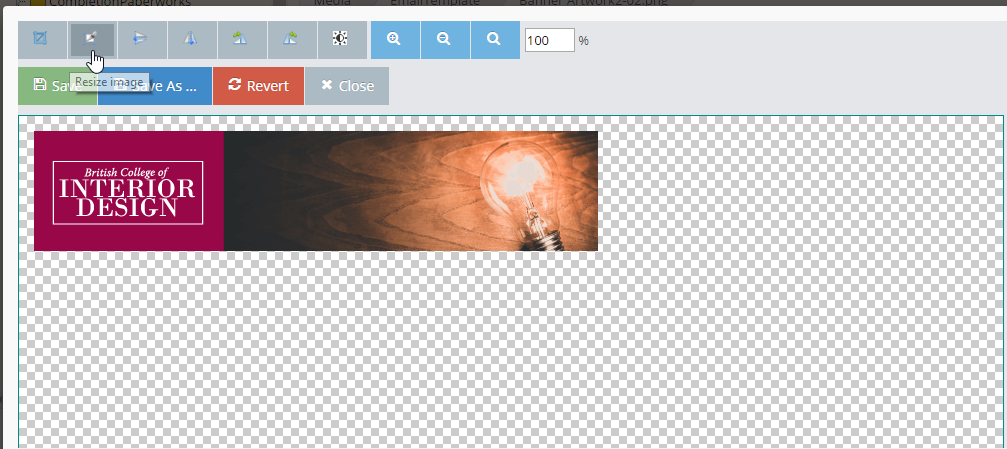
4The image will open in the editor
-
5From the toolbar select Crop, Resize, Rotate or Adjust Brightness (you can also zoom in and out of the image)
How to Use the Crop Tool in WebEd
-
1Select 'Crop' on the toolbar
-
2Set the zoom to 100%
-
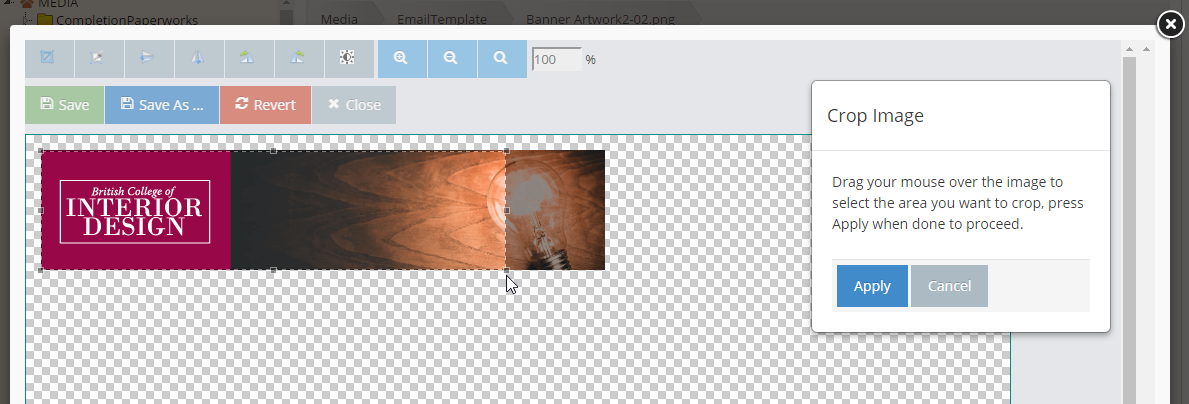
3Drag your mouse over the area to crop
-
4Click 'Apply' to crop the image
-
5Choose 'Save As' to save the image with a new name (enter the new name) or click 'Save' to overwrite/update the original image
Resize
-
1Select 'Resize' on the toolbar
-
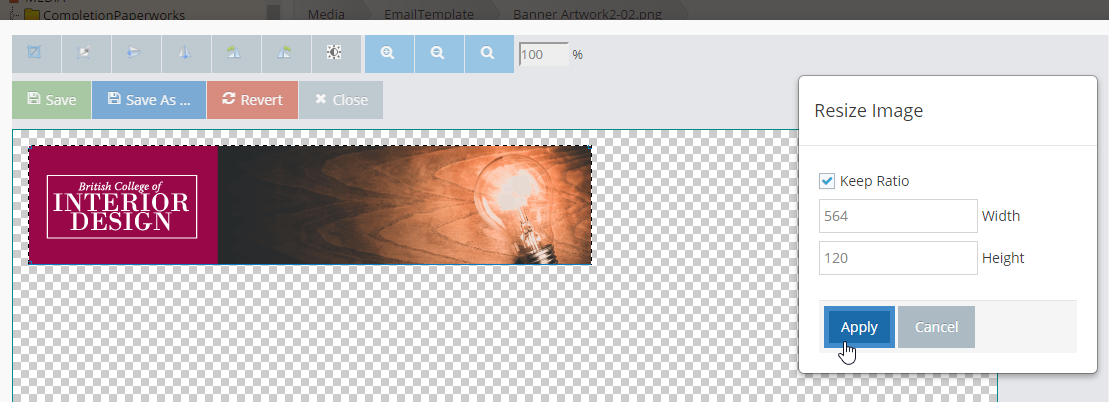
2Ensure 'Keep Ratio' is checked (or the image will be distorted)
-
3Enter either the height or width of the image (the other size will auto resize)
-
4Click 'Apply' to resize the image
-
5Choose 'Save As' to save the image with a new name (enter the new name) or click 'Save' to overwrite/update the original image
-
6Congratulations! You have successfully resized the image.
Remove an image on the page/page content
-
1Log in as an administrator and go to the Admin Dashboard.
Learn how to log in here → -
2In the Admin Module, on the left menu, click Pages, then select Pages and Edit the page you wish to update or
-
3Edit directly the page you wish to Update
-
4Click the Image you will remove
-
5Click the backspace or Delete button on your keyboard
-
6The Image will be removed
-
7Save the page to apply changes
Editing a Banner Image
Navigating to the File Manage browser
-
1Log in as an administrator and go to the Admin Dashboard.
Learn how to log in here → -
2On the left Menu Panel go to Page Content > Look and Feel > File Manage
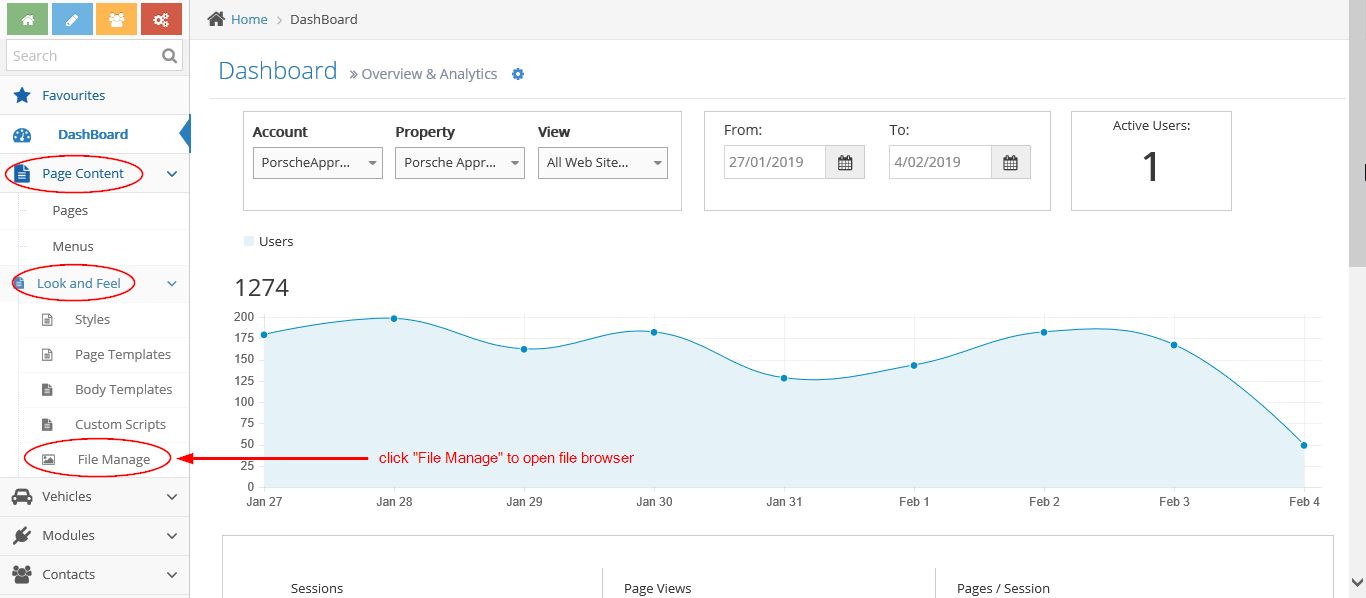
-
3Once you click on File Manage it should open up the File Manage browser
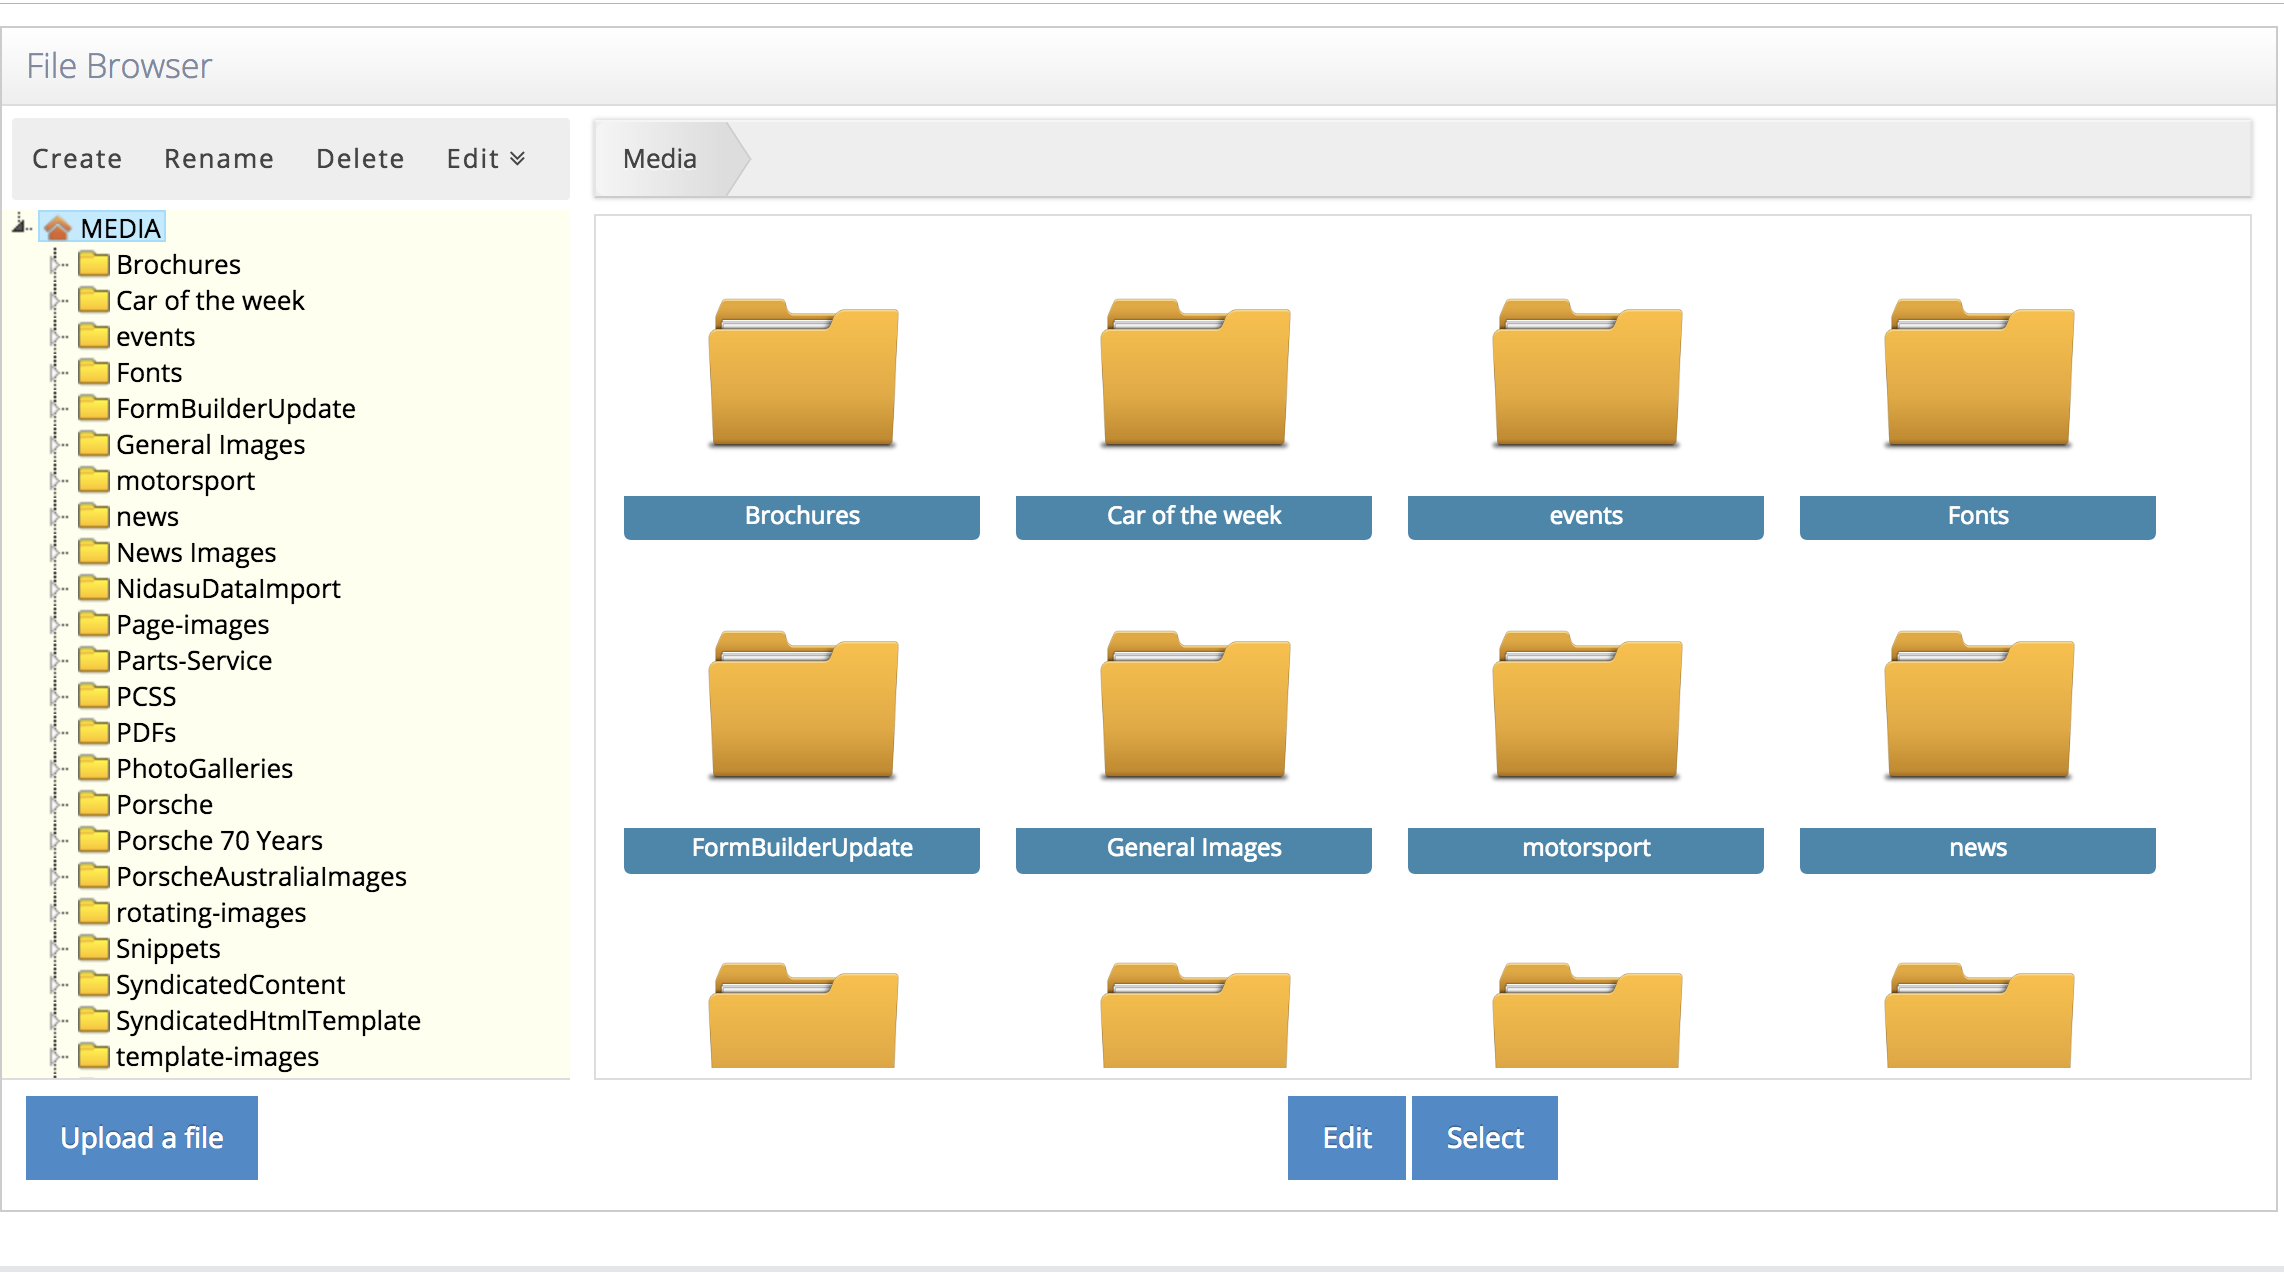
-
4Once you click on File Manage it should open up the File Manage browser
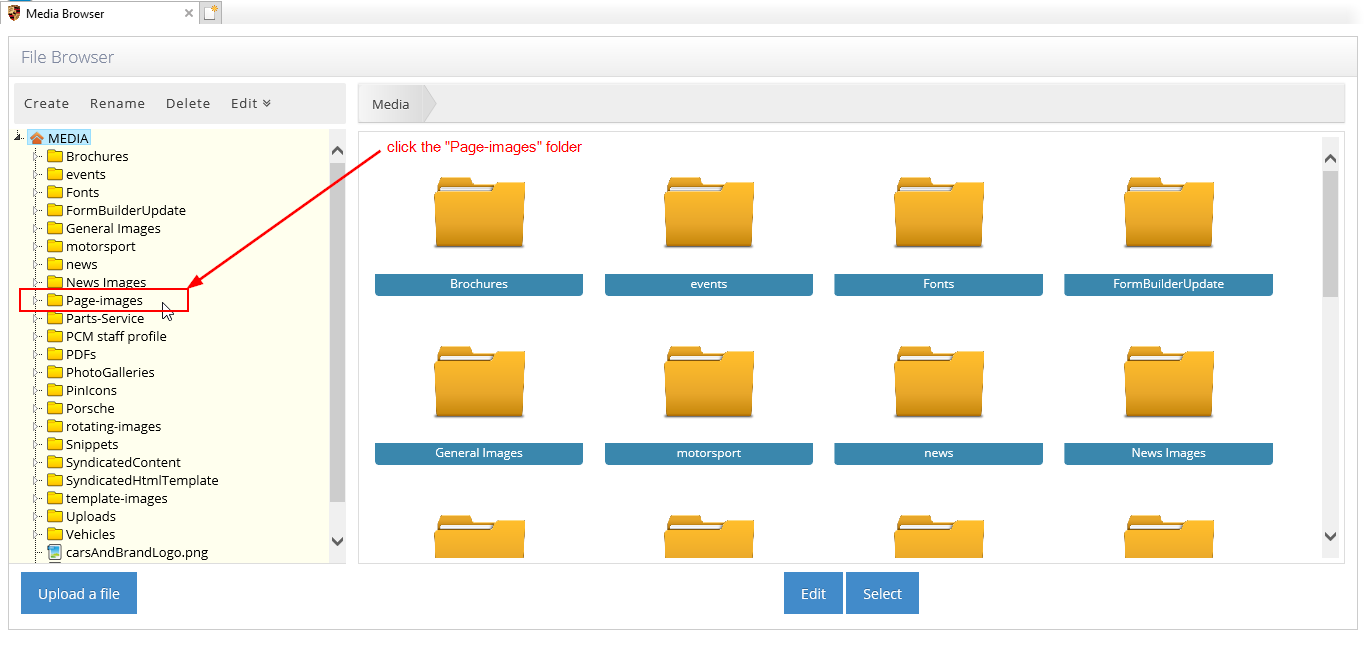
Uploading an image for a Banner on a new page
-
1If you are uploading a new image for a new page that you've just created - please ensure your image file name matches exactly your page Title or Friendly URL and it is in JPG format.
Example: the page title is The New Cayenne has arrived
-
2Ex. If you're uploading an image on the page then you need to rename your photo to The-New-Cayenne-has-arrived so it matches the end URL of your page.
-
3Once you've renamed it - click on the Upload a file button > Locate the file you want to upload > and upload the file.
-
4Once that's done the image will automatically appear on the website.
Note: There are times when the image might take a while to load as it could be Cached.
To Clear cache: The keyboard shortcut is Shift+Ctrl+Delete.
Updating a Banner with an existing image
-
1If you are replacing an existing image of an existing page you will need to delete the existing image. Locate the file under the Page-images folder (you can locate it by the file name which should match your website page's URL) and delete it.
Example: the page title is: The New Cayenne has arrived -
2Ex. If you're going to replace the image on the page then locate the image file The-New-Cayenne-has-arrived and delete or rename it.
Example for renaming the old/existing page image banner: The-New-Cayenne-has-arrived_old or The-New-Cayenne-has-arrived_old -
3After deleting or renaming the image, click on Upload a file, locate your image (make sure you rename it exactly as the URL still) then upload it.
-
4For this example, you need to rename the new image as The-New-Cayenne-has-arrived
-
5Once that's done the image will automatically appear on the website.
Note: There are times when the image might take a while to load as it could be Cached. To Clear the cache: The keyboard shortcut is Shift+Ctrl+Delete.
Creating a Photo Gallery on a Page
Why you would use a Photo Gallery curly bracket?
If a user wants to showcase their business's end-product or services through pictures and images. A Photo Gallery module which is a built-in feature for WebEd 9 CMS lets the user display a set of images on a page that is stored in a single folder. This gallery can be updated by the user by going to the File Manage module. The Photo Gallery has a lightbox effect with arrows to view and scroll the group of images from left to right.
Creating a Photo Gallery folder of your images
-
1Log in as an administrator and go to the Admin Dashboard.
Learn how to log in here → -
2Choose the page you want to create the gallery on
-
3Open the edit window by selecting the edit icon on the right-hand side
-
4Open the image icon & go to the server browser/file manager
-
5
Create a new folder under Images Galleries & upload your images
Remember to always upload your images in low res - 72dpi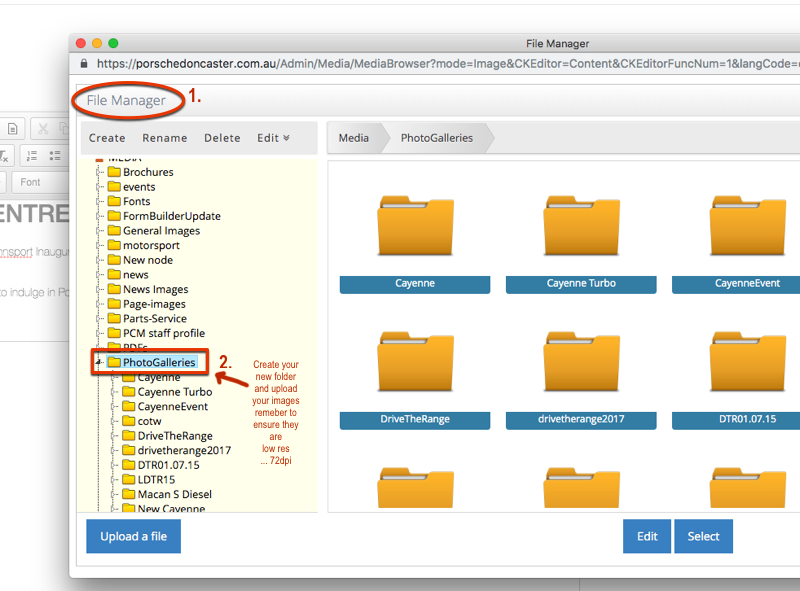
-
6Once you have created your photo Gallery file & uploaded your images, you can put your gallery on your webpage
Inserting a Photo Gallery on a page
-
1Log in as an administrator and go to the Admin Dashboard.
Learn how to log in here → -
2Load the page editor
-
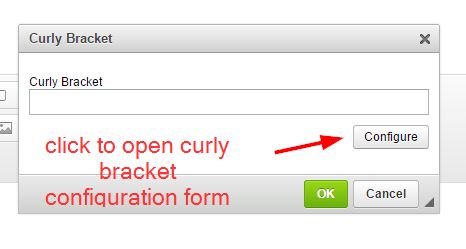
3Position the cursor where you want to place the gallery and click the curly bracket icon


-
4When the window opens, click Configure
-
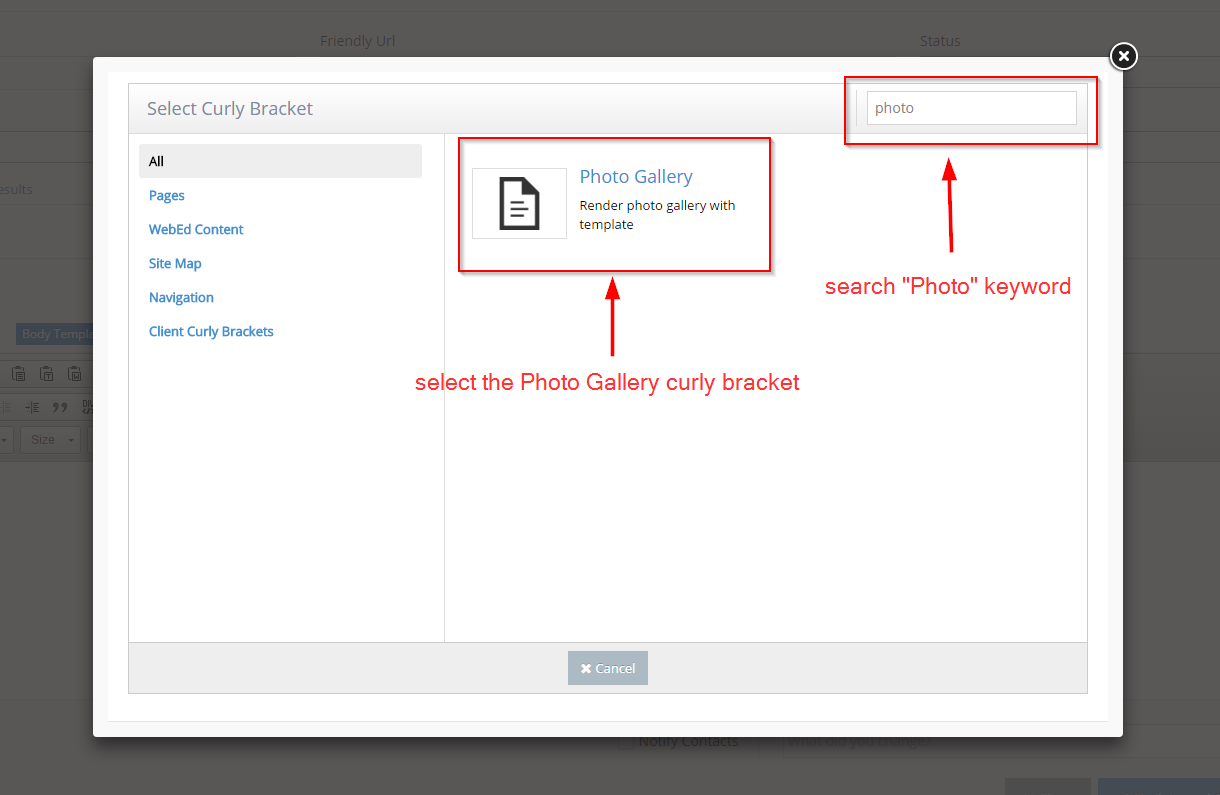
5The available curly bracket features are shown
-
6Search the "Photo" keyword and then select the Photo Gallery curly bracket
-
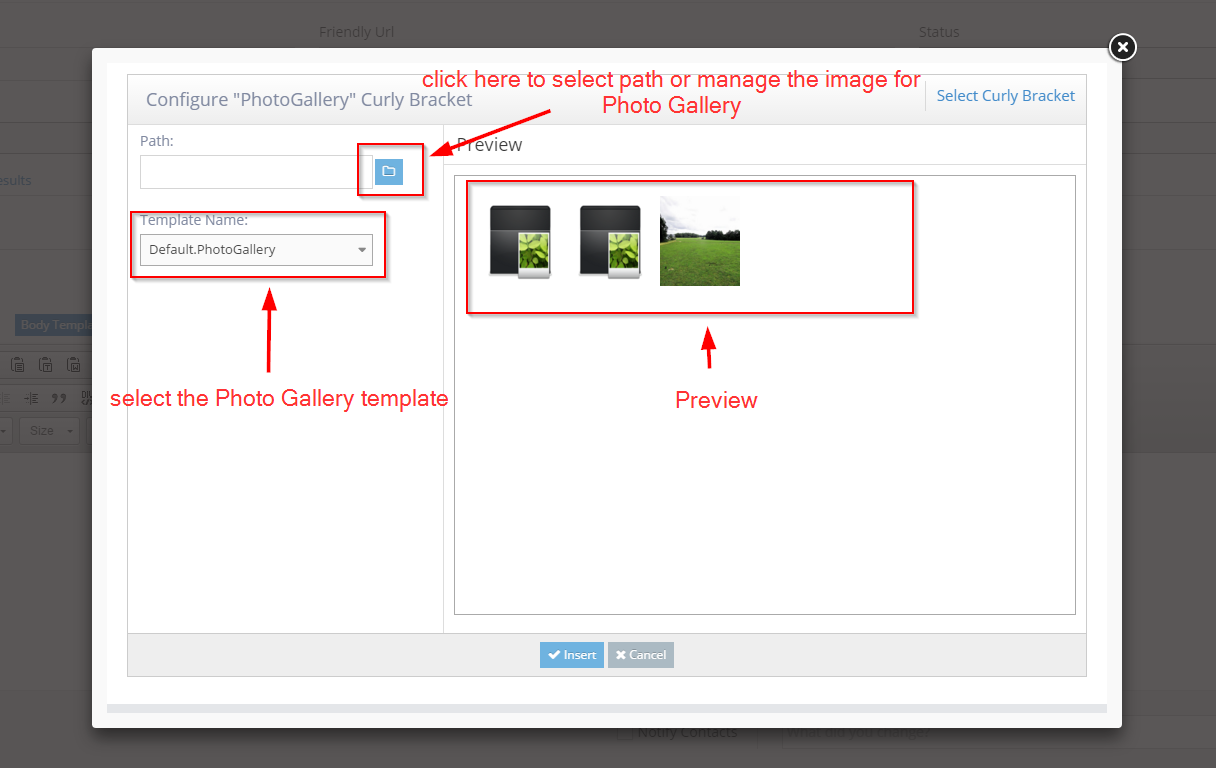
7Open the Photo Gallery configuration form
-
8Click on the folder icon to open the media browser
-
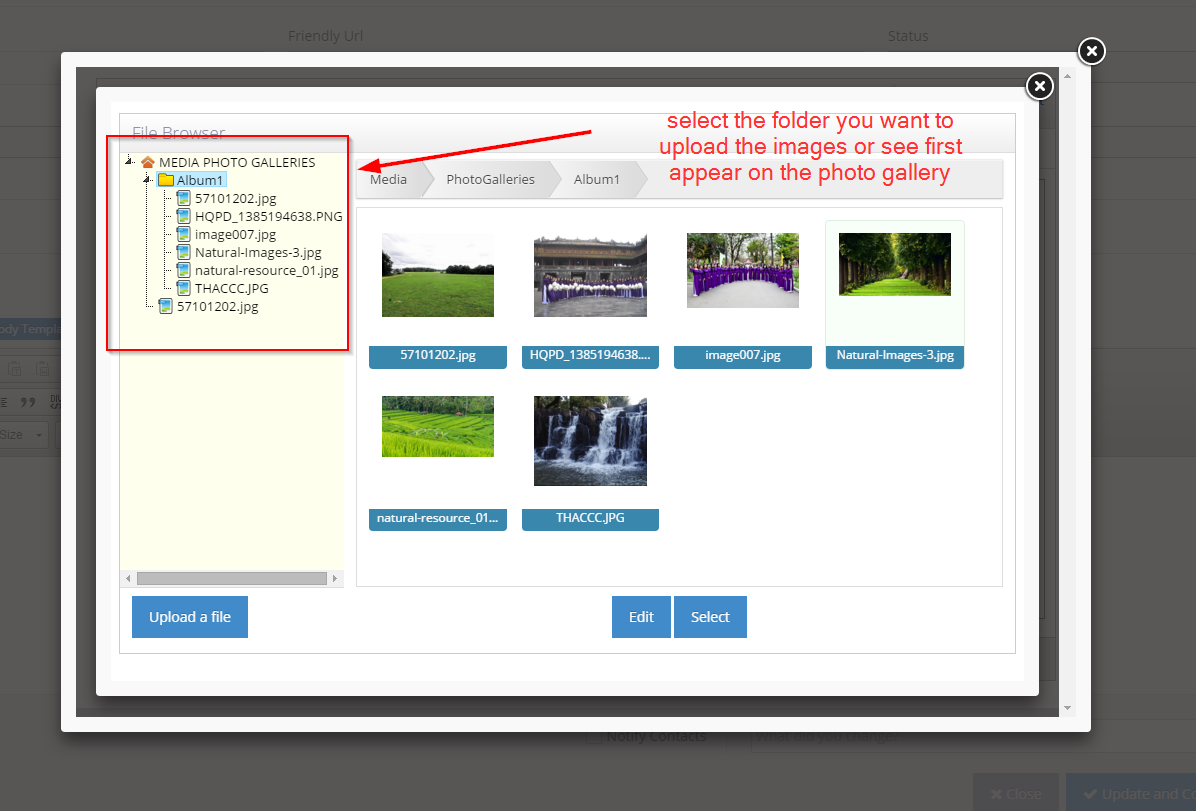
9Click the folder you want to use for the photo gallery on the Configure "PhotoGallery" Curly Bracket form
-
10Click Select Button
-
11The folder selected will populate into the path
-
12Select the template name to use for the gallery (Default.Photogallery by default)
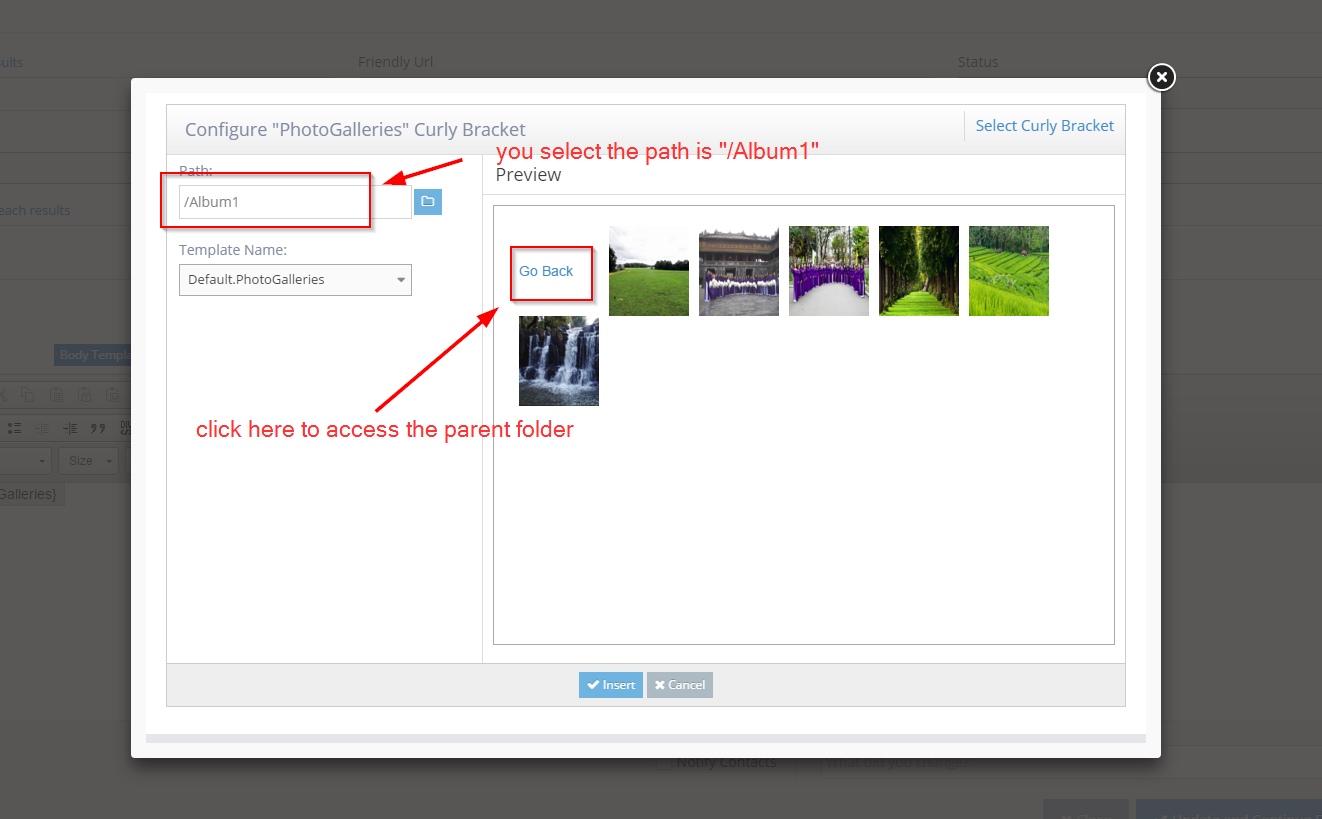
-
13Click Insert - this is what you should see (or something like it)
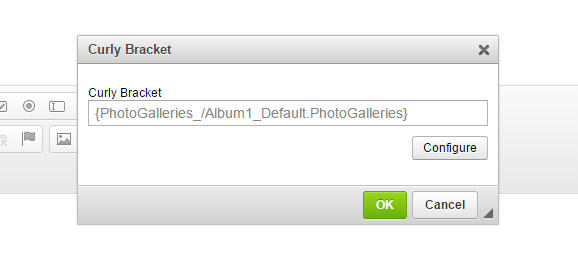
-
14Click OK to insert into the page

-
15Click 'Update' and Close to save the page
-
16The photo gallery will be displayed as a series of images and scrollers

-
17Click on the image item to test
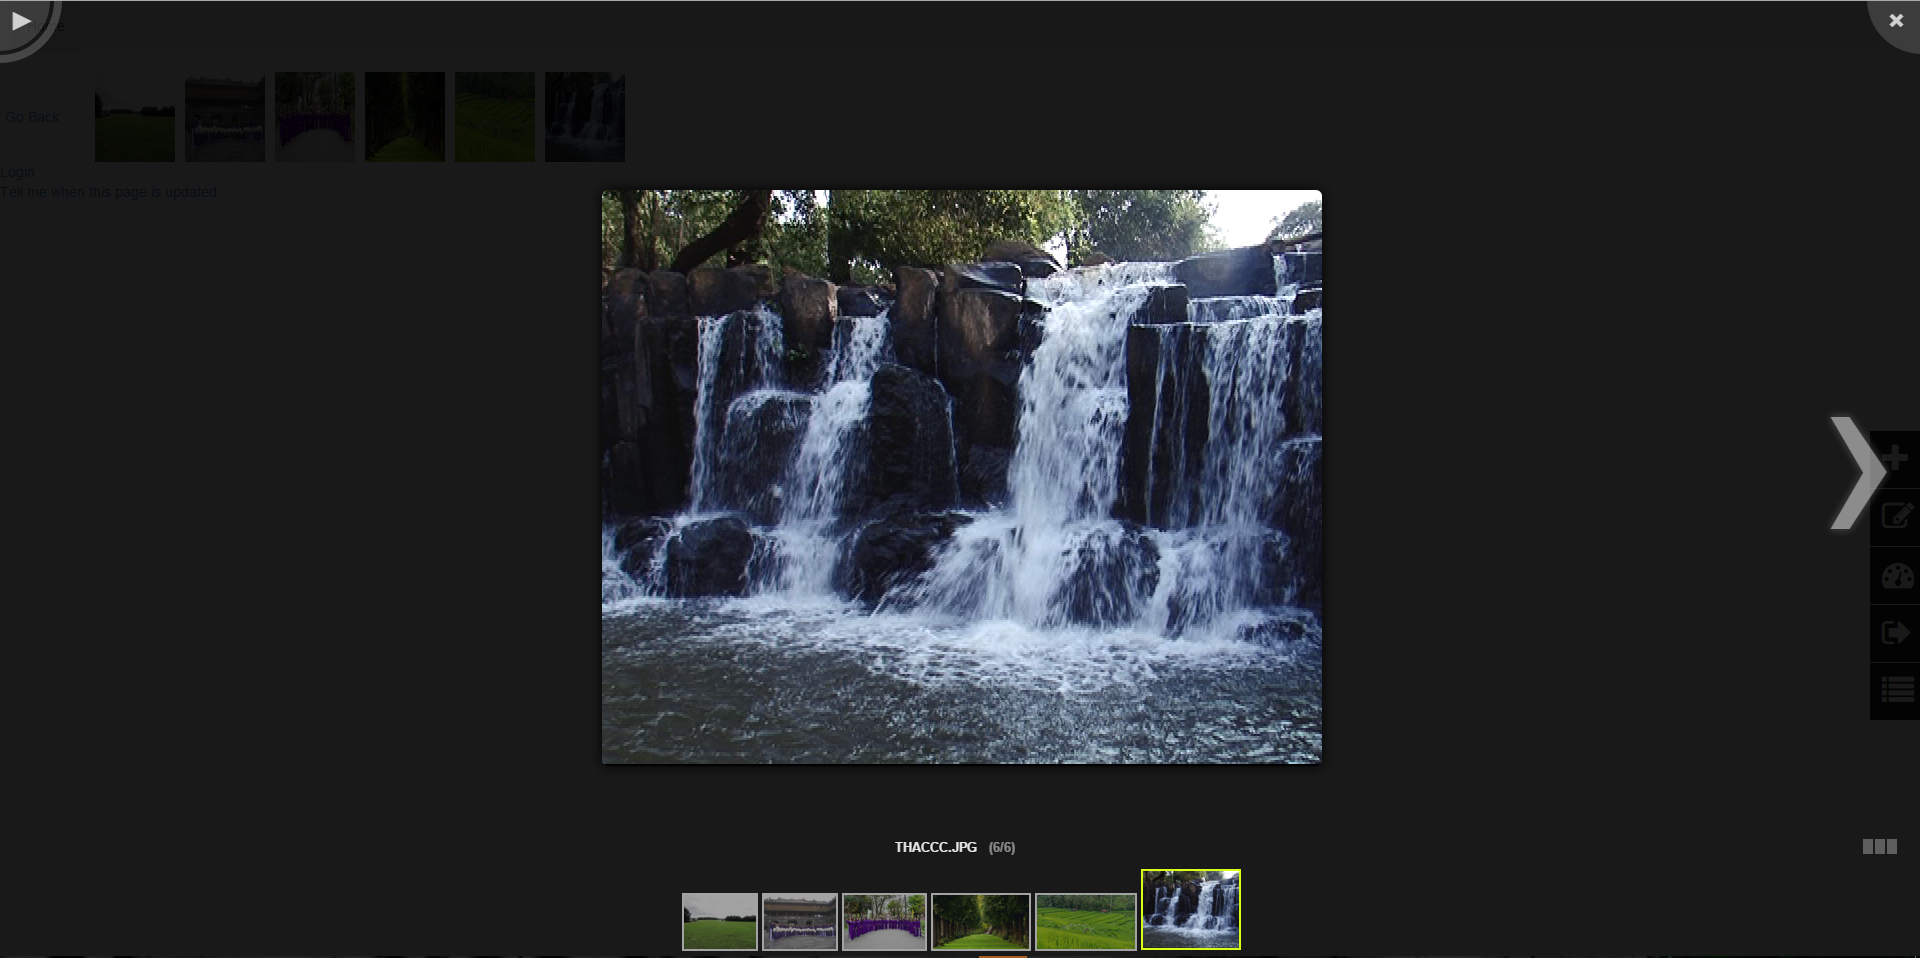
Updating a Photo Gallery
Updating your Photo Gallery images
Checking the location of a photo gallery
-
1Log in as an administrator and go to the Admin Dashboard.
Learn how to log in here → -
2Go to the page where the photo gallery is located
-
3Load the page editor: click the edit icon on the right
-
4Place your cursor over the photo gallery curly bracket
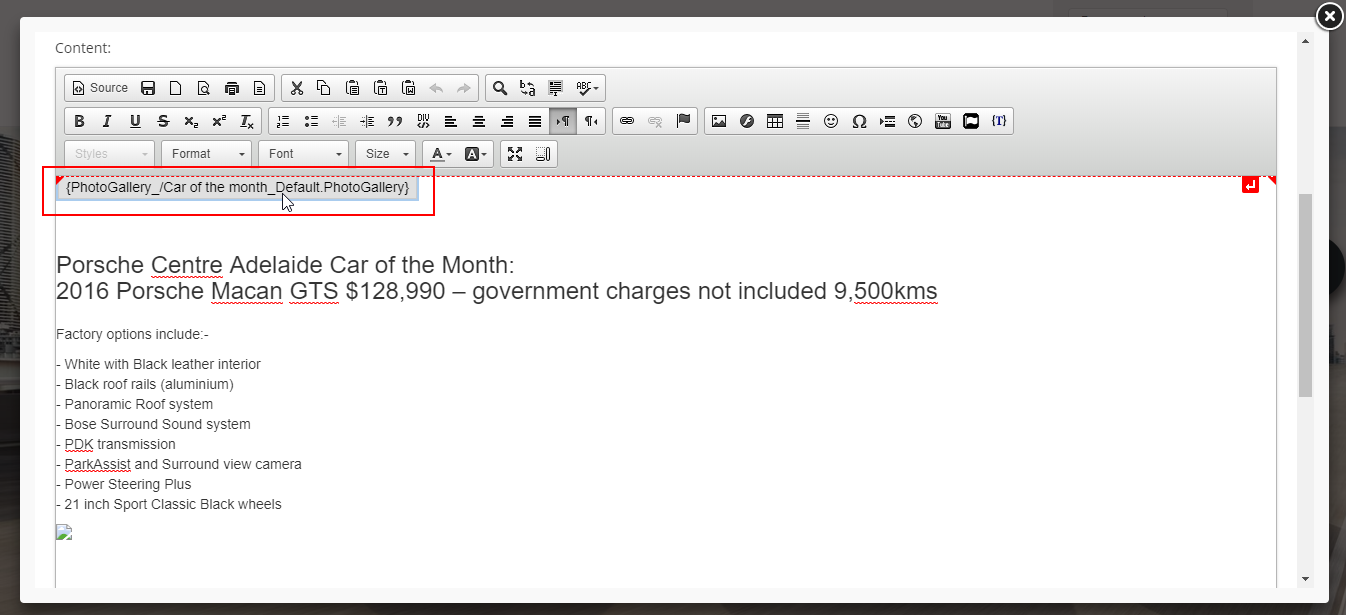
-
3Click the curly bracket icon
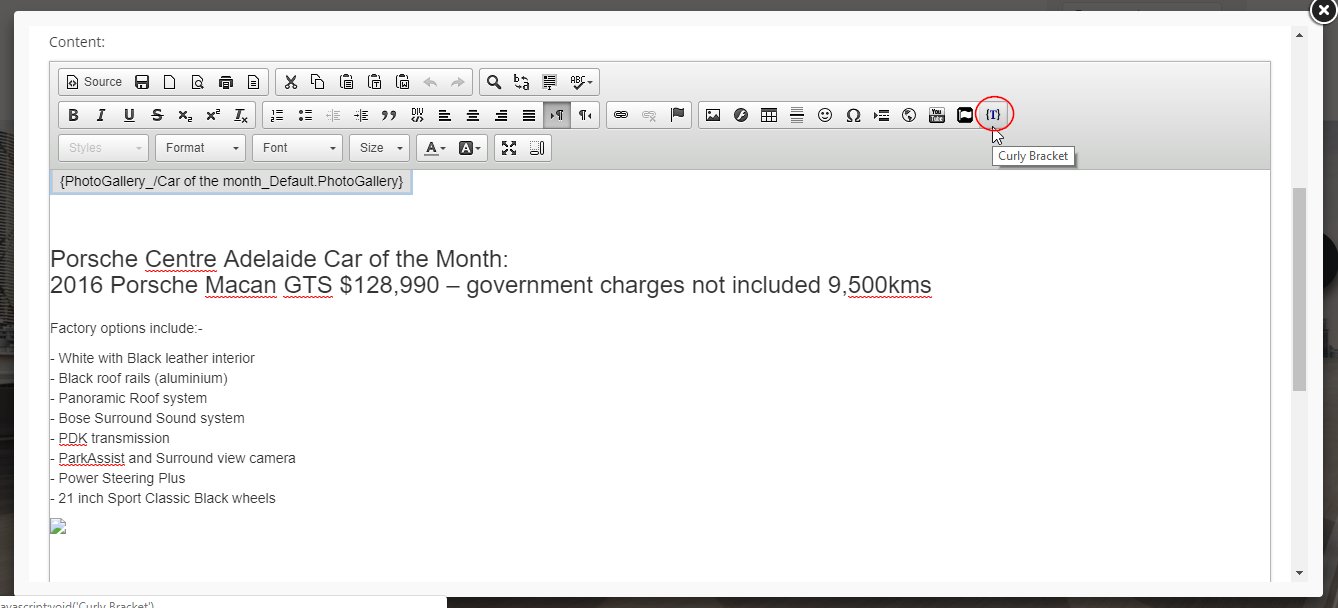
-
3Click "Configure"
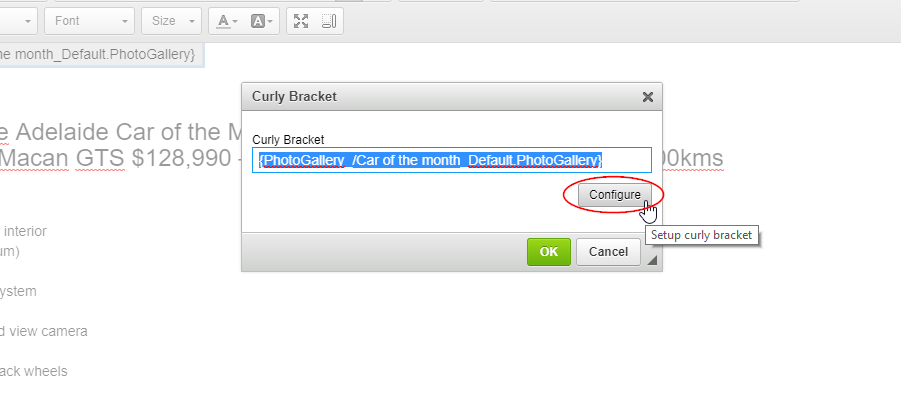
-
4Under "Path" is the location of the images in your photo gallery
Updating the images in your photo gallery
-
1Log in as an administrator and go to the Admin Dashboard.
Learn how to log in here → -
2On the left nav panel, go to Look and Feel >File Manage
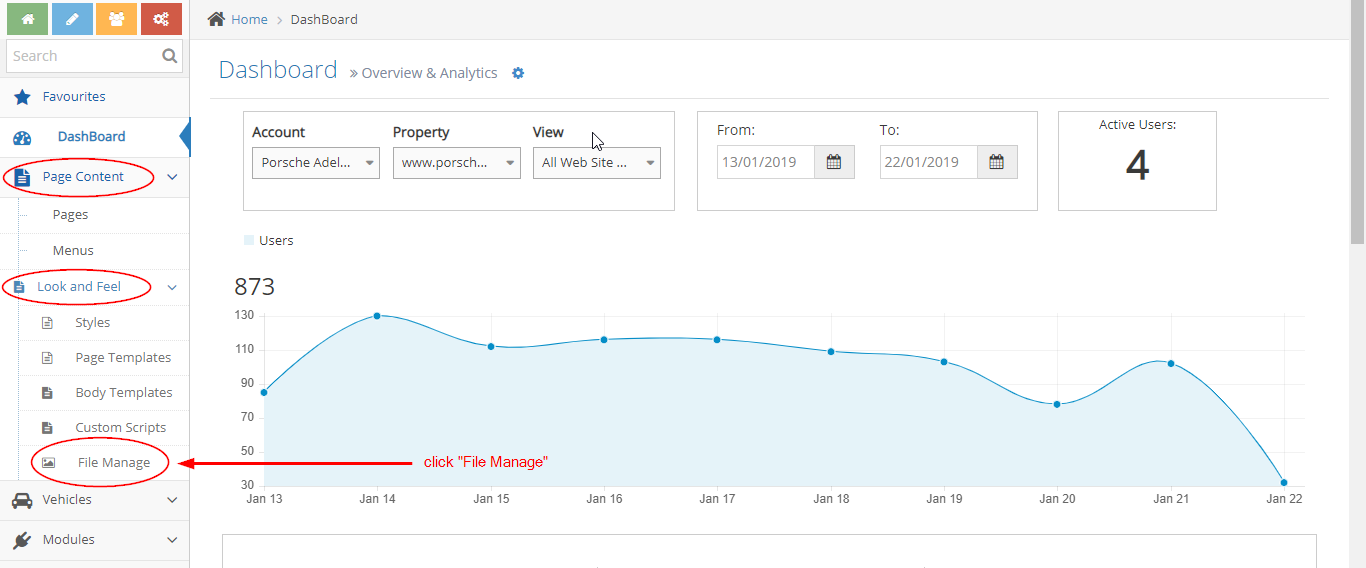
-
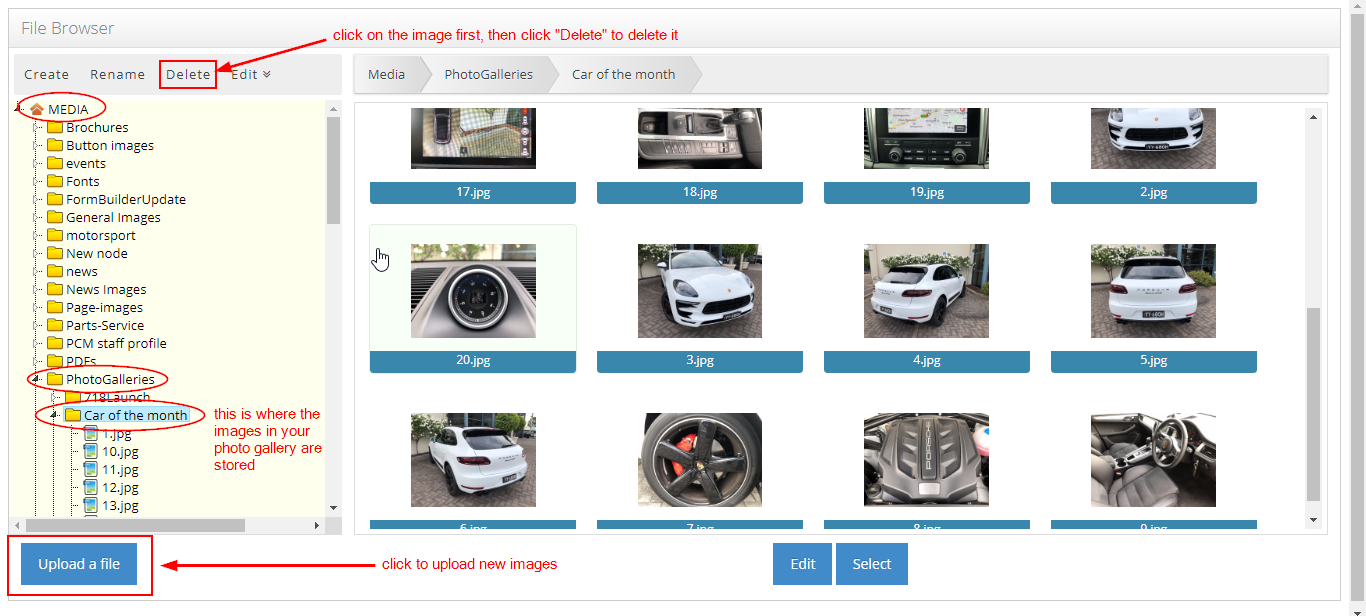
3Under "MEDIA", open the "PhotoGalleries" folder
-
4Look for the folder of the photo gallery
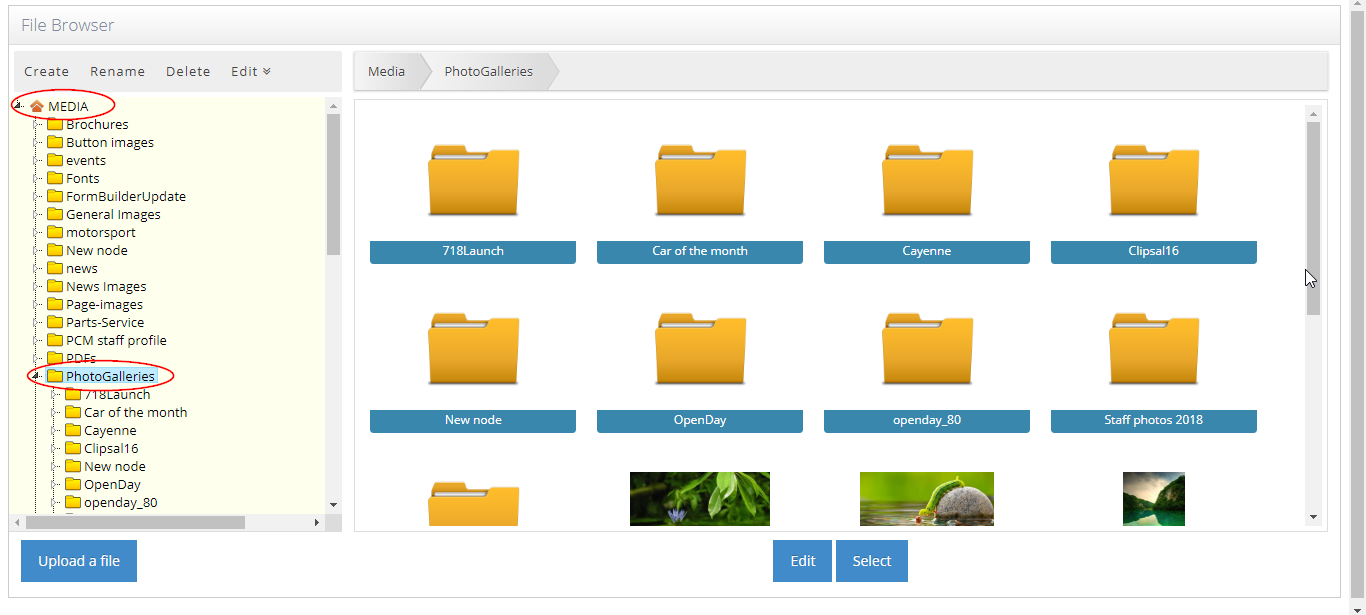
-
5Click the curly bracket icon
-
6Update images as needed (add, edit, delete)
Adding a Popup Lightbox Effect on an Image
Why you would use Lightbox effects?
- Lightbox effects can be very useful, especially on the thumbnail, single or gallery images that are too small to view.
- This module can help view and maximise the image using the modal popup view for a better resolution and display.
How to add lightbox effects on images in WebEd CMS editor
This documentation will teach a non-technical user to add lightbox effects to the images.
Uploading your Image
-
1Open your WedEd editor on the page you want to insert the image
-
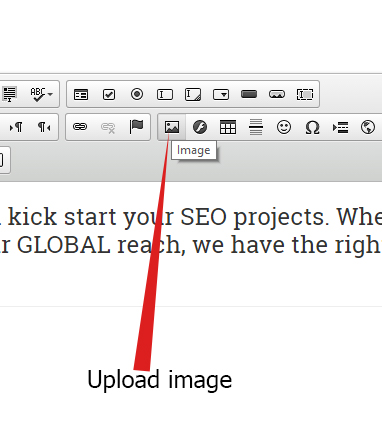
2Upload your image using the image icon
-
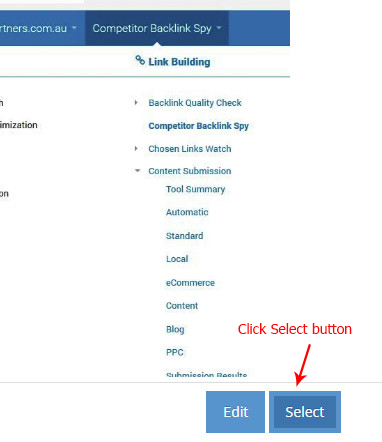
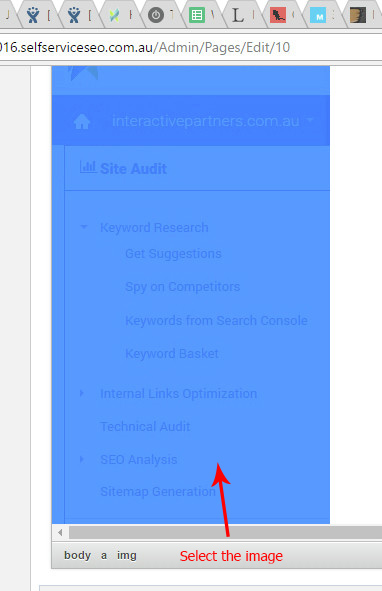
3Select the image you just uploaded
-
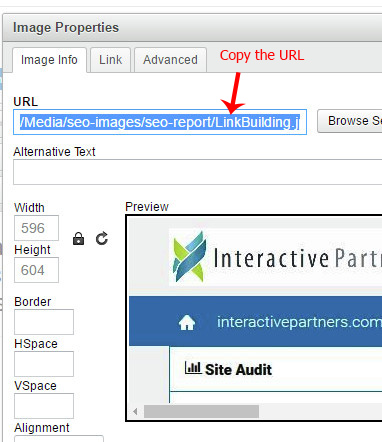
4Select the image path then use ctrl-c to copy the URL of the image
-
5Click OK to close the image window and insert the image
-
6Select the image you recently upload
Troubleshooting Tips for Image Loading Problems
What if the image does not display correctly?
This guide provides practical solutions for resolving image loading problems on your website. Whether you're dealing with slow load times, broken images, or display issues, our troubleshooting tips will help you identify and fix the root causes, ensuring your images load efficiently and correctly.
The correct image may not have been selected in which case another image will be displayed in its place.
- Reload with the correct file name.
- The file name may also need to be checked if the wrong image was saved under that file name.
It might not have been uploaded correctly.
- A box will be displayed on your site with a broken image symbol
- You will need to re-save the image and then re-upload it to the server
The image may not be in an acceptable format.
- Image files can only be JPEGs, GIFs or PNGs.
- Check the format of the image
