When should I resize my images?
Unsure when to resize your images? Learn the best practices for resizing images to optimize website performance and user experience. Find out when resizing is necessary and how to do it effectively.
Resizing images is crucial for maintaining optimal website performance and user experience. This article explores the scenarios where image resizing is necessary, the benefits of proper image dimensions, and provides practical advice on how to resize your images without compromising quality.
- This is a common question
- There is no doubt resizing the image before uploading gives the best results.
- If you don't have any desktop imaging software, we use and recommend paint.net (free)
- This will prevent users from resizing the images in the content
- See the guide below on how to resize images using the image editor in our software
Resizing Image Tips
Proper image resizing is key to maintaining quality across various platforms and devices. This guide offers practical tips on resizing images, ensuring that they look great while also optimizing for speed and performance. Whether you're working with large photos or small icons, you'll find the right approach here.
Resizing Images Overview
- Images create a great visual impact on a page, they are an effective way to present a product or service.
- The problem with images is that they are most often the cause of slow-loading pages because they are not always being optimised for screen resolution.
- We have put together some tips for resizing and saving your images for your website and newsletter.
Best Image Resolution, Size, and DPI
- The problem with images is that they are most often the cause of slow-loading pages - because they are not always being optimised for the best screen resolution. Larger-sized images slow down the load time of your page and worse still frustrate users.
- Scanned images, or stills from a camera, are by default saved at the print resolution which is double or triple the size of screen resolution, which means they need to be resized before they are uploaded to the WebEd Editor and thus to your web pages.
- Here are some tips for preparing images to be web-ready. Any basic image editing software will allow you to edit image size.
- Image size is made up of two components:
- the first being resolution or DPI (dots per inch),
- the second being the dimensions height by width.
- Images should be saved to the exact size you want them to be viewed on the web.
Understanding and Setting DPI
DPI (Dots Per Inch) is a critical factor in determining the quality of printed images. This article explains what DPI is, how it affects image clarity and print results, and provides guidance on selecting the appropriate DPI settings for various uses. Enhance your understanding of DPI to improve both digital and print image quality.
- DPI means Dots Per Inch
- The recommended DPI for images is 72 DPI
- Check your desktop image editing software help to be sure you are saving 72 DPI
- If you don't the image may become distorted and will increase the load time of the page.
JPEG, GIF or PNG?
PNG is generally the best format to use
- JPEG
- JPG files are best for photographs or artwork with gradient tints because they support thousands of colours. JPG files are easily compressed but drop photo quality easily,
- GIF
- GIF images are best for line art or artwork with flat areas of colour such as text rendered as an image.
- GIF images are compressed by removing colours from its palette of 256.
- GIF images support transparency.
- GIF is an older file format that is being superseded by PNGs.
- PNG
- PNGs provide all the advantages of GIFs with a greater colour range support
- They compress much better than GIFs
- PNG images support transparency
Always provide an Image Title
- The image dialogue window asks for a Title for your image, otherwise known as an image ALT tag.
- You should always include a brief description of the image, this is important for search engine optimisation.
- The image title should be relevant to the flow of content on your page and possibly contain a keyword.
Your image size is still too large?
- There is a general rule of thumb that no element on your page should be over 30kb.
- Although this is not as pressing with faster internet connections, we still get surprised at how many sites are using images over 200kb.
- If you have Abode Photoshop or Photoshop Elements ensure you select the "Save For Web & Devices" tool to minimise the size without minimising quality
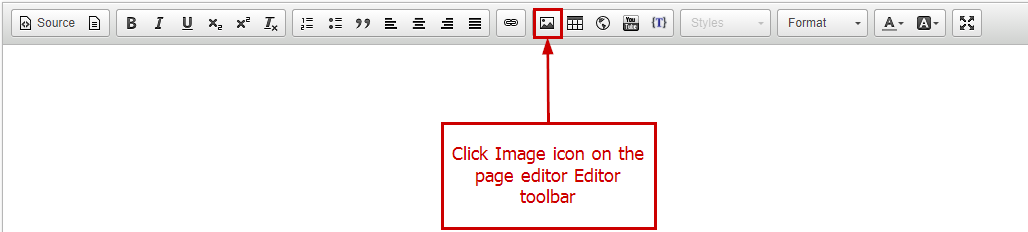
Resizing Images in Media Manager
-
1We have a tool in the media manager that we use for image resizing.
-
2You can access it by clicking the image icon in the toolbar.
-
3Navigate to an image and click the Edit button
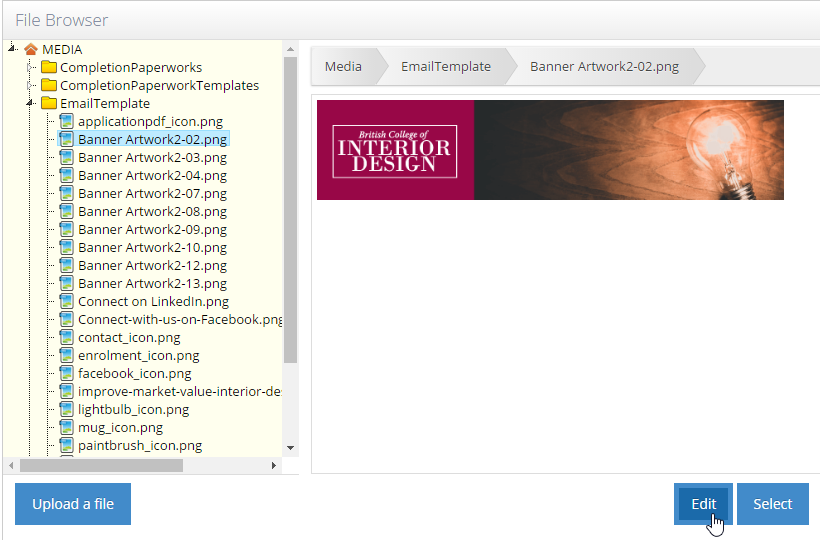
-
4The image will open in the editor
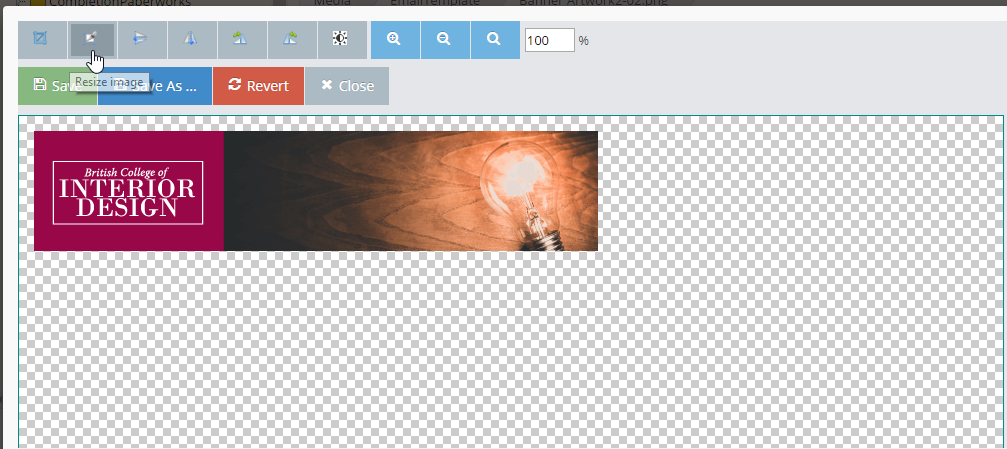
-
5From the toolbar select Crop, Resize, Rotate or Adjust Brightness (you can also zoom in and out of the image)
How to Use the Crop Tool in WebEd
-
1Select 'Crop' on the toolbar
-
2Set the zoom to 100%
-
3Drag your mouse over the area to crop
-
4Click 'Apply' to crop the image
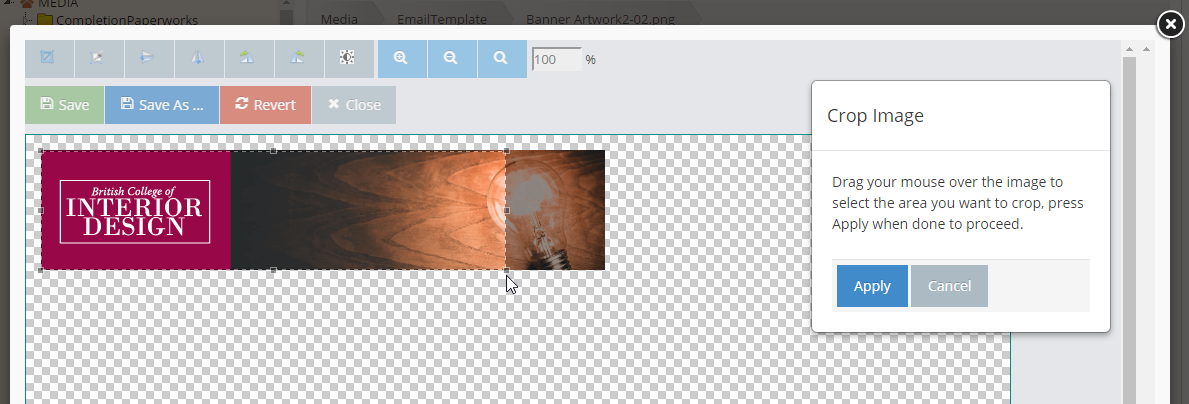
-
5Choose 'Save As' to save the image with a new name (enter the new name) or click 'Save' to overwrite/update the original image
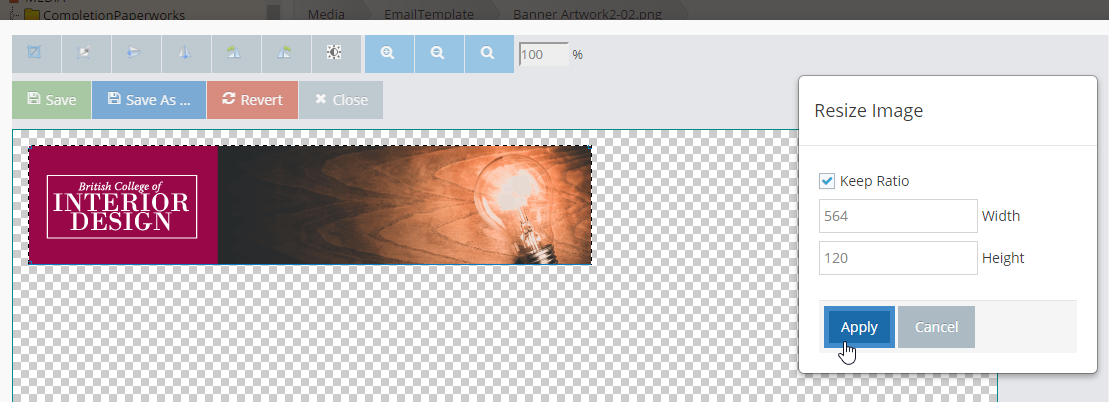
Resize
-
1Select 'Resize' on the toolbar
-
2Ensure 'Keep Ratio' is checked (or the image will be distorted)
-
3Enter either the height or width of the image (the other size will auto resize)
-
4Click 'Apply' to resize the image
-
5Choose 'Save As' to save the image with a new name (enter the new name) or click 'Save' to overwrite/update the original image
-
6Congratulations! You have successfully resized the image.