Tables Overview
Using a table is a good way to present multiple data in a more readable form and this guide will be handy when you need to add a table structure to your website.
Why Use Tables?
- Aside from the obvious use of tables to present information to a website's visitor in a tabular form, tables are extremely useful in website design. If you were to simply place text and graphics on your web page it may look good in your web browser. But, because visitors use a variety of browser window sizes the content will flow to fill their window. This may destroy your carefully laid out web page.
- Tables on Web sites are used to present information in a particular way and are by far the most popular way of organizing a web page.
- A table consists of Rows and Columns. When a row and a column intersect or meet, the intersection point is called a cell.
- Below is an example of a table and its elements - Rows, Columns and Cells and how to reference them:
Column 0 Column 1 Column 2 Column. Column n Row 0 Cell (0,0) Cell (0,1) Row 1 Cell (1,0) Cell (1,1) Row 2 Cell (2,0) Cell (2,1) Row 3 A Cell Row. Row n Cell (n,0) Cell (n,n)
Definitions of table elements
- Rows: run horizontally across the table (Purple, yellow)
- Columns: run vertically down the table (Blue, green)
- Cells: the point where a column and a row meet (Red, Crimson)
- Cell reference: Each cell has a unique cell reference number expressed as (x,y), where x = row number and y = column number. Example : (2,1), the red cell is the cell in row 2, column 1
- Border: the solid black line around the table
- Grid lines: the light grey lines outlining each cell.
Tables Serve Several Functions
- Tables allow for greater control over page layout, allowing the creation of more visually interesting pages.
- Tables help designers lay out text and graphics on the page so that they remain in specific places and relationships to other information on the page.
- Tables also help determine what happens to the content of a web page when the browser window is re-sized.
- Tables are also used to set apart sections of documents, such as in sidebars, navigation bars, or framing images and their titles and captions.
Often tables are not visible on a site's visitor pages. Grids and columnar layouts use tables often invisible, to control page layout.
- Many Web pages utilize tables as the primary means of controlling the placement of page elements. This is often done with an invisible table. This example uses an invisible table to create three distinct areas
- Sites with newspaper-like layouts using tables. These sites show distinct columns to create the columns.
- Distinctly coloured backgrounds for separate cells in a table can be created to highlight and separate information.
Creating A Table
Creating a Table Guide
STEP-BY-STEP
| Table1: Spacing defined as 1 pixel | Table2: Spacing defined as 5 pixels. Note the increase in "white space" between the cells. |
|---|---|
|
  |
-
1Position the cursor where you want the new table in the Content area.
-
2Click the Icon on the tool bar to insert a new table. A sample table displays the features you have selected. Note: Each cell in the sample table has a unique cell reference number expressed as (x,y), where x = row number and y = column number. Example: (1,1) is the cell in row 1, column 1.

-
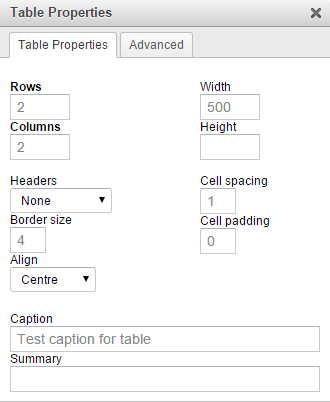
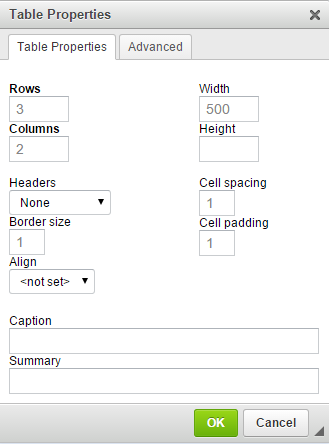
3Enter information for the following fields:
- In the Table Properties tab:
- Rows - enter the number of rows you want
- Columns - enter the number of columns you want
- Borders - Choose from the drop-down list; or a border up to 5 pixels wide. The sample table will display border selections. To change the colour and attributes of the border: After you have "inserted" the table - highlight the table, and click on the BORDERS & SHADING icon on the toolbar.
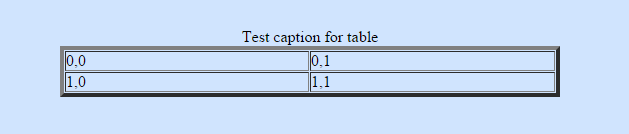
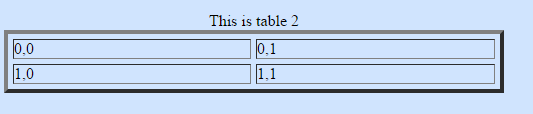
- Cell Spacing - Spacing defines the space between adjacent cells and between a cell and the edge of the table. The default is 1 pixel. Increasing the space will increase the distance between cells and create more "empty" space. The effect will be obvious on testing. Watch the sample table grid lines to see the effect. The 2 tables below show borders of 5 pixels wide, the first has a spacing of 1 pixel, and the second has a spacing of 5 pixels. Note the increase in white space around the cells.
- Cell Padding - Padding defines the space between the cell contents and its border/ edge. Increasing the padding creates more white space between the cell content and its border.
Creating a Table Advanced Guide
STEP-BY-STEP
-
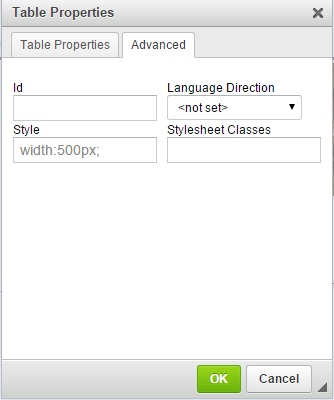
1In the Advanced tab, you can enter the element ID, css style codes, and style sheet class for this table
-
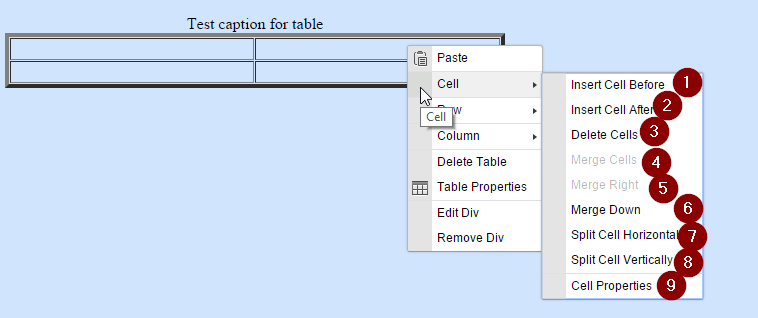
2More features: you can right-click on the table after created in the page content You can get more features for this table In the Cell right-menu
- (1): Inserts a cell before the current cell
- (2): Inserts a cell after the current cell
- (3): Deletes the highlighted cells
- (6): Merges a cell below with the current cell
- (7): Splits current cell become two-cell horizontal
- (8): Splits current cell become two-cell vertical
- (9): Opens the Cell Properties popup
-
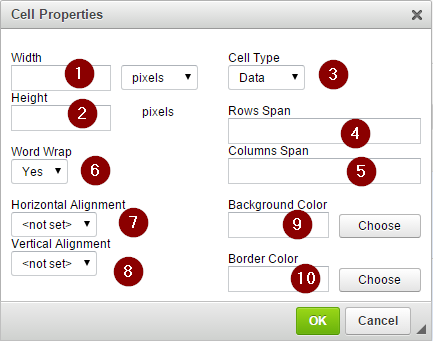
3In the Cell Properties:
- (1): Sets the width for the current cell
- (2): Sets the height for the current cell
- (3): Sets cell type as header or data
- (7): Sets horizontal alignment
- (8): Sets vertical alignment
- Example: right-bottom
-
4
- (9): Sets the background color for the current cell
- (10): Sets border colour for current cell
-
5
- (1): Inserts a row above the current row
- (2): Inserts a row below the current row
- (3): Deletes the highlighted rows

-
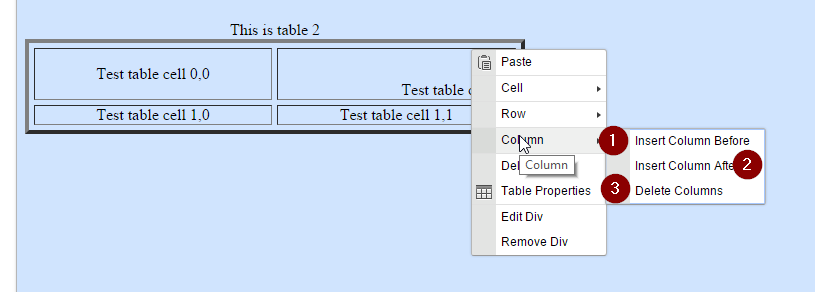
6
- (1): Inserts a column before the current column
- (2): Inserts a column after the current column
- (3):Deletes the highlighted columns
Deleting A Table
To delete an existing table while in edit mode of the page:
STEP-BY-STEP
-
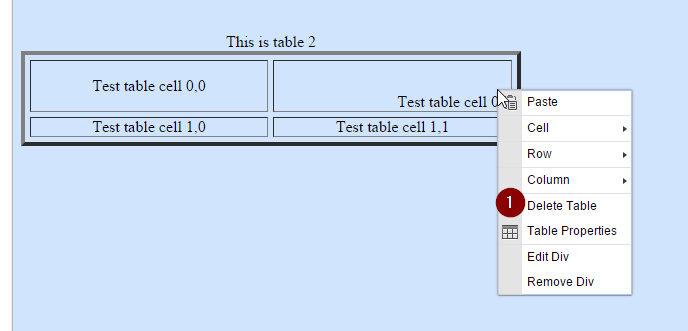
1Right-click on the table that you want to delete
-
2Click Delete Table
-
3The table has been deleted from your page content
-
4Click Save and the table will not show on your website
Insert or Delete Rows
A new row can be inserted into an existing table while in the edit mode of the page.
STEP-BY-STEP
-
1Place your cursor within the table to be edited and right-click
-
2Hover over the Row menu item
-
3In the Row right-menu
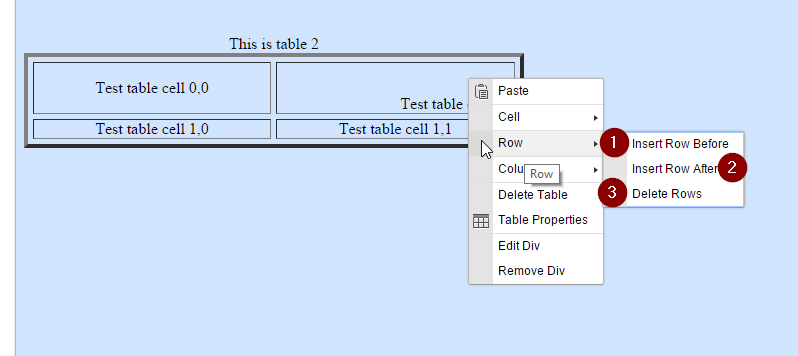
-
4(1): Inserts a row above the current row
(2): Inserts a row below the current row
(3): Deletes the highlighted row
Insert or Delete Columns
A new column can be inserted into an existing table while in edit the mode of the page.
STEP-BY-STEP
-
1In the Advanced tab, you can enter the element ID, css style codes, and style sheet class for this table
-
2More features: you can right-click on the table after created in the page content You can get more features for this table In the Cell right-menu
- (1): Inserts a cell before the current cell
- (2): Inserts a cell after the current cell
- (3): Deletes the highlighted cells
- (6): Merges a cell below with the current cell
- (7): Splits current cell become two-cell horizontal
- (8): Splits current cell become two-cell vertical
- (9): Opens the Cell Properties popup
-
3In the Cell Properties:
- (1): Sets the width for the current cell
- (2): Sets the height for the current cell
- (3): Sets cell type as header or data
- (7): Sets horizontal alignment
- (8): Sets vertical alignment
- Example: right-bottom
-
4
- (9): Sets the background color for the current cell
- (10): Sets border colour for current cell
-
5
- (1): Inserts a row above the current row
- (2): Inserts a row below the current row
- (3): Deletes the highlighted rows
-
6
- (1): Inserts a column before the current column
- (2): Inserts a column after the current column
- (3):Deletes the highlighted columns
Merge Column or Row
If you want to merge columns or rows in the table on your website:
STEP-BY-STEP
-
1Place your cursor within the table to be edited and right-click
-
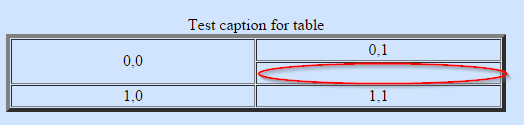
2Hover to the Cell menu item you can see in right-menu Merge Cells, Merge Right, Merge Down item
- Merge Cells: you can highlight multiple cells and click here to merge all cell become to one cell
- Merge Right: you can merge a right cell with the current cell become to one cell
- Merge Down: you can merge a below cell with the current cell become to one cell
-
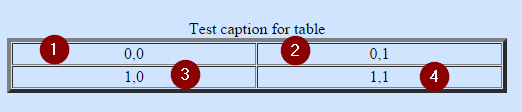
3Example: see the image above
-
4If the current cell is 0,0, when you right-click and hover over Cell menu item, you will see Merge Down and Merge Right on displayed options

-
5If you select the Merge Down, cells 0,0 and 1,0 will become one cell. This means you want to merge the rows.

-
6If you select the Merge Right, cells 0,0 and 0,1 will become one cell. This means you want to merge the columns.
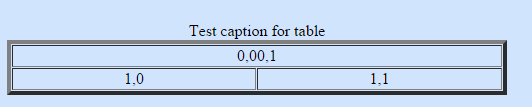
Creating Two Cells from One
When you want to create two cell from one cell.
STEP-BY-STEP
-
1
- Place your cursor within the table to be edited and right-click
-
2Hover over the Cell menu item, and you will see in the right menu Split Cell Horizontally, Split Cell Vertically
- Split Cell Horizontally: This means one cell becomes two cells horizontally
- Split Cell Vertically: This means one cell becomes two cells vertically
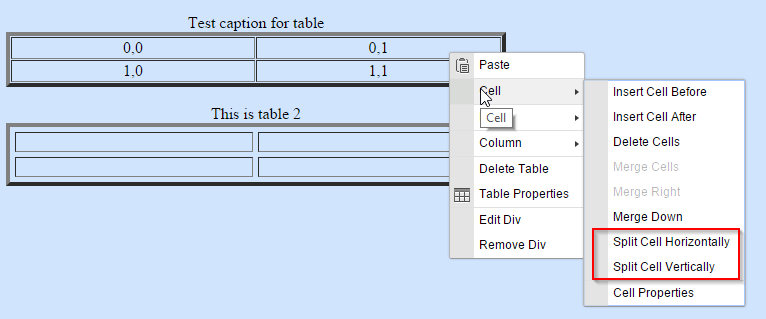
-
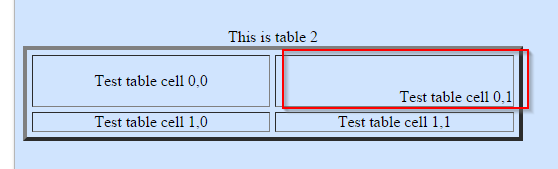
3Example: If the current cell is 0,1 when you right-click and hover over the Cell menu item, you will see Split Cell Horizontally, Split Cell
Vertically
If you click Split Cell Horizontally, cell 0,1 will become two cells
-
4If you click Split Cell Vertically, cell 0,1 will become two cells