Admin Menu Items
What is an Admin Menu?
These are the menus on the left side of every admin page, that will make the user navigate through different parts of the WebEd cloud Admin and CRM section.
Creating a new Admin Menu
-
1Log in as an administrator and go to the Admin Dashboard.
Learn how to log in here → -
2Click on "Launch The Admin Module" after Logging in to your site
-
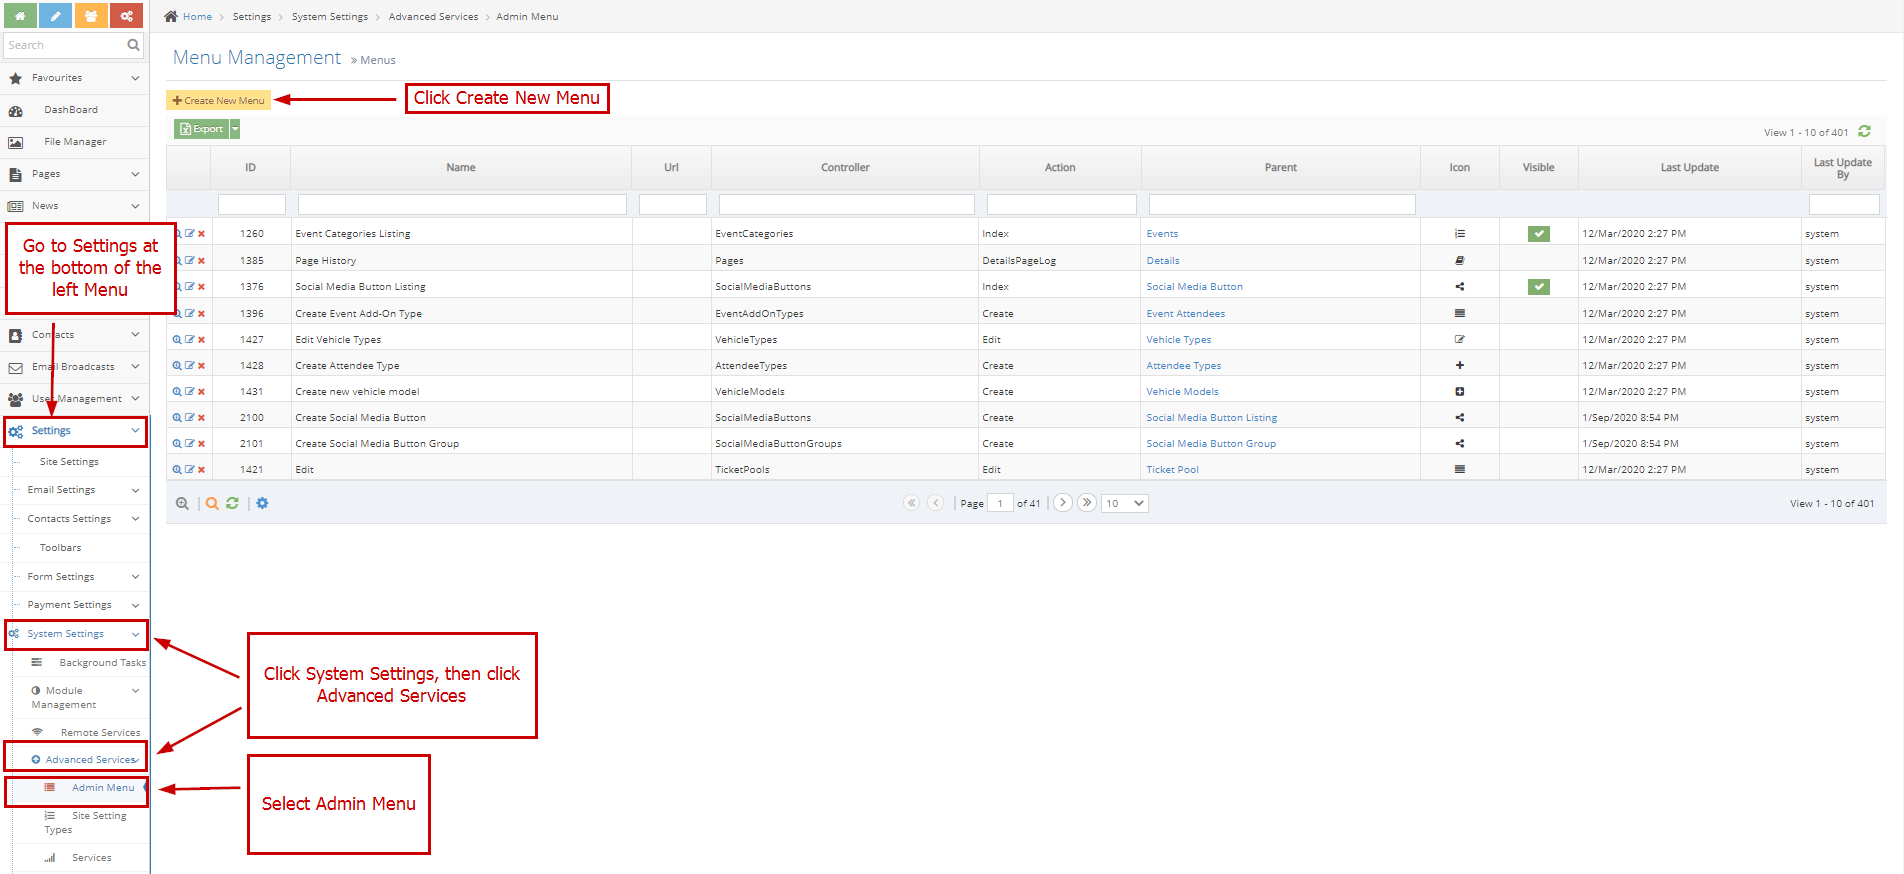
3Go to Settings at the bottom of the left Menu
-
4Click System Settings, then click Advanced Services
-
5Select Admin Menu
-
6Click Create New Menu
-
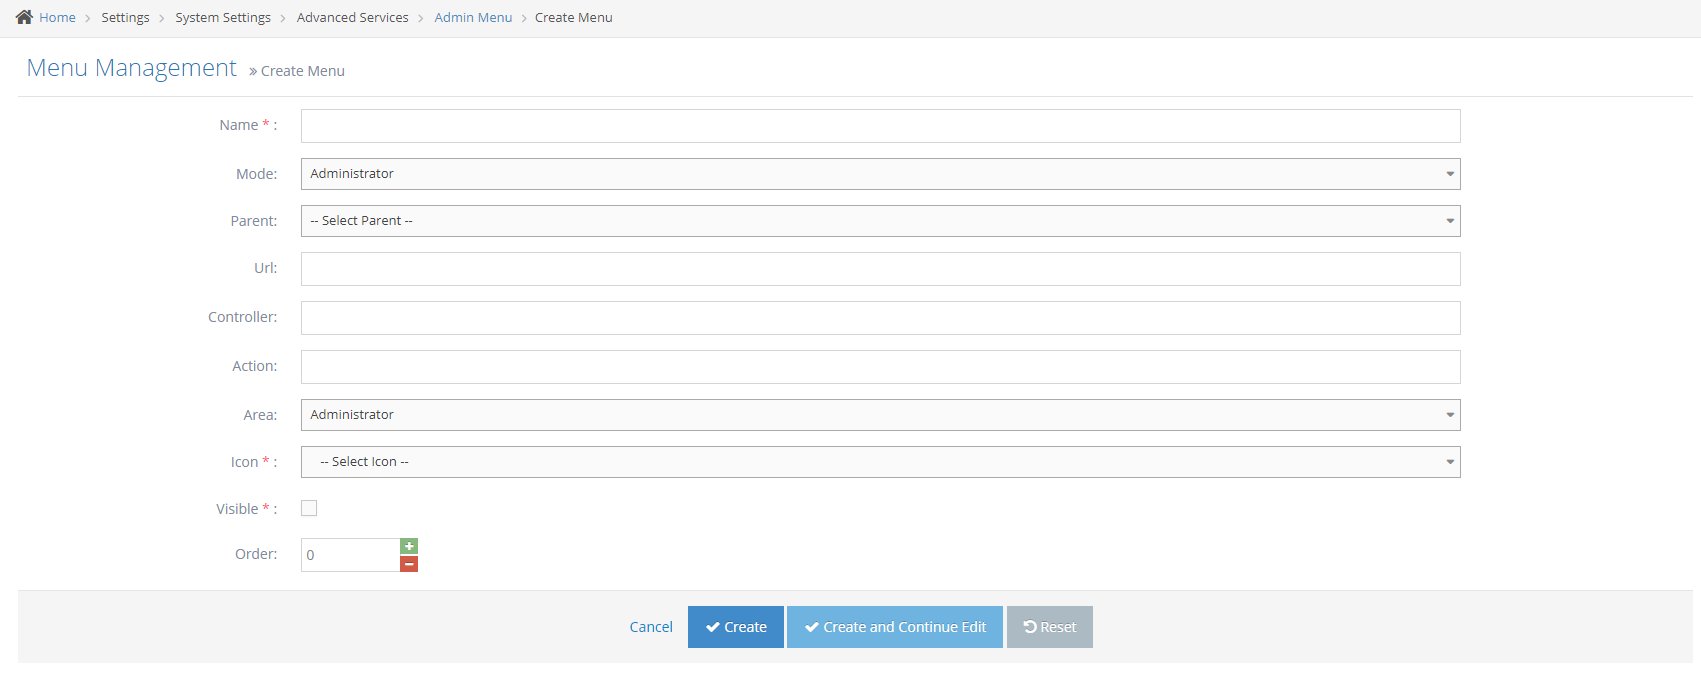
7Enter Details of the Page
-
8Input the new value in the correct format (separate each PartnerTypeID by a comma) then save.
- Name - This is the word/text that will appear to represent the menu
- Mode and Area - This is where the user can set which section the menu will appear
- Parent - If the menu should be shown as part of the main navigation meaning it is not under any other menus then the parent should not be changed from --Select Parent--, if the menu was meant to be shown under a certain menu that already exists then that menu should be selected in this field
- URL - URL of the menu (This is optional)
- Controller - The controller of the menu in the back codes for example in http://webed9.customercommunity.com.au/Admin/Events the controller is always the last word after the last backslash in any URL in WebEd cloud admin or CRM. In the example given the controller is Events
- Action - The action of the menu in the back codes to load the listings of any controller you can just type Index if not then, you should contact your system administrator to ask for the action of a certain controller
- Icon - The icon that will appear beside the Name of the Menu
- Visible - Check if you want the menu to be visible
- Order - Position of the Menu, the lowest will be at the top and the highest will be at the bottom
-
9Click Create button to apply changes made
Editing an Admin Menu
-
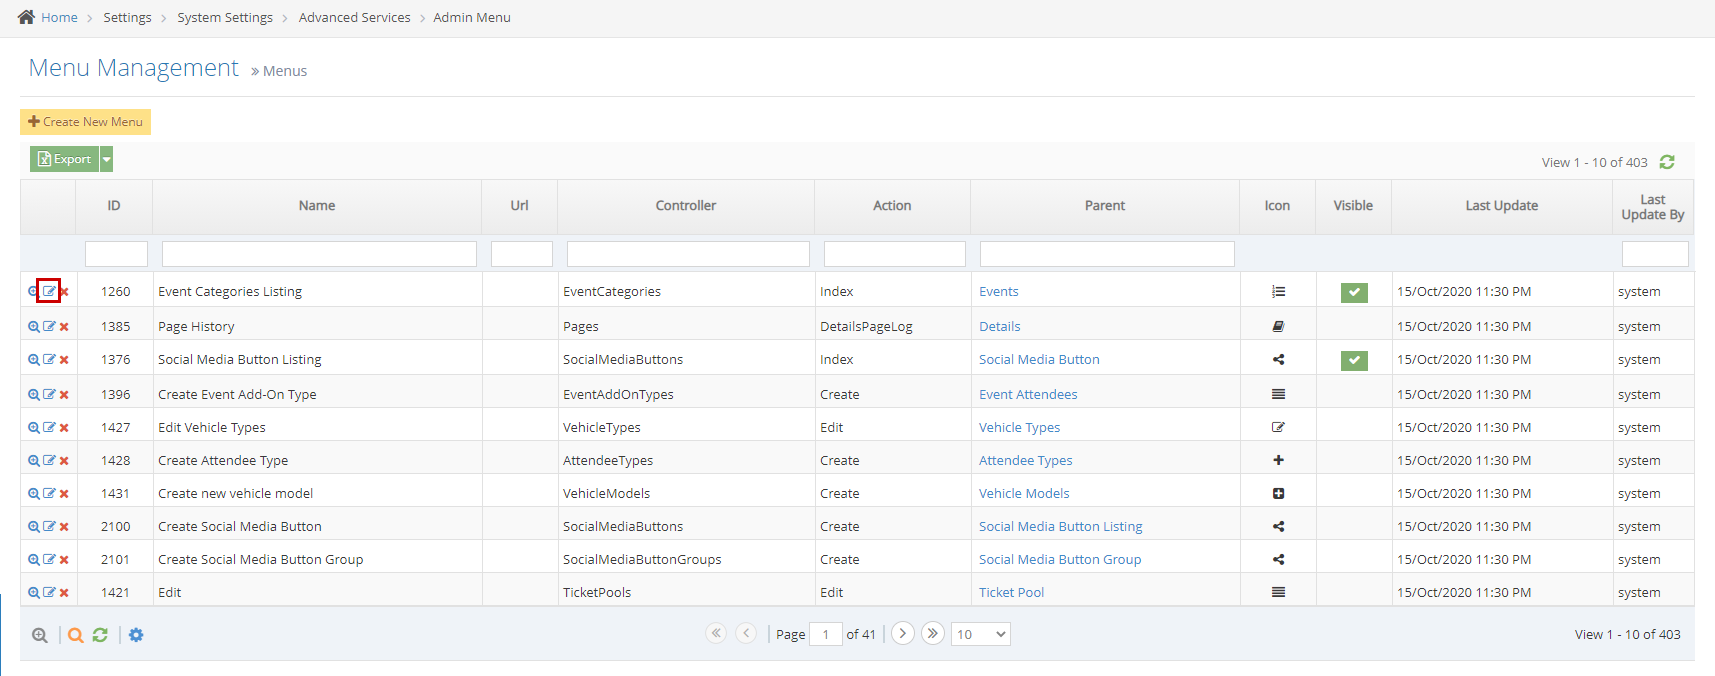
1In the listing page, to edit a certain menu you will need to click the Edit button in the left-most part of your chosen Menu
-
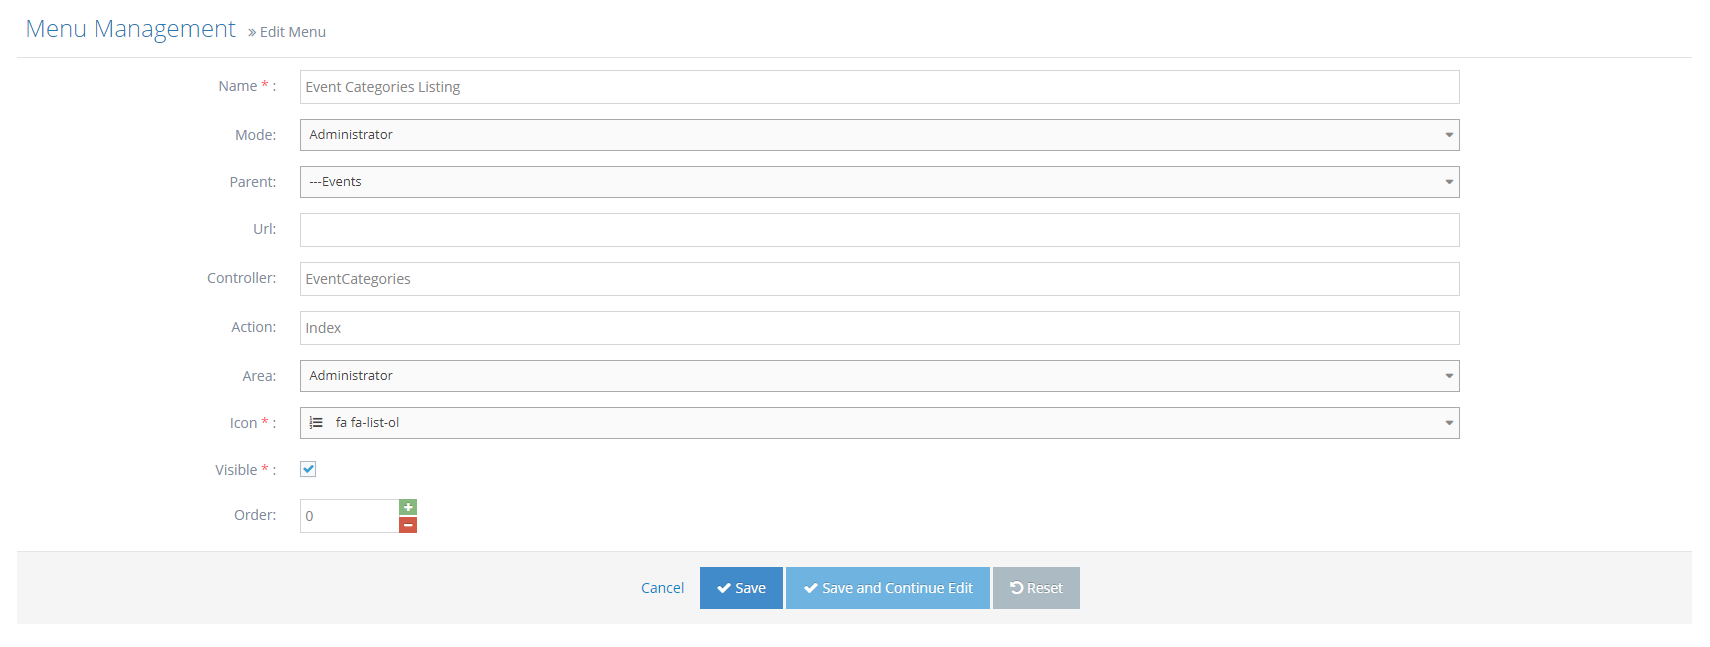
2Enter the details that you want to be changed
- Name - This is the word/text that will appear to represent the menu
- Mode and Area - This is where the user can set which section the menu will appear
- Parent - If the menu should be shown as part of the main navigation meaning it is not under any other menus then the parent should not be changed from --Select Parent--, if the menu was meant to be shown under a certain menu that already exists then that menu should be selected in this field
- URL - URL of the menu (This is optional)
- Controller - The controller of the menu in the back codes for example in http://webed9.customercommunity.com.au/Admin/Events the controller is always the last word after the last backslash in any URL in WebEd cloud admin or CRM. In the example given the controller is Events
- Action - The action of the menu in the back codes to load the listings of any controller you can just type Index if not then, you should contact your system administrator to ask for the action of a certain controller
- Icon - The icon that will appear beside the Name of the Menu
- Visible - Check if you want the menu to be visible
- Order - Position of the Menu, the lowest will be at the top and the highest will be at the bottom
-
3Click the Save button
Background Tasks
Why you would use a Background Tasks?
This module will allow a user to control the task and activity. It can be useful if the website will set a daily notification message to send onto subscribers or any kind of activity.
How to view all Background Tasks?
-
1Log in as an administrator and go to the Admin Dashboard.
Learn how to log in here → -
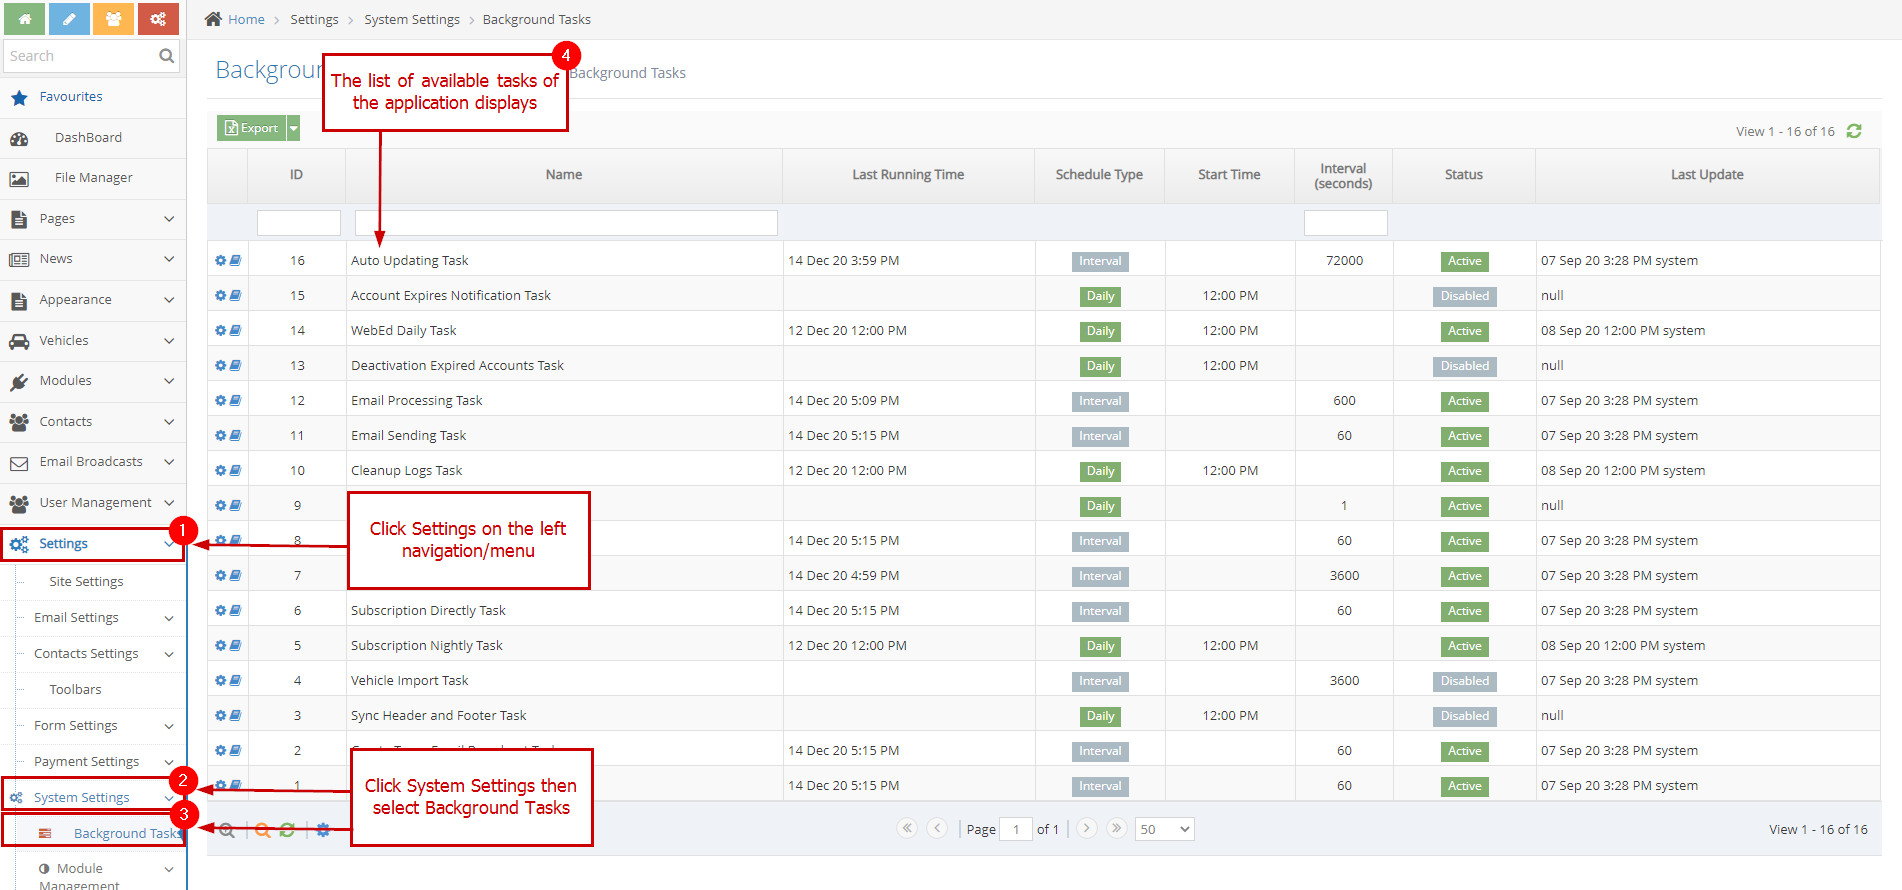
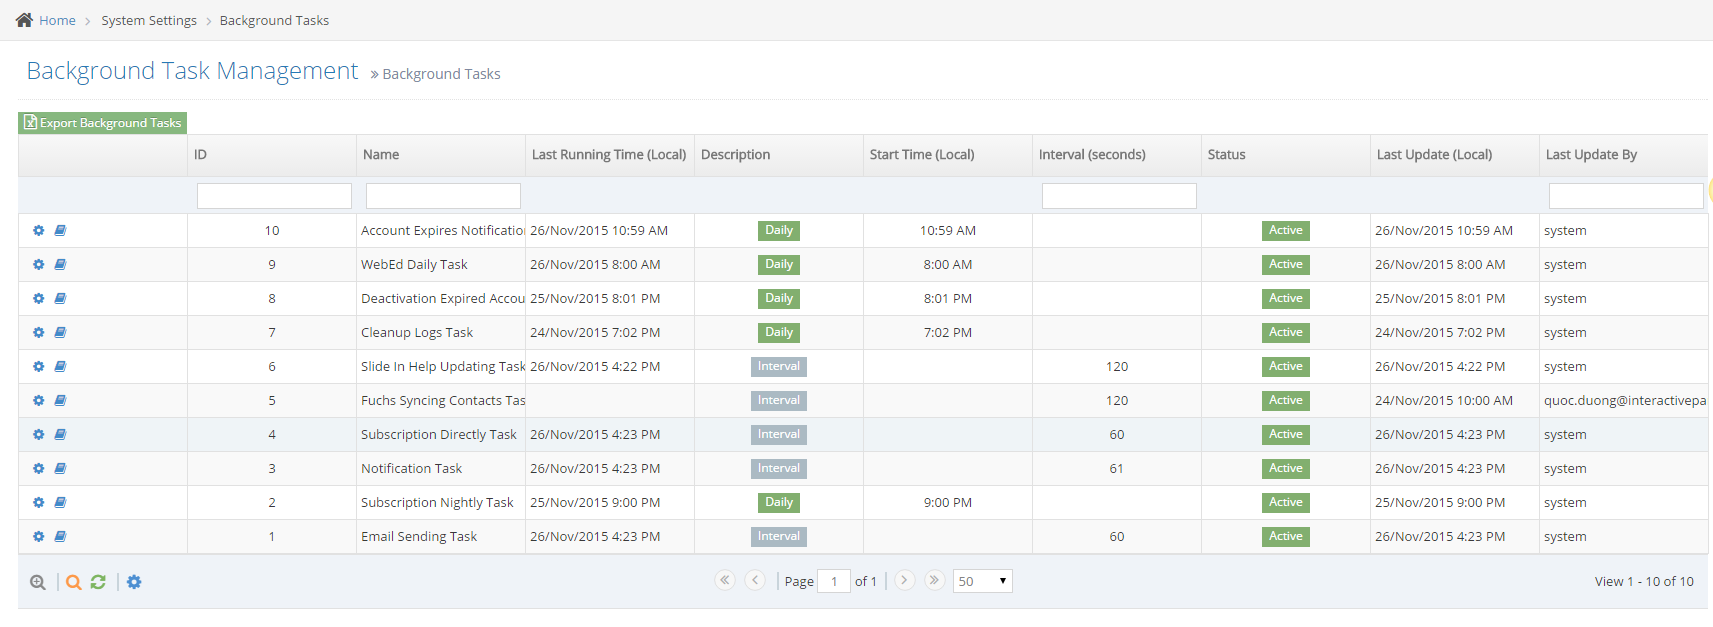
2Click System Settings then select Background Tasks and a list of available tasks of the application display
-
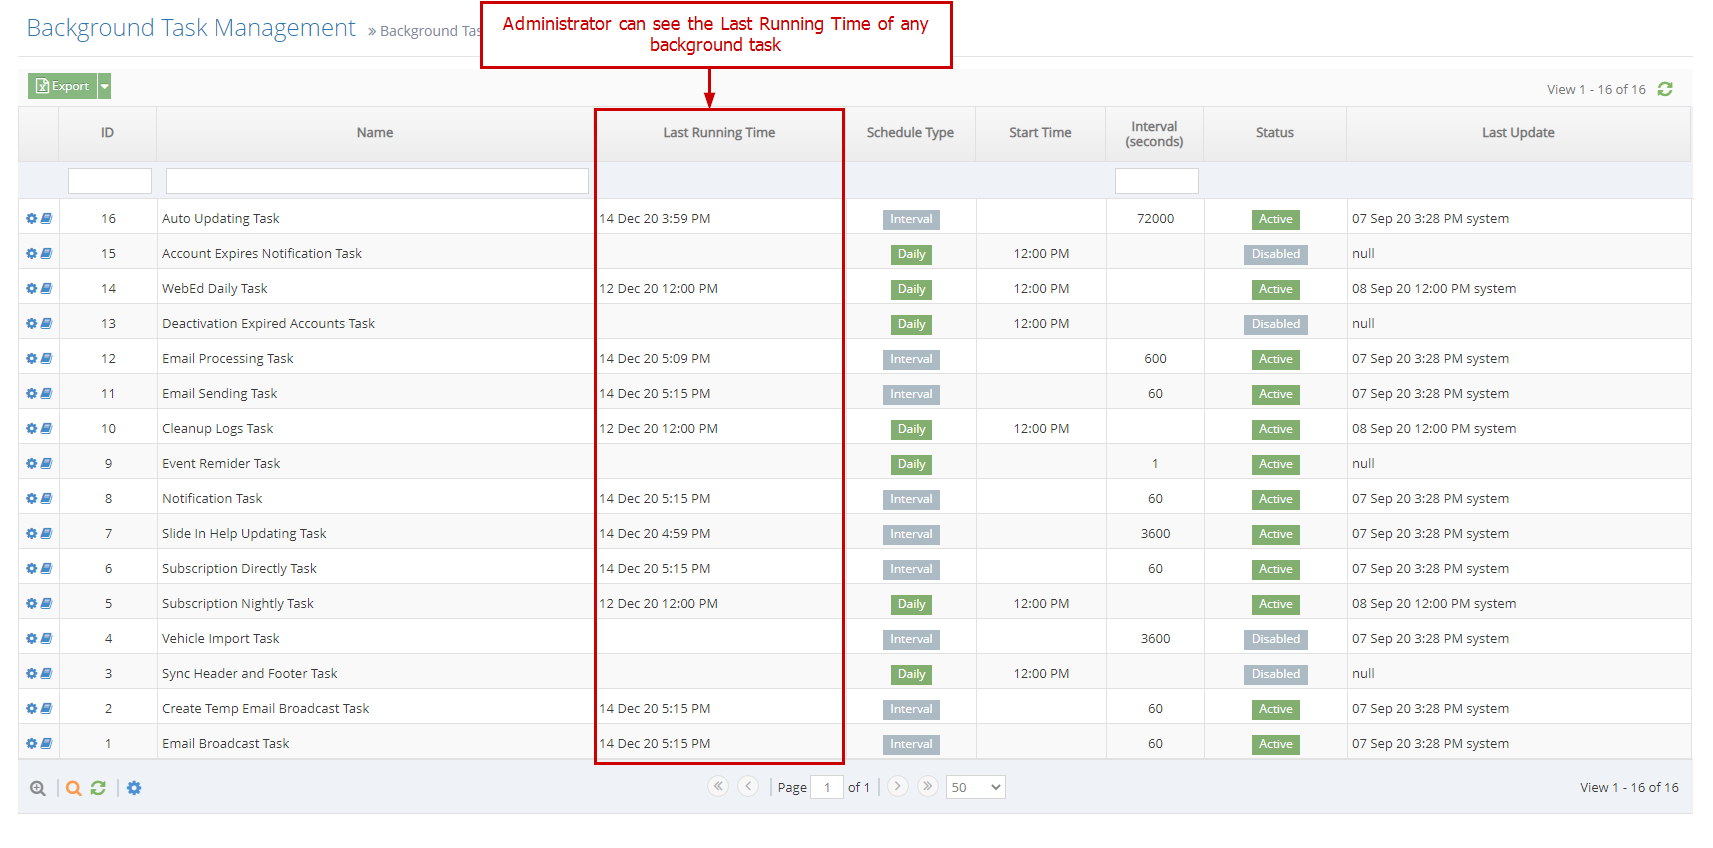
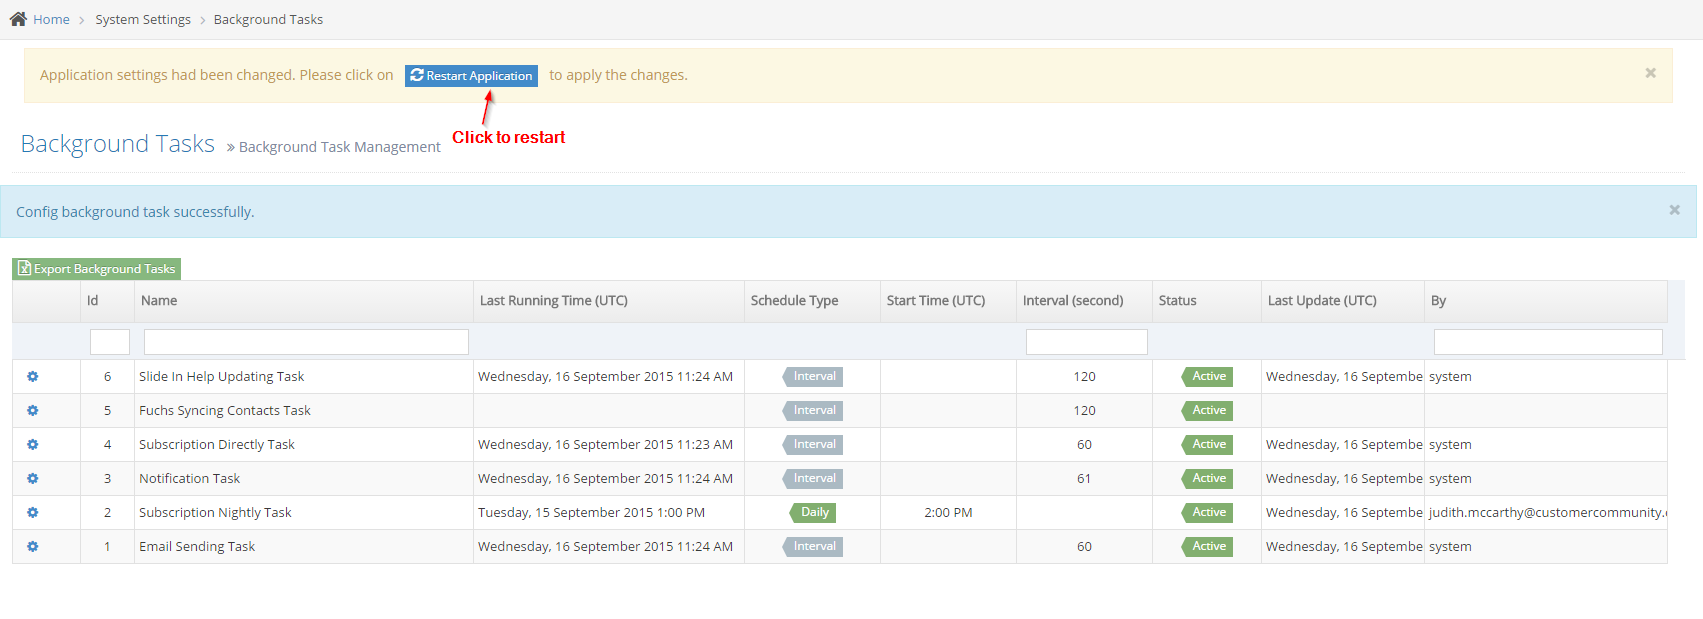
3An administrator can see the Last Running Time of any background task here
How to setup task
-
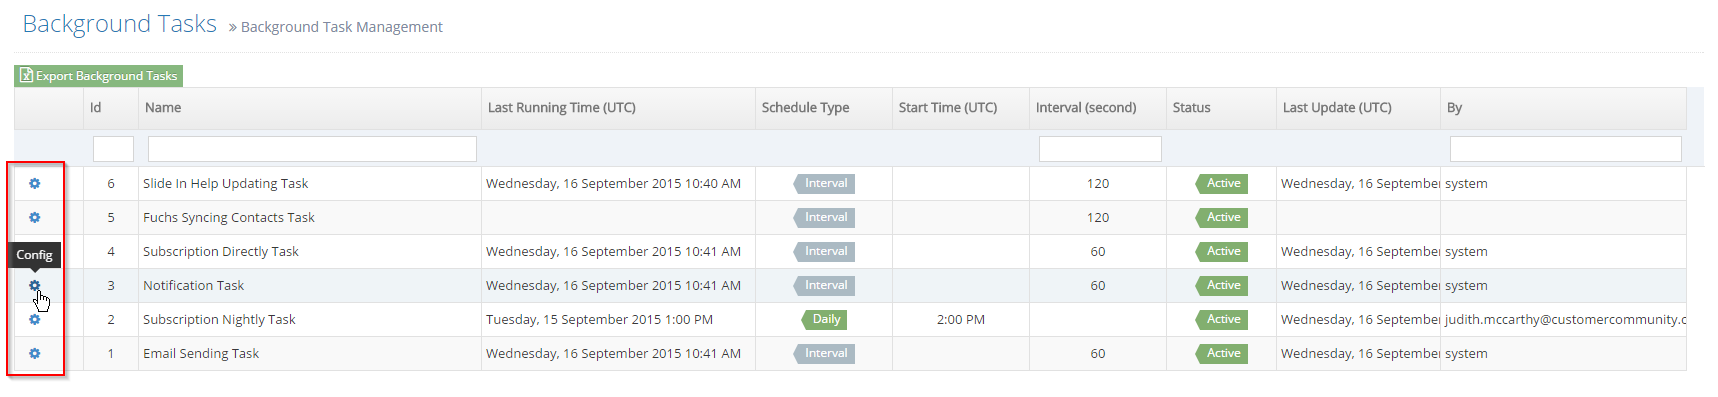
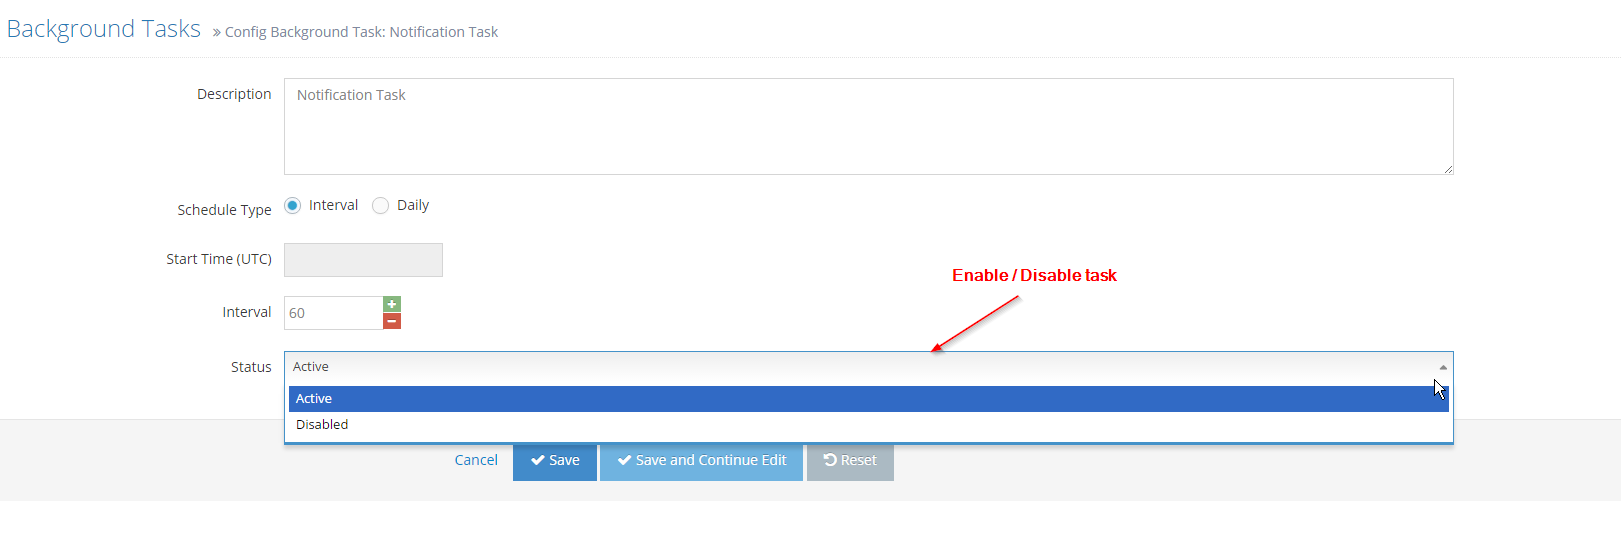
1Click the config icon on the task you want to setup
-
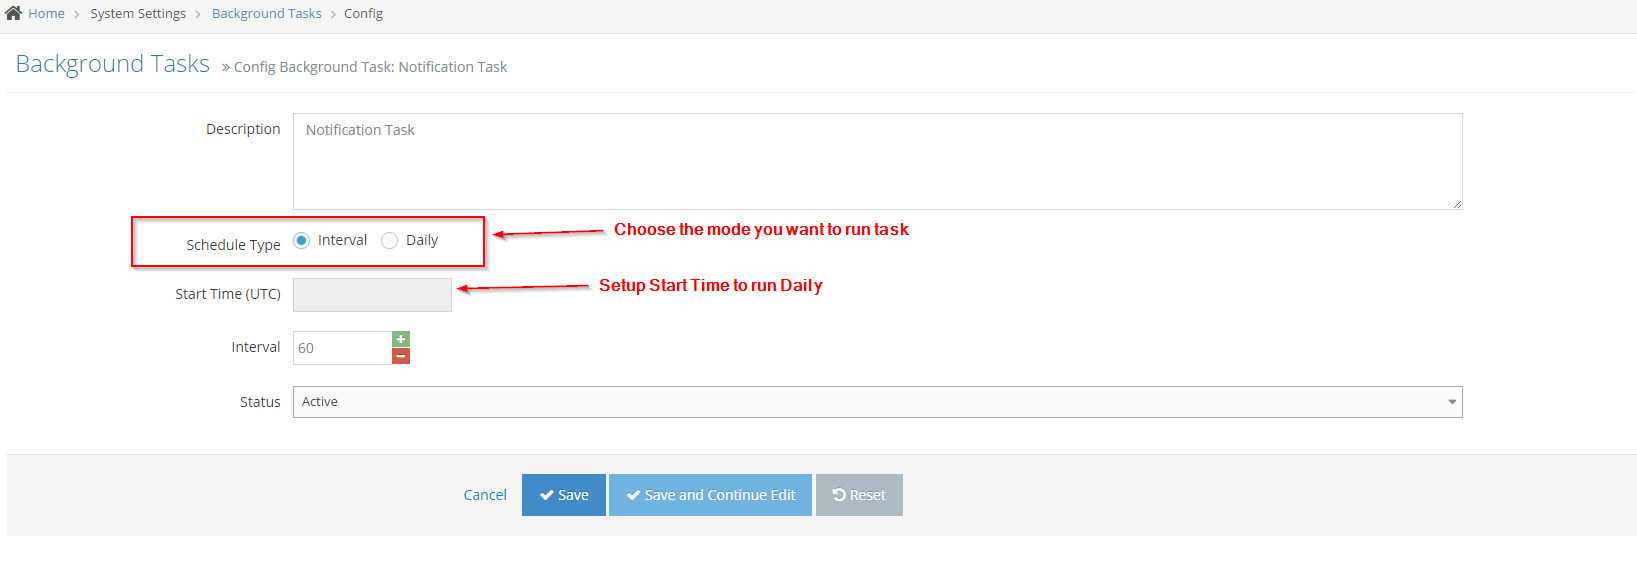
2An administrator can update the task with 2 modes:
- Interval: running by an interval time (seconds)
- Daily: running every day at a specific time
-
3An administrator can Enable/Disable task
-
4Click Save
-
5A message displays to inform that Application settings had been changed and need to restart to apply the changes. Click Restart Application
-
6Click OK to confirm
-
7Your setting for the background task has been applied
How to set Background Task Logs Days Per View
-
1Log in as an administrator and go to the Admin Dashboard.
Learn how to log in here → -
2Go to Admin Module and click Settings on the left navigation/menu
-
3Click System Settings then select Background Tasks
-
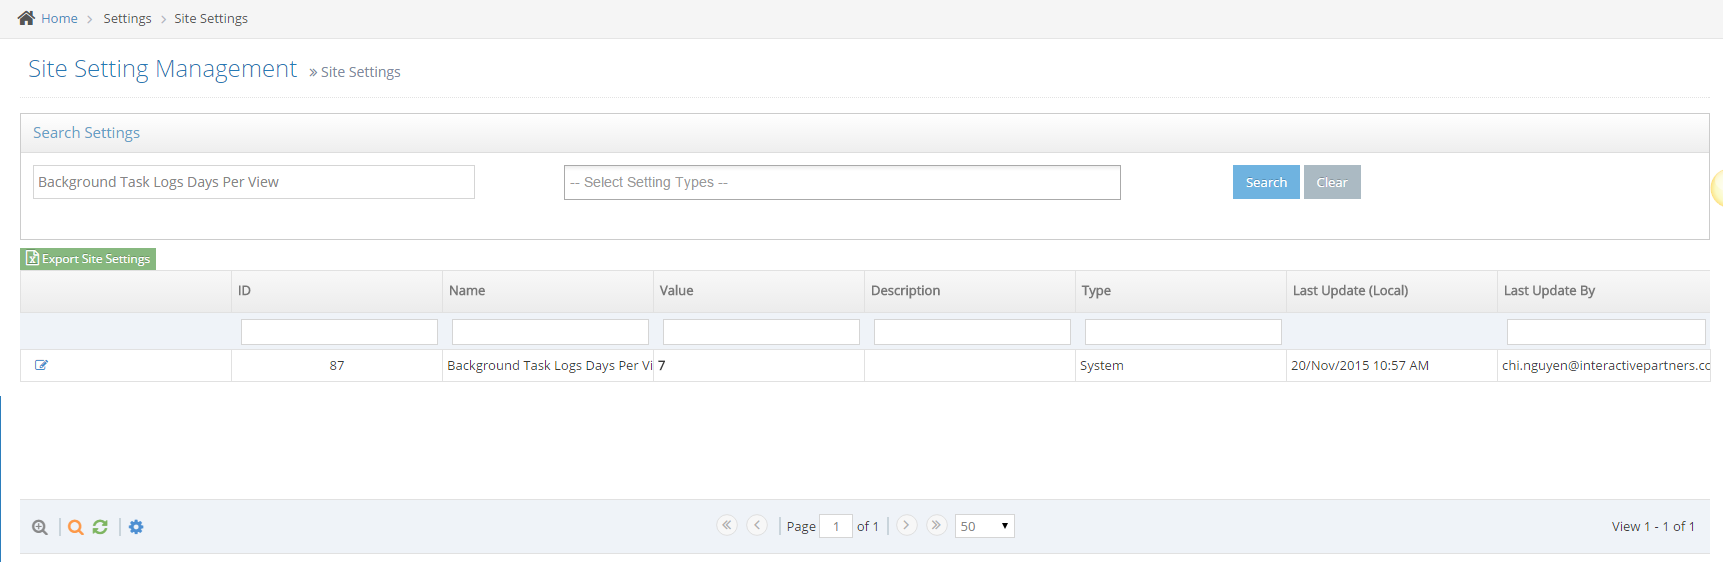
4Search Background Task Logs Days Per View
-
5Click the Edit icon

-
6Change the value

-
7Click Save or Save and Continue Edit
- Click Save: back to the site setting listing and show message update successfully
- Click Save and Continue Edit: keep page edit and show a message update successfully
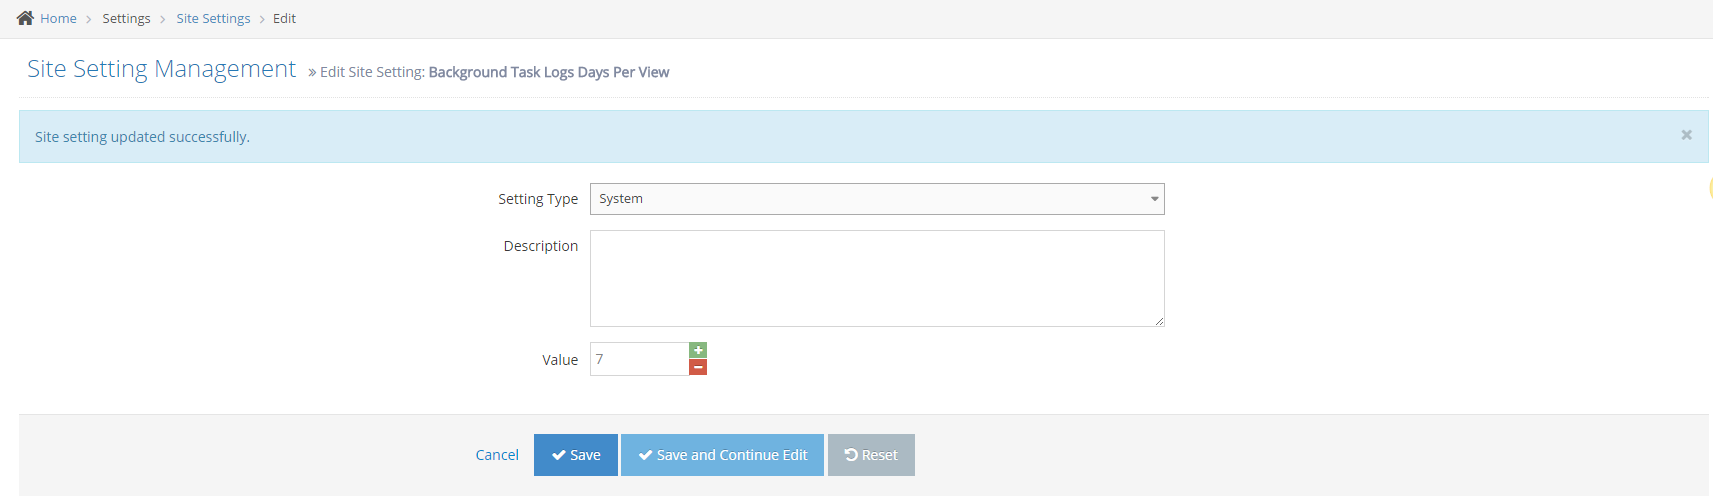
- Click Save: back to the site setting listing and show message update successfully
How to View Logs
-
1Log in as an administrator and go to the Admin Dashboard.
Learn how to log in here → -
2Go to Admin Module and click Settings on the left navigation/menu
-
3Click System Settings then select Background Tasks
-
4Click View Logs in a row to view the log of the background task

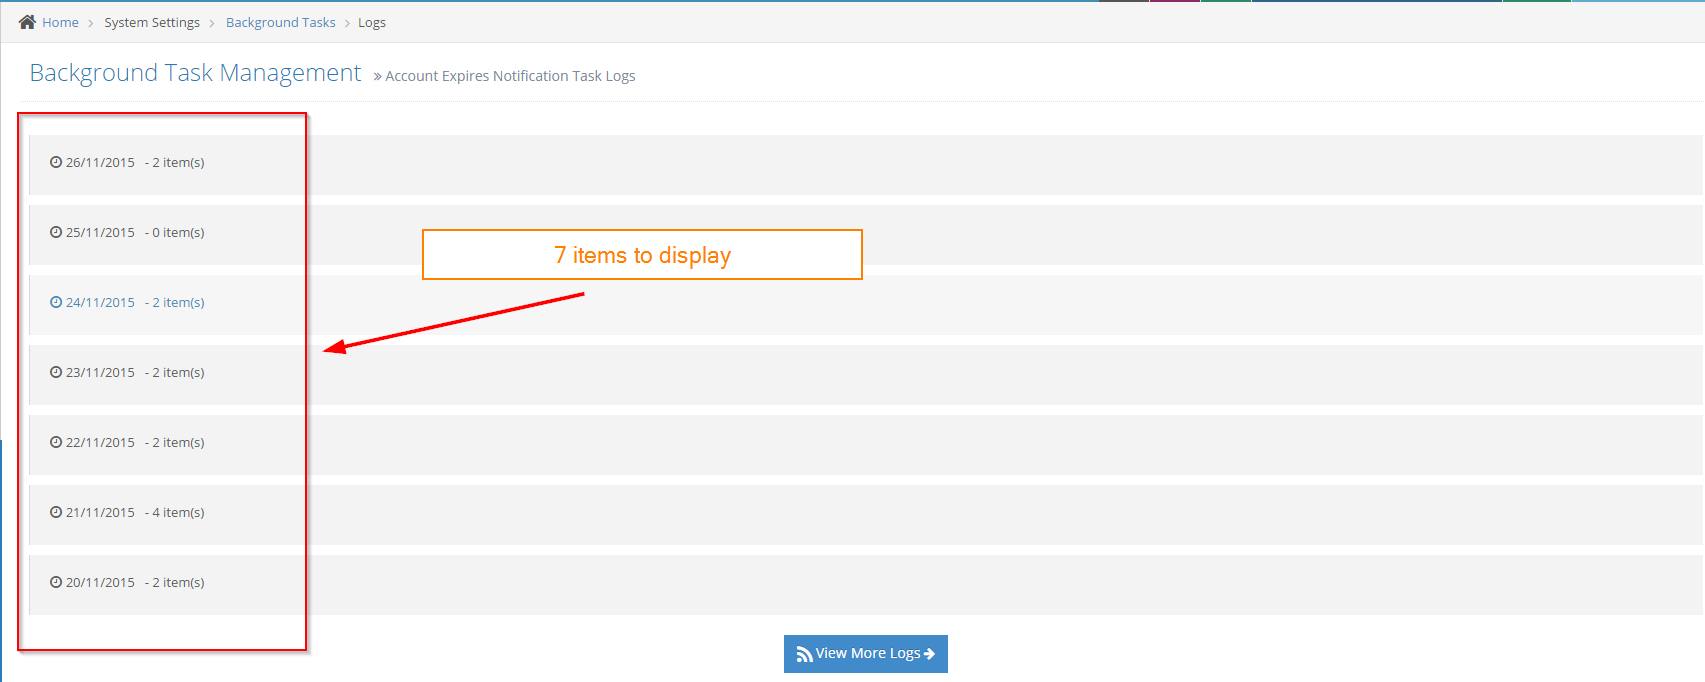
-
5Click the View More Logs button (if there are more logs to view)
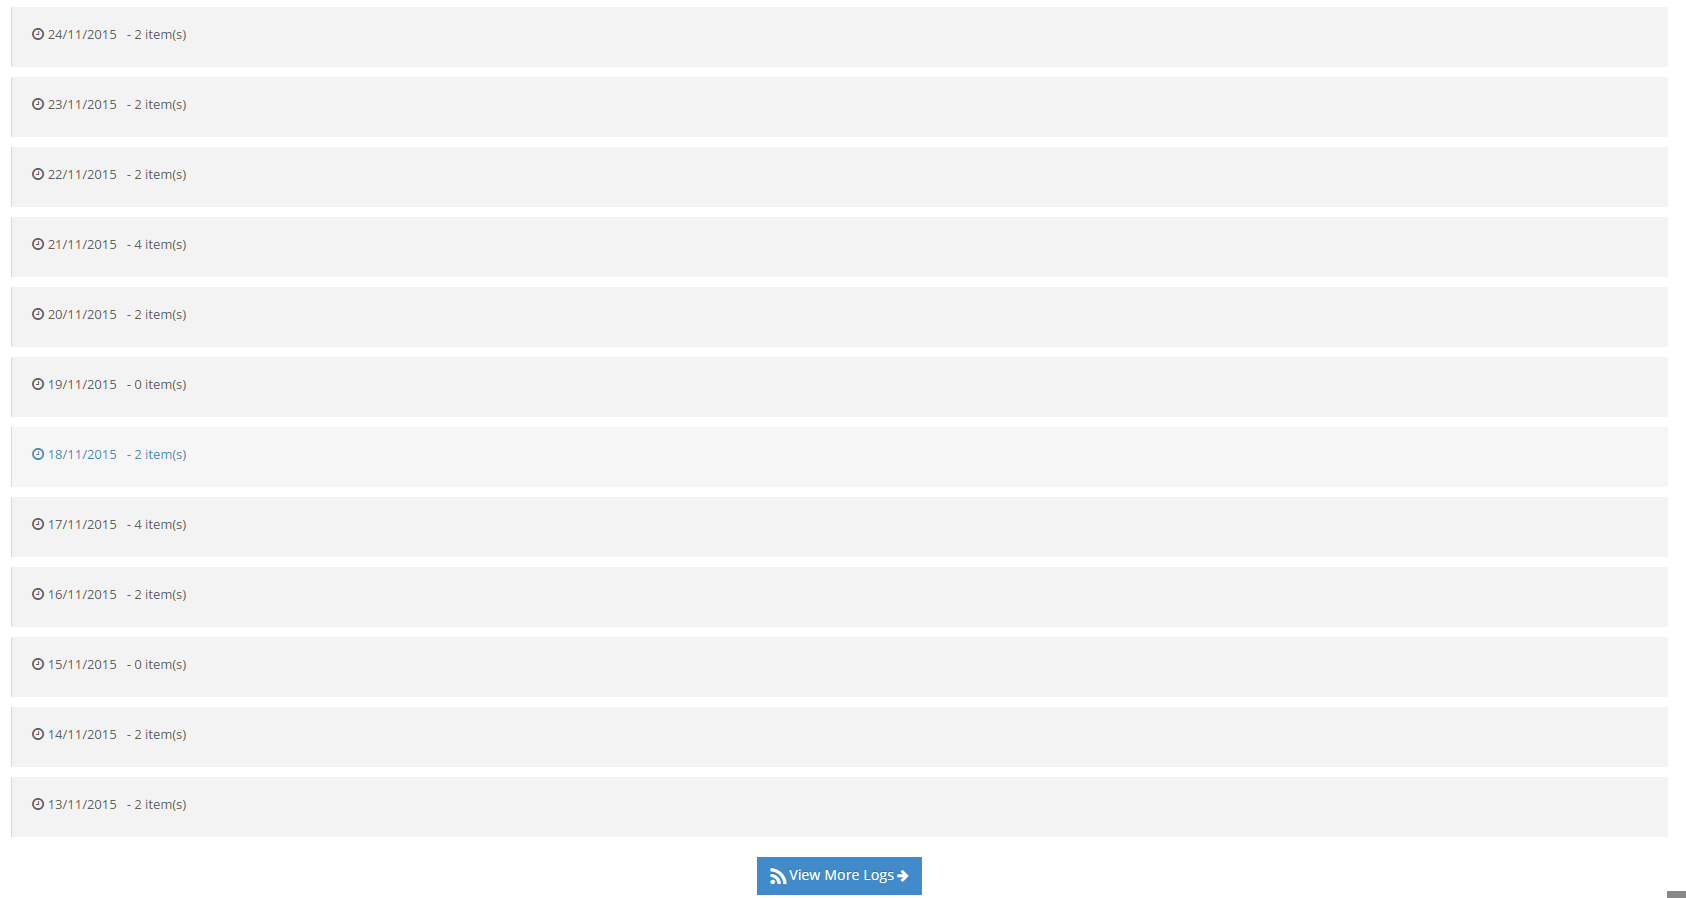
-
6Click on a log date item

-
7Click the log date item in step 6 again

Ability to add specific client task
- For setting specific tasks for the client. The administrator must install the client module first.
Refer to this document to install the client module → - After installing the client module, please go to the list of available tasks to set up.
Setting Up Payment Methods
Why you would use a Payment Method?
Payment method allows a user to make payments using a variety of methods online.
Creating a Payment Method
-
1Log in as an administrator and go to the Admin Dashboard.
Learn how to log in here → -
2Go to Admin > Settings > Payment Methods
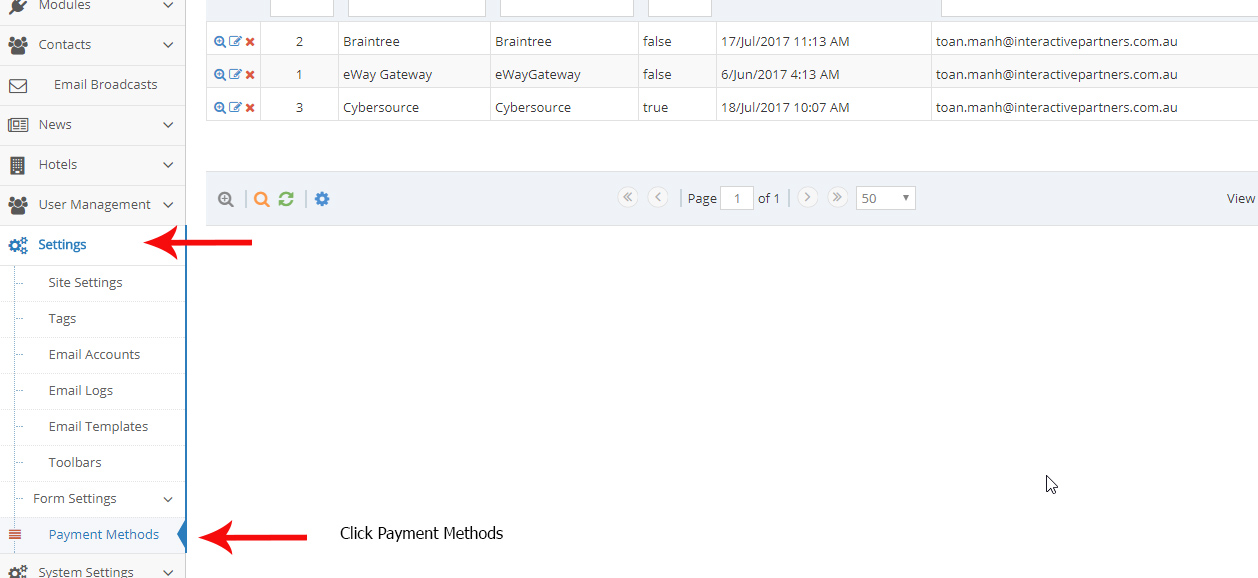
-
3Click Create New Payment Methods
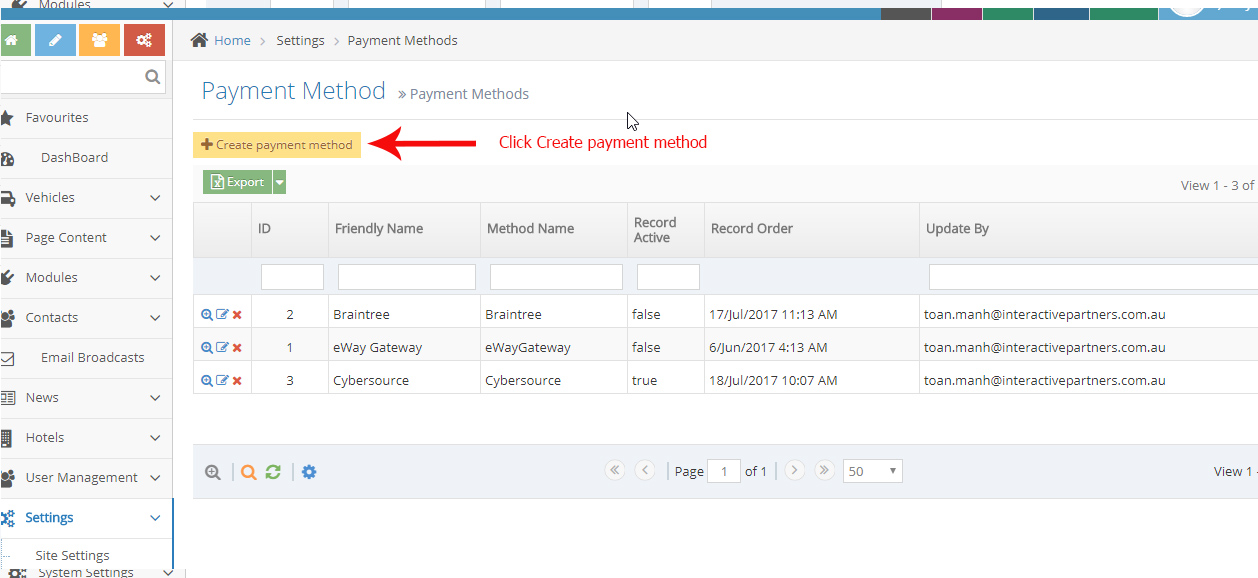
-
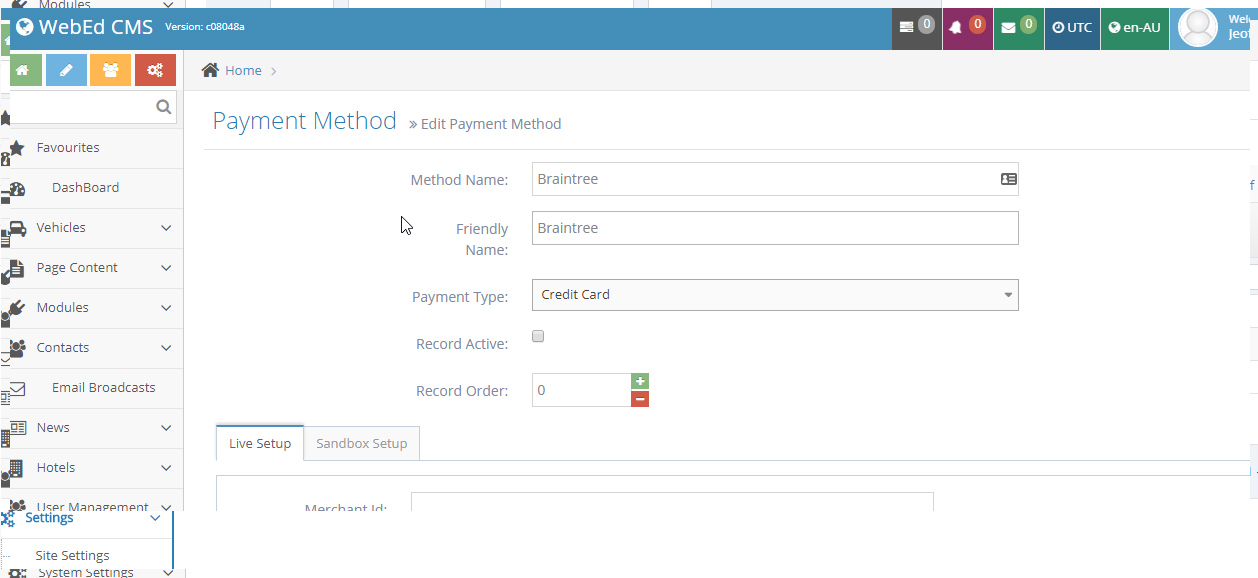
3Fill up the necessary fields:
- Method Name - The name of your payment method
- Friendly Name- assign a friendly name for this method
- Payment Type - select a type of payment either credit card, Cash or etc..
- Record Active - Select or check this option to activate this payment method
- Record Order - The display and arrangement of payment method from the grid.
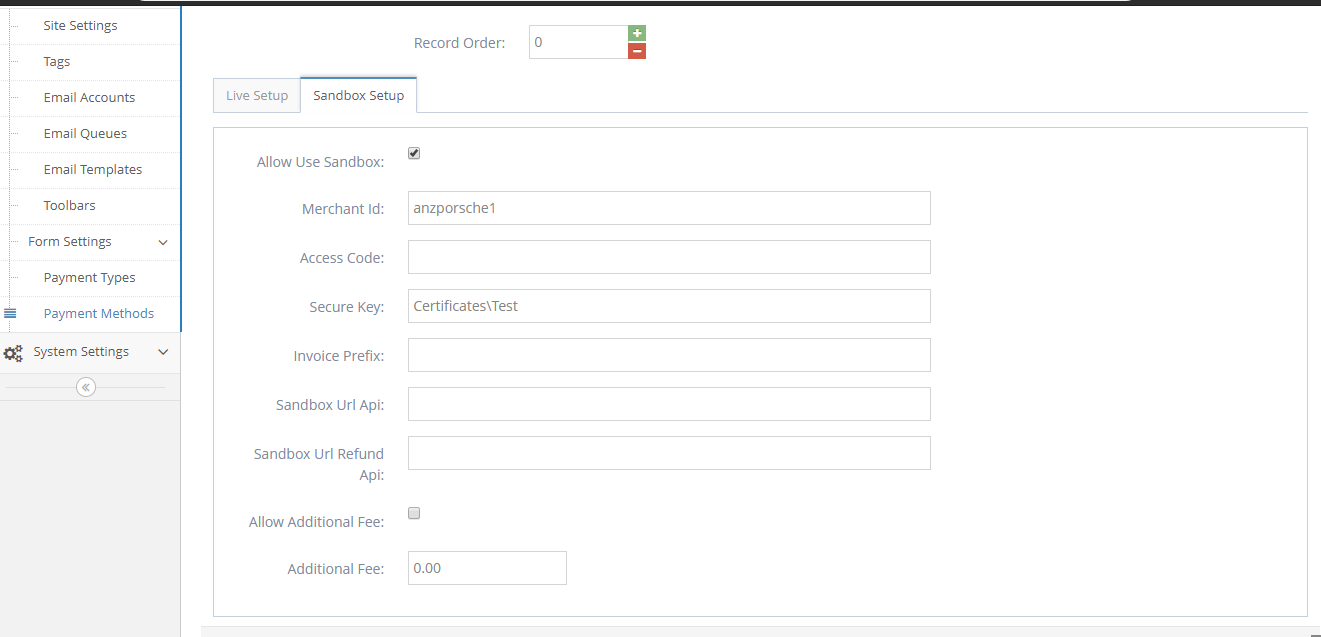
Payment Method Live and Sandbox Setup
-
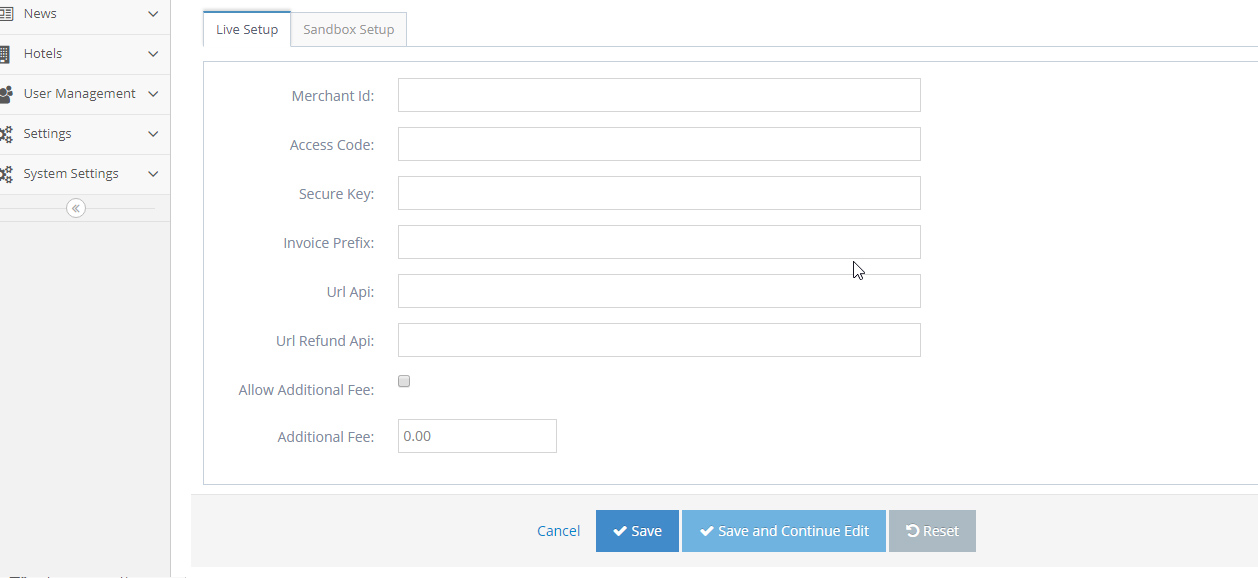
1Live and Sandbox Setup fields are the following:
- Merchant ID - is a unique identification to a specific account.
- Access Codes - are issued by agencies and unique characters or digits for making special transfers and payments to your account.
- Secure key - a payment authentication from your account.
- Invoice Prefix - to identify the type of Sales Invoice that has been issued.
- URL API - the URL interface represents an object and variables to send data of payment.
- URL refund API - the URL for the refund object and variables
- Allow Additional Fee - check if you want to add a price or fee for this method.
- Additional Fee - add a fee or price for this payment method.
-
2For Sandbox setup there's an additional field for allowing to use "Sandbox" modes
- Test Mode - tick to set the payment gateway to Sandbox
- Live Mode - untick to set the payment gateway to live mode
-
3Click Save
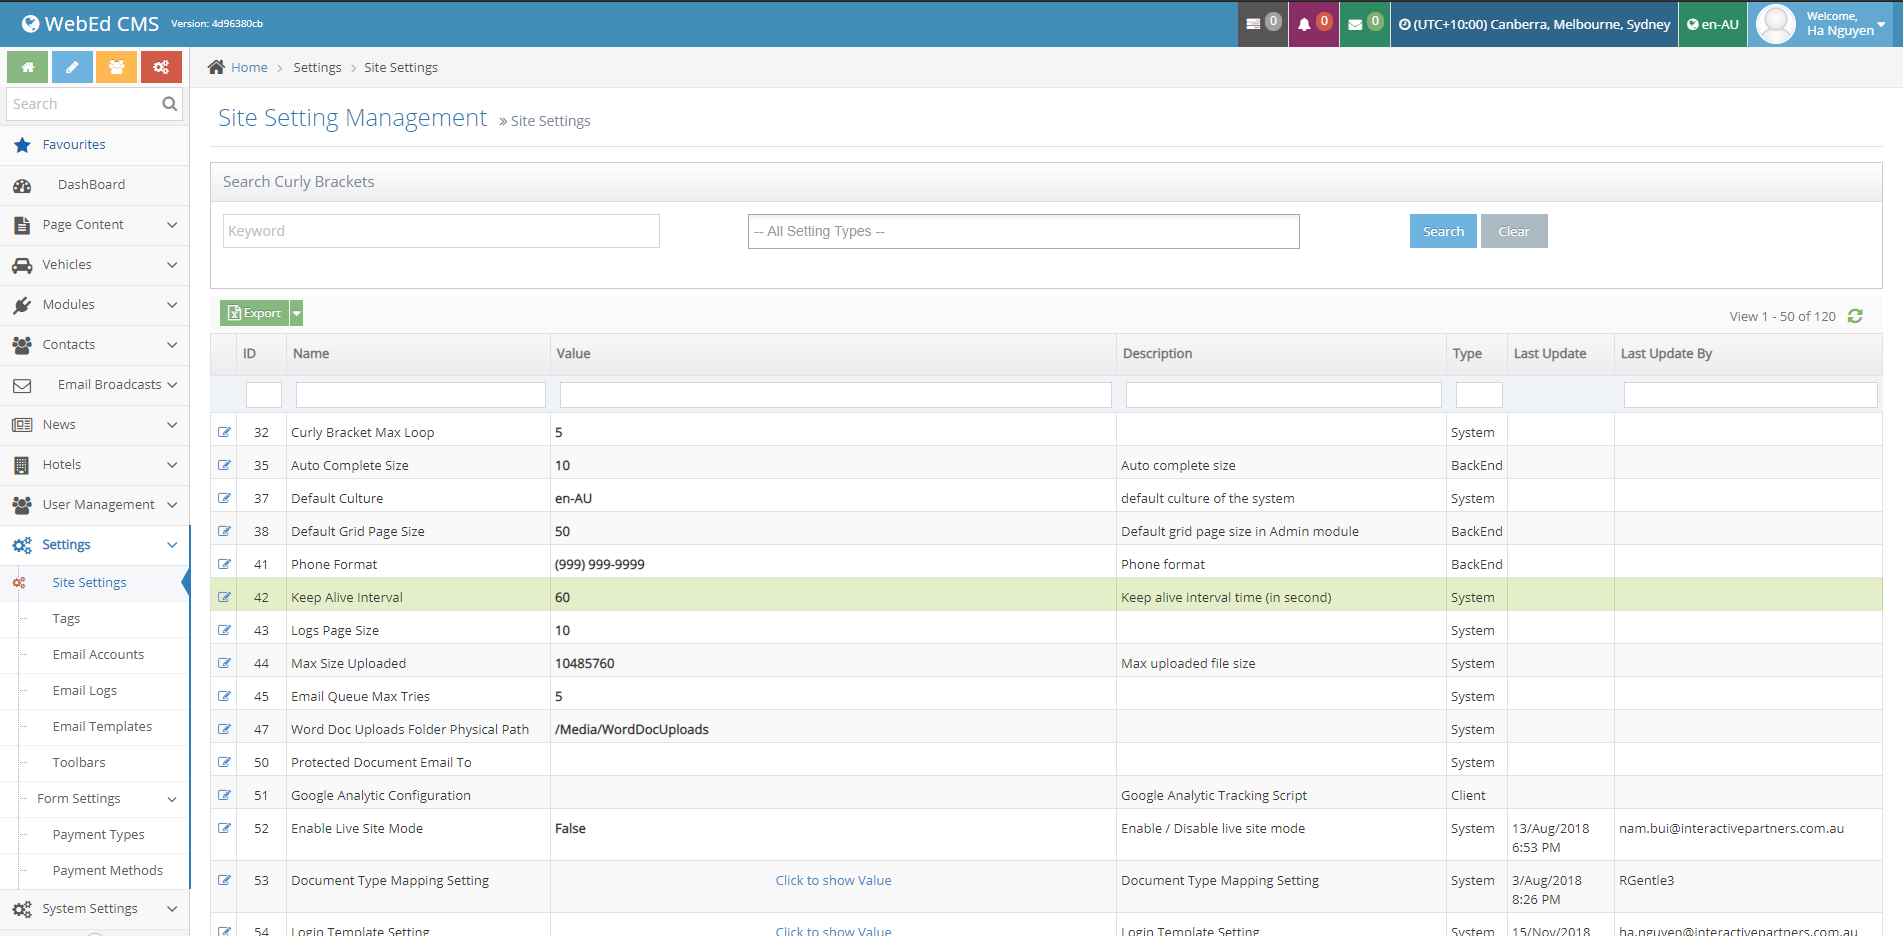
Updating the Site-Setting
Why you would use Site Setting Management?
If a user wants to set up any of the website information or any reference like phone, maximum file uploads, and any kinds of important site settings this module can be very useful.
Changing the Site-Setting
-
1Log in as an administrator and go to the Admin Dashboard.
Learn how to log in here → -
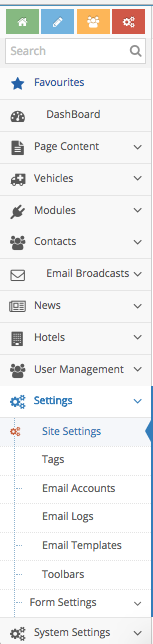
2Go to the Admin module and click Settings on the left navigation/menu
-
3Click Site Settings
-
4Click on the Edit button to the left of a setting that needs to be changed


-
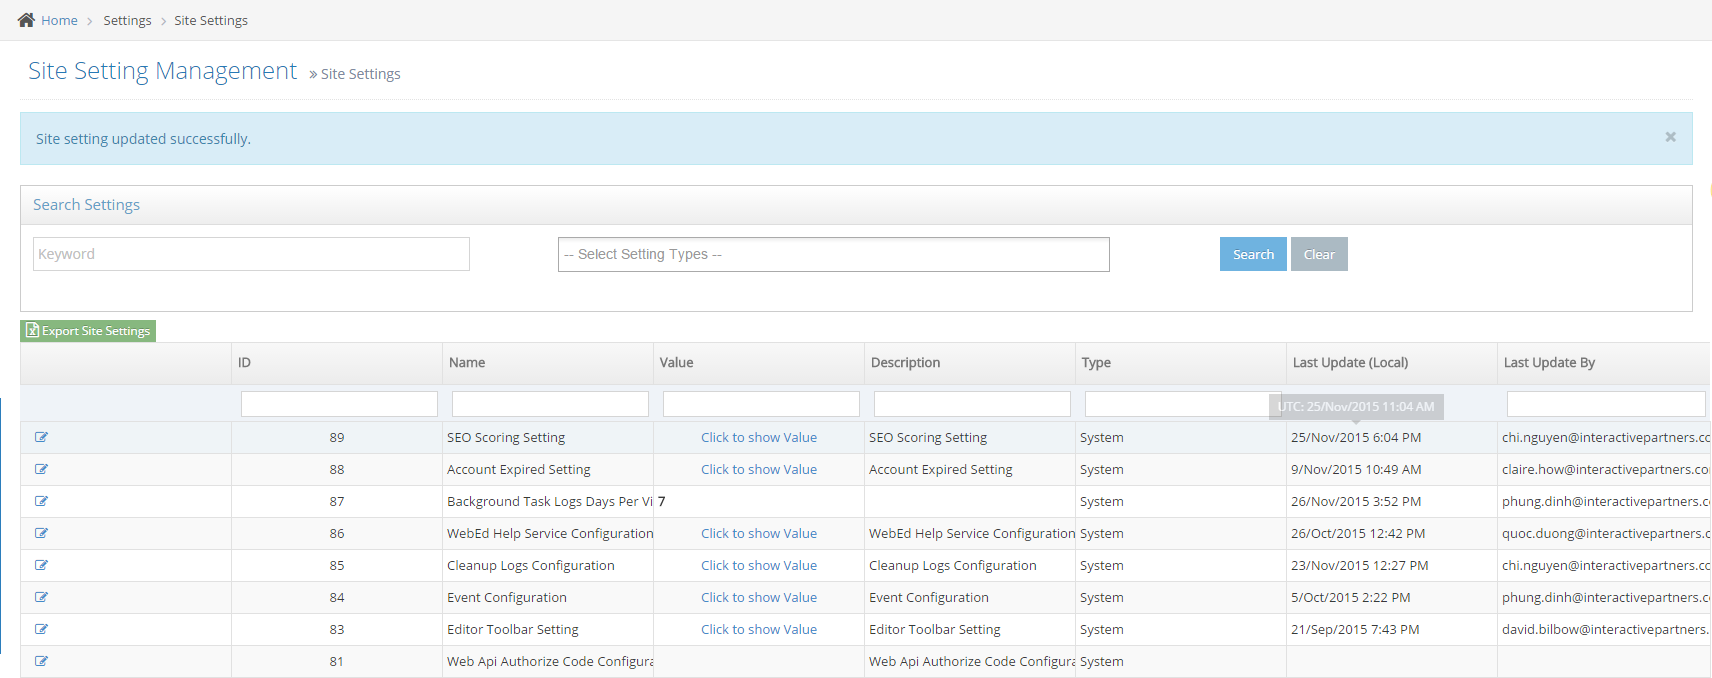
5Change the values as you want and click Save
-
6The site setting is updated successfully.
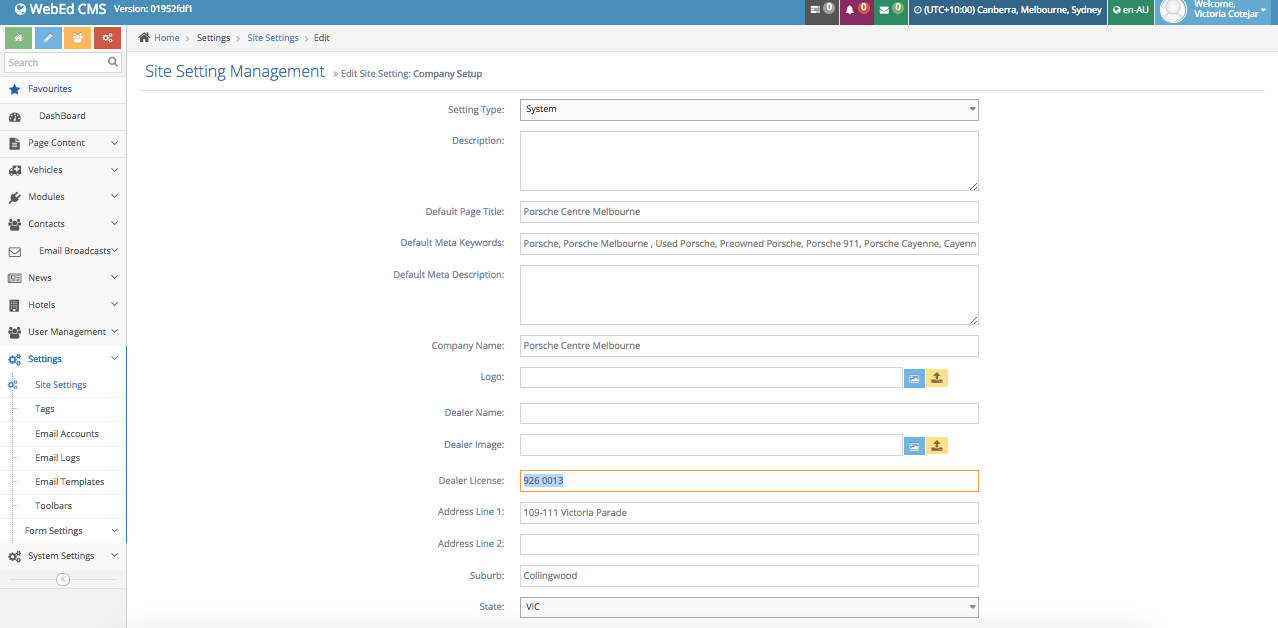
Updating Dealer License Number on Footer
What is a Dealer License Number?
- A license number is found in permits issued by government agencies that allow individuals or companies to conduct business within the government's geographical jurisdiction.
- It is the authorisation to start a business issued by the local government.
Managing the Edit License Number on a footer
-
1Log in as an administrator and go to the Admin Dashboard.
Learn how to log in here → -
2On the left menu panel, go to Settings > Site Settings
-
3A list will show - Look for Company Set up or type it in the Name Search Bar - then click on the Edit Button to the left of it.

-
4The settings for this should appear. Go to the Dealer License Field and Add/Edit the License Number
-
5After editing to the correct dealer license number - scroll down and click Save.

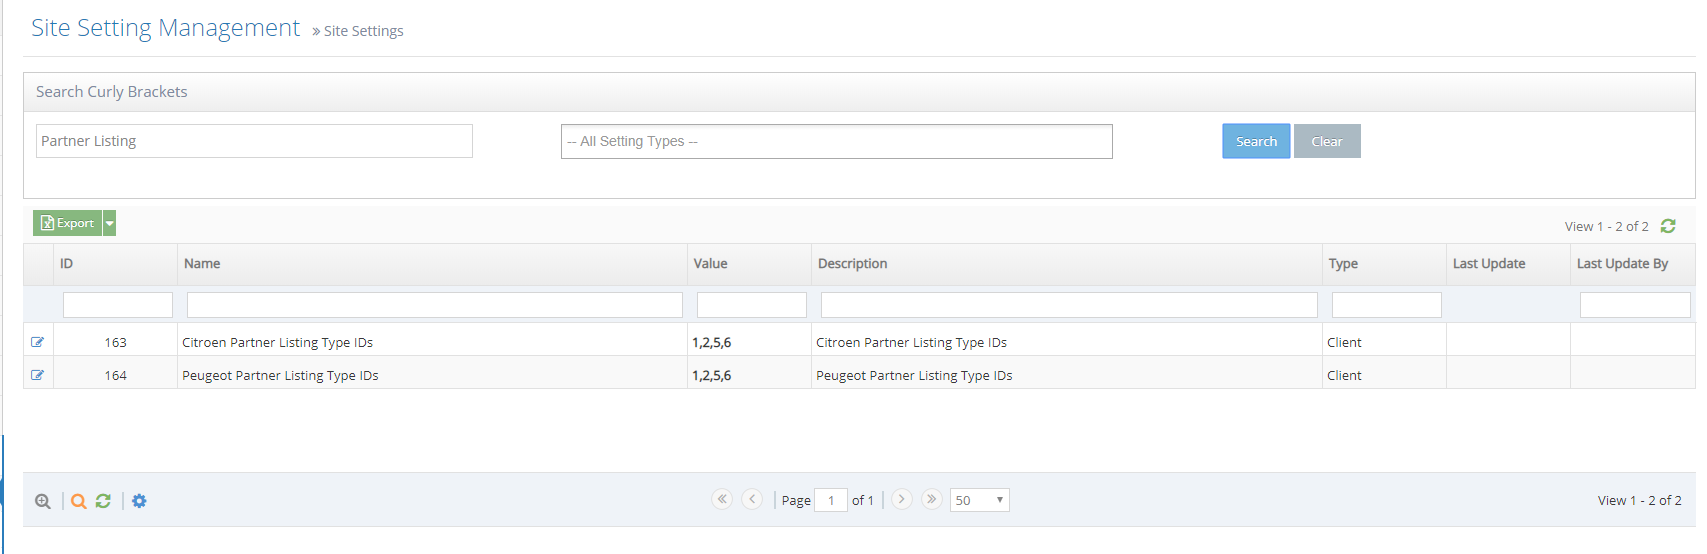
Partner Listing Type IDs for Citroen and Peugeot
Partner Listing Type IDs Overview
This page shows how to config those site settings and what they use for
Definition
CitroenPartnerListingTypeIDs and PeugeotPartnerListingTypeIDs are the string of PartnerTypeID separated by a comma.
Ex: 1,2,3 - mean PartnerTypeID == 1 or 2 or 3.
Purpose
This setting is used to limit dealer listing in PCA connect. Only show partner location have partnertypeID in site setting value.
Changing a Partner ID value
-
1Log in as an administrator and go to the Admin Dashboard.
Learn how to log in here → -
2On the left menu panel, go to Settings > Site Settings
-
3Search with the keyword "Partner Listing" or scroll down to find
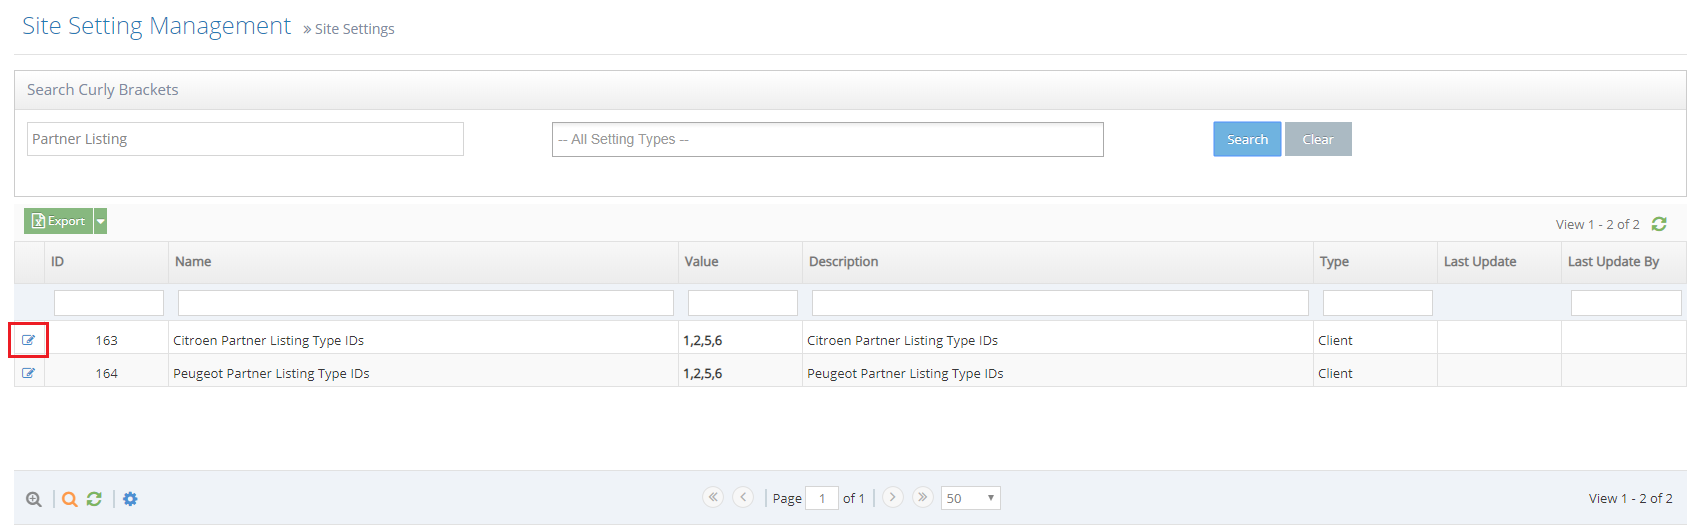
-
4Click on the edit icon
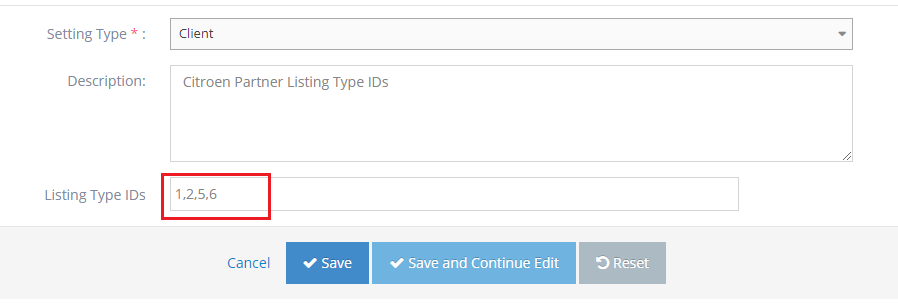
-
5Input the new value in the correct format (separate each PartnerTypeID by a comma) then save.
Canonical Tags
Canonical Tags Overview
This documentation shows how to edit the Canonical tag in the Site Settings and how to search for it on the page.
See it in action, watch the demo here.
Why you would use a site setting for the canonical tag?
Using a canonical tag ( rel="canonical" ) prevents problems caused by identical or "duplicate" content appearing on multiple URLs. There is a site setting in WebEd that you can update to set the URL for the site's canonical tag.
How to search for the canonical tag on a page
-
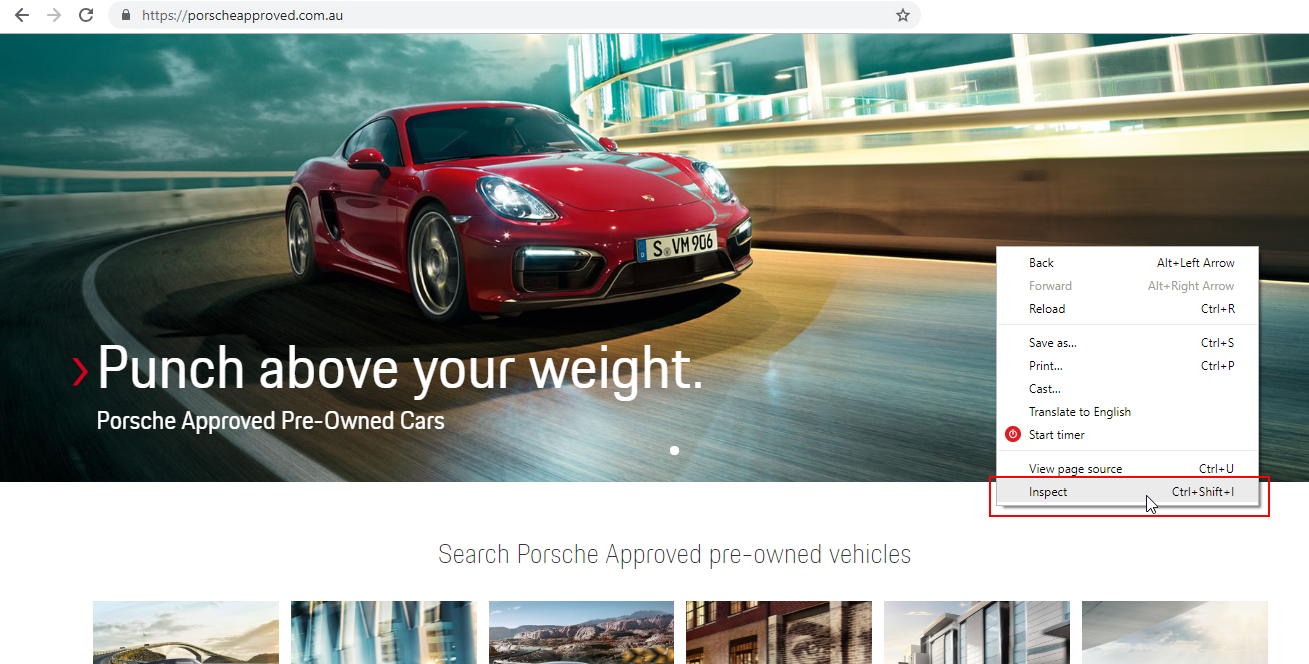
1Load the page where you want to check the canonical tag
-
2Right-click on the page and select "Inspect"
-
3Click Site Settings
-
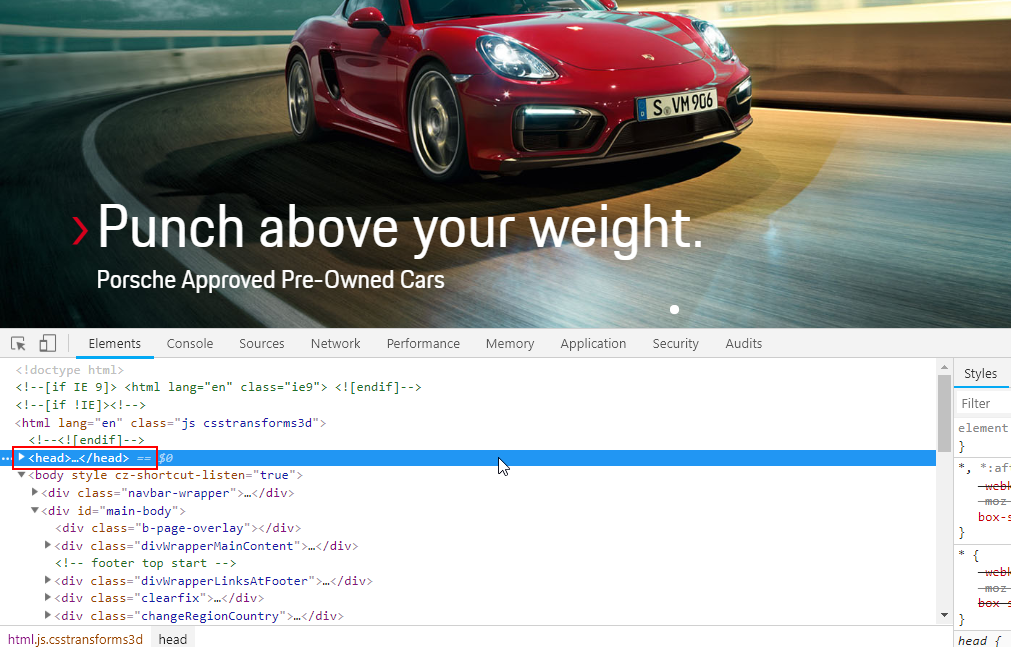
4Check the head tag of the page
-
5Go to the head tag; the canonical tag is found on the of the page
-
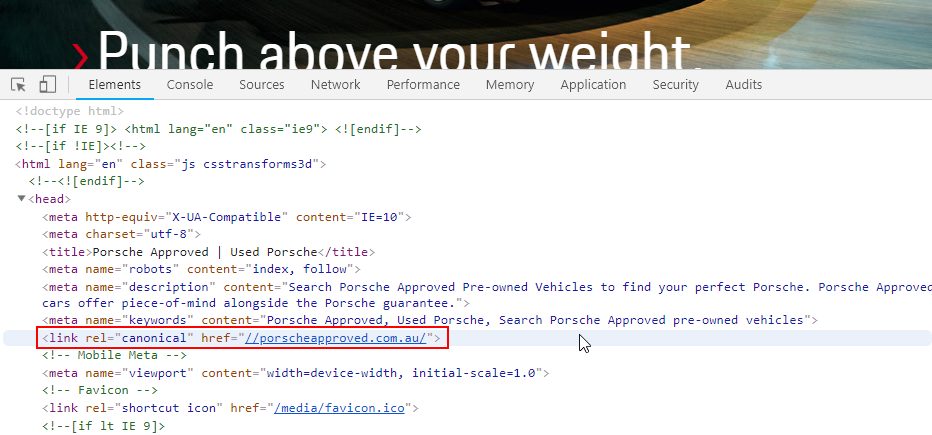
6Expand the head tags and look for the canonical tag
-
7Inside the attribute href, you will see the URL that is currently used for the page
How to update a Canonical Tag
-
1Log in as an administrator and go to the Admin Dashboard.
Learn how to log in here → -
2Go to Admin > Settings
-
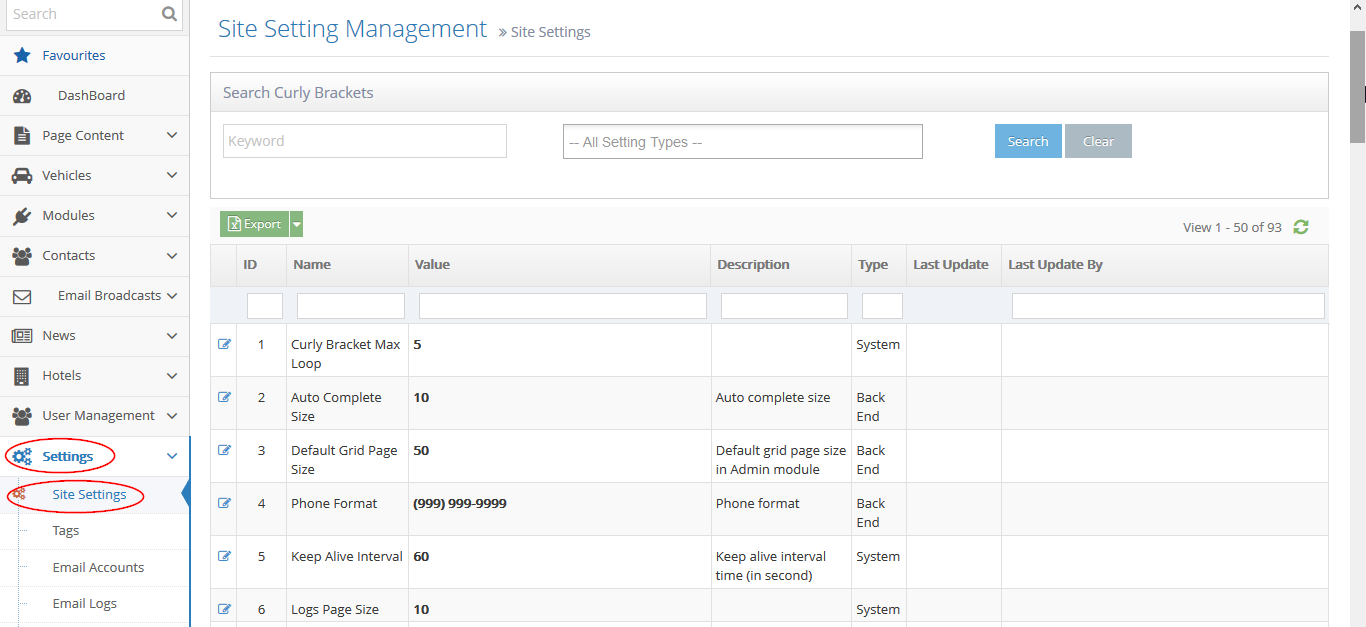
3Select "Site Settings"
-
4Search for the canonical site setting
-
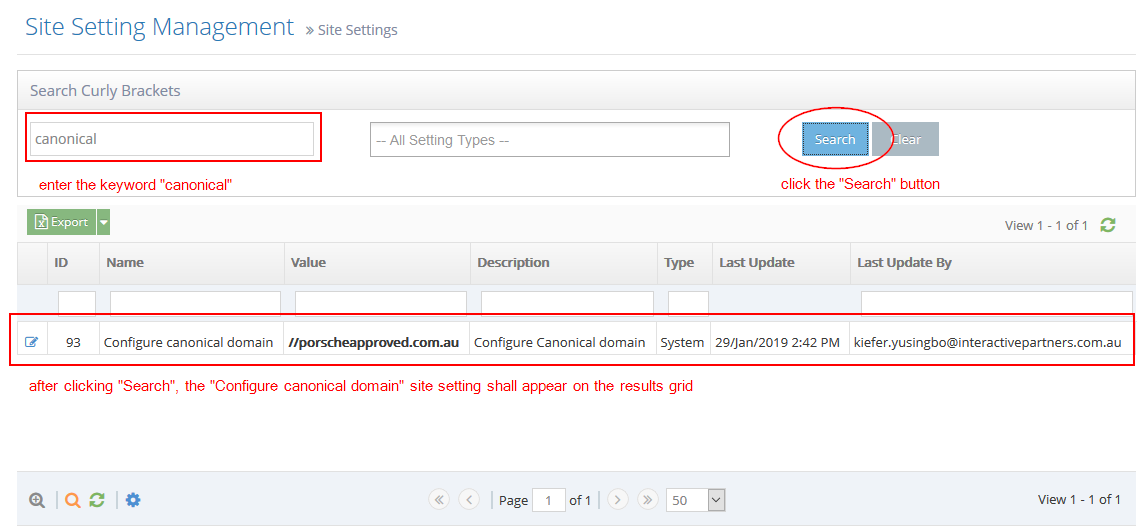
5Under the "Search Curly Brackets" section on top, enter the keyword "canonical" on the first input field
-
6Click the "Search" button on the right
-
7After clicking the "Search" button, the "Configure canonical domain" site setting shall appear on the results grid
-
8Update the canonical site setting
-
9Click the "Edit" icon on the left


-
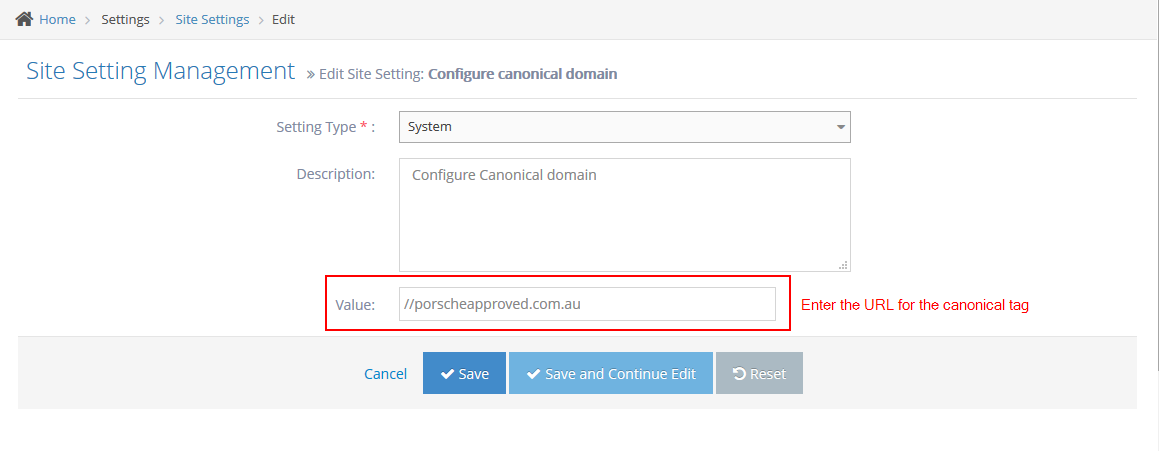
10On the "Value" field, enter the URL for the canonical tag
-
11Click the "Save" button to save the update. This change shall be applied to all pages.
-
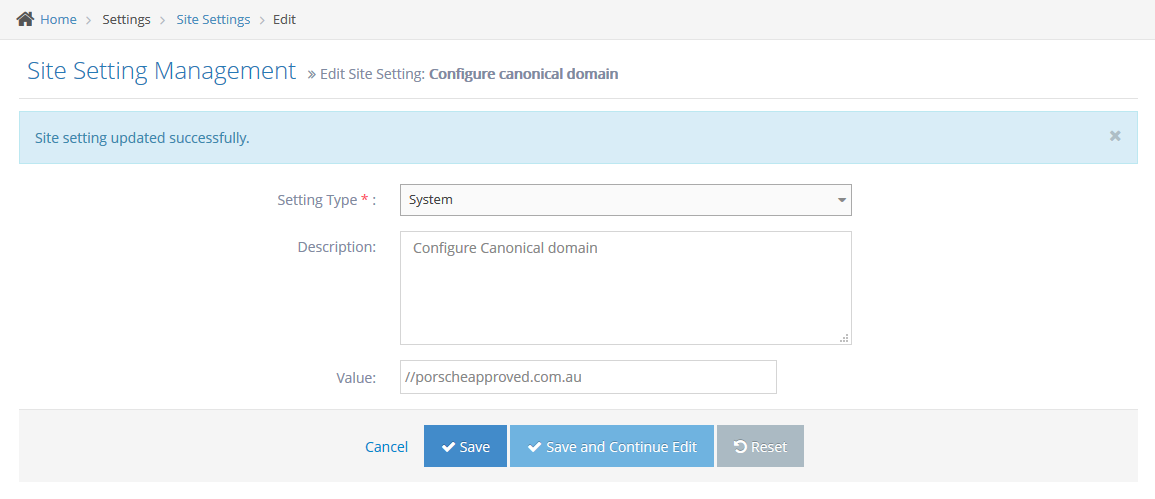
12There will be a notification on top that says "Site setting updated successfully".
Managing Email Accounts
This part of the user guide will show you how to manage your email accounts.
Why do you need an email account?
The email account will serve as a default FROM email account when sending email notifications.
Creating a new email account
-
1Log in as an administrator and go to the Admin Dashboard.
Learn how to log in here → -
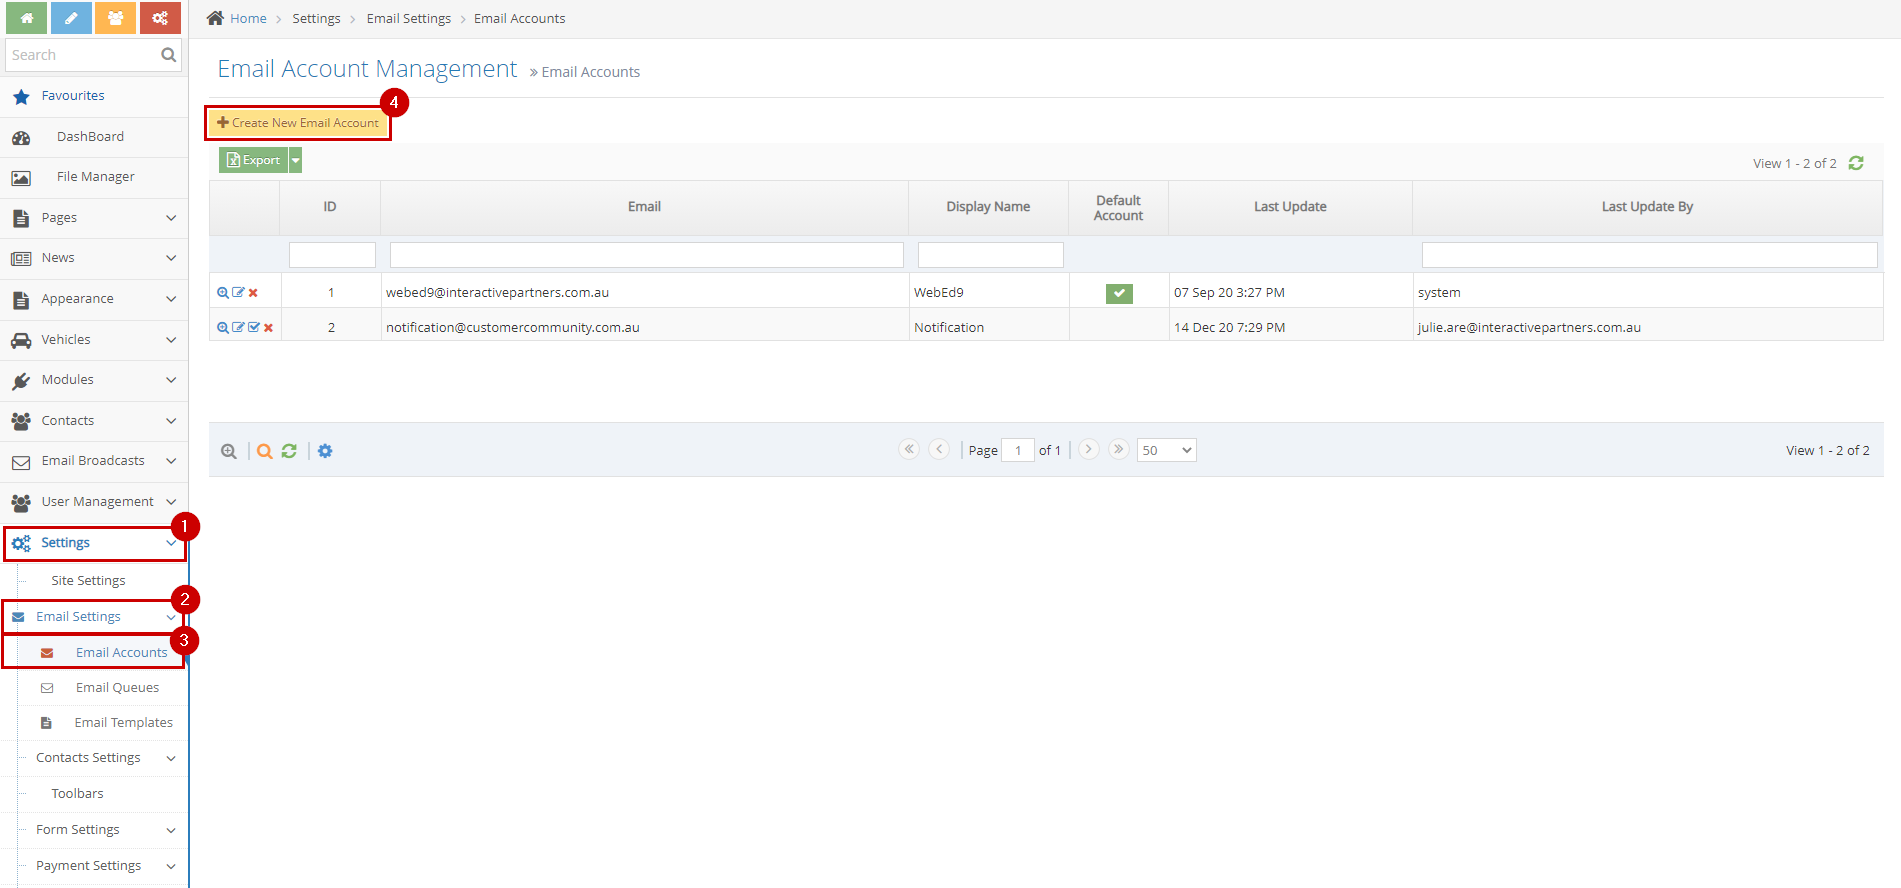
2Click Settings
-
3Click Email Settings and select Email Accounts
-
4Click Create New Email Account
-
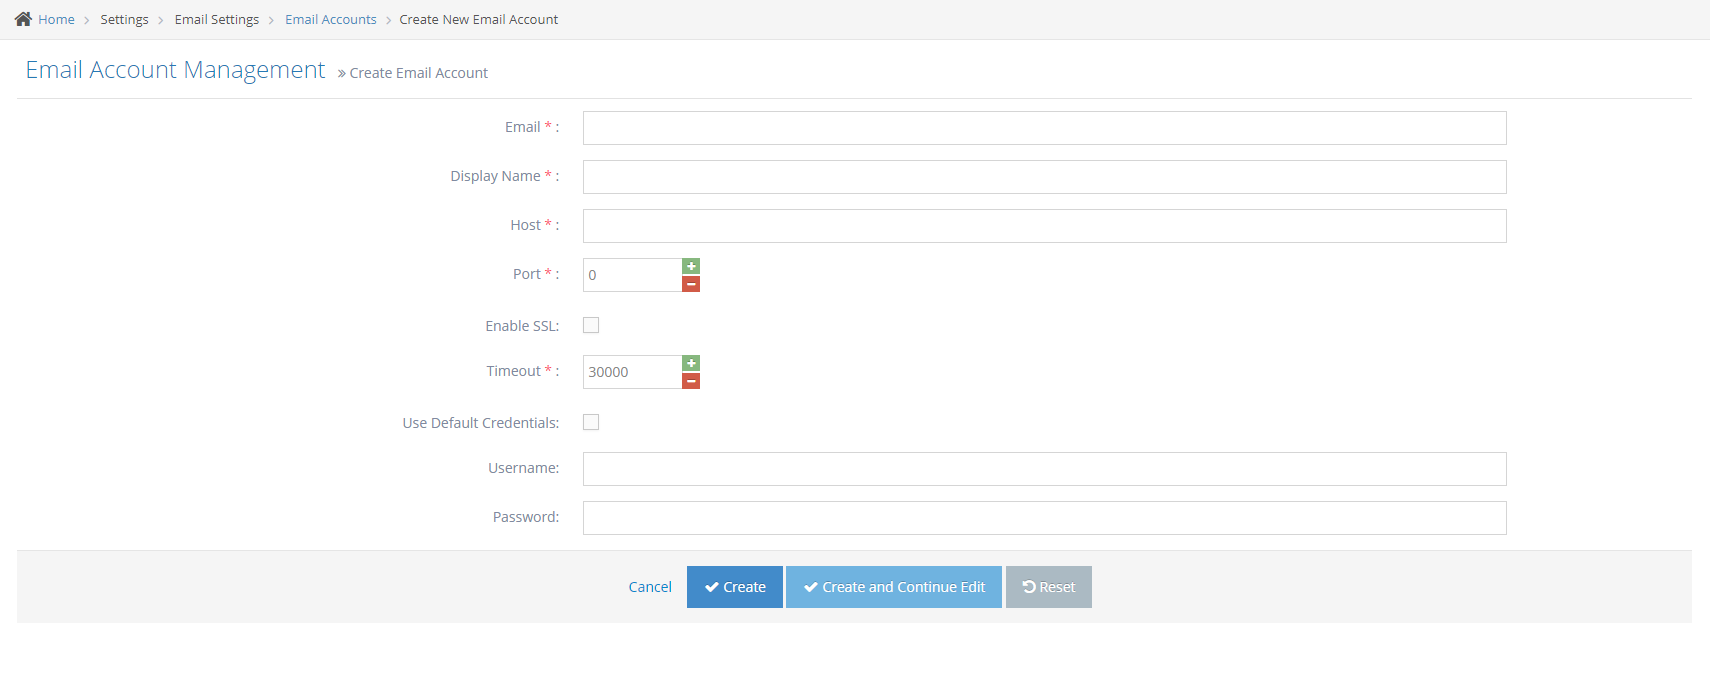
5Input information for the new email account
- Email - This is the email address of the email account
- Display Name - This is the display name on the email notification
- Host - This is the host server where the emails messages and stored files are stored
- Port
- 25 – this is the default SMTP non-encrypted port;
- 2525 – this port is opened on all SiteGround servers in case port 25 is filtered (by your ISP for example) and you want to send non-encrypted emails with SMTP;
- 465 – this is the port used if you want to send messages using SMTP securely.
- Enable SSL - tick this to enable SSL
- Timeout -
- Use Default Credentials - Tick this to set the email account as the default email account
- Username -
- Password -
-
6Apply Changes
- Create - Click the 'Create' button to save the changes. This action saves the changes, closes the page, and redirects you to the back to the list page. You will see a note above that it is successfully created.
- Create and Continue Edit - Click the 'Create and Continue Edit' button to save the changes. This action saves the changes but lets you stay on the page.
- Reset - Click the 'Reset' button to start over. This action refreshes the page and shows the current event information. The changes will not be saved.
Set an email account as the default account
Only one default account in the system is used to send an email. To mark an email account as default, please follow the steps below:
-
1Log in as an administrator and go to the Admin Dashboard.
Learn how to log in here → -
2Click Settings
-
3Click Email Settings and select Email Accounts
-
4Click Mark As Default Account on the email account user wants to set as default.
The current default account doesn't have this icon.
Editing an Email Account
Only one default account in the system is used to send an email. To mark an email account as default, please follow the steps below:
-
1Log in as an administrator and go to the Admin Dashboard.
Learn how to log in here → -
2Click Settings
-
3Click Email Settings and select Email Accounts
-
4Click Edit on an email account

-
5Update information on the existing email account
- Email - This is the email address of the email account
- Display Name - This is the display name on the email notification
- Host - This is the host server where the emails messages and stored files are stored
- Port
- 25 – this is the default SMTP non-encrypted port;
- 2525 – this port is opened on all SiteGround servers in case port 25 is filtered (by your ISP for example) and you want to send non-encrypted emails with SMTP;
- 465 – this is the port used if you want to send messages using SMTP securely.
- Enable SSL - tick this to enable SSL
- Timeout - This is the time until the server refuses to send the email
- Use Default Credentials - Tick this to set the email account as the default email account
- Username - This is the username if the SMTP server requires credential
- Password - This is the password if the SMTP server requires credential
-
6Apply Changes
- Save - Click the 'Save' button to save the changes. This action saves the changes, closes the page, and redirects you to the back to the list page. You will see a note above that it is updated successfully.
- Save and Continue Edit - Click the 'Save and Continue Edit' button to save the changes. This action saves the changes but lets you stay on the page.
- Reset - Click the 'Reset' button to start over. This action refreshes the page and shows the current event information. The changes will not be saved.
Deleting an Email Account
-
1Log in as an administrator and go to the Admin Dashboard.
Learn how to log in here → -
2Click Settings
-
3Click Email Settings and select Email Accounts
-
4Click Delete on an email account
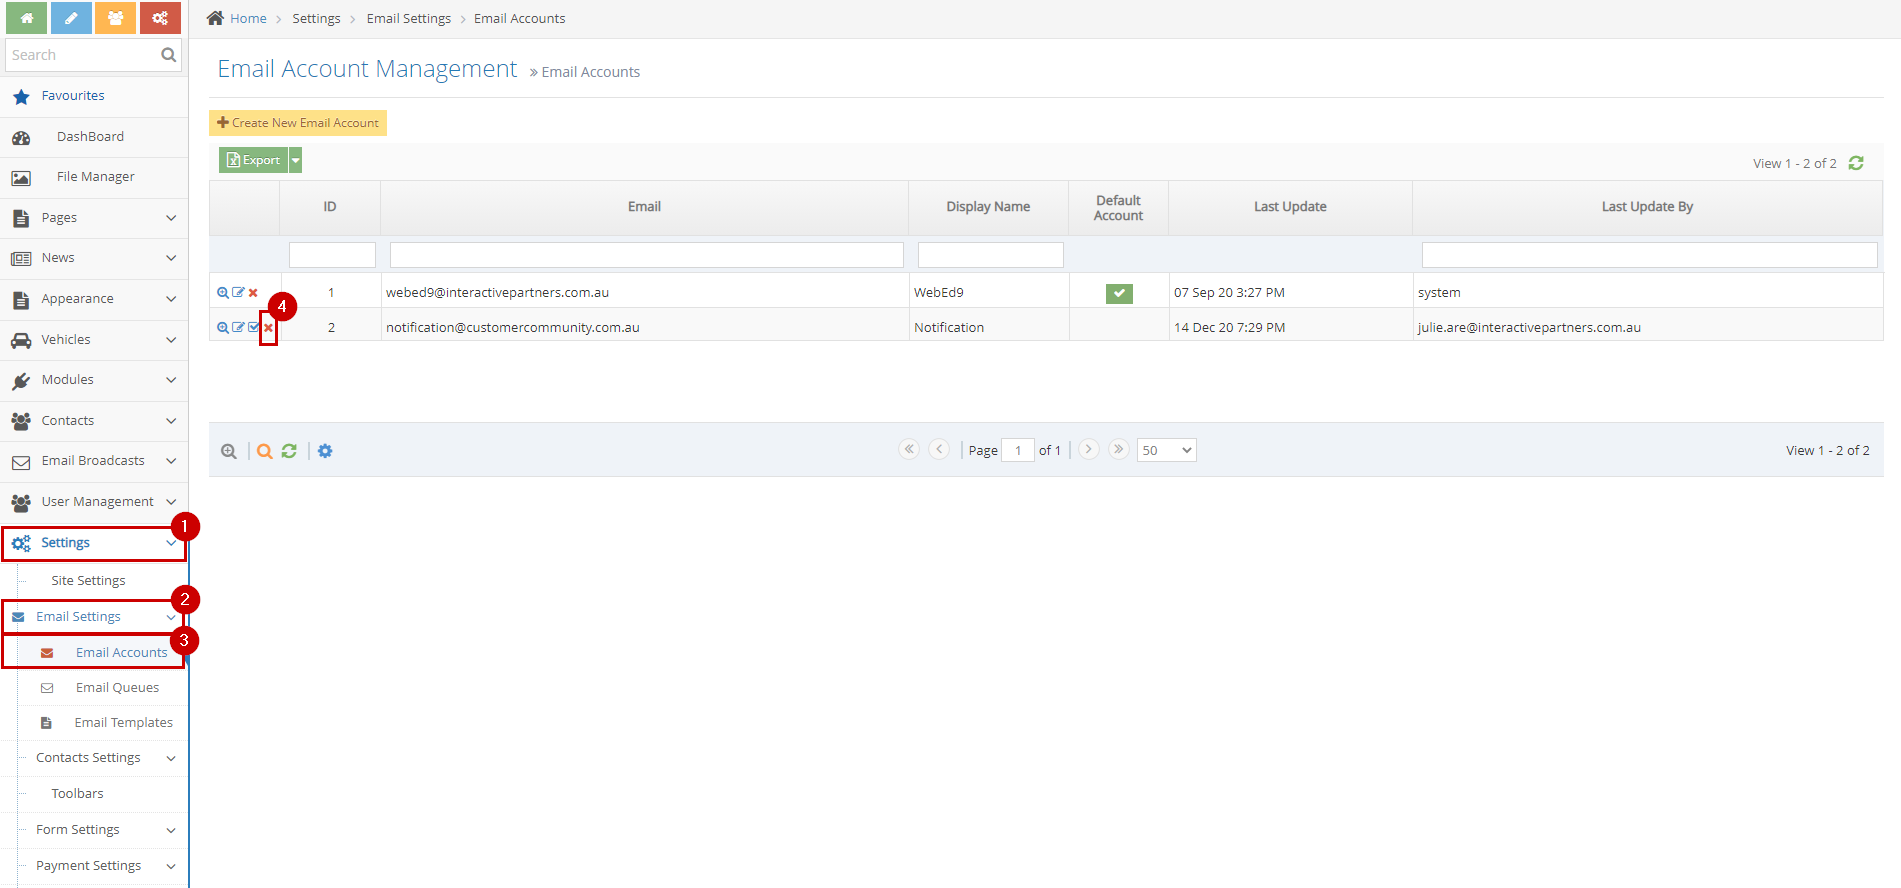
-
5Click OK on the popup modal 'Are you sure you want to delete this email account? This action can not be undone.'
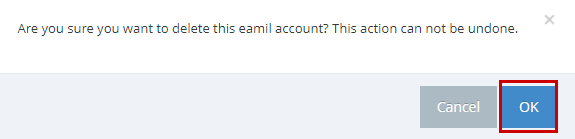
-
6Click OK on the popup "Email account deleted successfully."
View the Details and Email Queues/Sent of an Email Account
-
1Log in as an administrator and go to the Admin Dashboard.
Learn how to log in here → -
2Click Settings
-
3Click Email Settings and select Email Accounts
-
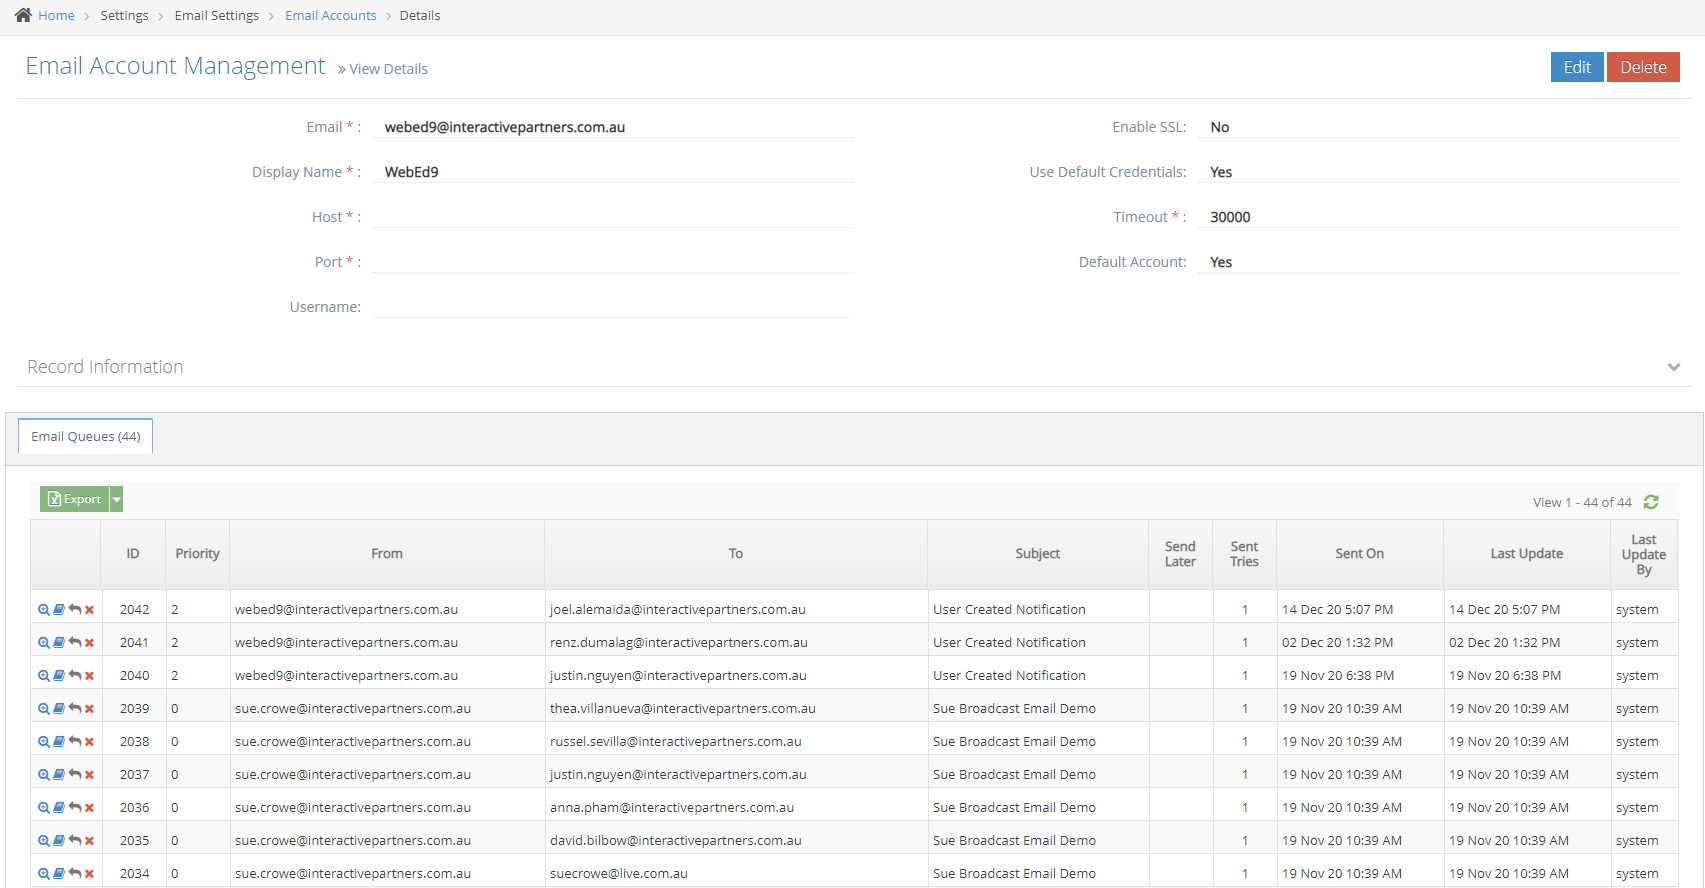
4Click View Details on an email accounts
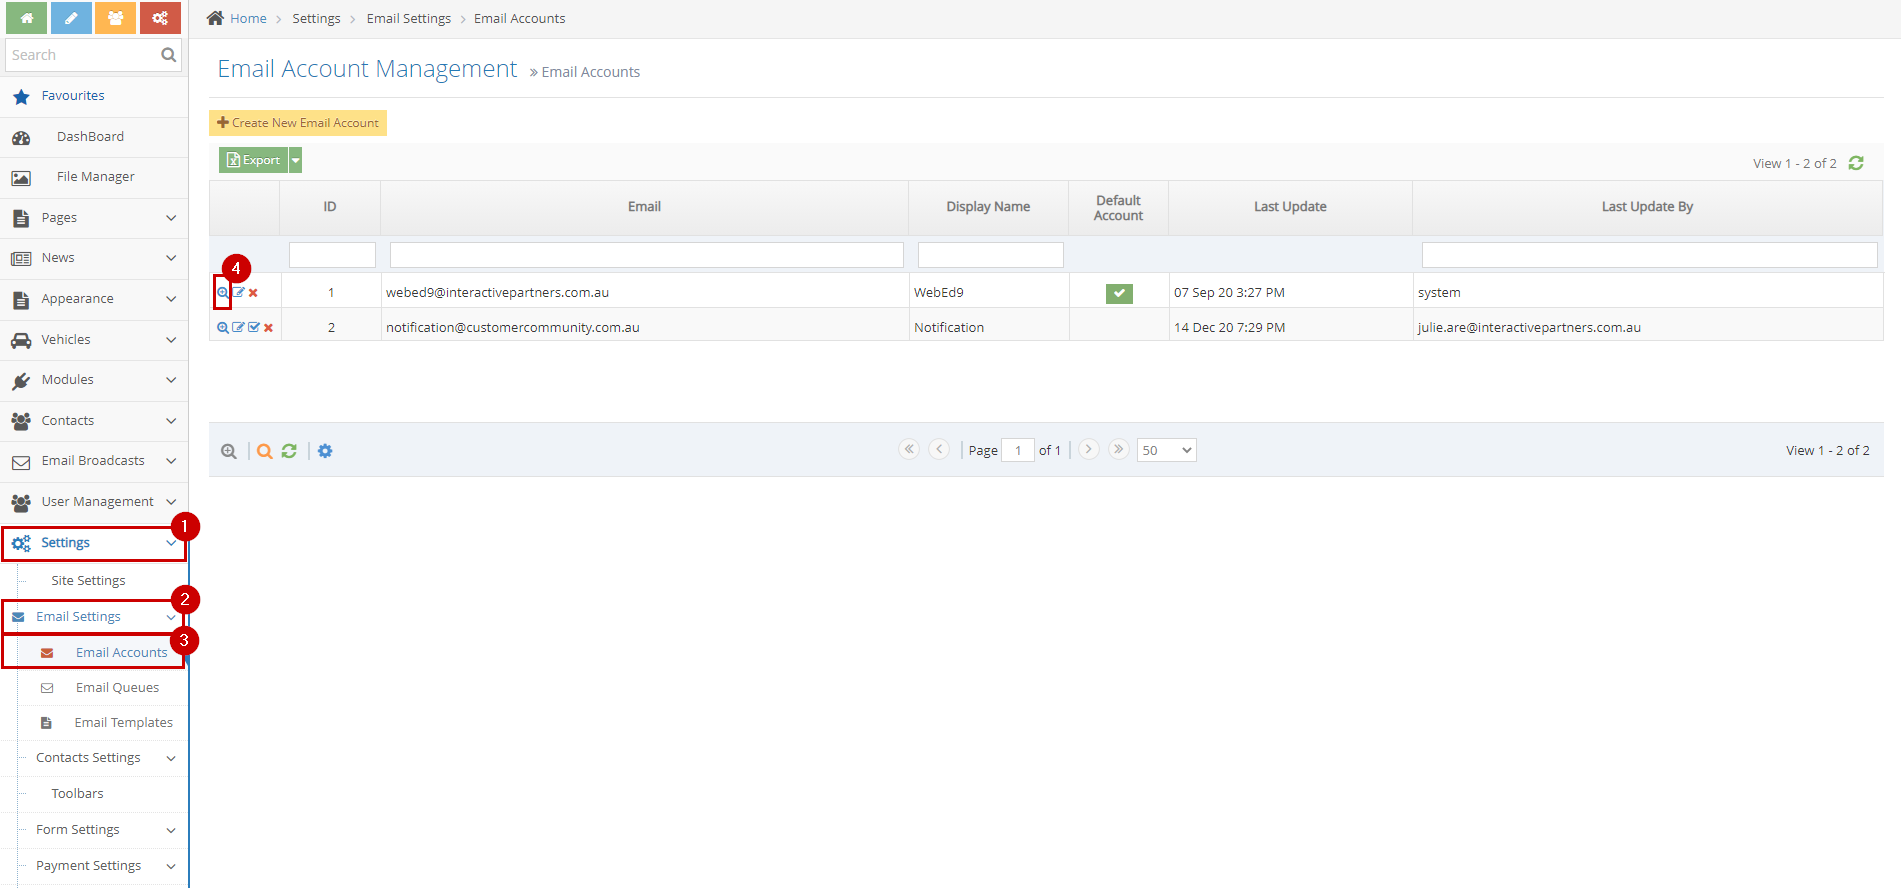
-
5You are now able to view the details of the Email Account
Email Account Site Settings
Additional Information:
To go to Site Settings, follow the steps below :
-
1Log in as an administrator and go to the Admin Dashboard.
Learn how to log in here → -
2Click Settings
-
3Click Site Settings
-
4Search the Settings you wish to update
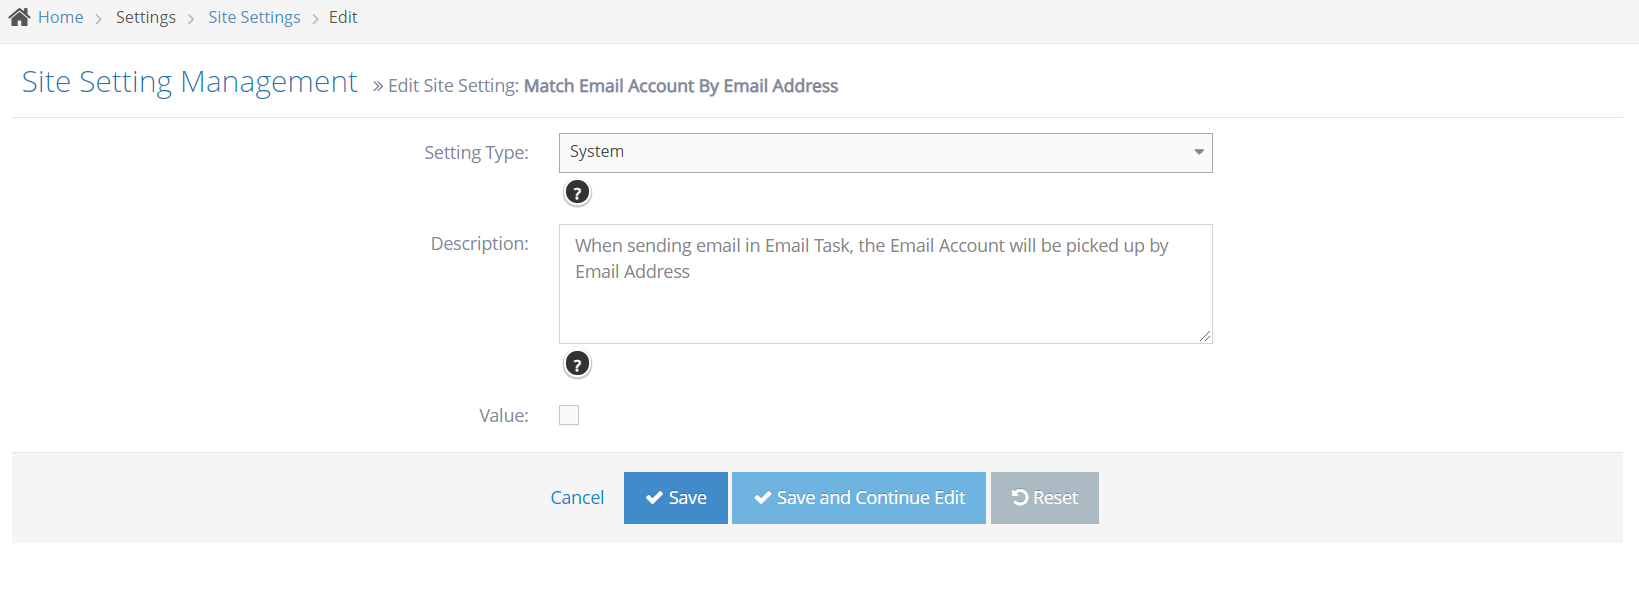
Match Email Account By Email Address
-
1There is a site setting "Match Email Account By Email Address". If this setting is True, the Email Account will be picked up Email Address.
-
2The default value for this issue is False. If the setting is False, the Email Account will be the Default Email Account.
Use Email Pickup Folder
- There is a site setting called "Use Email Pickup Folder".
- This site setting has 2 fields, the enable/disable and the directory path. They already have default values set.
- If this setting is True, the email processor will use a Pickup Directory rather than an SMTP account.
- The default value for this is False.
- You can also specify the folder that will be used to put the emails that will be generated. An external program will process them and this will remove some load from the web app.

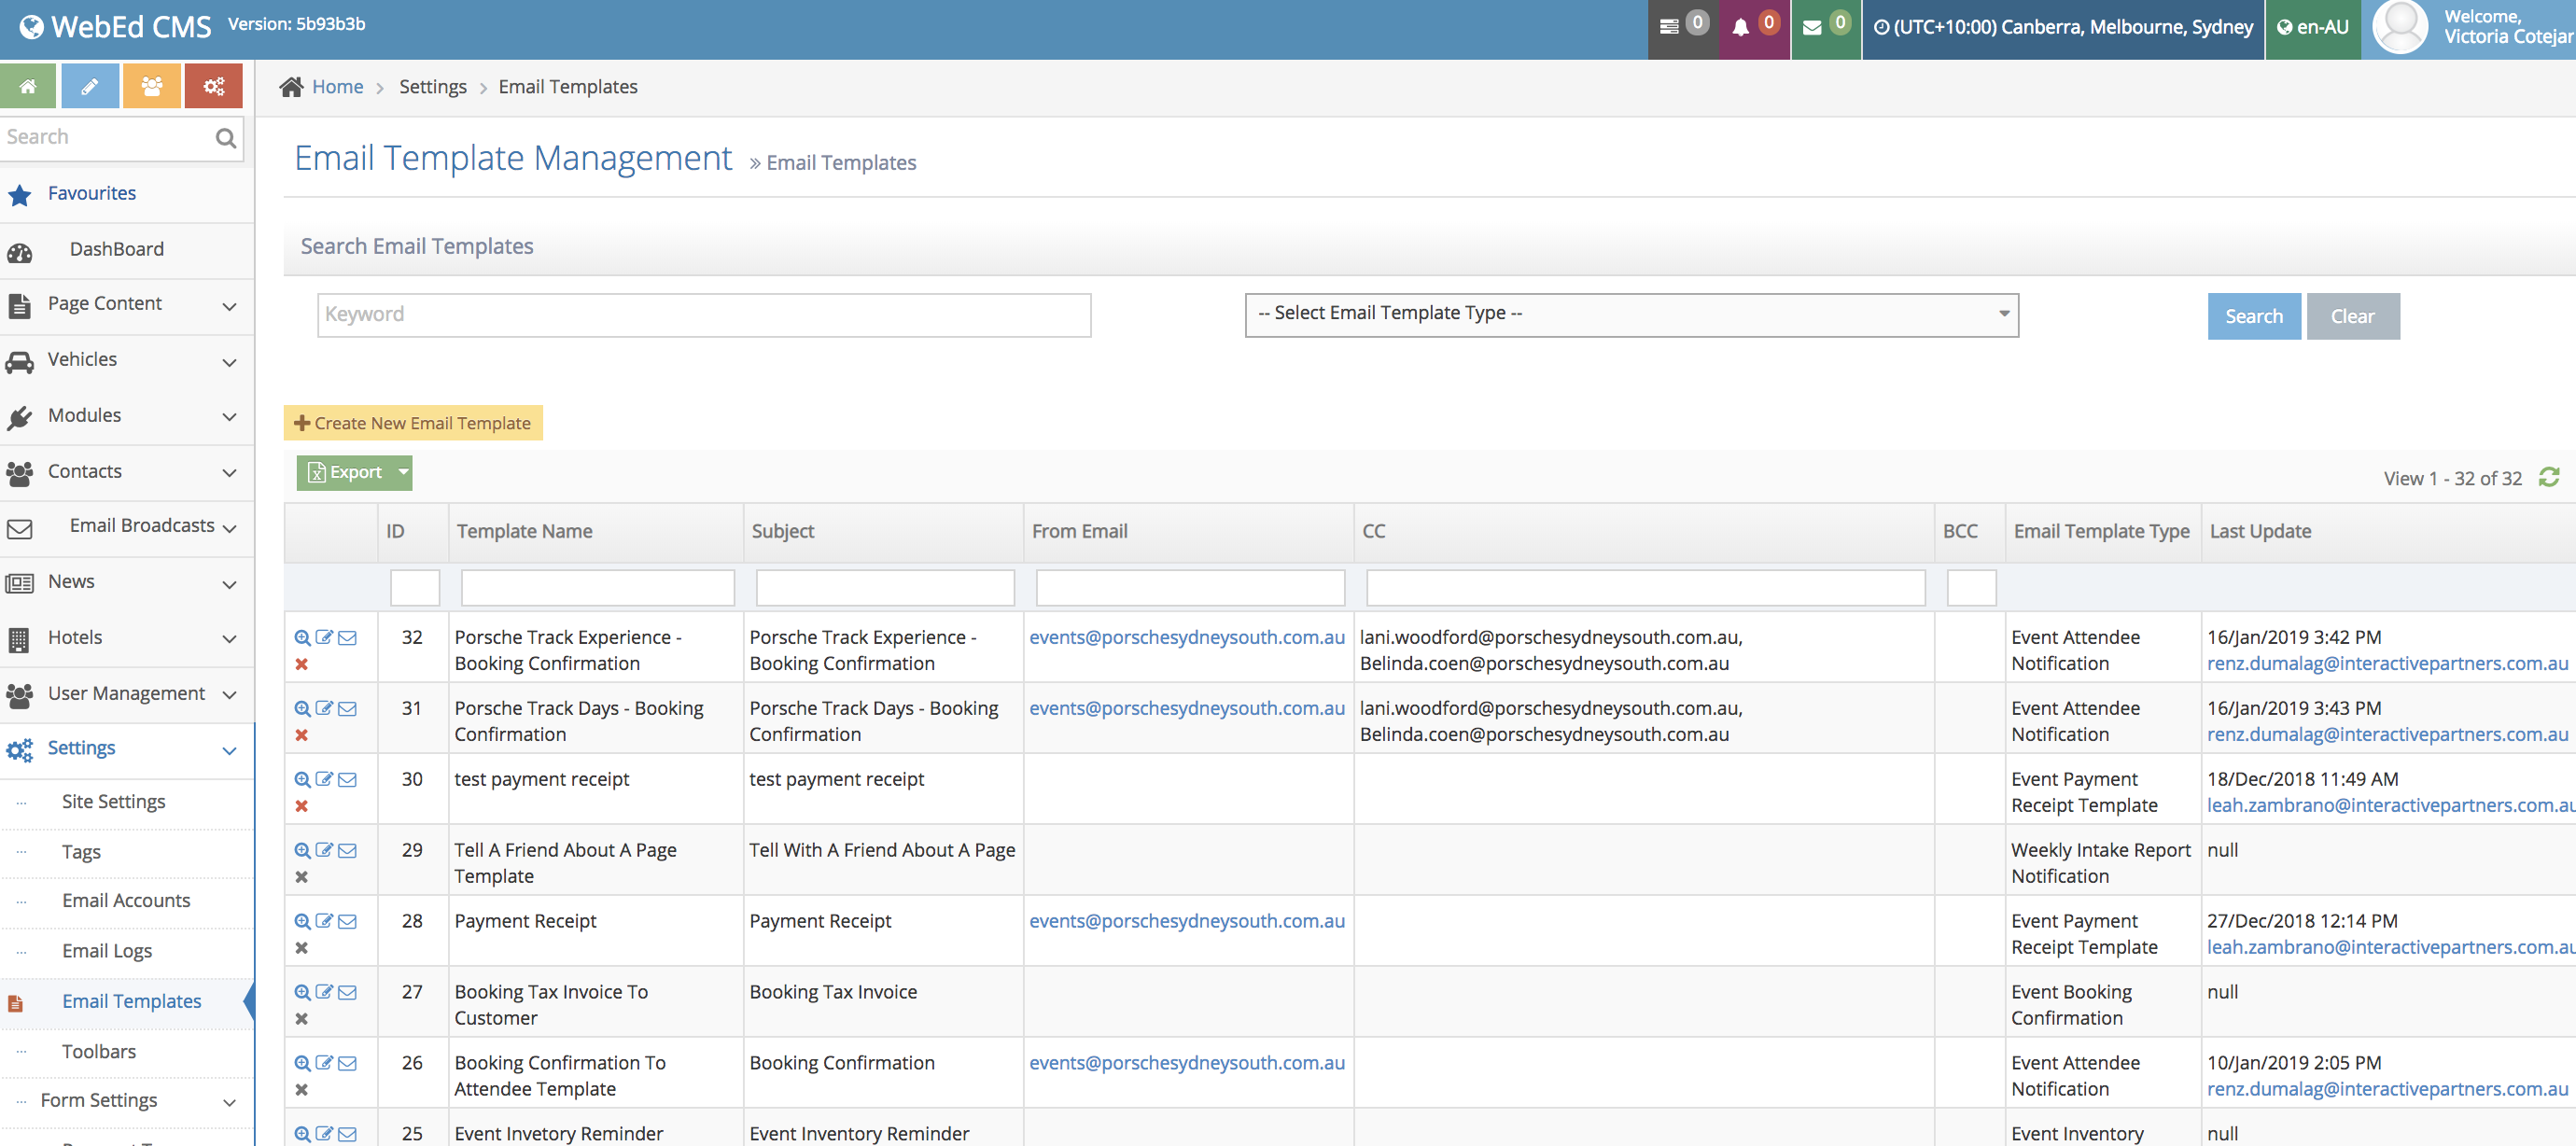
Editing Email Templates
-
1Log in as an administrator and go to the Admin Dashboard.
Learn how to log in here → -
2On the left side menu panel, go to Settings > Email Templates
-
3A list of Templates will then show
-
4Look for the Template you want to Revise/Edit. Click on Edit on the left icons (the one in the middle)
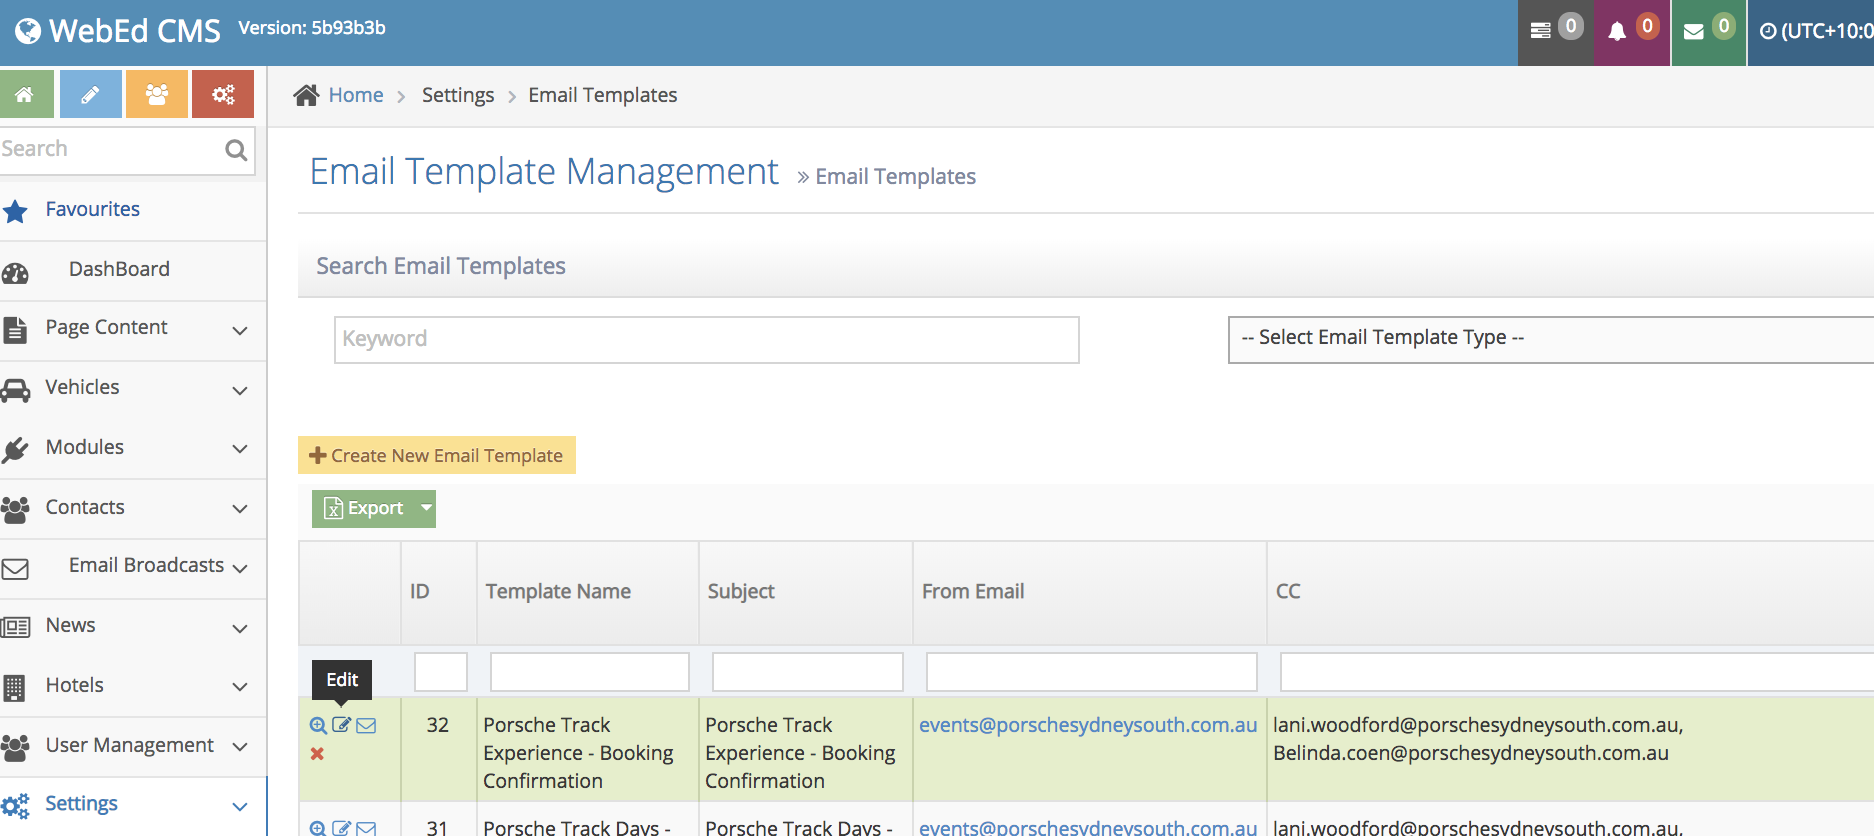
-
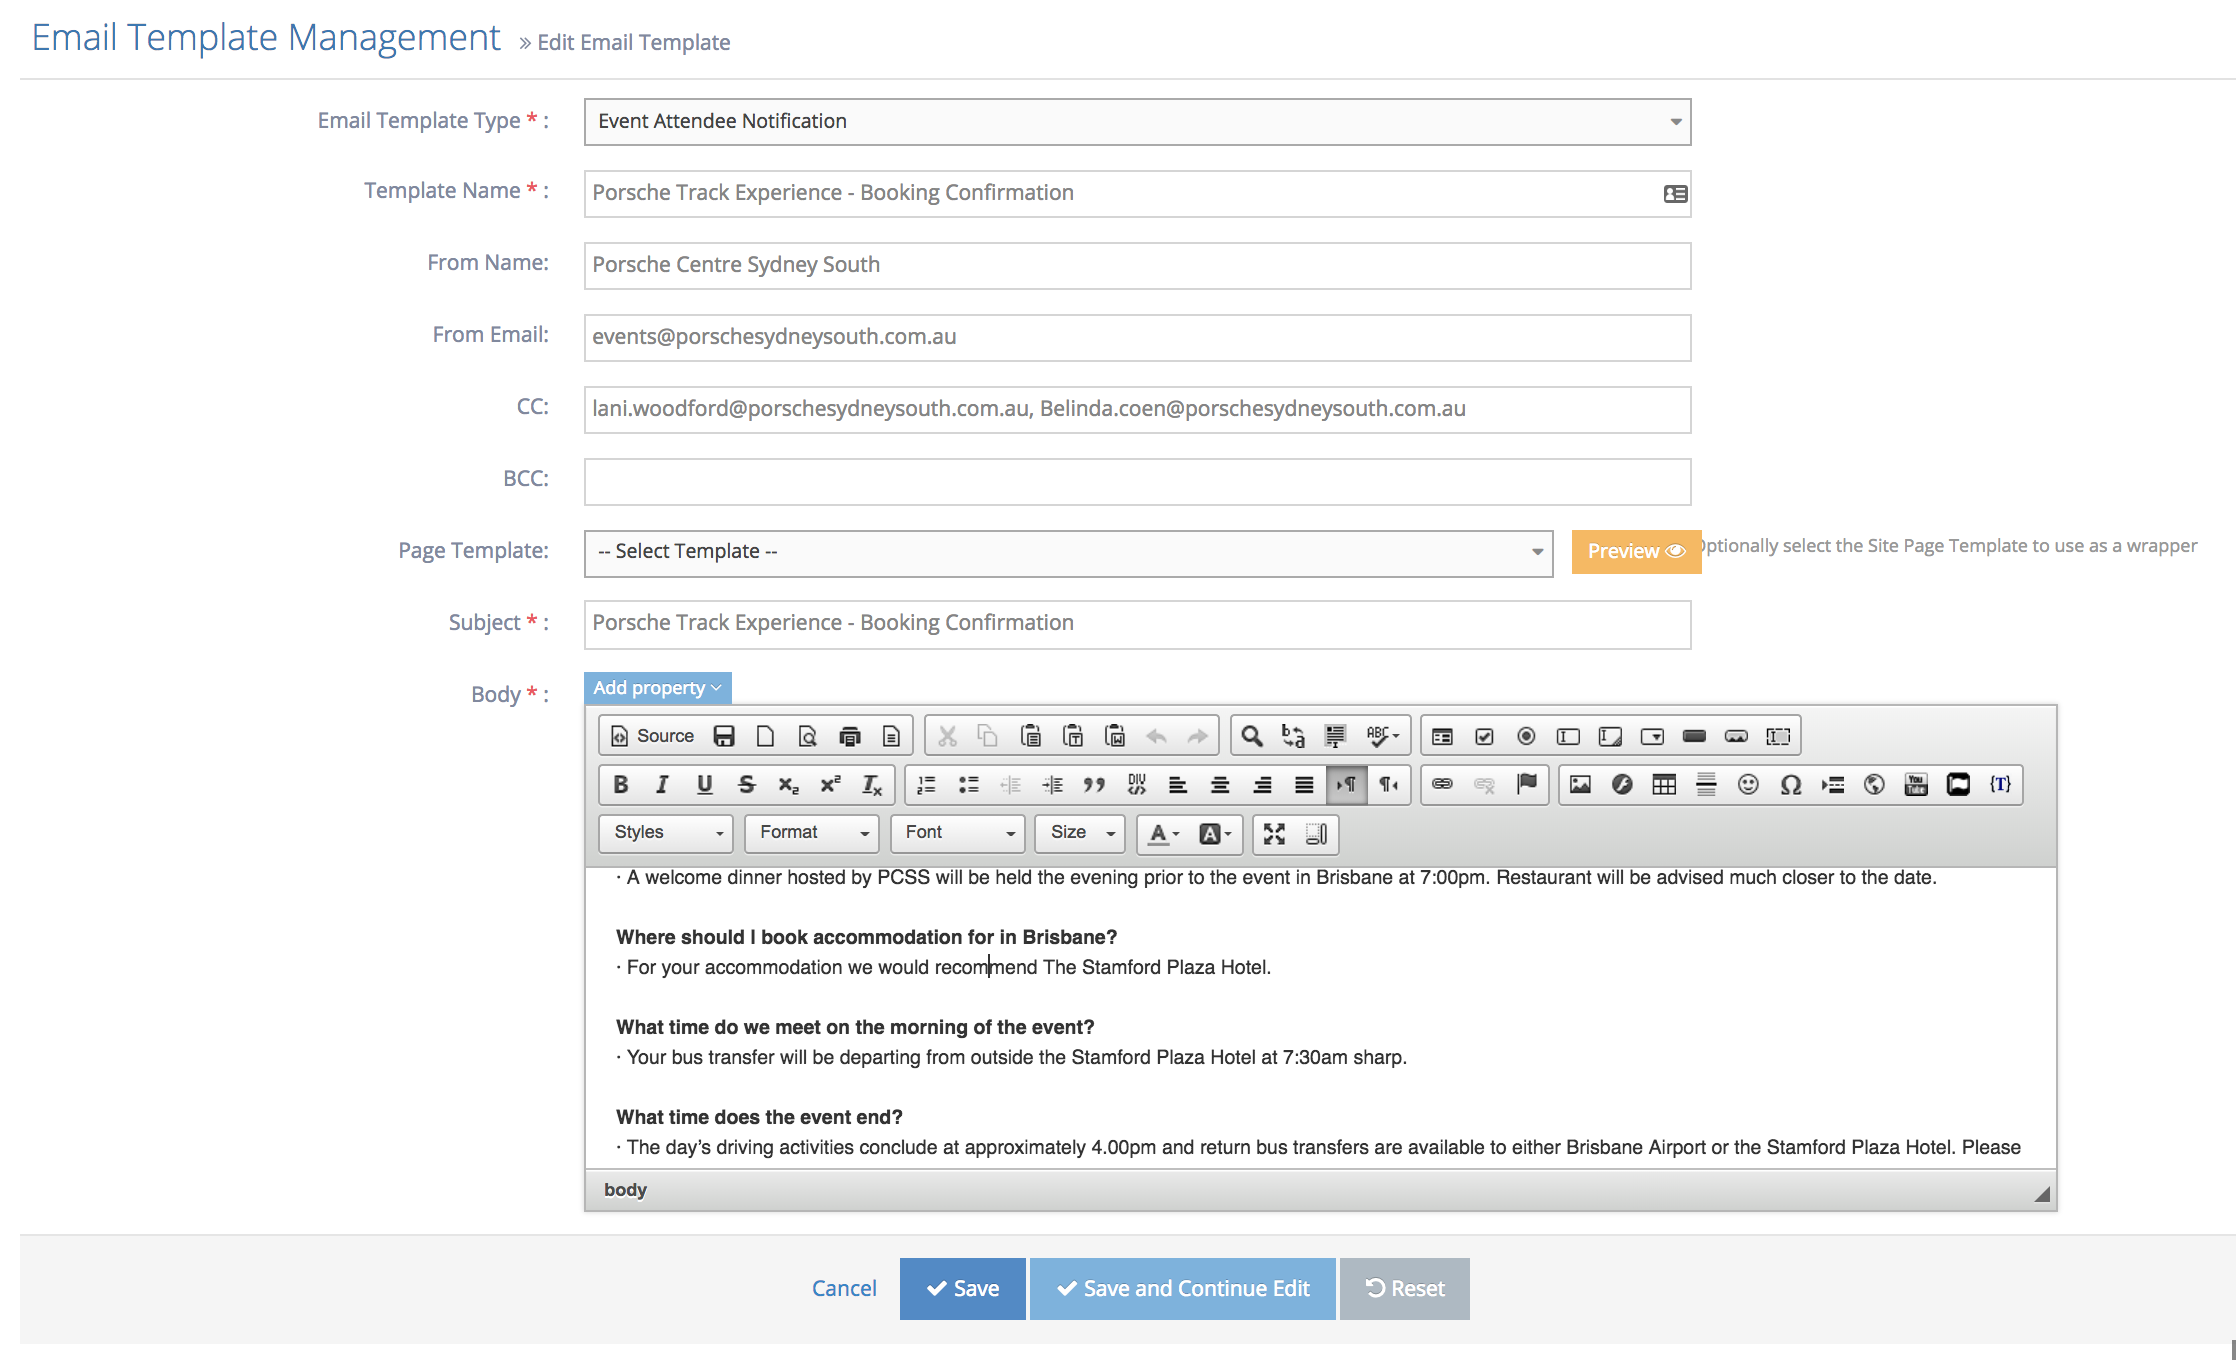
4The Email Template details will then show. Scroll to the bottom and edit the text details in the body. Once done click on Save.
Ticket Engines
Ticket Engines Workflow Overview
Ticket Engine is the module that manages support requests from basic users to admins. Basic users can send a request by email and the system will automatically convert it to a ticket on our website.
Admins can manage tickets directly like a reply, forward, etc. without going through each email address.
The Ticket Engine also supports admins better with additional toolkits, for example, logging, time tracking, and more.
Setting up the Ticket Engine
Step 1: Setting up the Ticket Engine
-
1Log in as an administrator and go to the Admin Dashboard.
Learn how to log in here → -
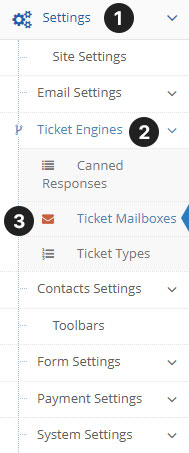
21 Settings > 2 Ticket Engines > 3 Ticket Mailboxes
-
3To edit the ticket mailbox, click on the edit button but if you want to remove it click the delete button. To add a new ticket type click the "Create New Ticket Engine Mailbox" Button.
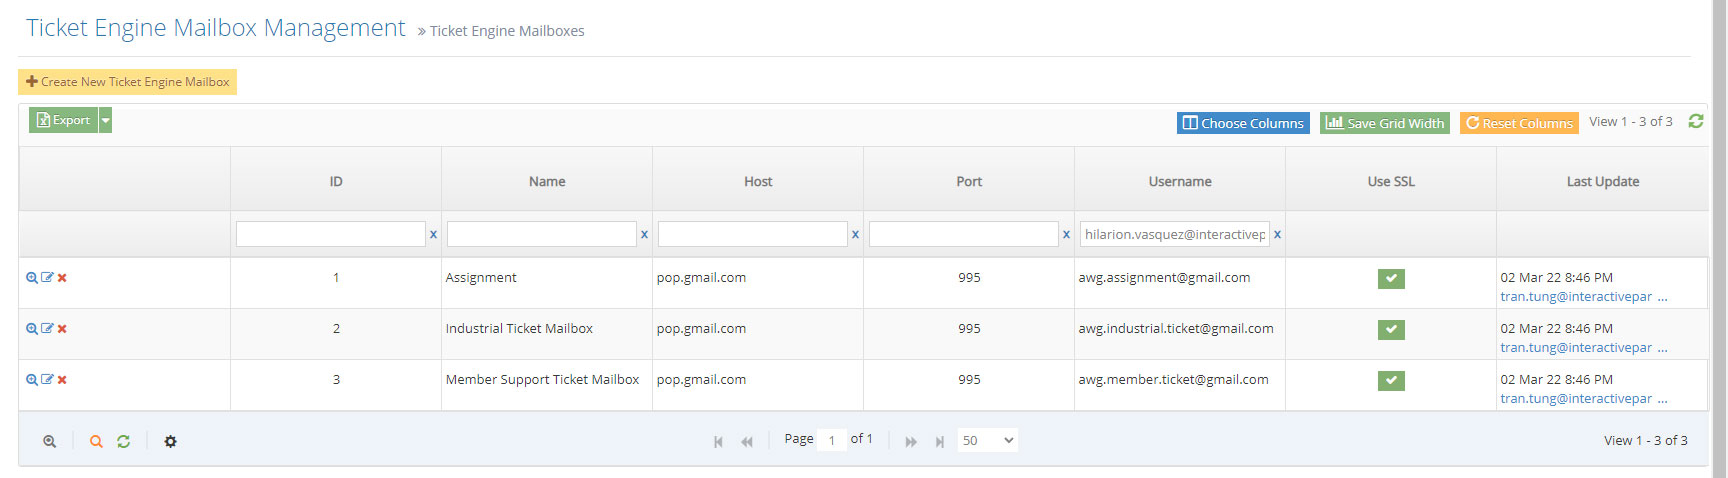
-
4Then proceed in creating a new ticket-type mailbox management take note of these field descriptions:
- Name - Name of the ticket engine type
- Type - The version of the connection type of the email forwarding to our system
- Host - The host of the SMTP server to connect to our system
- Port - This is depending on the email you are using that wants to connect to the server. The default is 993 for Gmail and Outlook
- Use SSL - If you want this to connect to a secured network we need to check this
- Username - Username to access the mailbox
- Password - Password needed to access the mailbox.
-
5Once finished setting up and filling in everything above click the "Create" button
Definition of Terms for Ticket Engine
- Name - Name of the ticket engine type
- Type - The version of the connection type of the email forwarding to our system
- Host - The host of the SMTP server to connect to our system
- Port - This is depending on the email you are using that wants to connect to the server. The default is 993 for Gmail and Outlook
- Use SSL - If you want this to connect to a secured network we need to check this
- Username - Username to access the mailbox
- Password - Password needed to access the mailbox.
Create Ticket Engine Type
Step 2: Create Ticket Engine Type
Ticket Type reads the email queue from the mailbox and converts the email to a ticket under it.
-
1Log in as an administrator and go to the Admin Dashboard.
Learn how to log in here → -
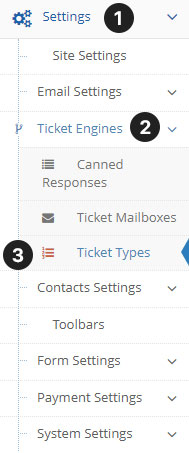
21 Settings > 2 Ticket Engines > 3 Ticket Types
-
3This is the Ticket Type management screen
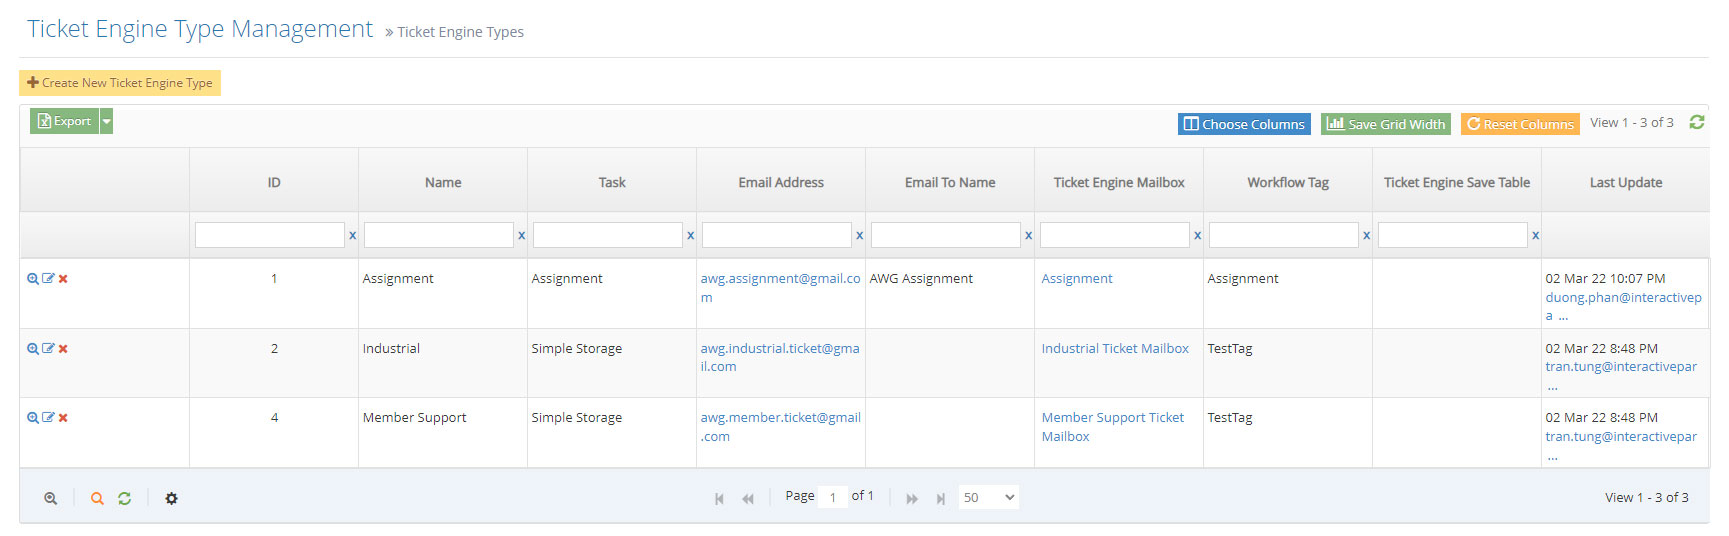
-
4To create a new Ticket Engine Type click the "Create New Ticket Engine Type" Button
We will create/edit the Ticket Engine Type and fill up the necessary fields below:- Task - should be Simple Storage for simple requests.
- Name - Any name of the category you like (e.g. Industrial)
- Email Address - should be the same as the mailbox email address
- Workflow Tag - When the ticket is generated, it will automatically assign to the ticket
- Ticket Engine Mailbox - Mailbox we created in Step 1
- Admin Email - If a user responds, This will be the selected email
-
5Once finished creating the ticketing engine, users can send emails to support email then email can be converted to tickets.
Working with Tickets
Step 3: Working with Tickets
The Ticket Engine module will check each mailbox every 10 minutes then an email will be converted to a ticket under Ticket Types. The admin can work with a ticket by following:
-
1Log in as an administrator and go to the Admin Dashboard.
Learn how to log in here → -
2Tickets > Ticket Listing
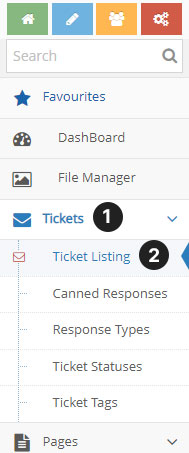
-
3Each Ticket will be under types that we configured in Step 2, we can search, and sort tickets for each filter.
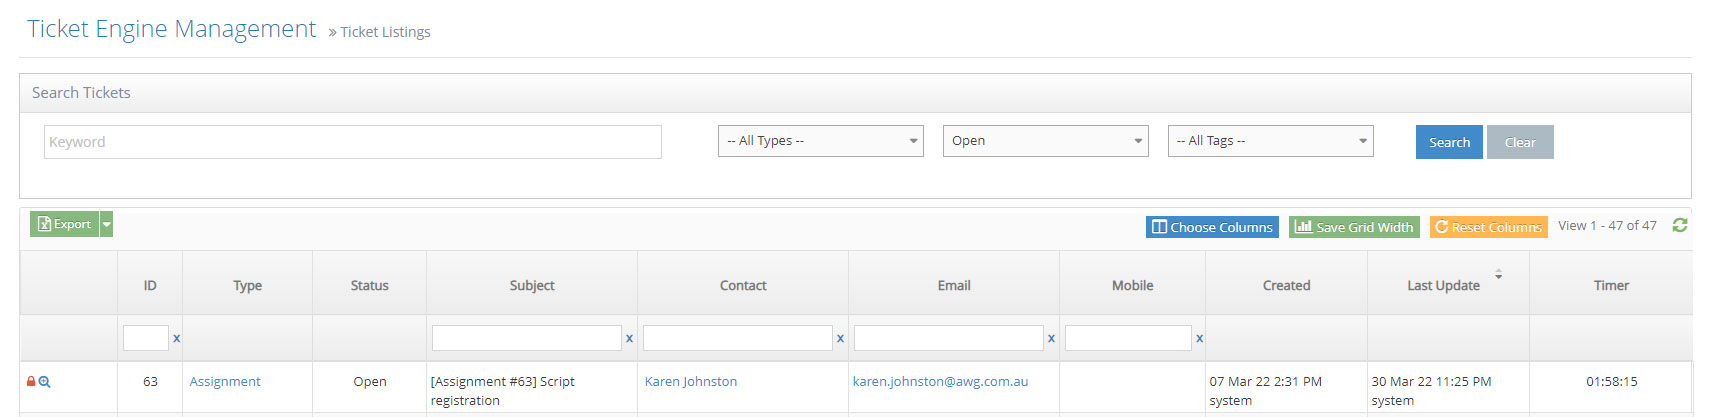
-
4From the ticket list screen, the admin can work with each ticket via the action icon:

From left to right, they are:
- View Detail - Click to go to the detail screen of each Ticket
- Re-assign - Change the Type of ticket
- Merge - Combine ticket with existing one
- Delete - Delete the ticket
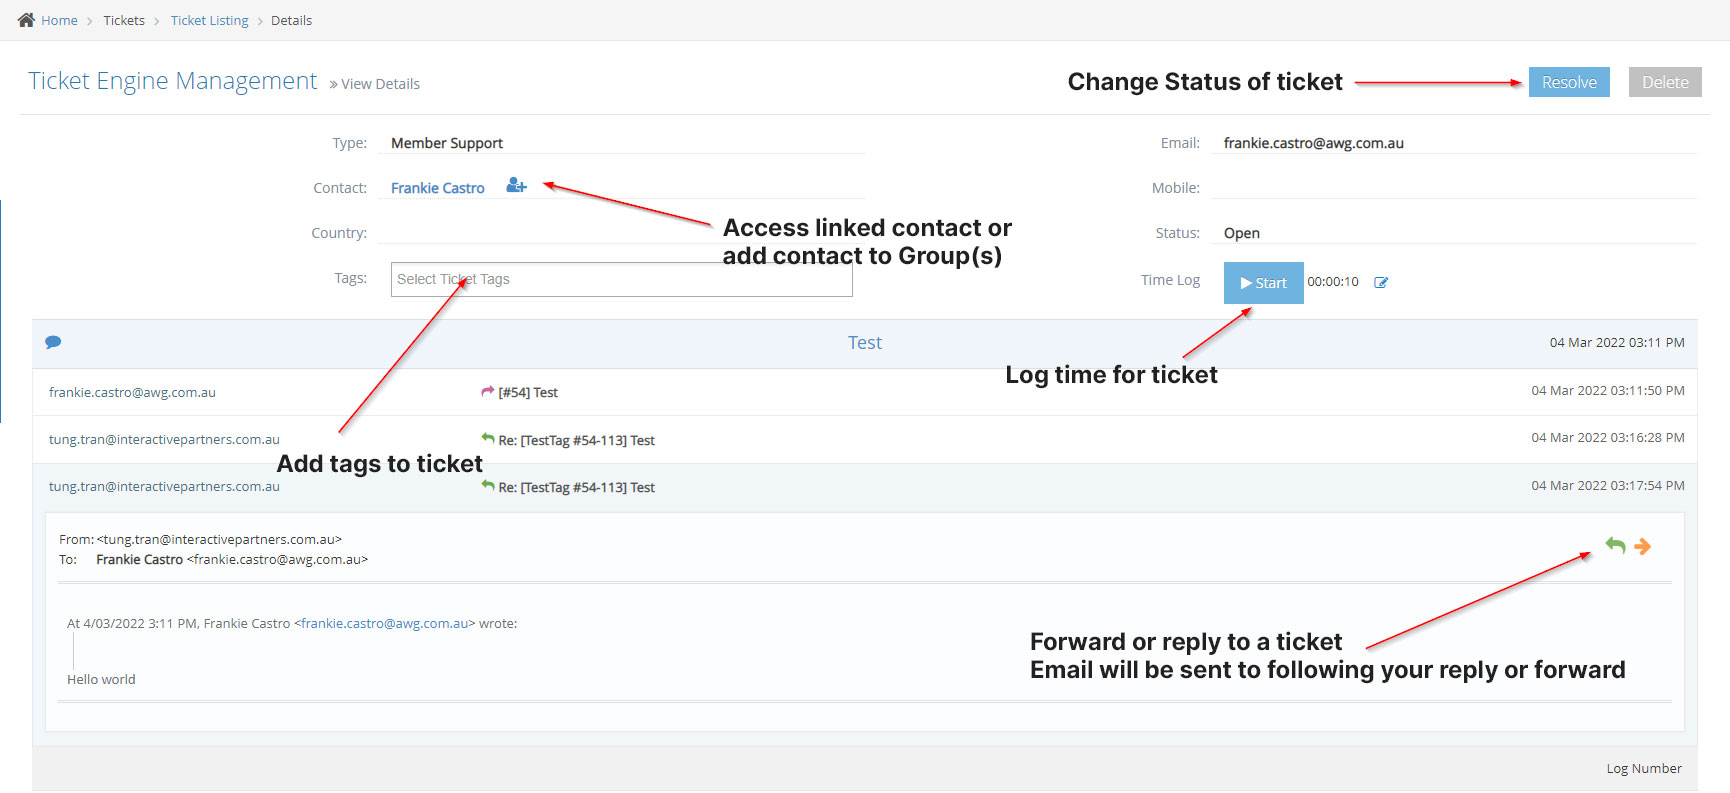
-
5When accessing the detail page of the Ticket, an Admin can
Other Ticket Engine Settings
Like other modules, the Ticket Engine Module Setting can be found in the:
-
1Log in as an administrator and go to the Admin Dashboard.
Learn how to log in here → -
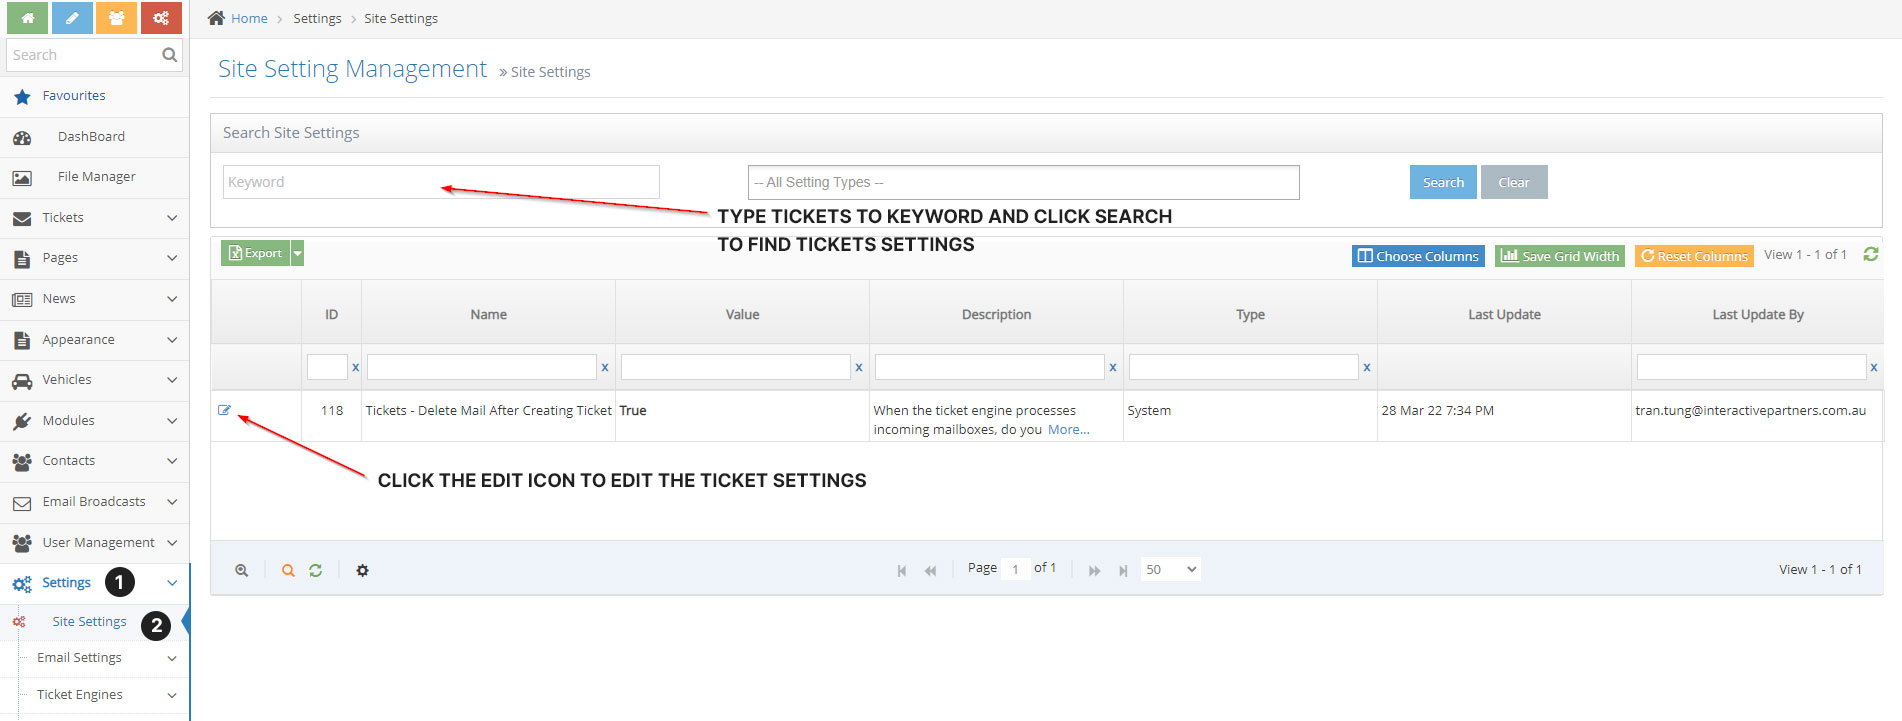
2Settings > Site Settings
-
3To find the Ticket Engine Module Setting, Click the keyword, type the word "tickets" and click the search button
-
4To edit the setting of the ticket engine module click the edit icon
Delete Mail After Creating Ticket
-
1For standard POP3 mail servers like Yahoo Mail and POP 3 private domain email if this setting is set to true, the email will be auto-deleted after being converted to a ticket.
-
2For non-standard POP3 mail servers like Gmail or Zoho, this behaviour will be configured in each mail server setting for POP3:
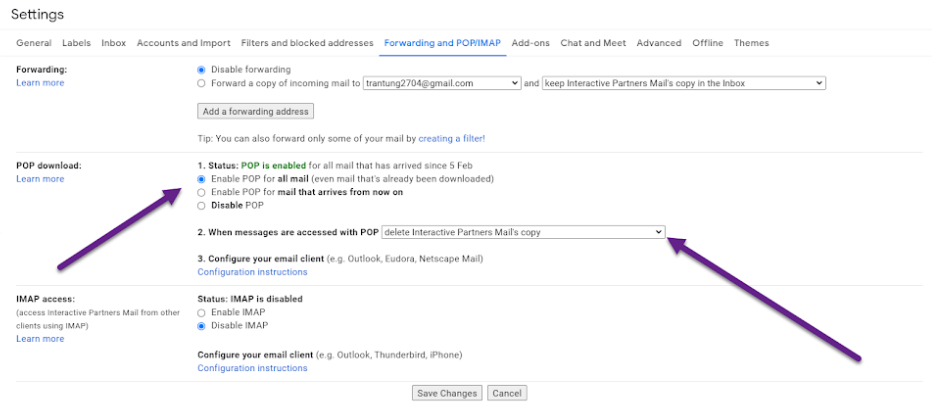
Privacy Policy Page Link
To update the Privacy Policy Page link follow the steps below.
-
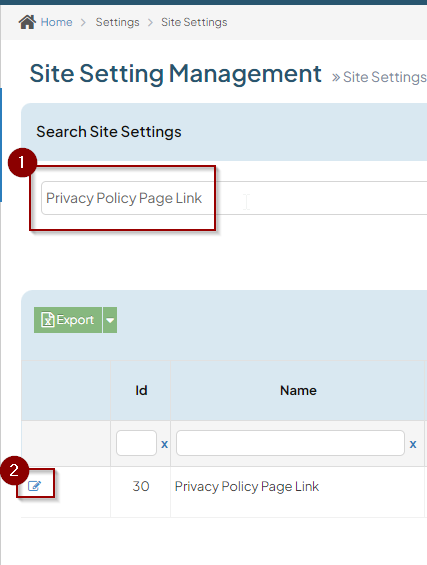
1Logged in as an admin go to the "Site Settings"
-
2Search for "Privacy Policy Page Link"
-
3Click the edit icon to update
-
4Fill in the URL field with your site's Privacy Policy page link.
Note: Use an absolute path even when the page is an internal link, since this will also be used on Email Templates to avoid error in the future.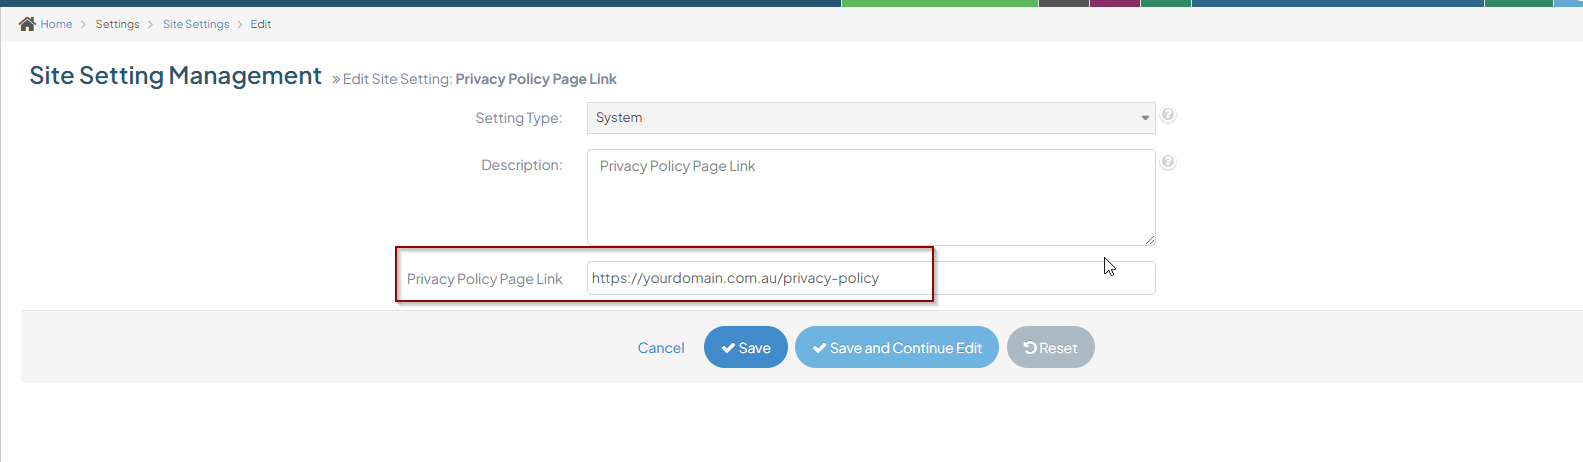
-
5Click "Save" or "Save and Continue Edit" to apply changes.