- Vehicle Listing Management Overview
- Checking your Vehicle Feed
- Checking Vehicle Import Status
- Troubleshooting Vehicle Feeds
- Checking Specific Stock Codes
- Checking for a stock code
- Files waiting for import
- Vehicle Settings
- To Check Vehicle Settings
- Enable/Disable display of sold vehicle details
- Hiding Vehicles with No Images
- How to remove vehicles from the vehicle listing
- How to Site Setting Overwrite Vehicle Type using the Current Domain
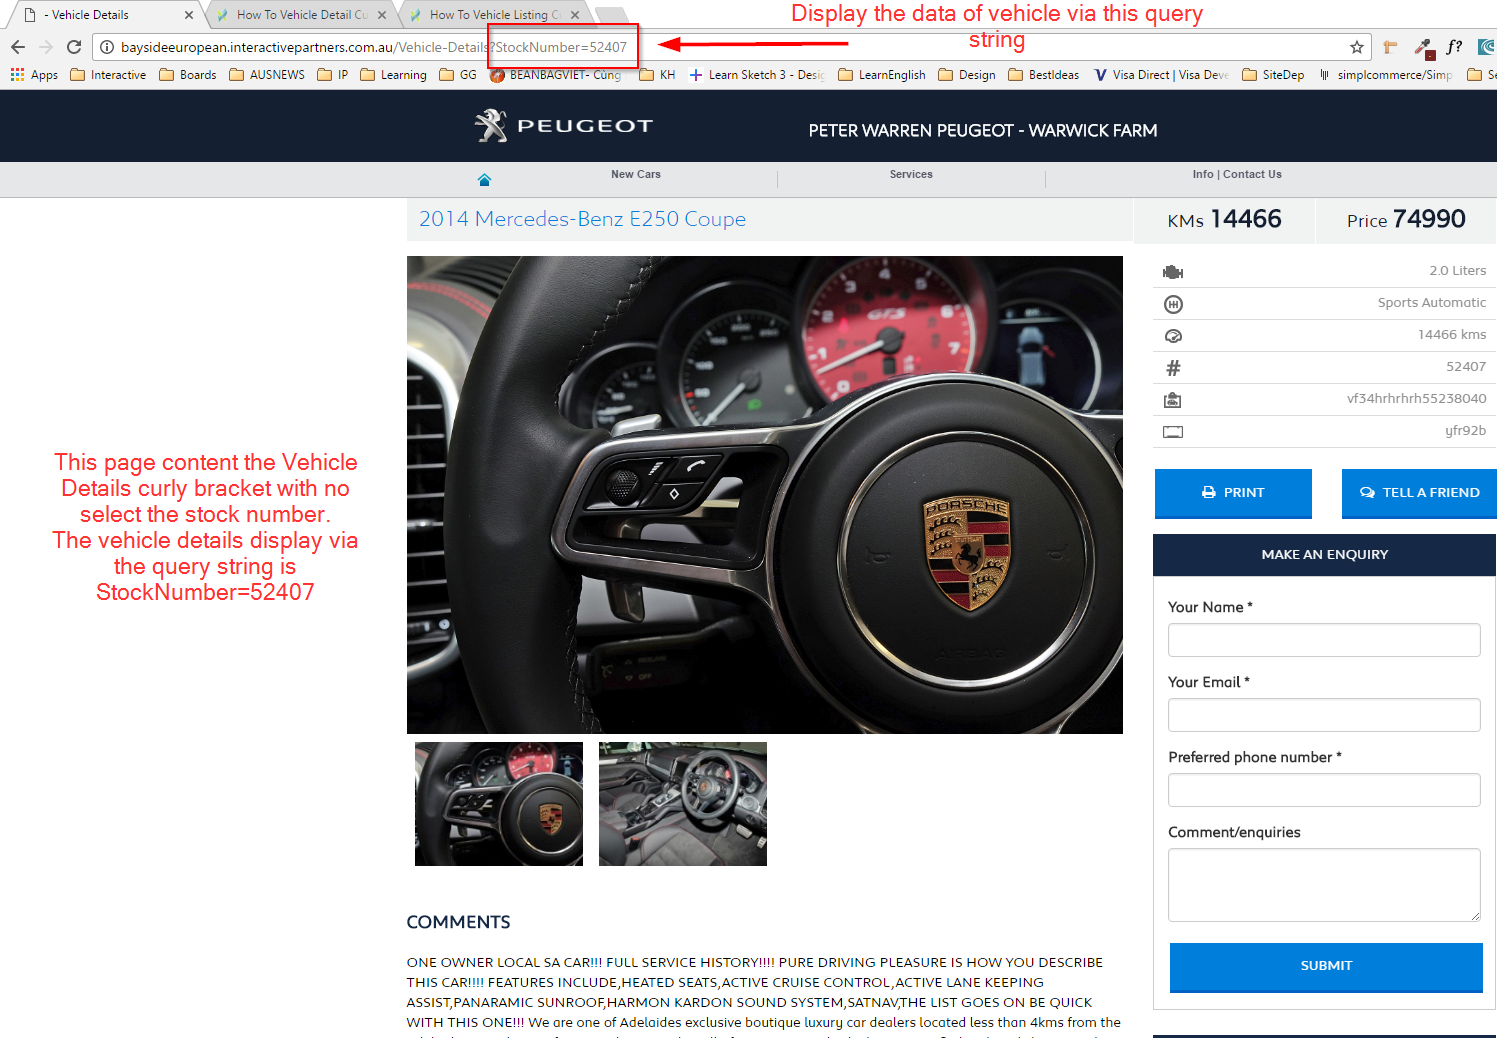
- Displaying a Single Vehicle as Page Content
- Manually Adding Vehicles into the Vehicle Listing Module
- Vehicle Type Management
- Managing Displayed Prices on Vehicle Listings
- Viewing the Vehicle Dashboard
- Editing the Vehicle Request More Info Form
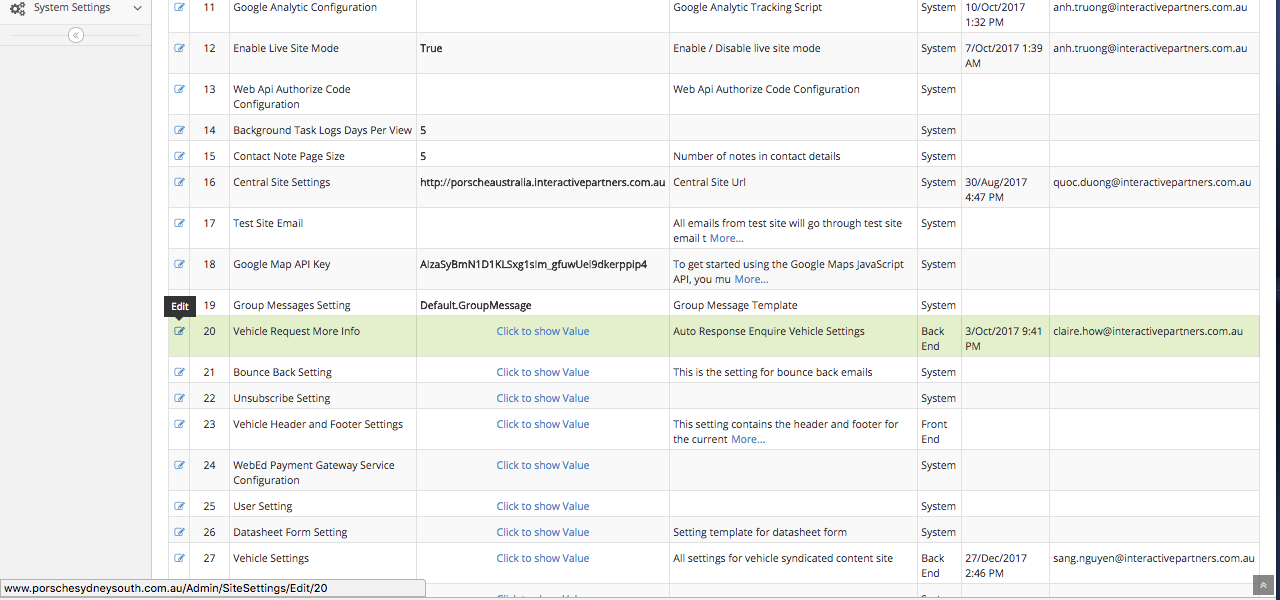
- Managing Vehicle Request More Info Site Setting
- Vehicles Not Showing Up on the Website
- Selecting Which Price will be Displayed on Vehicle Listings
- Adding a Vehicle Listing on a Page
- Vehicle Listing Sort Options
Vehicle Listing Management
Vehicle Listing Management Overview
The Vehicle Listing Management module enables the user to manage new and used vehicles, but, it can also be configured to be used for any product. It supports automated vehicle feeds from a wide range of data suppliers and configurable listings, details and lead management.
Checking your Vehicle Feed
- Vehicle data comes from external providers.
- WebEd will display the data received.
- If a vehicle is not appearing on your site, it is most likely because we haven't received the data.
- You can review the current data using the admin module
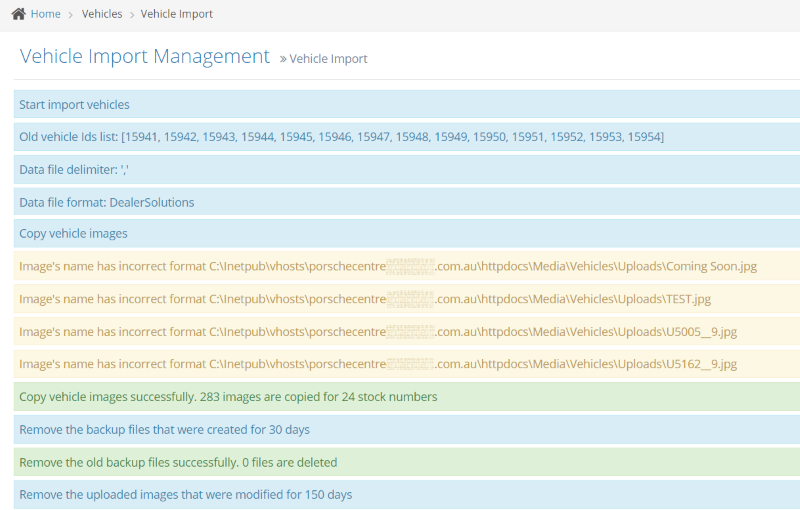
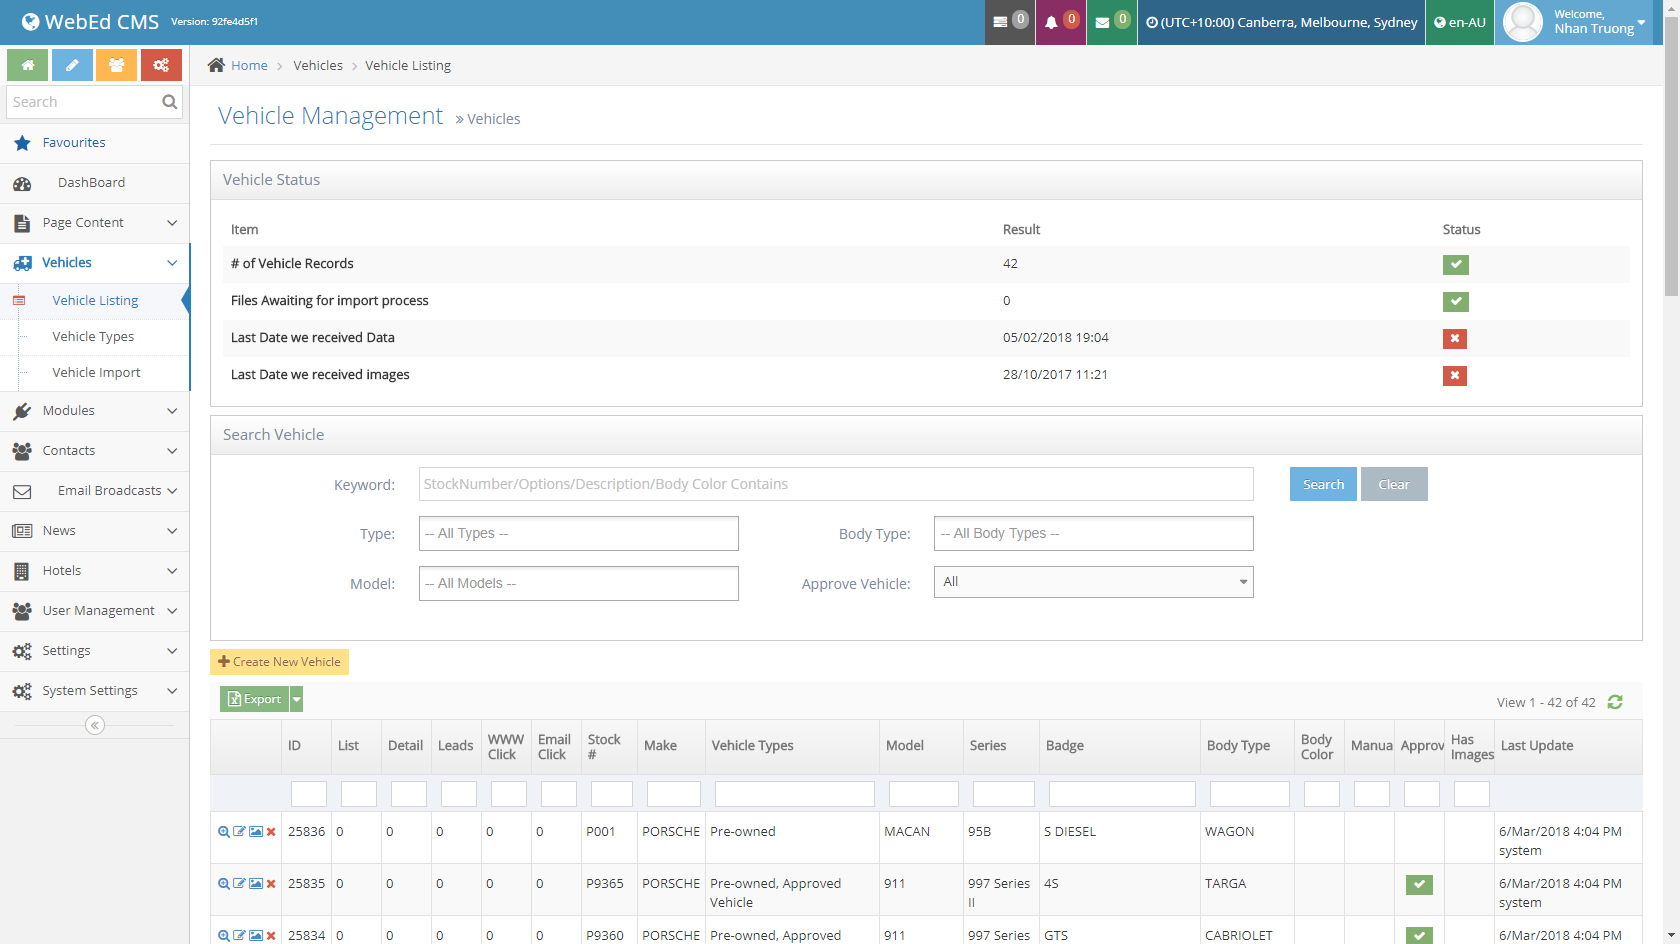
Checking Vehicle Import Status
-
1Log in as an administrator and go to the Admin Dashboard.
Learn how to log in here → -
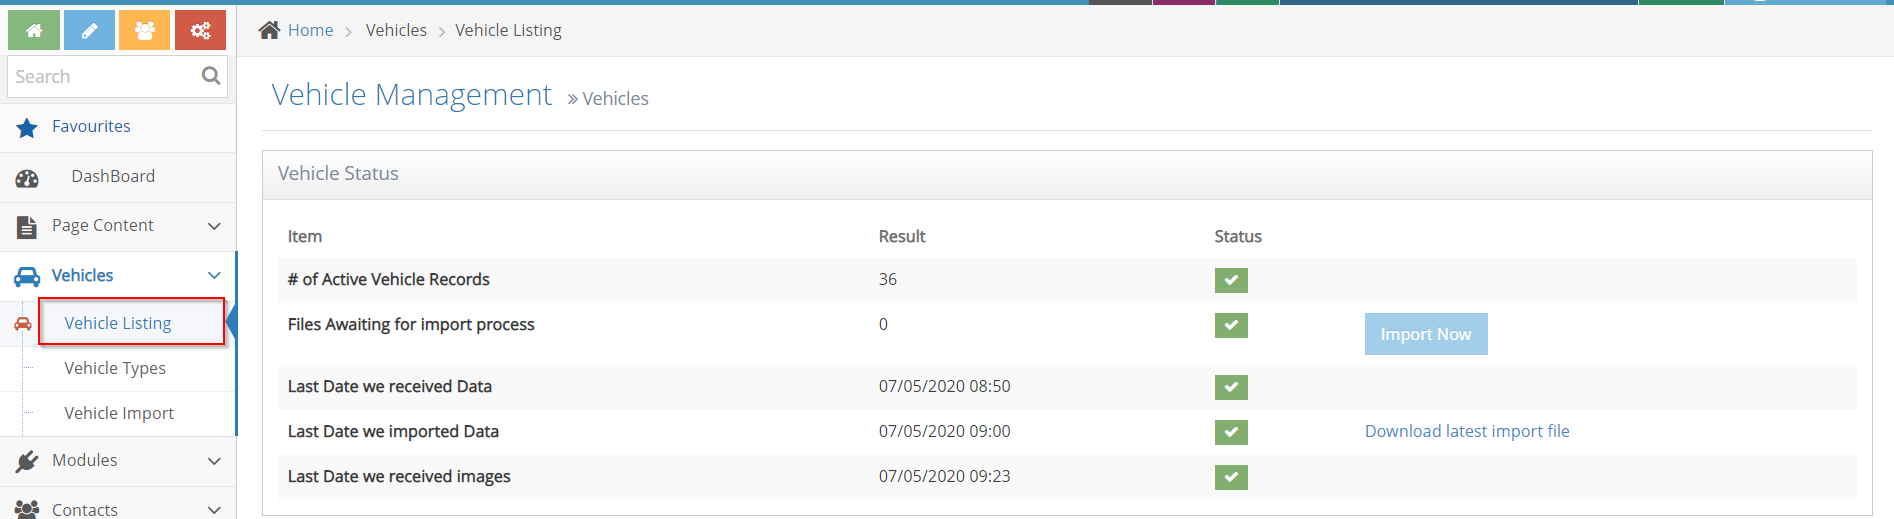
2Once you're in the Admin Dashboard, from the left pane, navigate to Vehicles, Vehicle Listing
-
3The current status of your vehicles will be displayed
-
4You can see the date the system last received data
-
5Check each item to see the current status of the data received
Vehicle Management Dashboard Green Tick 
Red Tick 
Number of Records in Vehicle table - Records Exist - No Records Files Awaiting for import process - No files waiting to be processed - Files are waiting to be processed
Last Date we received data - Data received in the last 24 hours
- No data in last 24 hours
Last Date we imported data - Data imported in the last 24 hours - No imported data in the last 24 hours Last Date we received images - Images received in the last 72 hours
- No data in last 72 hours
Troubleshooting Vehicle Feeds
- The quickest way to find an issue with feeds is to check the data being received
- Use the Vehicle Console and check the latest data received by your site, search for specific stock codes (shown below)
- Each time you update your Dealer Management System, your data provider (Carsales, Dealer Solutions, CDS and others) will send us a data file and images
- You can see the status of the last data received
- # of Vehicle Records we have received - the count of vehicle records sent to us by your provider
-
# of Files Awaiting the import process - Any files we have received but not yet processed. The import process runs on a schedule, normally every 60 minutes
-
Last Date we received Data - The date of the last data file received from your data provider
- Last Date we imported Data - The date of the last data file imported from the received data
-
Last Date we received images - The date of the last data file received from your data provider
Checking Specific Stock Codes
-
1When the results are shown, click the display details for the vehicle
-
2Compare this to what you have in your internal stock system
-
3If the data on your site does not match the data in your DMS, please check with your data provider
Checking for a stock code
-
1All vehicles are displayed in the data grid below the status
-
2To check a specific stock code, enter all or part of the stock code into the search box and click search
-
3Matching stock records will be displayed

-
4If the vehicle doesn't exist, please check with your data provider
-
5If the vehicle exists, you can also see the images you have for the vehicle by clicking on the Manage Images icon for this record

Files waiting for import
If your dashboard shows files waiting to import, you can run the import process manually to save waiting for the next scheduled import
-
1Log in as an administrator and go to the Admin Dashboard.
Learn how to log in here → -
2Navigate to Vehicles, Import Vehicles
-
3The process will run and show the output of the import
-
4The import process outputs the results of the import process
Vehicle Settings
WebEd supports several rules for vehicle display, these can be found under your admin area.
-
1Log in as an administrator and go to the Admin Dashboard.
Learn how to log in here → -
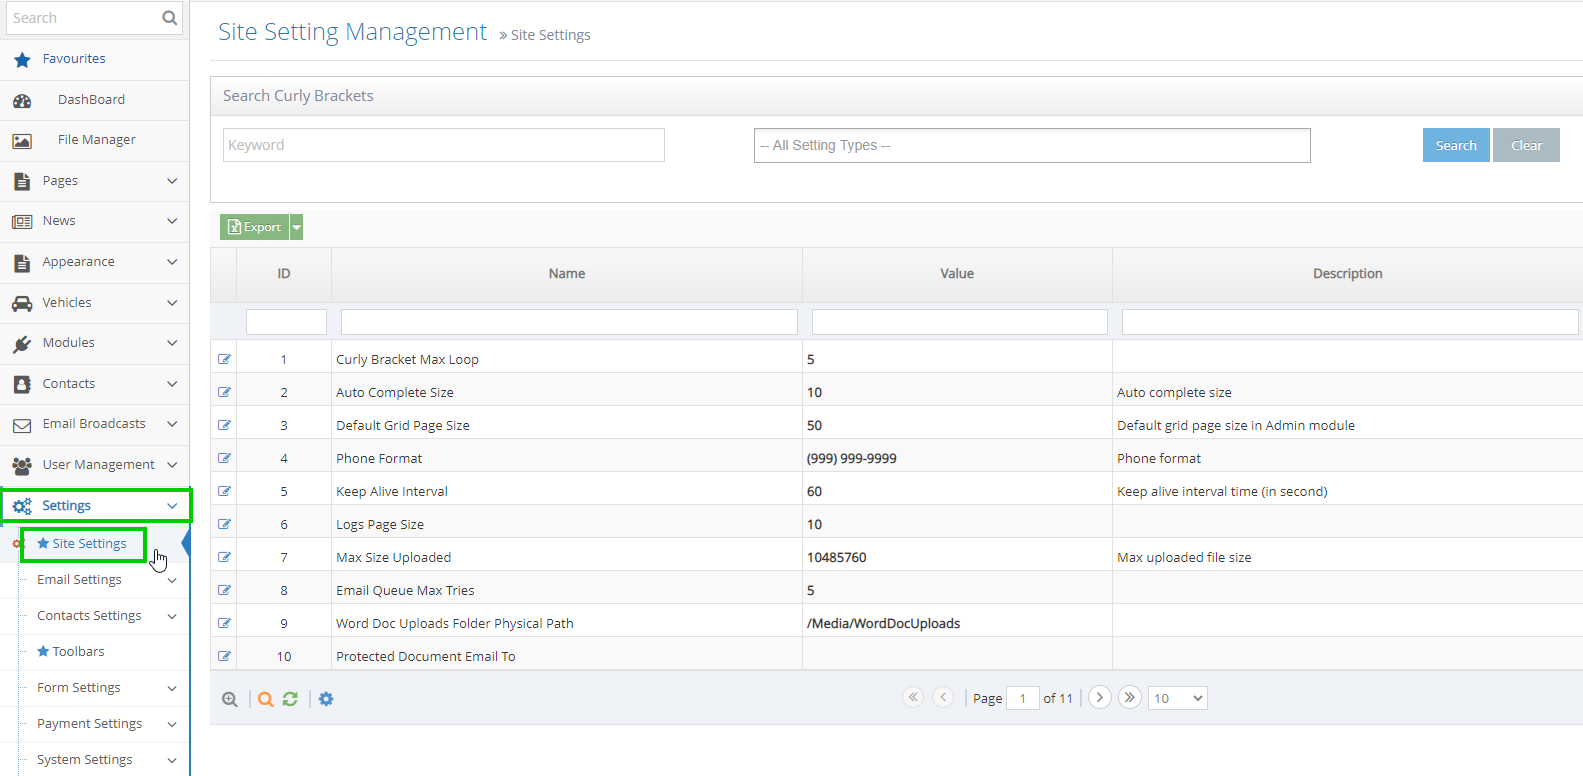
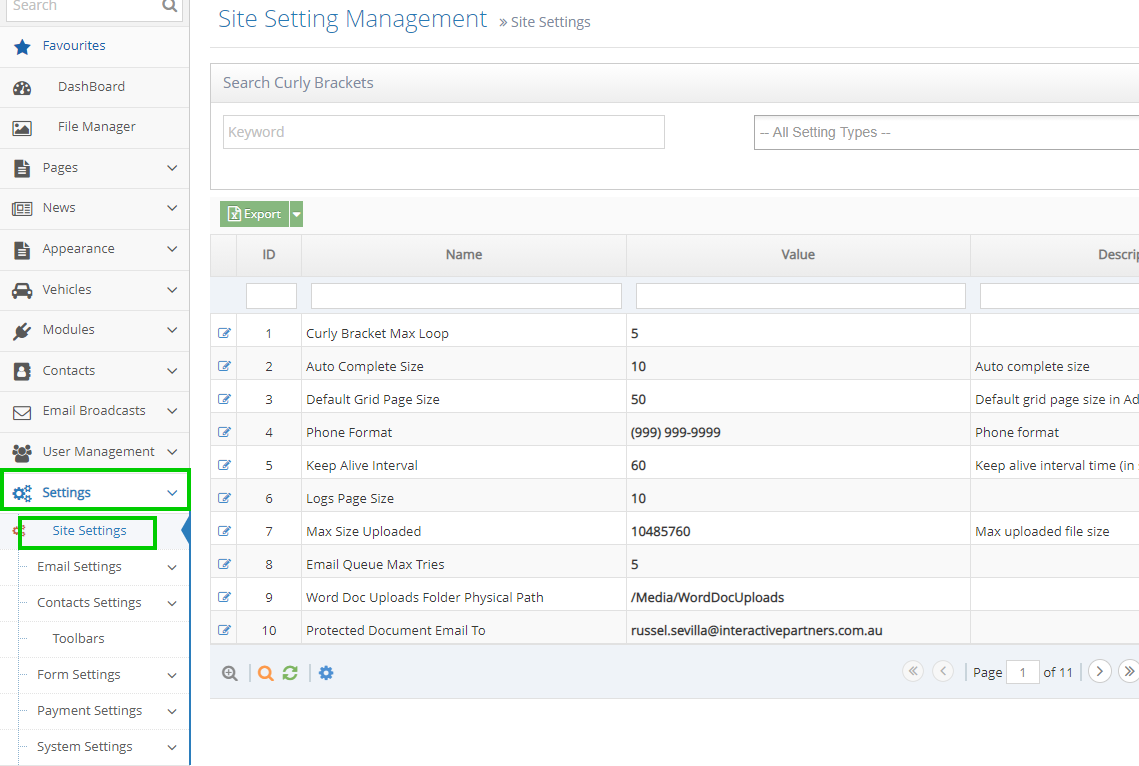
2Click Settings, then on the dropdown select Site Settings
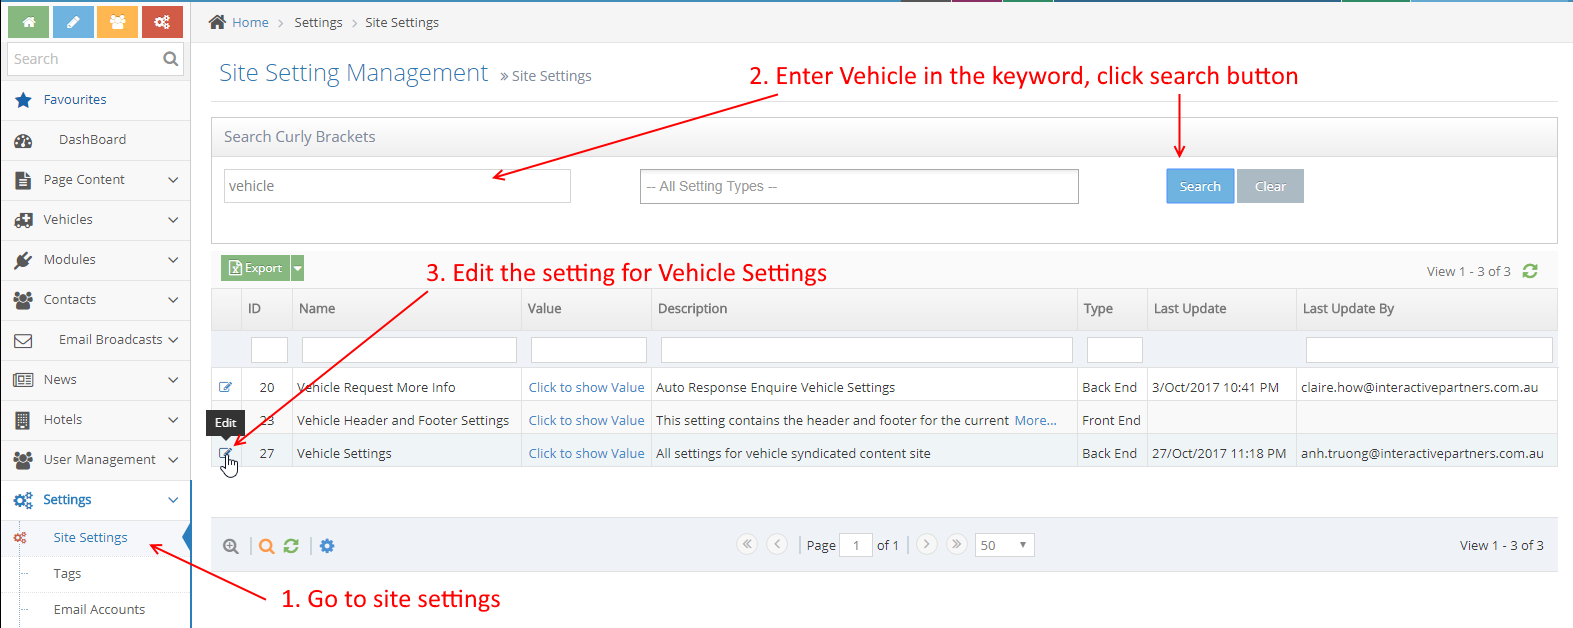
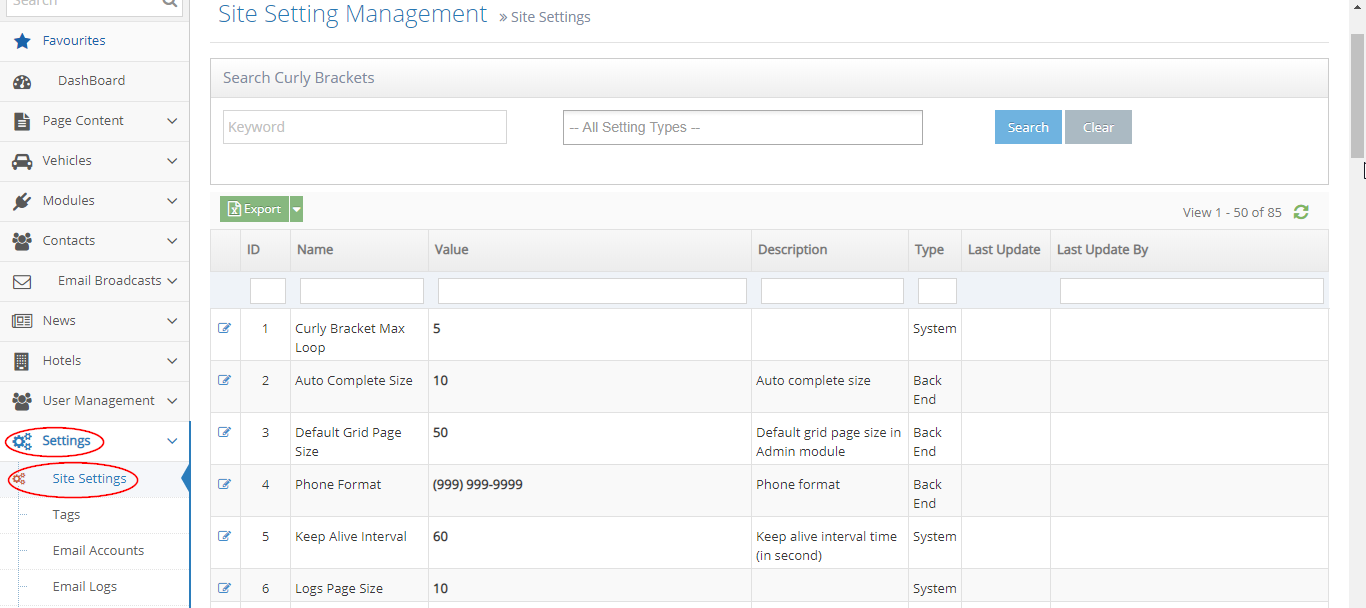
To Check Vehicle Settings
-
1Log in as an administrator and go to the Admin Dashboard.
Learn how to log in here → -
2Click Settings, then on the dropdown select Site Settings
-
3On the Site Setting Management screen, enter "vehicle" in the keyword textbox
-
4Click Search
-
5Scroll down to the vehicle settings and click edit
-
6Two main settings that control the listing
-
7Primary Make: this controls what vehicles are displayed on the site. The Primary make will display
Enable/Disable display of sold vehicle details
- The default setting is, sold vehicle details information will still display
- This can be set to yes/no by ticking(yes)/unticking(no) the setting
- Setting this to yes/ticked will not display sold vehicle details information and will just show "Vehicle Not Found Text"
- Setting this to no/unticked will display sold vehicle details information
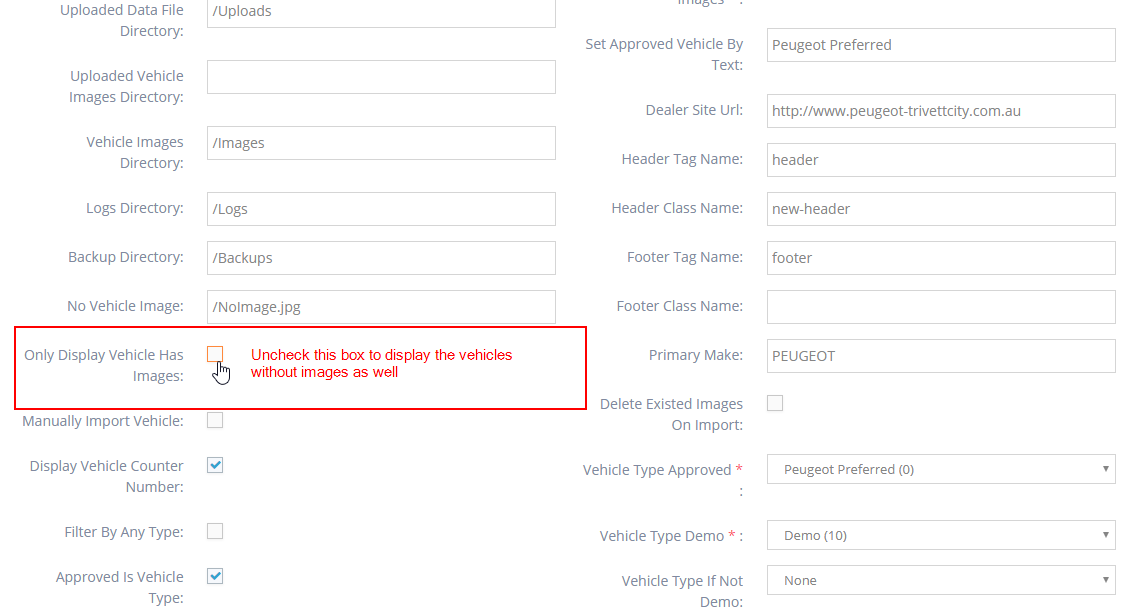
Hiding Vehicles with No Images
- A common setting is to "Only Display Vehicles With Images"
- This can be set to yes/no
- Setting this to yes will hide vehicles that do not have images
- This will hide/display vehicles if images are not available
- Display only one brand.
- If this is set, only the requested brand of the vehicle will be displayed, all other brands are hidden
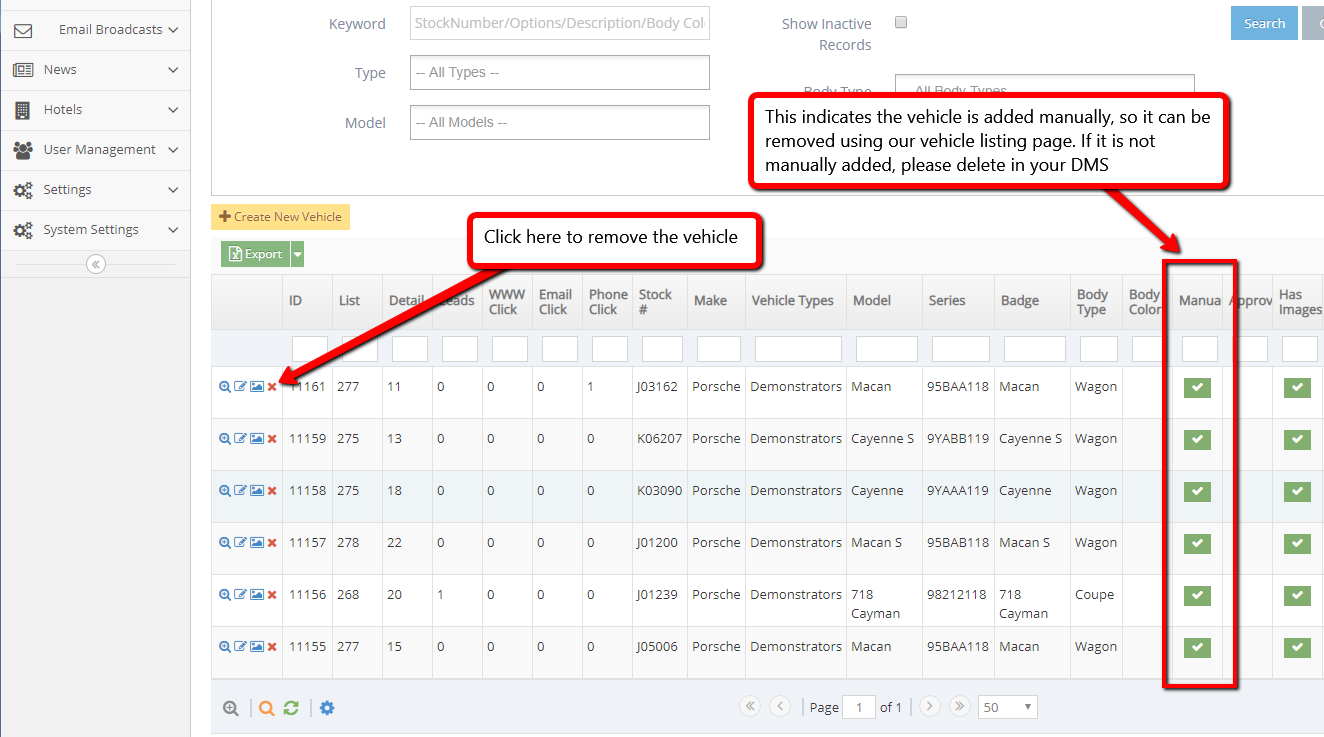
How to remove vehicles from the vehicle listing
This is only applied to vehicles that were added manually in our admin. For the vehicles that were added to Dealer Management System (DMS), please delete the vehicles from DMS and wait 1 hour so that the update can be sent to us.
-
1Log in as an administrator and go to the Admin Dashboard.
Learn how to log in here → -
2Navigate to Vehicles > Vehicle Listing
-
3Select the delete icon at the vehicle that you want to remove, you will be redirected to the Details page to confirm for deletion.
How to Site Setting Overwrite Vehicle Type using the Current Domain
- This setting is to set up the Vehicle Types of Vehicle Listing using the domain.
- By default, the value is false, which means it is not overwriting the Vehicle Type.
- If the setting is True, the vehicle type of the vehicle listing will be matched using the current domain.
- Example: If the setting is True, we have a vehicle type "Testing Vehicles" and the current domain is "testingvehiclesannette.com.au", the vehicle type of the vehicle listing will be "Testing Vehicles" regardless of the set-up Vehicle Types for the vehicle listing.
Displaying a Single Vehicle as Page Content
-
1Log in as an administrator and go to the Admin Dashboard.
Learn how to log in here → -
2Go to page that you want to show vehicle details and click Edit
-
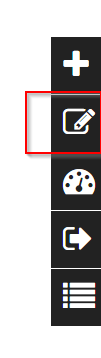
3In the editor click Curly Bracket button to open the configuration curly brackets
-
4Click Configure button in the popup
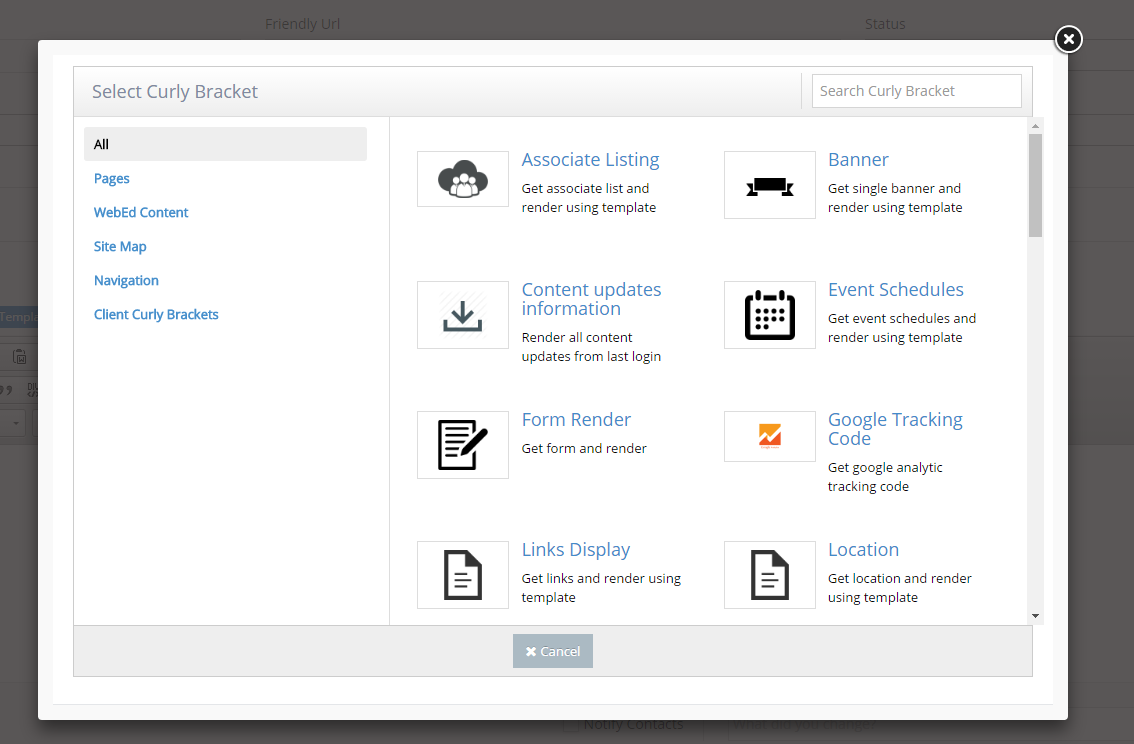
-
5Search Vehicle Details in new popup and click Vehicle Listing item in result search
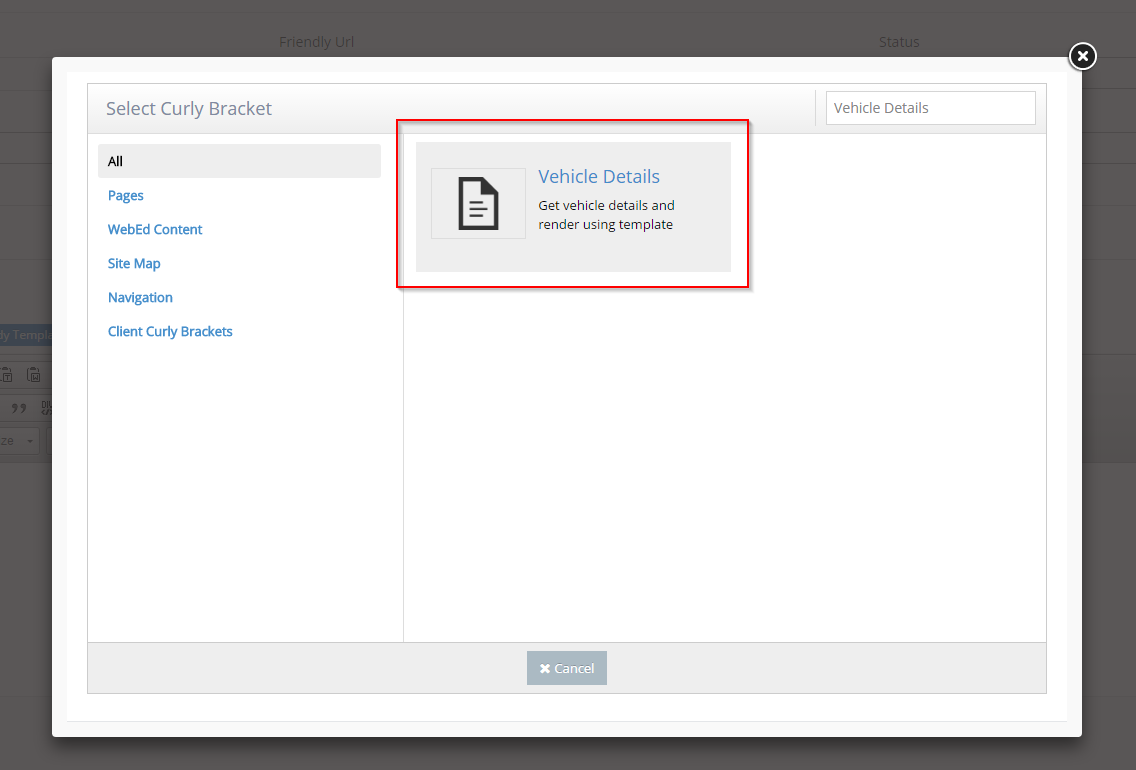
-
6Configuration popup will be shown. Config options in the left side and review the UI in the right side
-
7Click Insert button to save. Click an OK button in next popup to complete.
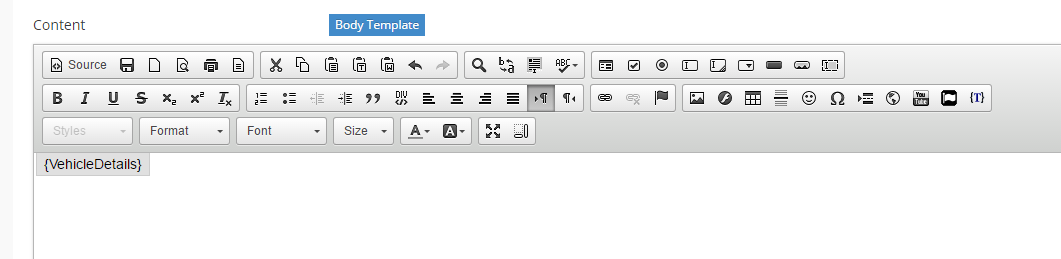
-
8Click Update And Close. Then you can see the vehicle details on the page
Manually Adding Vehicles into the Vehicle Listing Module
Vehicle Listing Module Purpose
The vehicle listing module creates a fast & efficient way of recording and displaying information on vehicles on your website. It creates a database of stock for easy integration into internal stock and inventory systems and is downloadable into Excel.
How to manually add vehicles to vehicle module
-
1Log in as an administrator and go to the Admin Dashboard.
Learn how to log in here → -
2Launch the Admin Module
-
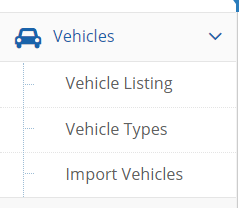
3In the blue tabs on the left-hand side select:
- Vehicles – then
- Vehicles Listing
-
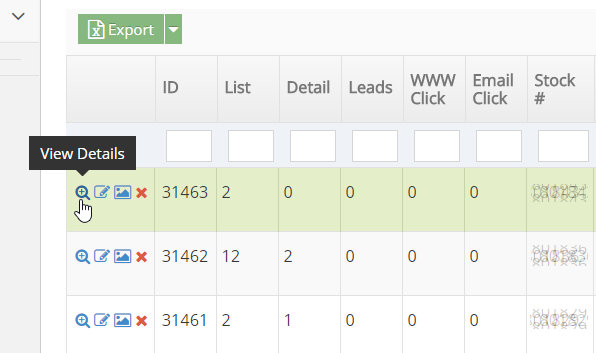
4From this index page, you can:
- Create new vehicle listings
- Edit existing listings (using the pencil icon)

- Delete listings (using the X icon)

- Upload Images (using the image icon)

You can also export the data to an excel spreadsheet using the Export to CSV button in the top right-hand corner
Adding and Uploading Images to your Vehicle Listing
-
1Once your details are complete, return to the index to add images to your vehicle
-
2Choose the image icon next to the vehicle you added
-
3The images listing will appear, without images
-
4Click upload More Images
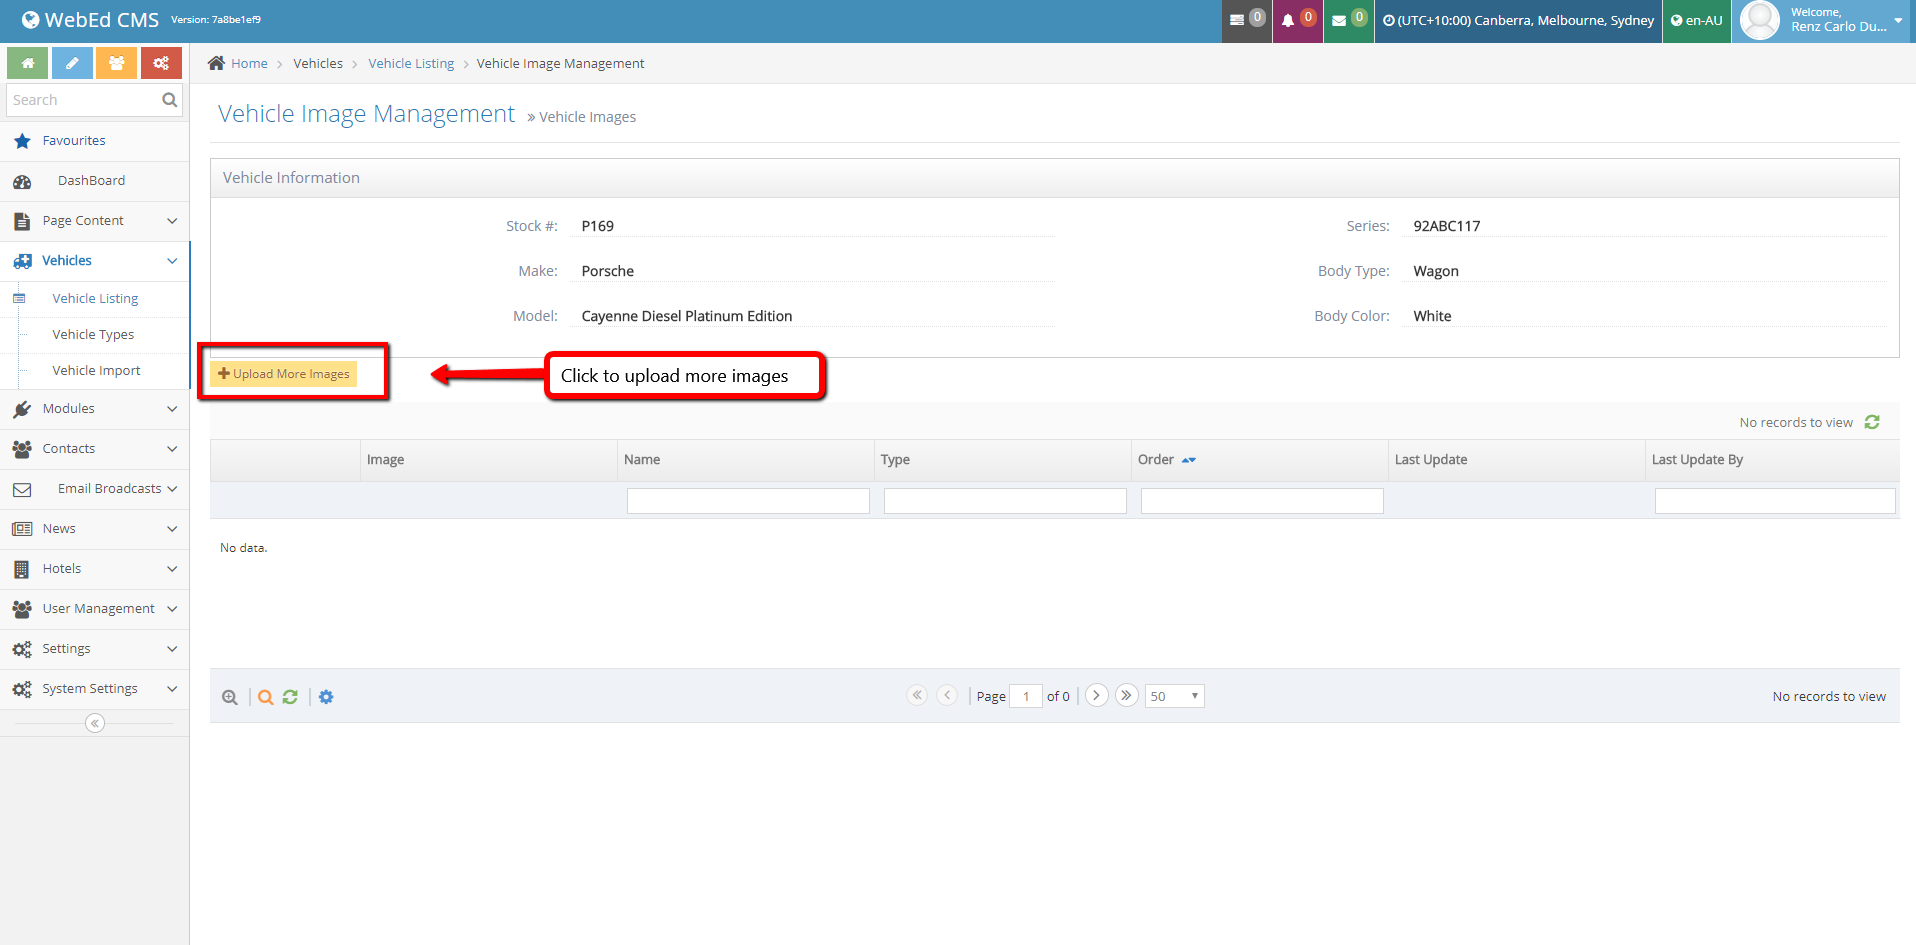
-
5To load an image – click Upload More Images
-
6A window will open
-
7Drag and Drop Files from your desktop or click the Upload Vehicle Images button.
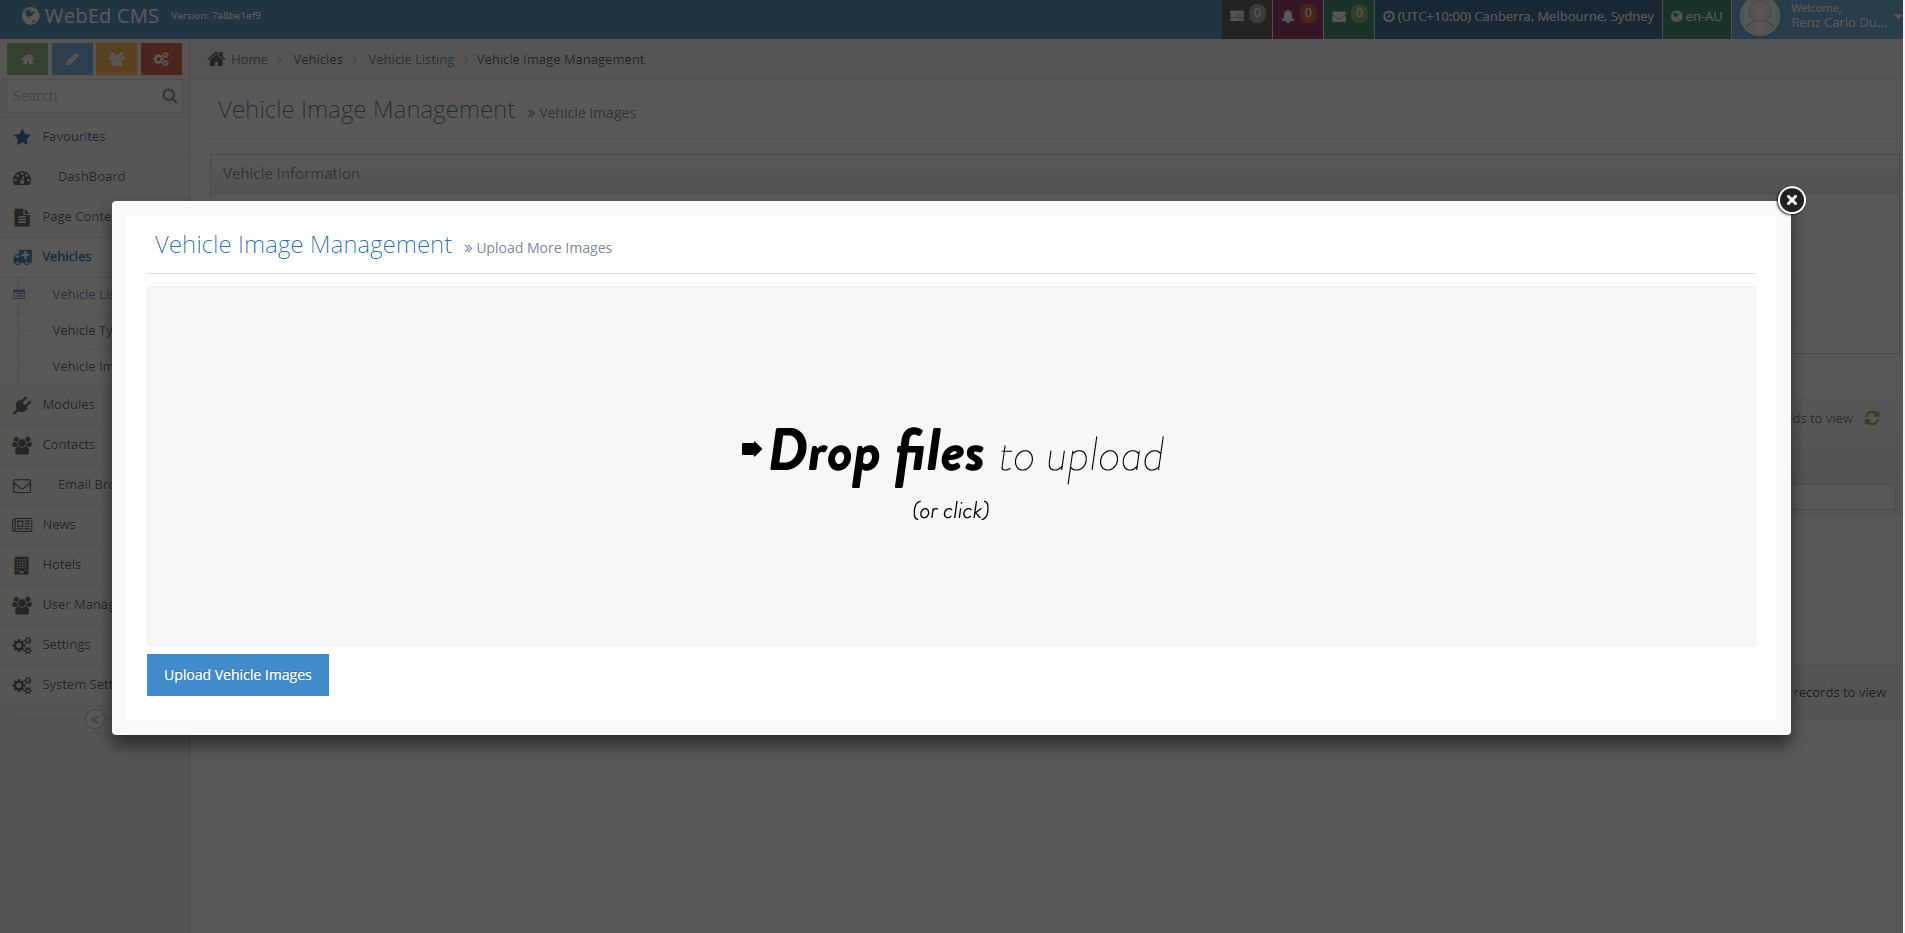
-
8Choose from your desktop or file image
-
9You can upload multiple images by selecting more than one image at a time
-
10The images will be uploaded and automatically deposited against your vehicleOnce vehicle details and images are complete – they will appear on the listing page of your website.
Vehicle Type Management
What is a Vehicle Type
Manage vehicles by types for display on specific pages or listings.
- A vehicle can belong to multiple types.
- Normally the types are present and do not need to be changed.
- Generally, you will only use this feature if you are manually maintaining your vehicles
Why you would use a Vehicle Type
Manage vehicles by type should be easier to:
- The filter in the admin module,
- The filter in end-user UI
- Show vehicles with types admin want in the UI.
Vehicle Type Details
-
1Log in as an administrator and go to the Admin Dashboard.
Learn how to log in here → -
2In the listing page, click on the View Details icon to view the details:

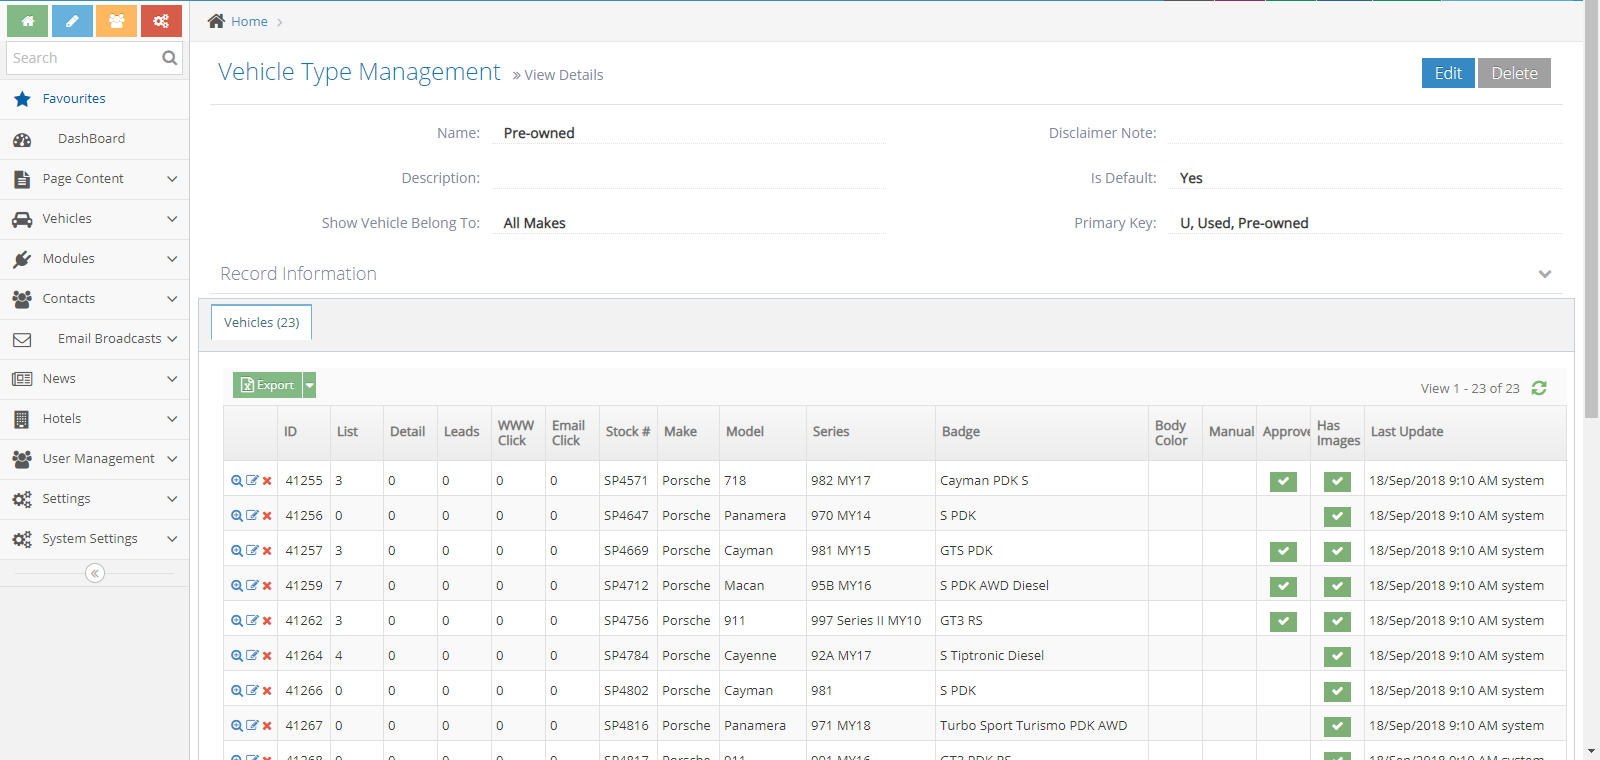
-
3The details of vehicle type will be shown
-
4You can see the listing vehicle has this type
Creating a Vehicle Type
-
1Log in as an administrator and go to the Admin Dashboard.
Learn how to log in here → -
2In the left menu, select: Vehicles > Vehicle Types
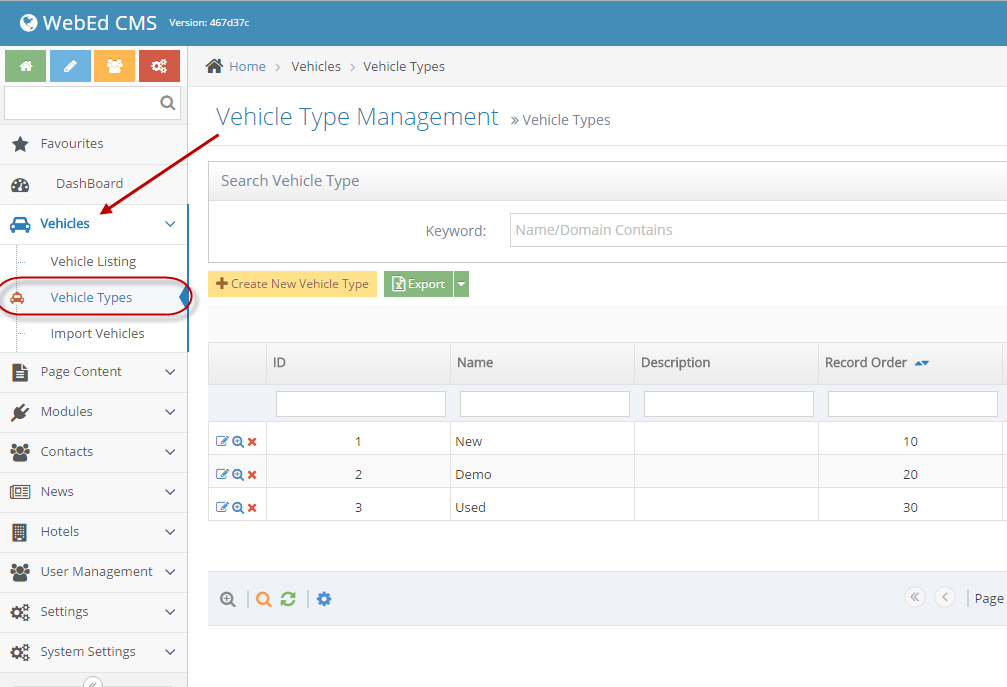
-
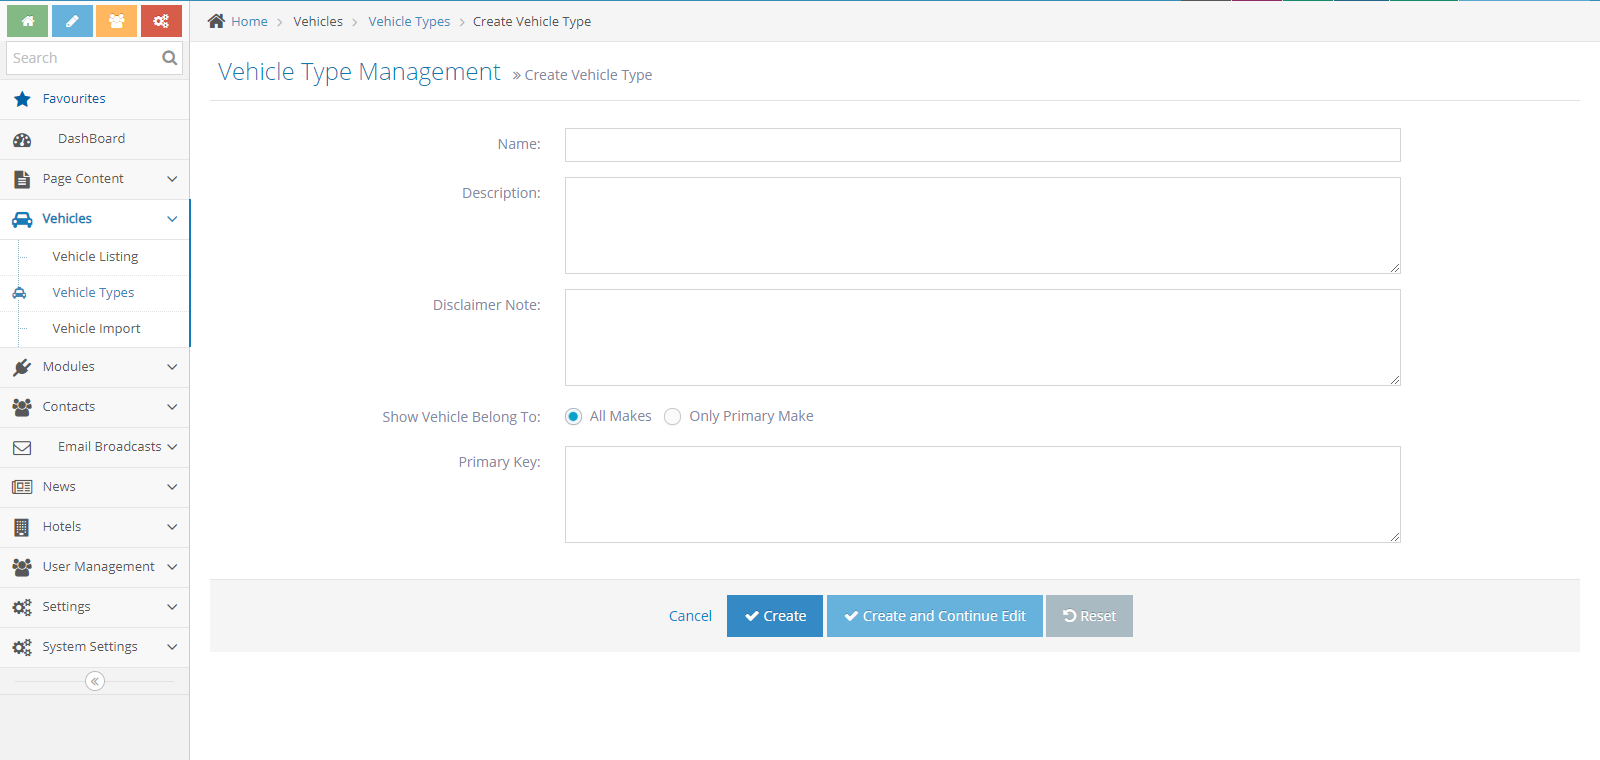
3Click on Create New Vehicle Type button
-
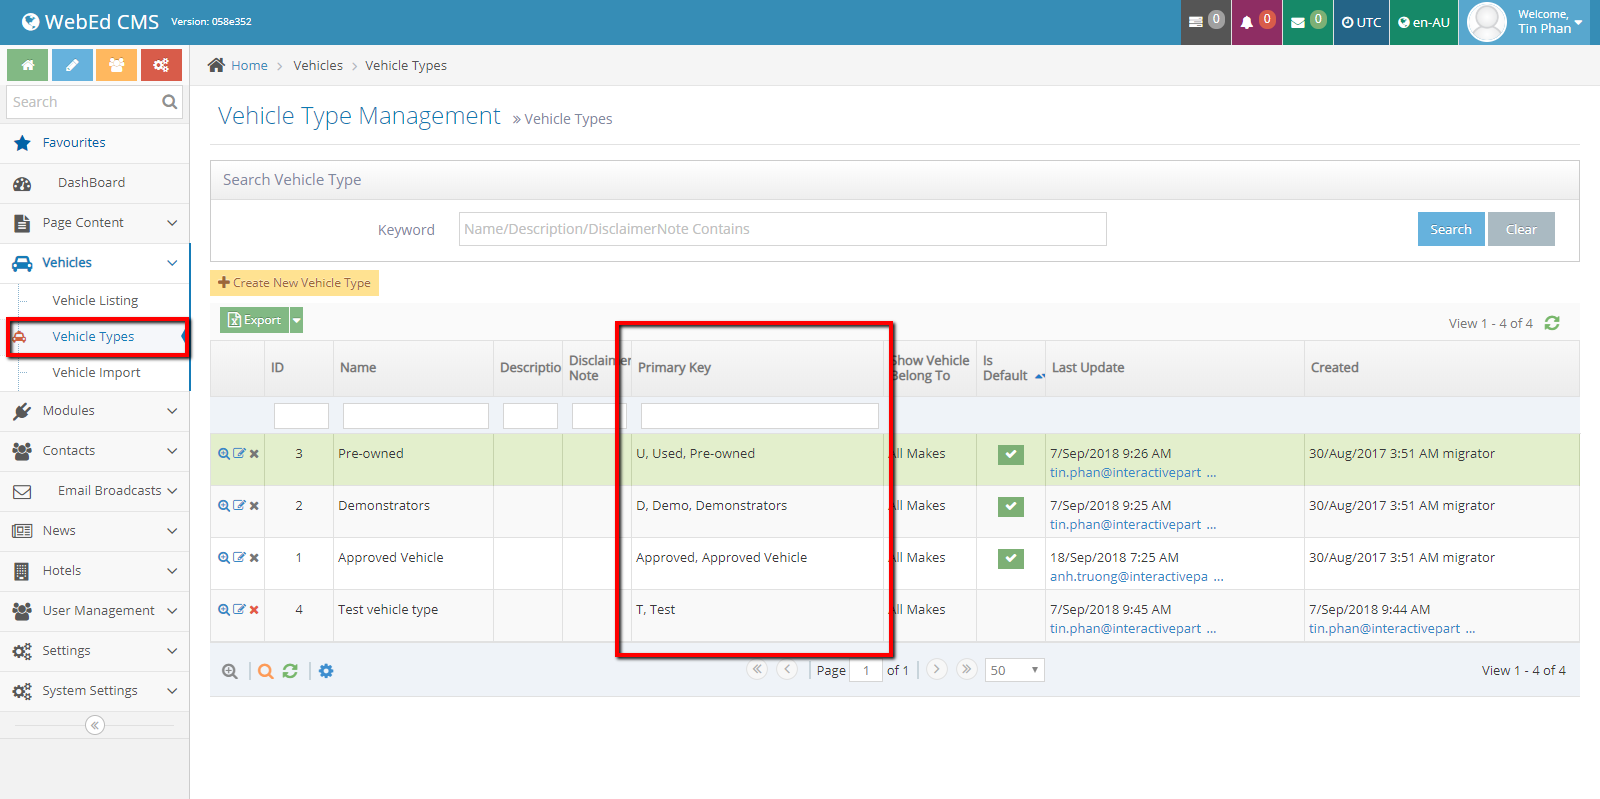
4Enter the value:
- Name: The name of the vehicle type
- Description: Explain or detail of vehicle type
- Disclaimer Note
- Show Vehicle Belong To
- Primary Key: This is key for checking on the vehicle import file
-
5Press the "Save" button to save the new vehicle type.
-
6The type just created will display on the grid in-vehicle type listing page.
Edit Vehicle Type
-
1Log in as an administrator and go to the Admin Dashboard.
Learn how to log in here → -
2On the listing page, click the edit icon


-
3On the edit page, modify fields then press Save or Save And Continue Edit button to save.
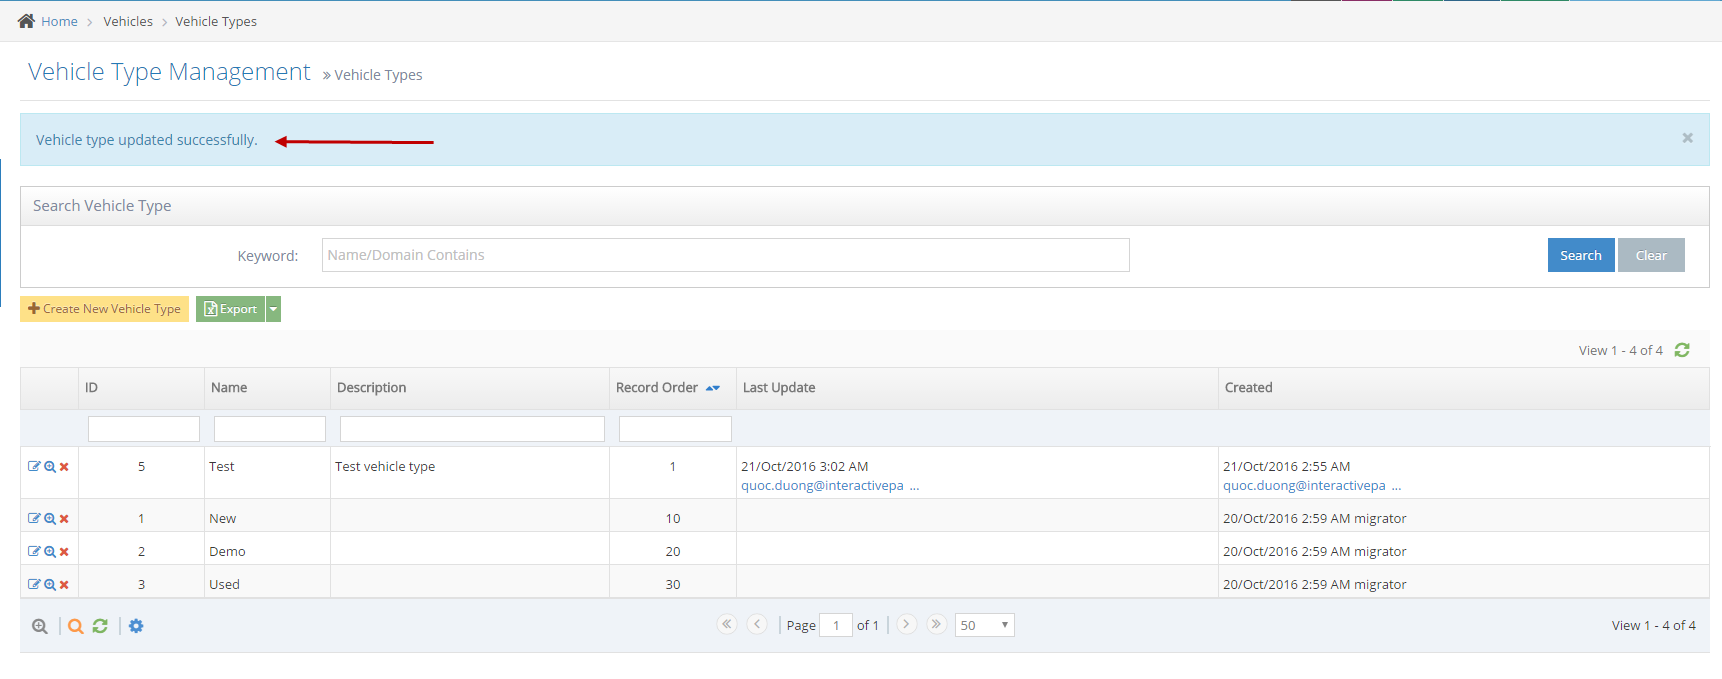
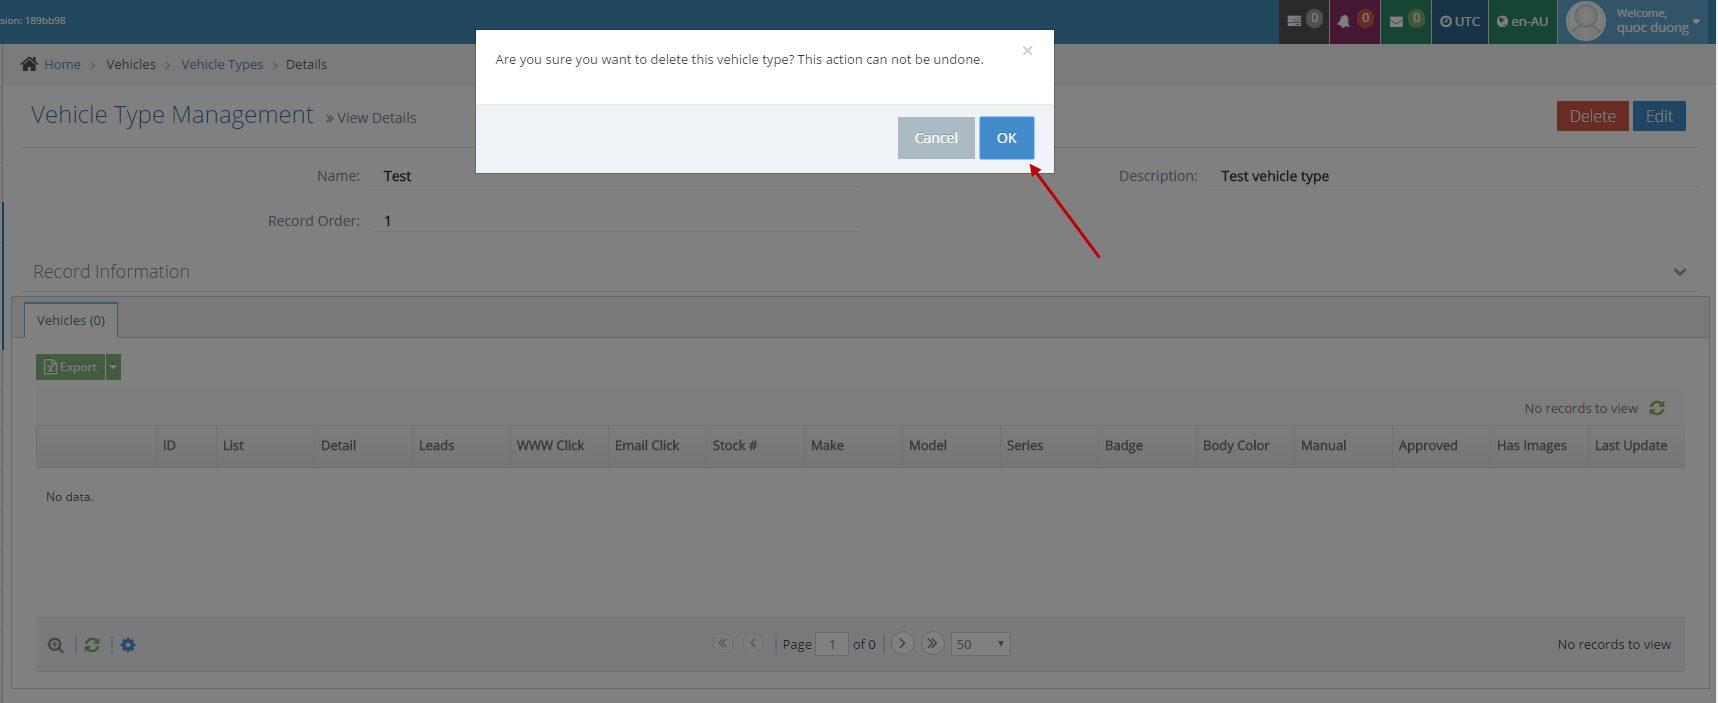
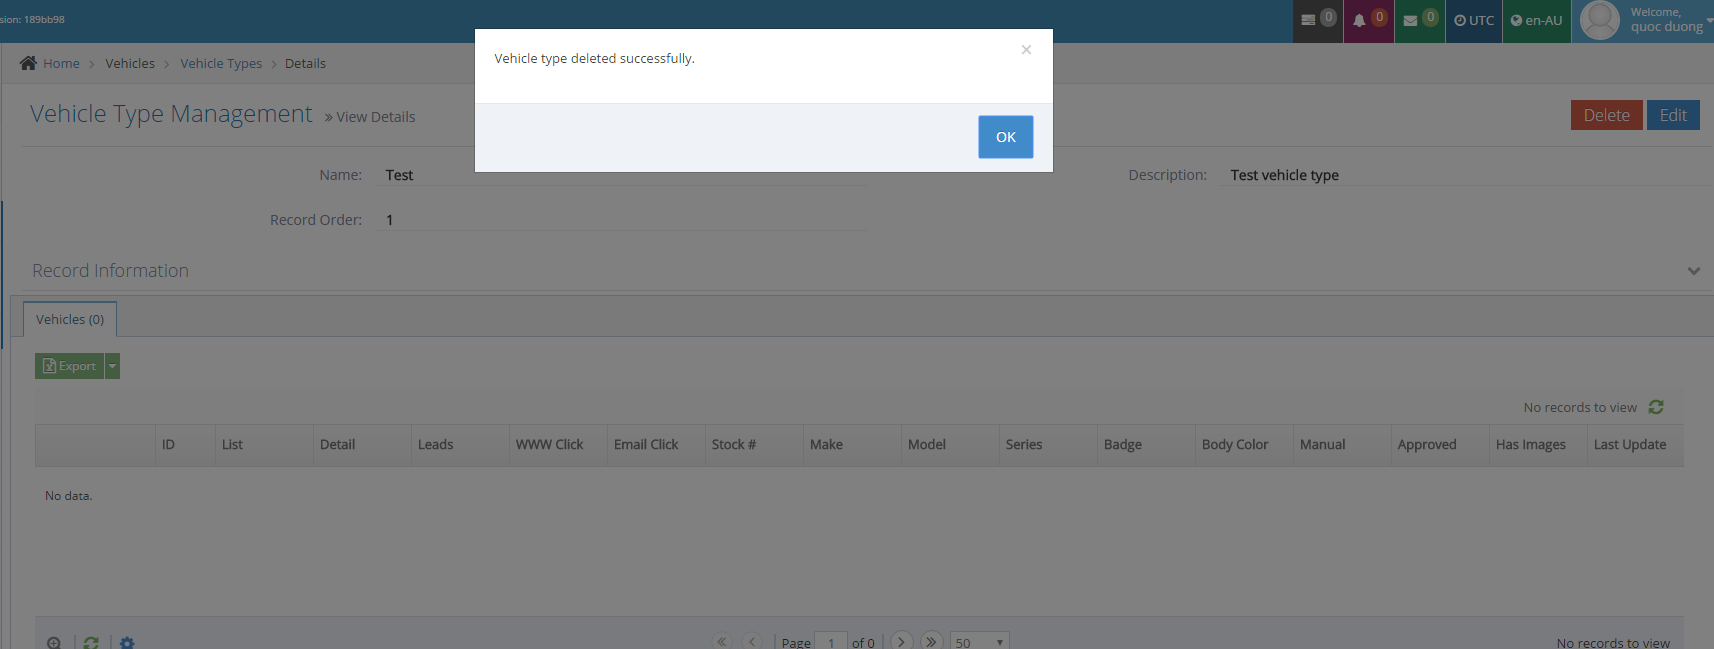
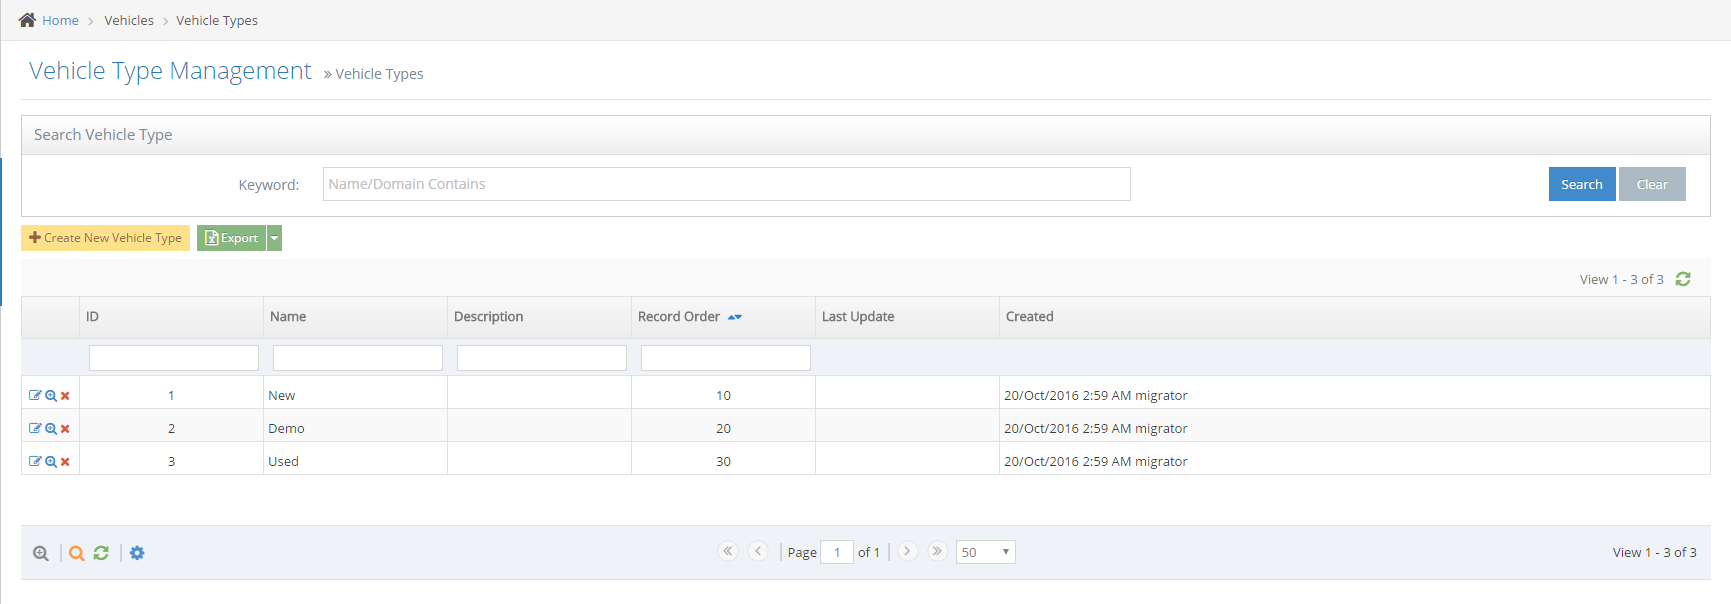
Deleting a Vehicle Type
-
1On the listing page, click on the icon or go to the details page and press the Delete button.

-
2A new small popup will be displayed. Click the OK button to delete or Cancel to ignore.
-
3A new popup display to inform the vehicle type has just been deleted, click the OK button to go to the listing page.
-
4Vehicle types were updated:
How to add a new vehicle type to the import file
-
1On the import file, The first row will be the property field of one vehicle.
-
2The field "NUD" contains the keyword of vehicle type.

-
3The NUD should be contained on the Primary Key field of the vehicle type.
-
4This is the document for the import vehicle process How To Vehicle Importing.
Managing Displayed Prices on Vehicle Listings
Why you would use Displayed Price on Vehicle Listing
- Most Vehicles have 2 prices in the supplied data.
- Drive Away Price = The selling price of the car including any transfer fee, government taxes or dealer delivery
- Base Price = The base price of the car before any additional drive-away fees are added
- As per ACC guidelines, it is recommended you always use the Drive Away price
- This setting allows you to set the price displayed based on rules to suit your business
- You can also set the text to display if there is no price available, the default is TBC (To Be Confirmed)
- At times, you may not have both prices set for a Vehicle in your Dealer Management System (DMS)
- The data displayed on your listing will be the same as the data you have entered in your DMS
What are the available settings?
- Price to Display
- Use Drive Away Price - always use the Drive Away Price. If the drive-away price is not available, then TBC (to be confirmed) will be displayed
- Use Base Price - always use the Base Price. If the drive away price is not available, then TBC (to be confirmed) will be displayed
- Use Drive Away Price if available else use Base Price - Use the Drive Away Price.
- If the drive-away price is not available, then Base Price will be displayed.
- If neither price is available, then TBC (to be confirmed) will be displayed
- Use Base Price if available else use Drive Away Price - Use the Base Price.
- If the Base price is not available, then the Drive Away Price will be displayed.
- If neither price is available, then TBC (to be confirmed) will be displayed
- No Price Text
- If the rules are set that no price can be displayed (for example, you may set Use Drive Away Price but there is no value entered in your DMS for Drive Away Price)
- The text to display instead of the price is used
- The default text is TBC but this can be changed to any value you wish
- Just be careful of the text length and test to ensure it matches the space available on your listing page
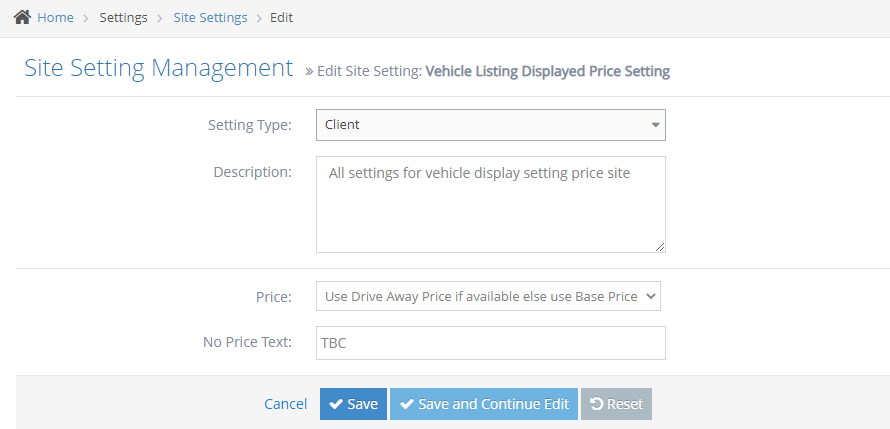
How To Edit Vehicle Listing Displayed Price Setting on Site setting
-
1Log in as an administrator and go to the Admin Dashboard.
Learn how to log in here → -
2Go to Admin Dashboard >> Site Setting >> Vehicle Listing Displayed Price Setting
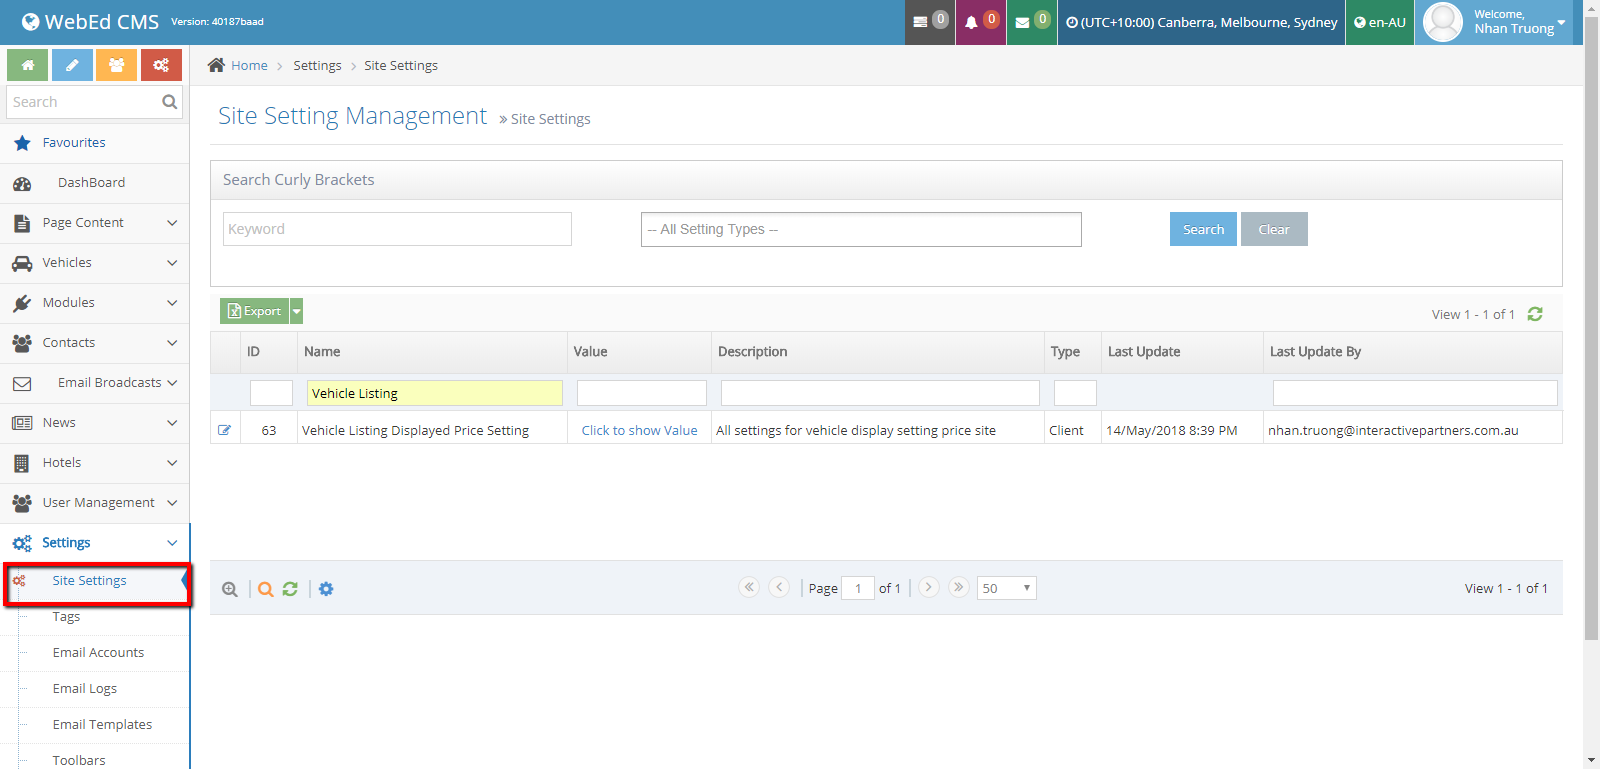
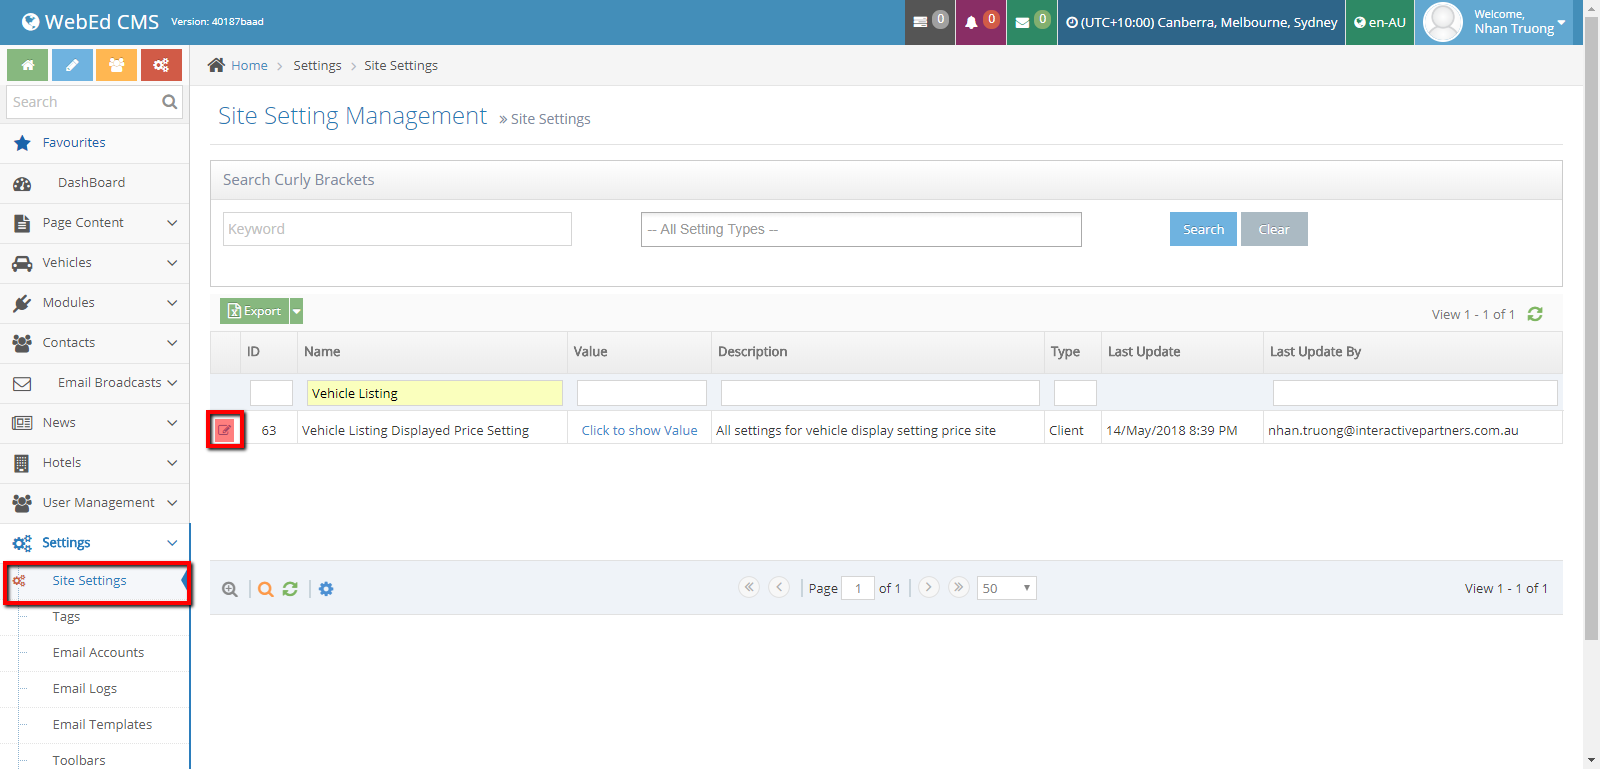
-
3Click icon "Edit"
-
4The Edit page will show.
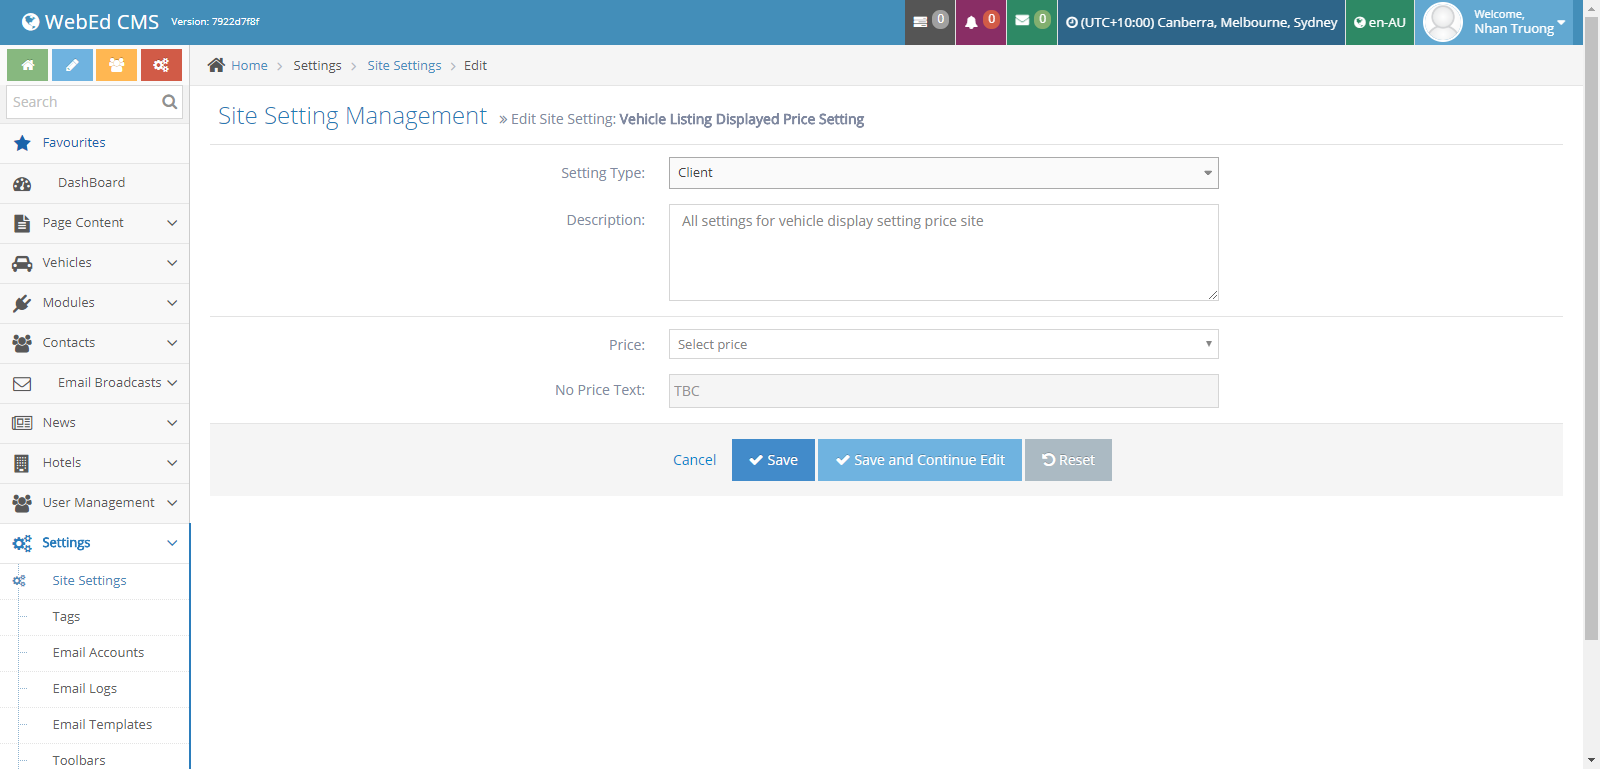
-
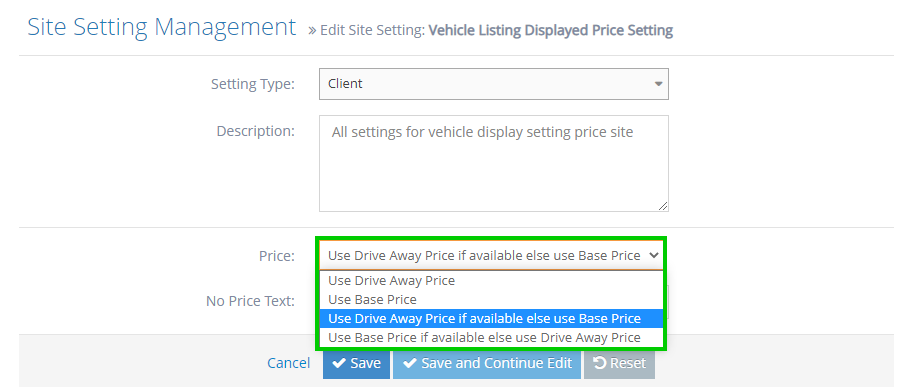
5Select Price option :
- Use Drive Away Price
- Use Base Price
- Use Drive Away Price if available else use Base Price
- Use Base Price if available else use Drive Away Price
-
6If a user doesn't select any, the price will get the default value "TBC"
-
7If a vehicle doesn't have both the price and retail price, it will show the default value "TBC".
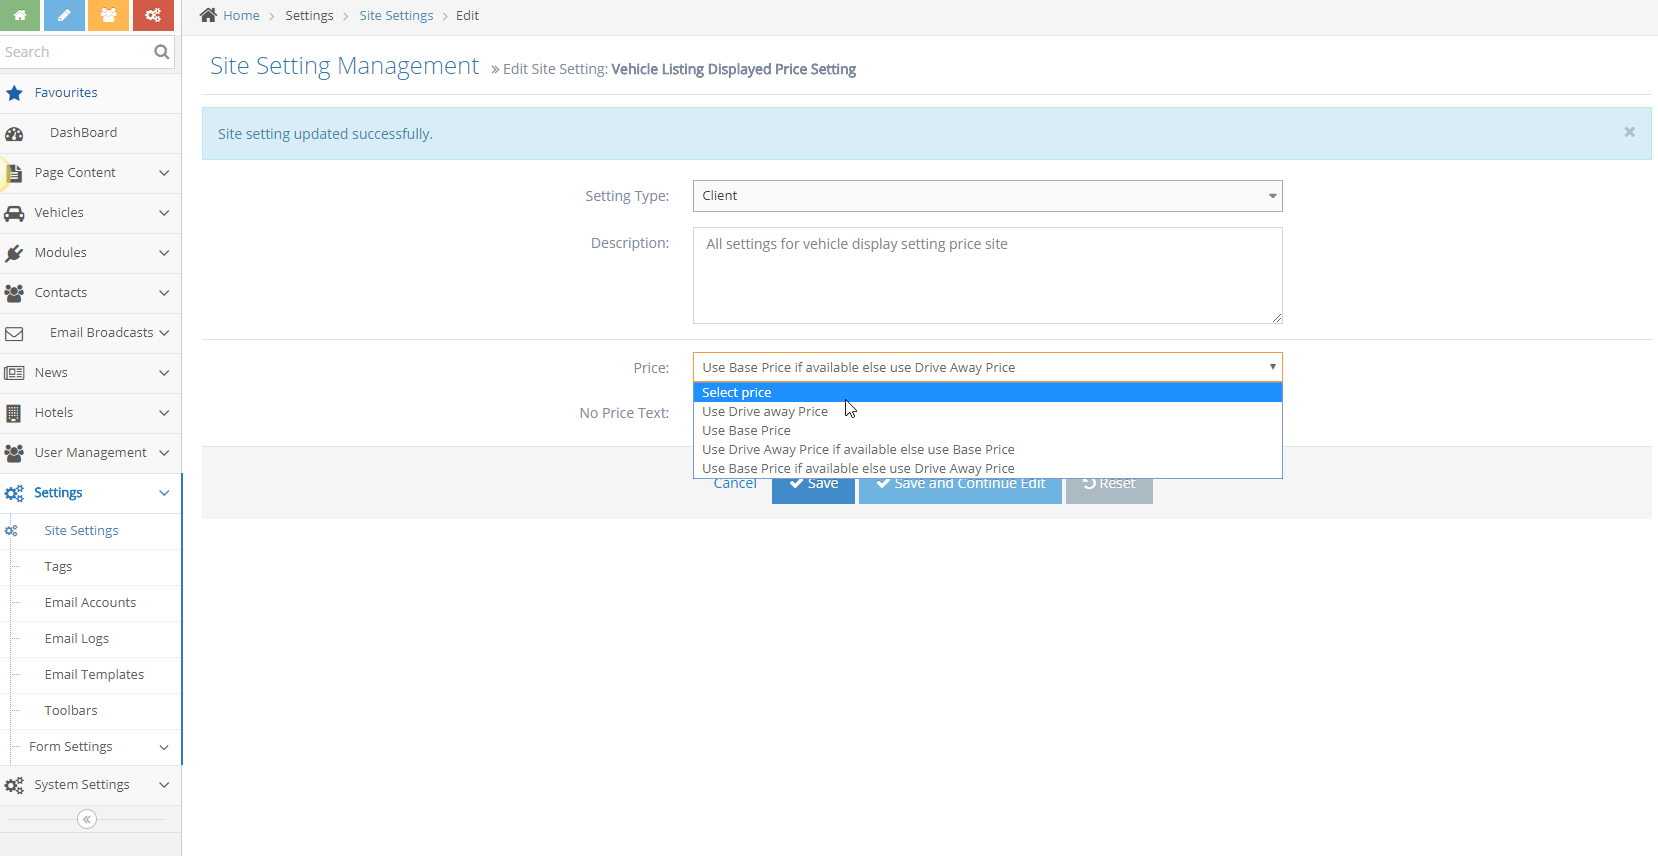
-
8Click the Save button.
-
9The Vehicle Listing page will display the Price according to the selected Price option in Vehicle Listing Displayed Price Setting. (Selected: Use Base Price)
-
10The Vehicle Listing page will display the Price according to the selected Price option in Vehicle Listing Displayed Price Setting. (Selected: Use Drive Away Price)
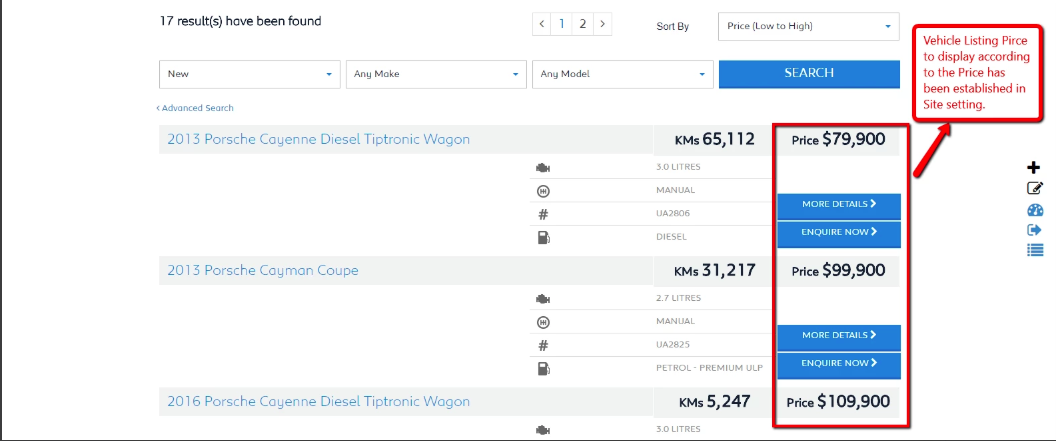
-
11The Vehicle Listing page will display the Price according to the selected Price option in Vehicle Listing Displayed Price Setting. (Selected: Use Drive Away Price if available else use Base Price)
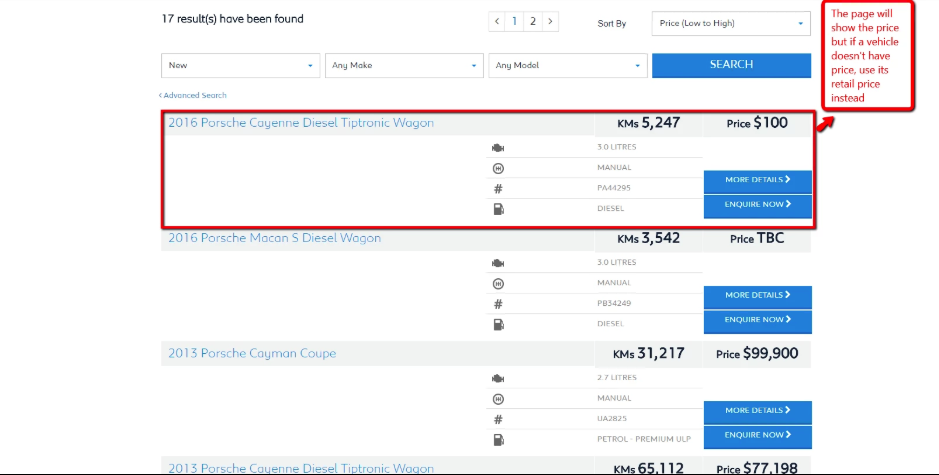
-
12The Vehicle Listing page will display the Price according to the selected Price option in Vehicle Listing Displayed Price Setting. (Selected: Use Base Price if available else use Drive Away Price)
-
13The Vehicle Listing page will display the Price according to the selected Price option in Vehicle Listing Displayed Price Setting. (None selected)

Viewing the Vehicle Dashboard
What is a vehicle dashboard?
- When the user wants to view the enquiry vehicle and vehicle tracking data
Why you would use a vehicle dashboard?
- The vehicle dashboard provides an overview about:
- Vehicle leads
- List view and details view of a vehicle
- Phone click, domain click, email click of the dealer on the vehicle details page
Vehicle Dashboard Logic
On the Curly Bracket
-
1This is the same for both vehicle listings: The Vehicle listing on the dealer site and the CentralizedVehicle Listing of Porsche approved site
-
1Get the vehicle based on a parameter and query search
-
2
Make a view model for saving tracking

-
3The vehicles will be updated or inserted into the VehicleViewDealers table with a number listview increase
-
4Also sent data for tracking to the central site
On the vehicle details page
-
1When we go to the detail page, it will be called to the "DealerTracking" function with the stock number of this vehicle
-
1Make a model data for saving to table tracking based on the action on the dealer page
-
3The details tracking will save on the "VehicleViewDealers" table
-
4Also sent data for tracking to the central siteThis data also sent to the central site
See Vehicle Dashboard in Action
You can check on your dealer website by typing in http://(DEALER_NAME).com.au/Admin/Vehicles
Navigating the Vehicle Dashboard
-
1Log in as an administrator and go to the Admin Dashboard.
Learn how to log in here → -
2Go to Vehicle Dashboard
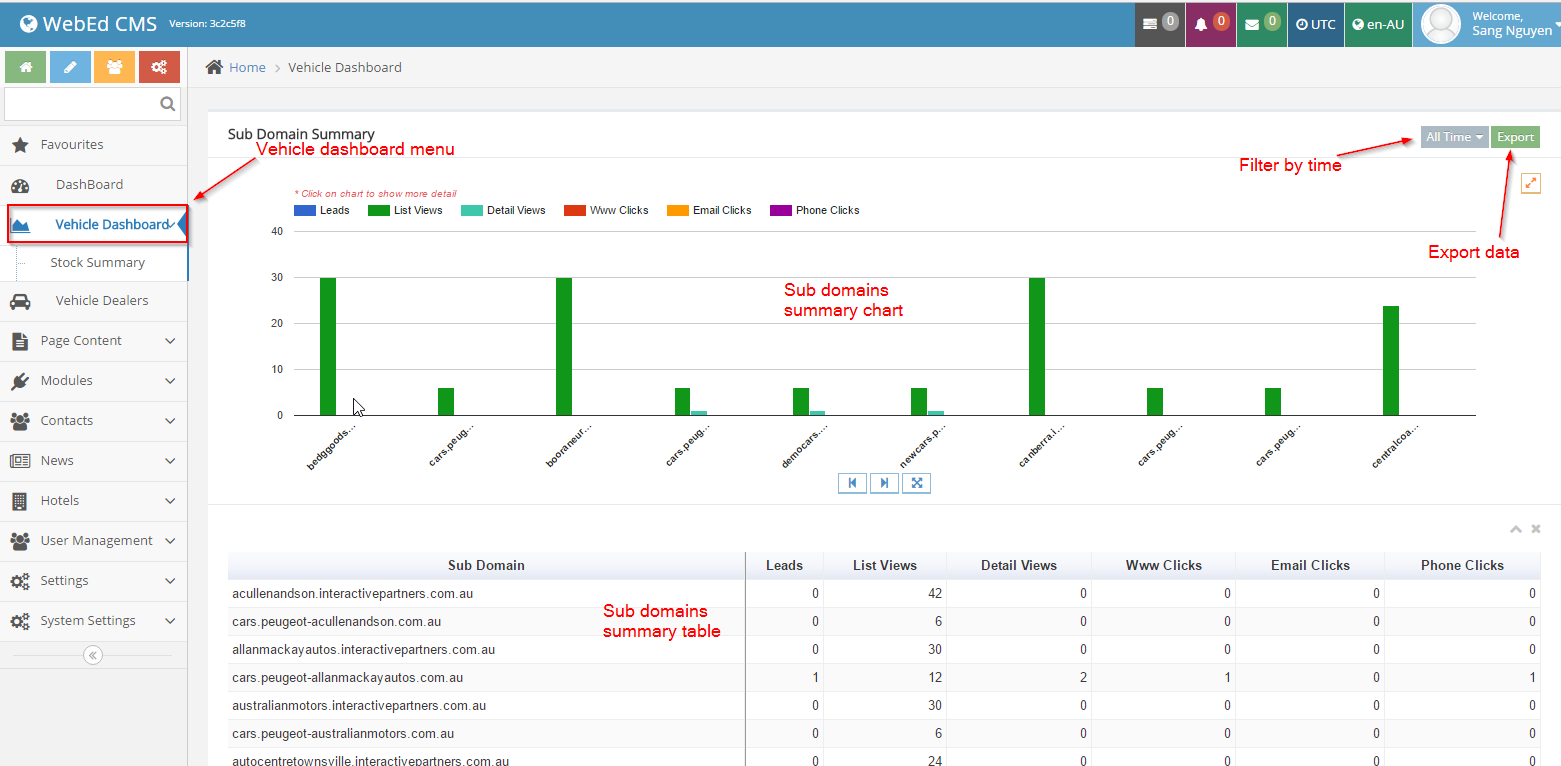
-
3Click on the filter button.
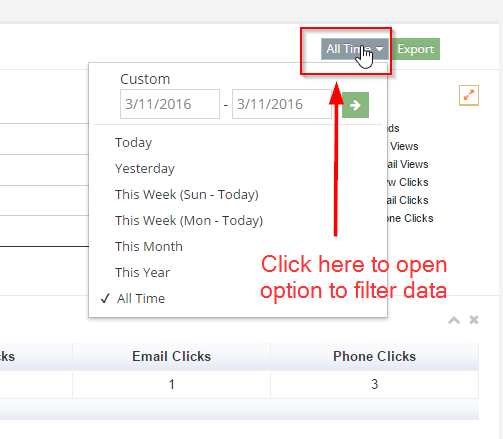
-
4All your requests will be shownSelect the date range you want to get data
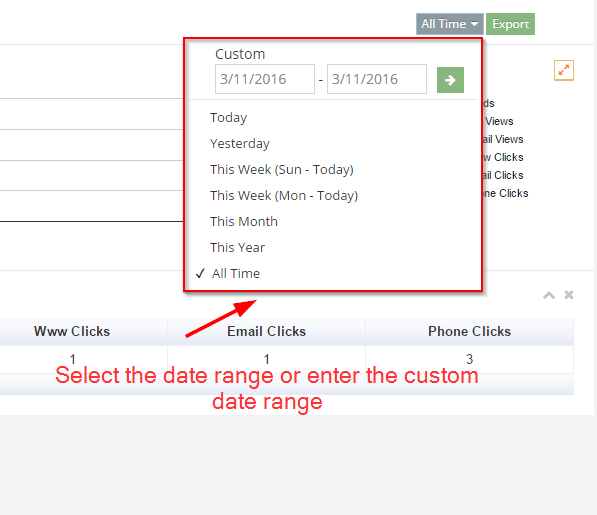
-
5Click on the Export button if you want to export to an excel file
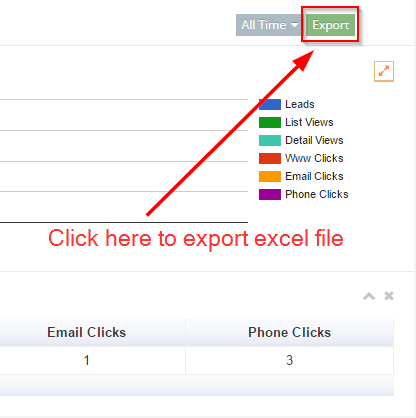
-
6The excel file will be downloaded

Finding Your Vehicle Leads
Why You May Need This, Even with Leads Sent to Your Email
It is possible to create a report which shows you how many people have responded to the vehicle request and Test Drive forms on your vehicle listings pages.
- Perhaps the person who usually handles leads is away
- To get a quick overview or a longer report on who or
- Download the report on how many have responded to the forms
How to Find your Vehicle Leads
-
1Log in as an administrator and go to the Admin Dashboard.
Learn how to log in here → -
2Search for ‘Email Queues’
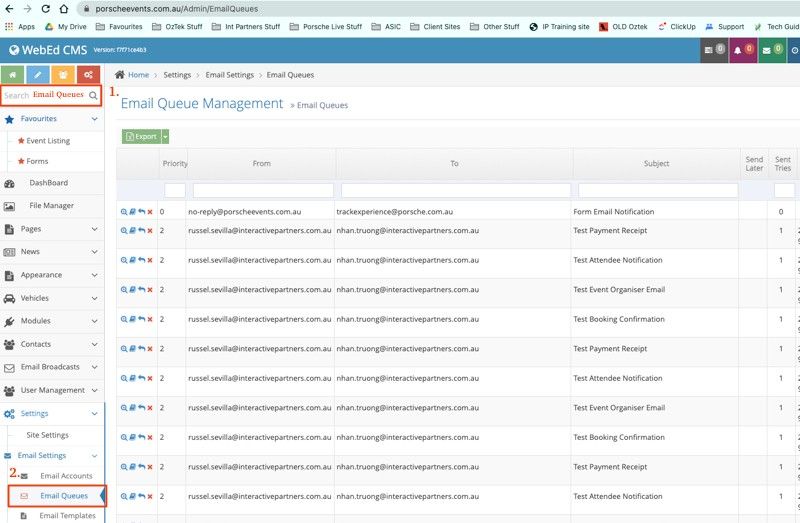
-
3In the ‘Subject’ field, write ‘Request’ and hit enter.
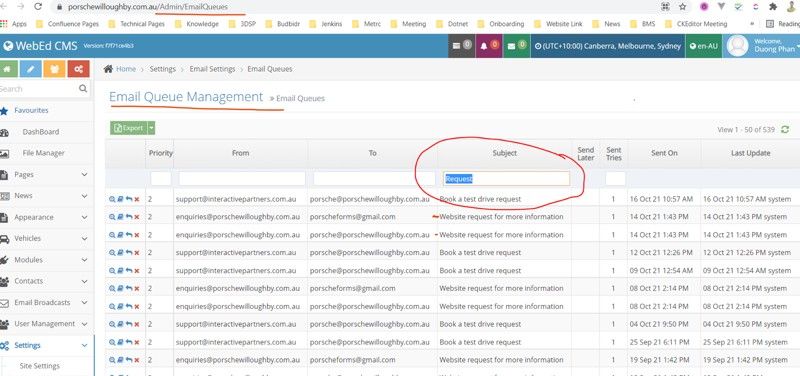
-
4All your requests will be shown
-
5If you want to print the data, Below the title - look for and select the green rectangle EXPORT
-
6Once selected save your information to excel, where you can easily look at it and separate the data if required
Editing the Vehicle Request More Info Form
What is a Vehicle Request more info Form?
- The form "Request More Info" is displayed on the vehicle listings.
- It allows anyone interested in a vehicle to send a request to the site owner
- The data is saved in contact and tagged with the product of interest for the vehicle make, model
What does it control?
- Request More Info Success Message - The text displayed to the end user after they submit
- Request More Info Email Address - The Email Address to which the request will be sent. This should be set to sales@ or enquiries@
- You can enter multiple email addresses separated by a semi-colon (;)
- Always leave the email address [email protected] in the email to list so Interactive Partners support staff can troubleshoot any issues
- The Auto Response Template. This is the email the user will receive after they submit a request
- The Notify Template. This is the email sent to addresses listed in the "Request More Info Email Address"
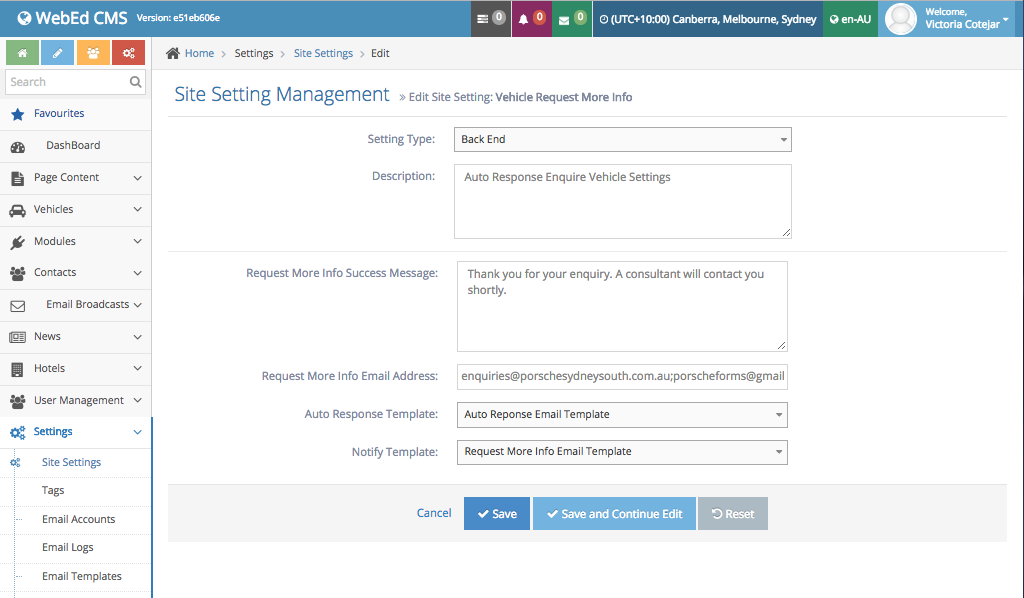
How to Edit the Vehicle Request More Info Form
-
1Log in as an administrator and go to the Admin Dashboard.
Learn how to log in here → -
2Go to the admin area
-
3Locate Settings on the left panel then click on Site Settings
-
4Or use the search box at the top of the admin menu to search "site settings"
-
5A list of Site Settings should appear
-
6Either scroll down and look for Vehicle Request More Info or type "Vehicle Request More Info" in the name text box at the top of the listing
-
7Once you've located it, click on the Edit icon
-
8After clicking on Edit, the setting for the form should appear:
- Description: the description of the setting
- Request More Info Success Message: This text will display after the form submit
- Request More Info Email Address: List email addresses will receive form information, each email separate by comma or semicolon
-
9Edit the email address it's coming from.
- And choose which Email Template will be sent to the client
Editing the Auto Response Template for the Vehicle Listing Enquiry form
-
1To Edit the Auto Response Template (or other templates shown in the drop-down)

-
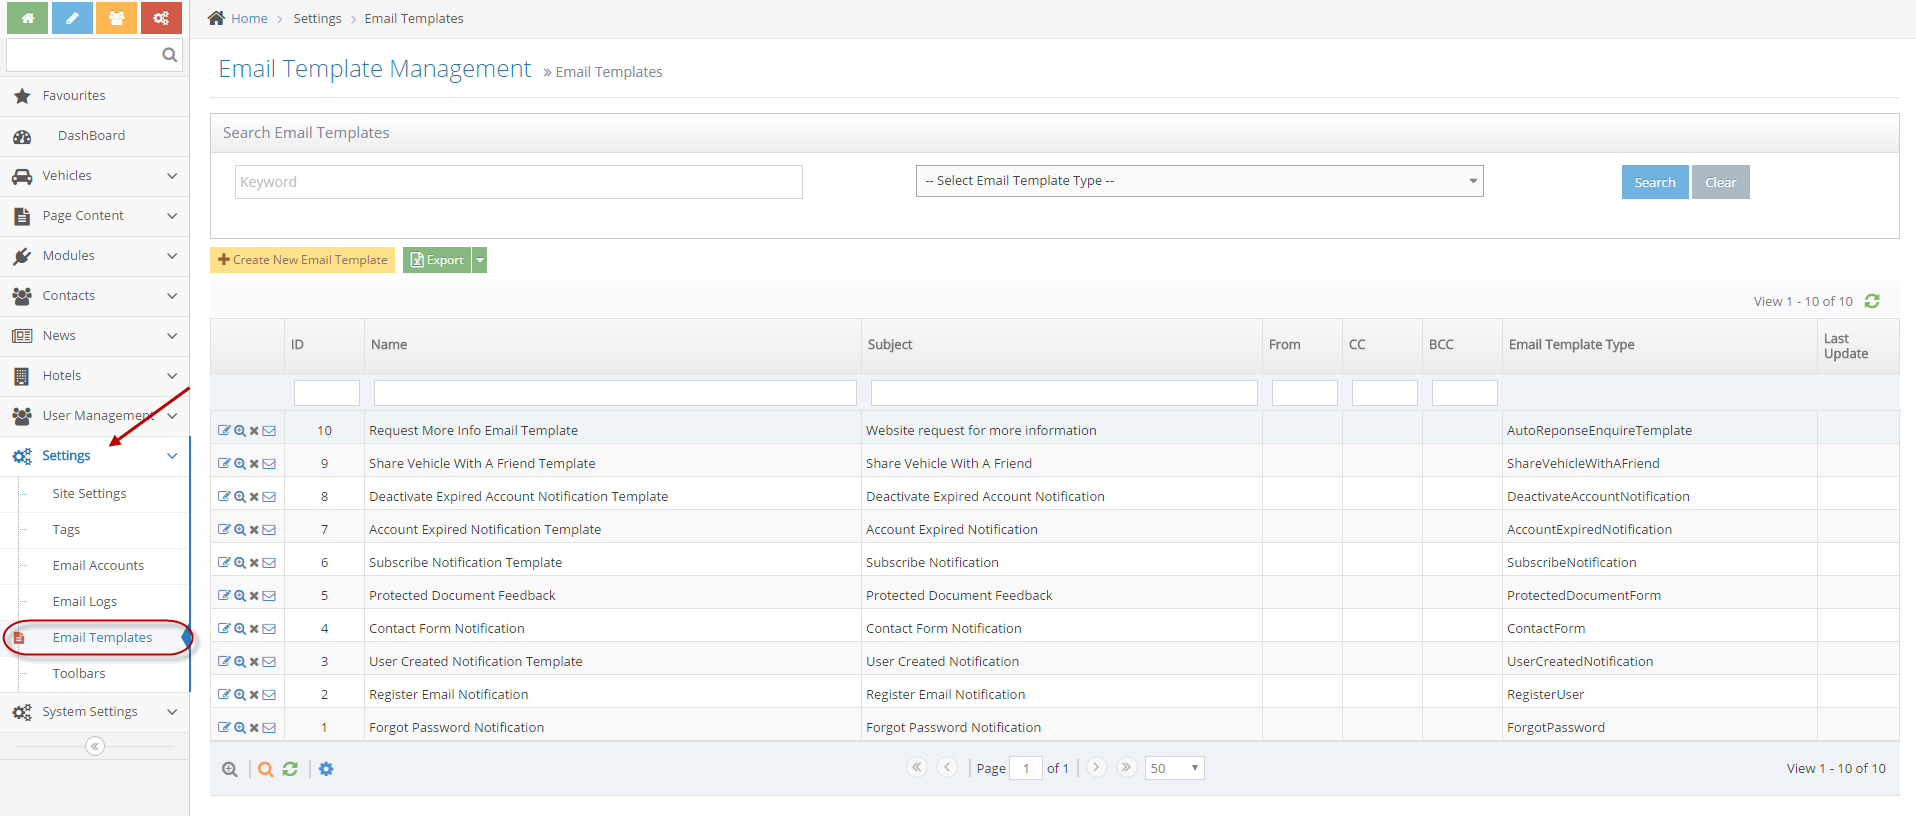
2Look for and click on Email Templates on the left menu panel under Settings
-
3A list of Templates should show, Scroll to look for Auto Response Email Template (Or the template you wish to edit)
-
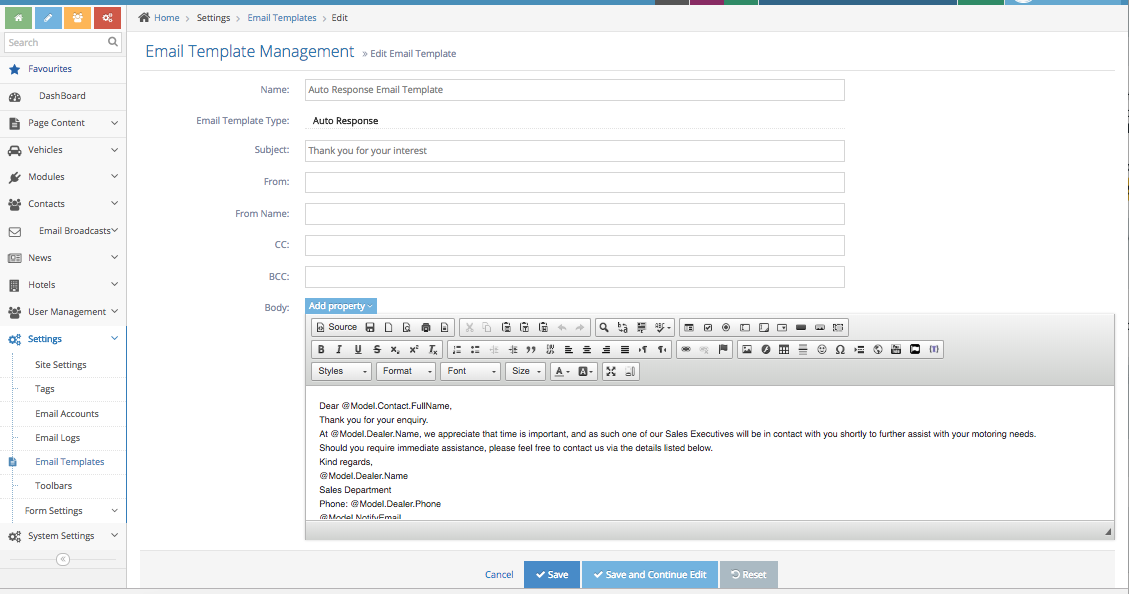
4Then click on the Edit icon
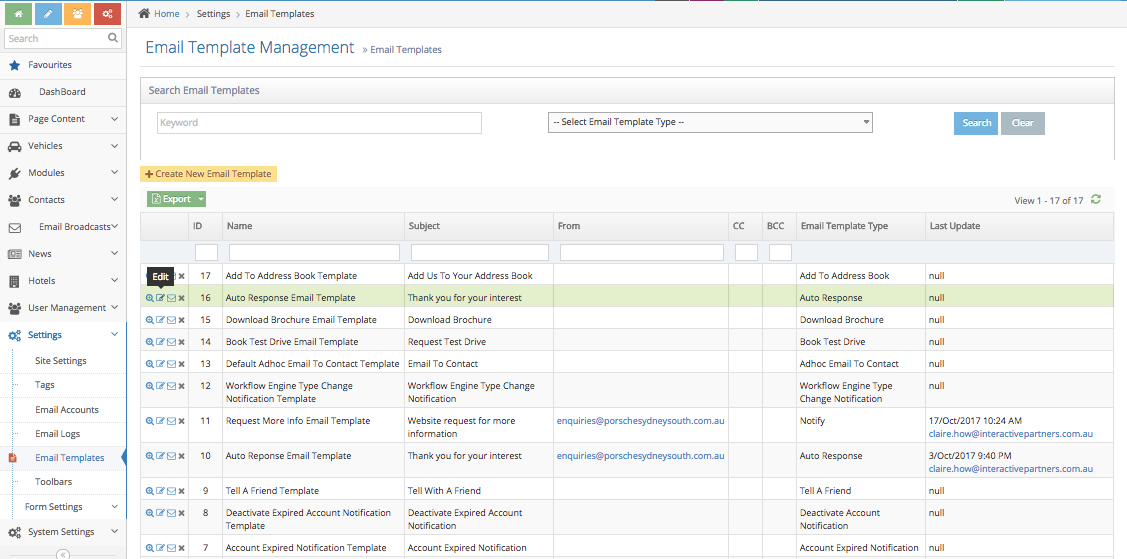
-
5The Template form should show - where you can edit the template body (Auto Response)
-
6Once the template has been finished, click on Save
Managing Vehicle Request More Info Site Setting
Vehicle Request Info Setting
After the user submits the form, the system needs to send information to the email addresses set up in this setting.
-
1Log in as an administrator and go to the Admin Dashboard.
Learn how to log in here → -
2Go to Site settings by selecting: Settings > Site Settings, then search for Vehicle Request More Info
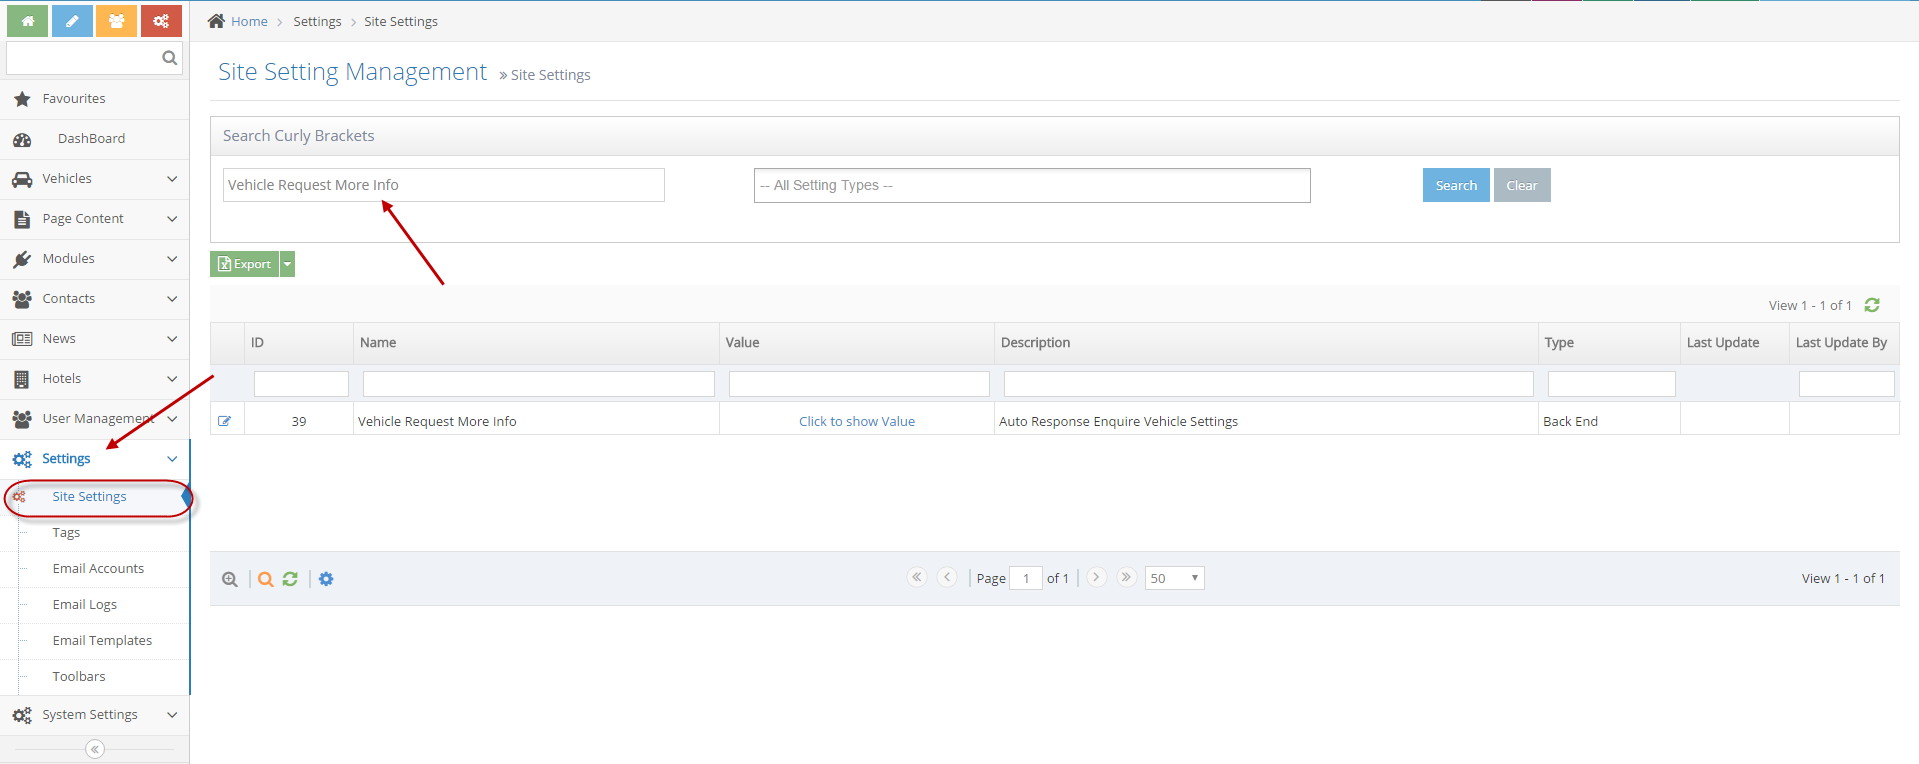
-
3Click the Edit icon to edit the settings
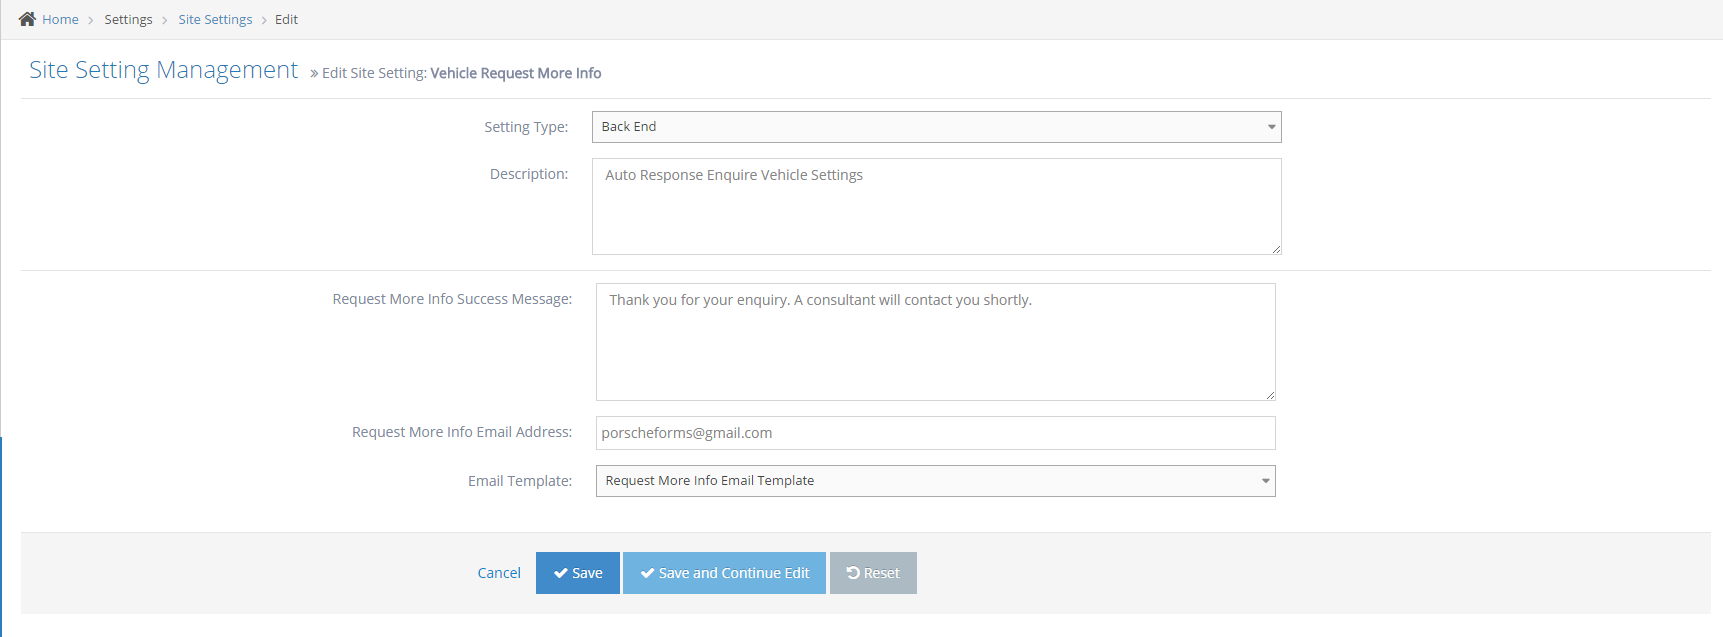
- Description: the description of the setting
- Request More Info Success Message: This text will display after the form submit
- Request More Info Email Address: List email addresses will receive form information, each email separate by comma or semicolon
- Email Template: The template will send to a list of Email Addresses
-
4Press Save or Save And Continue Edit to save
Configurating an Email Template
-
1Log in as an administrator and go to the Admin Dashboard.
Learn how to log in here → -
2Edit email template
- In the left menu, select Settings > Email Templates
- List email templates will list in the grid
-
3Find Request More Info Email Template

-
4Click the icon to edit the email template

- Name: Name of email template
- Subject: The subject of the email will send to list emails in Request More Info Email Address in site settings.
- From: Send From Email address
- From Name: The name to be displayed in the From field in the email
- CC, BCC: The list of the email address/es that also needs to receive the Request More Info email and separate them by comma or semicolon
- Body: Content of email template. Admin can be added more fields by clicking on Add Property button
-
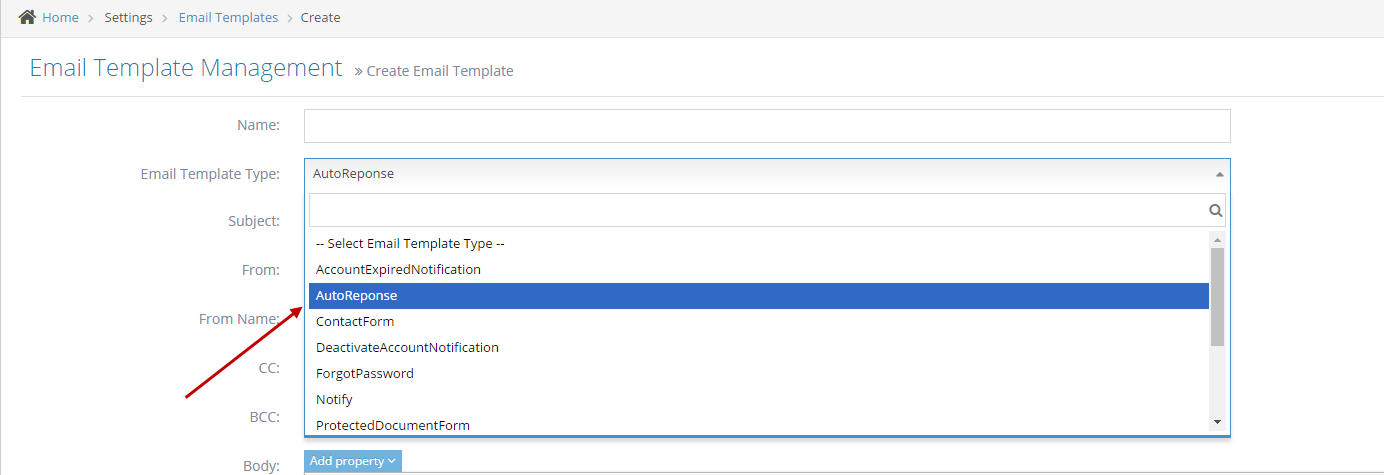
5Create a new email template
- Click Add New Email Template button to create
- Choose Email Template Type is AutoResponse in the select box
-
6Enter other information then press Create or Create And Continue Edit button to save.
-
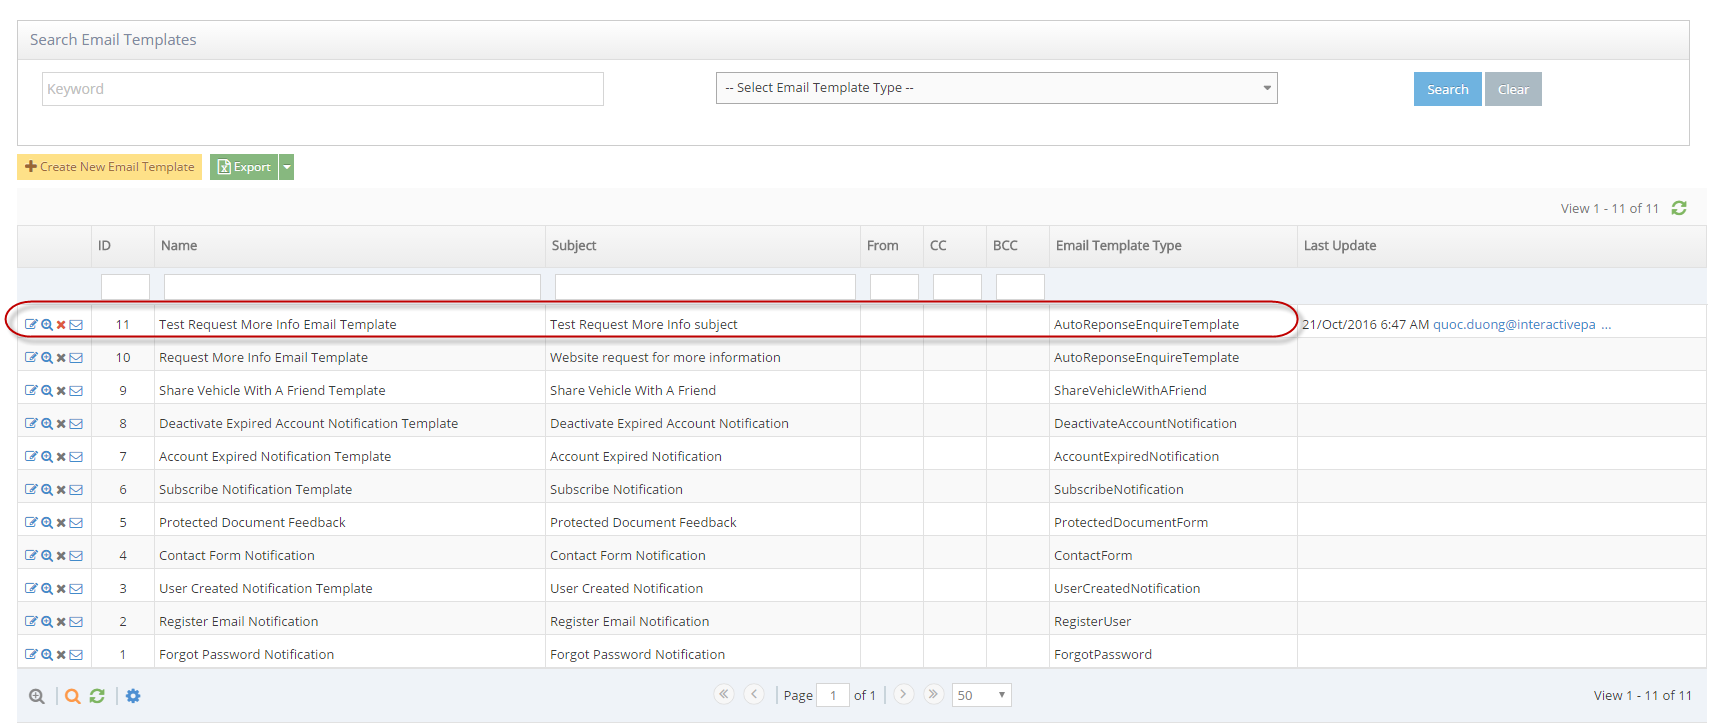
7A new email template will display in the grid
-
8Now, go back to Site Settings and then edit the Vehicle Request More Info setting.
-
9In the Email Template dropdown will display the new email template just created from the previous step
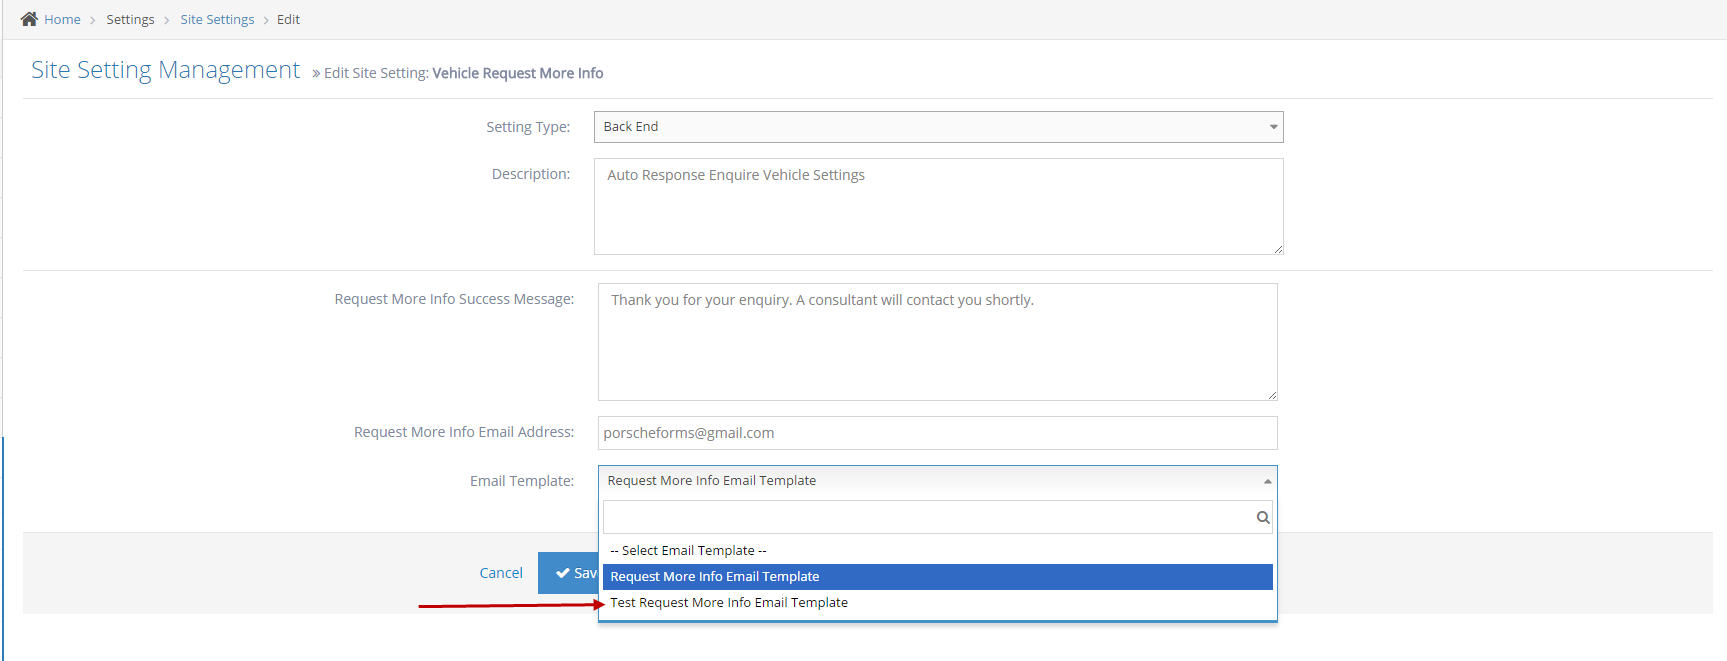
Vehicles Not Showing Up on the Website
The site is displaying vehicles with images only
Some vehicles may not show up on the website even if the data has been imported. This can be controlled in the admin module.
Your website is displaying only the vehicles that have images. You can check below if this is the case.
1. Checking your site settings
-
1Log in as an administrator and go to the Admin Dashboard.
Learn how to log in here → -
2Go to Settings > Site Settings
-
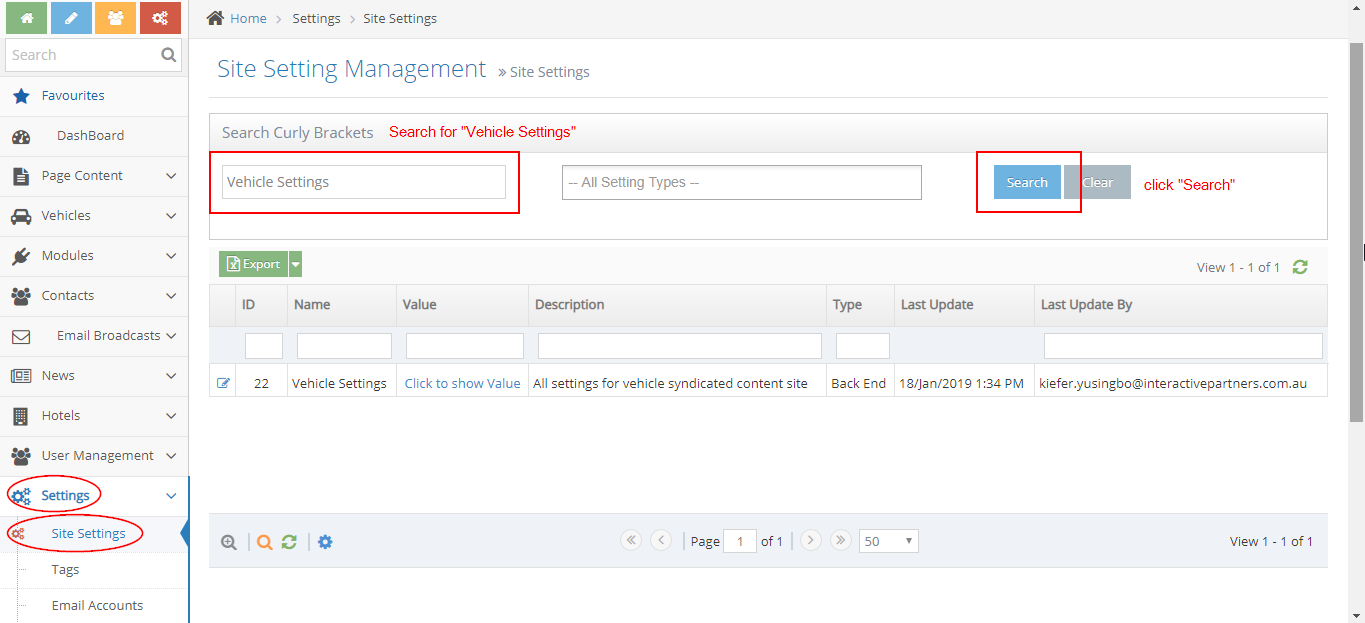
3On the Search bar, search for "Vehicle Settings"
-
4Click "Search"
-
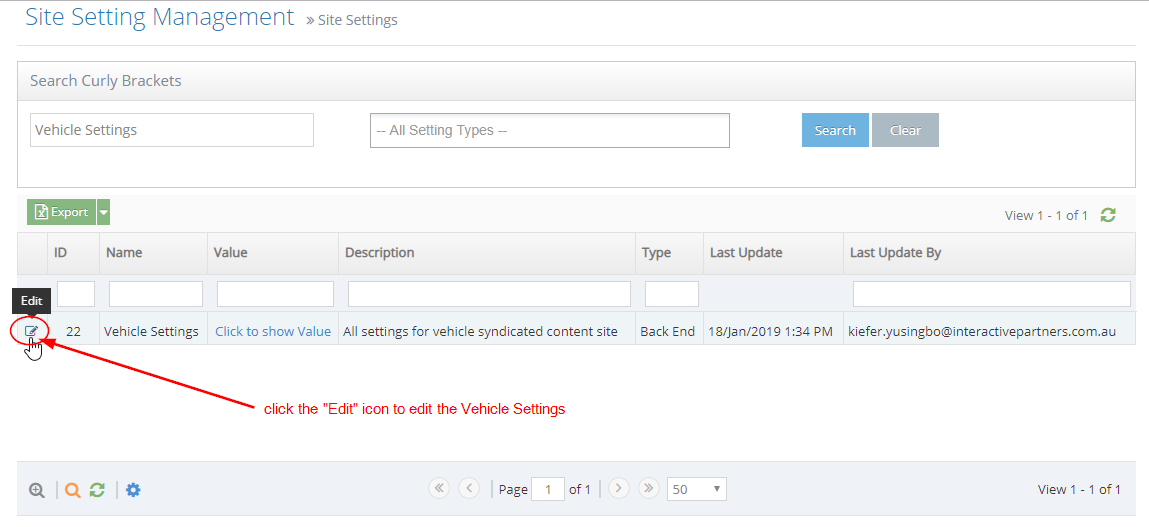
5Click the "Edit" icon on the left

-
6Scroll down to the checkbox "Only Display Vehicles Has Images"
- Checked - this means your page is displaying ONLY the vehicles with images
- The box is checked by default as best practice.
- Unchecked - this means your page is displaying vehicles with and without images
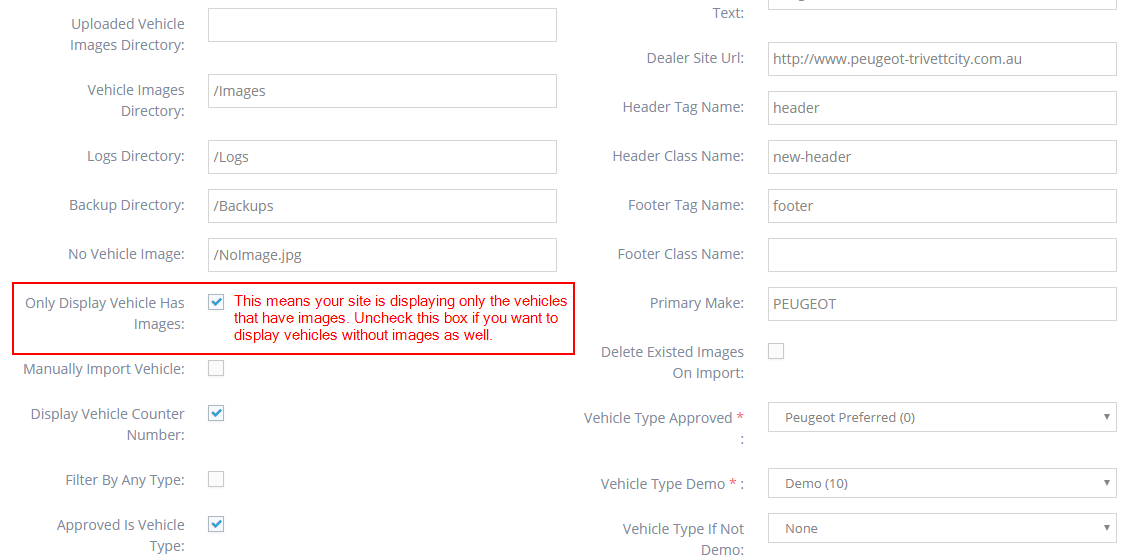
- Checked - this means your page is displaying ONLY the vehicles with images
Please be advised: If you want to display the vehicles without images, you may continue to step 2. However, it is recommended that you do not change this setting. You may contact your data provider to push the images for us to be able to receive them during import and display them on your site, without you having to change this setting.
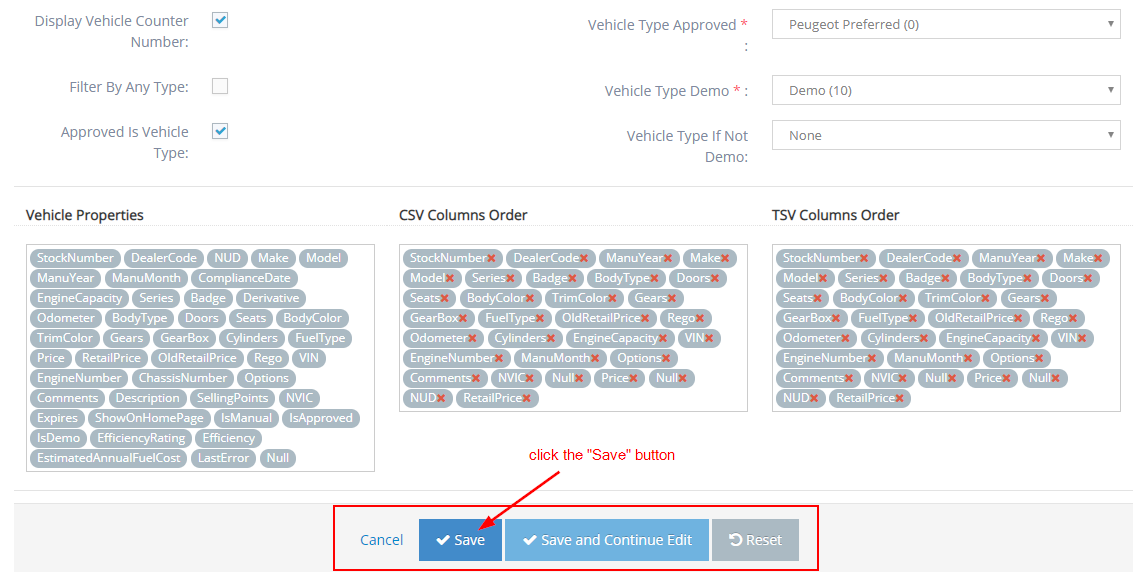
2. Changing the Site Settings
-
1Uncheck the box to display vehicles without images as well
-
2Click the "Save" button at the bottom of the page
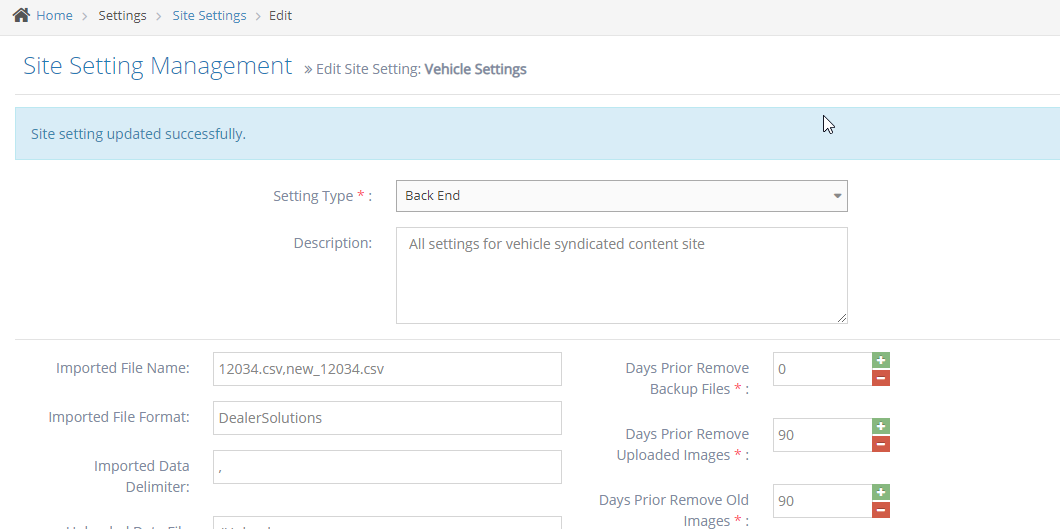
-
3You will see the message "Site Setting updated successfully" which indicates you have successfully made your update.
-
4You should now be able to see the vehicles without images on your website
-
5Previous results on your page:
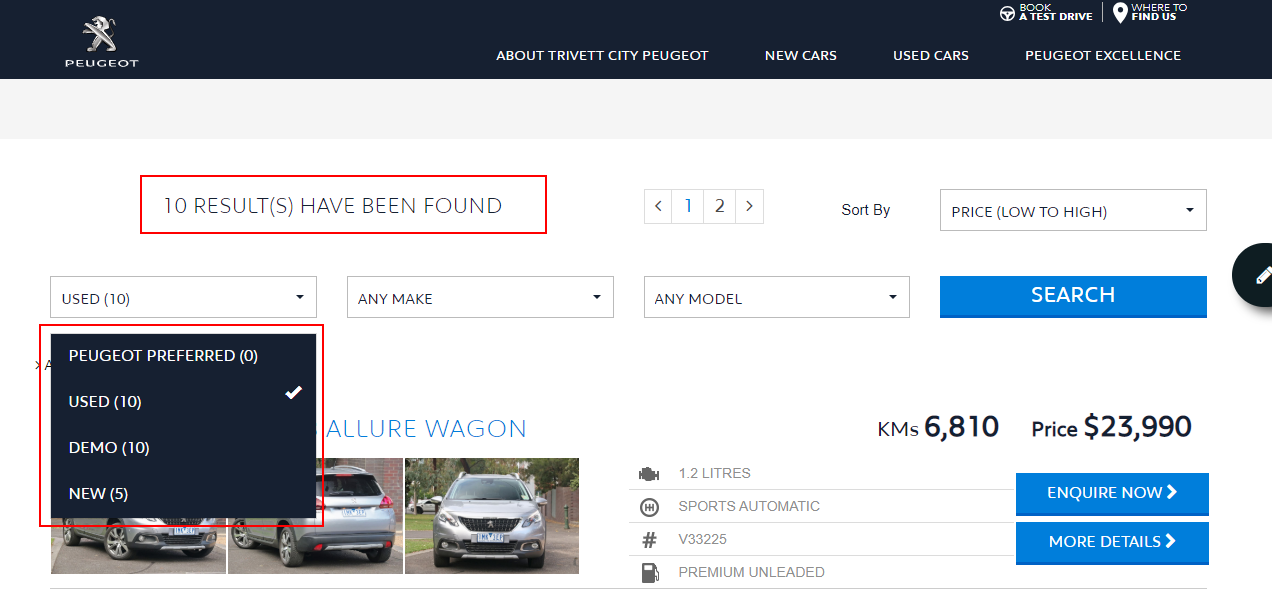
-
6After making the change:
Please be advised: The box is checked by default as best practice. If you change this setting, customers may end up getting frustrated because they can read the details of the vehicles but cannot see images, which is why it is recommended that your page only shows vehicles with images. If you want all your vehicles to have images displayed, please contact your data provider to push the images for us to be able to receive them during import and display them on your site, without you having to change this setting.
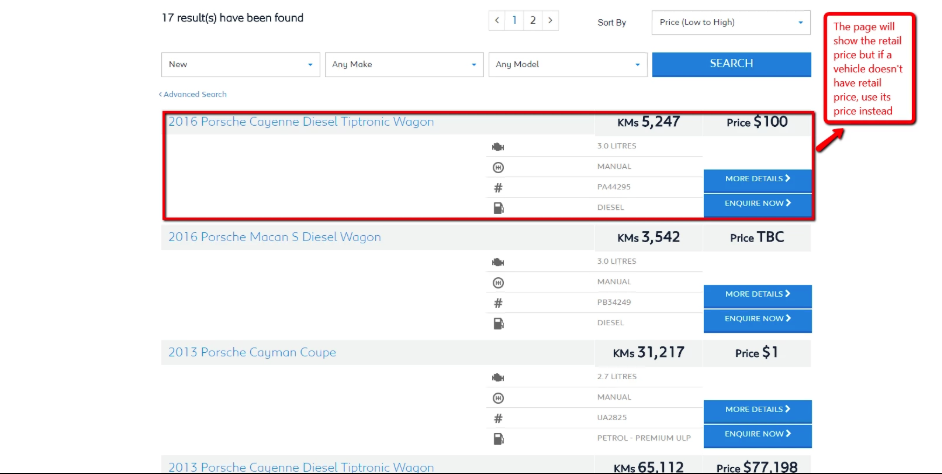
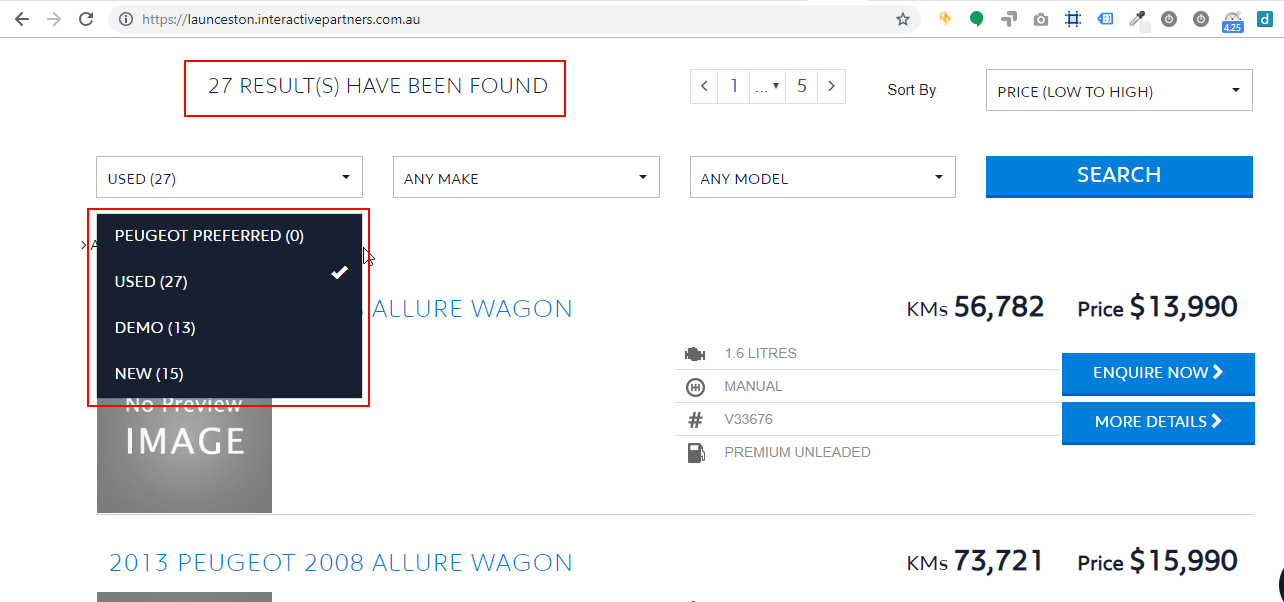
Selecting Which Price will be Displayed on Vehicle Listings
Vehicle Listing Pricing Overview
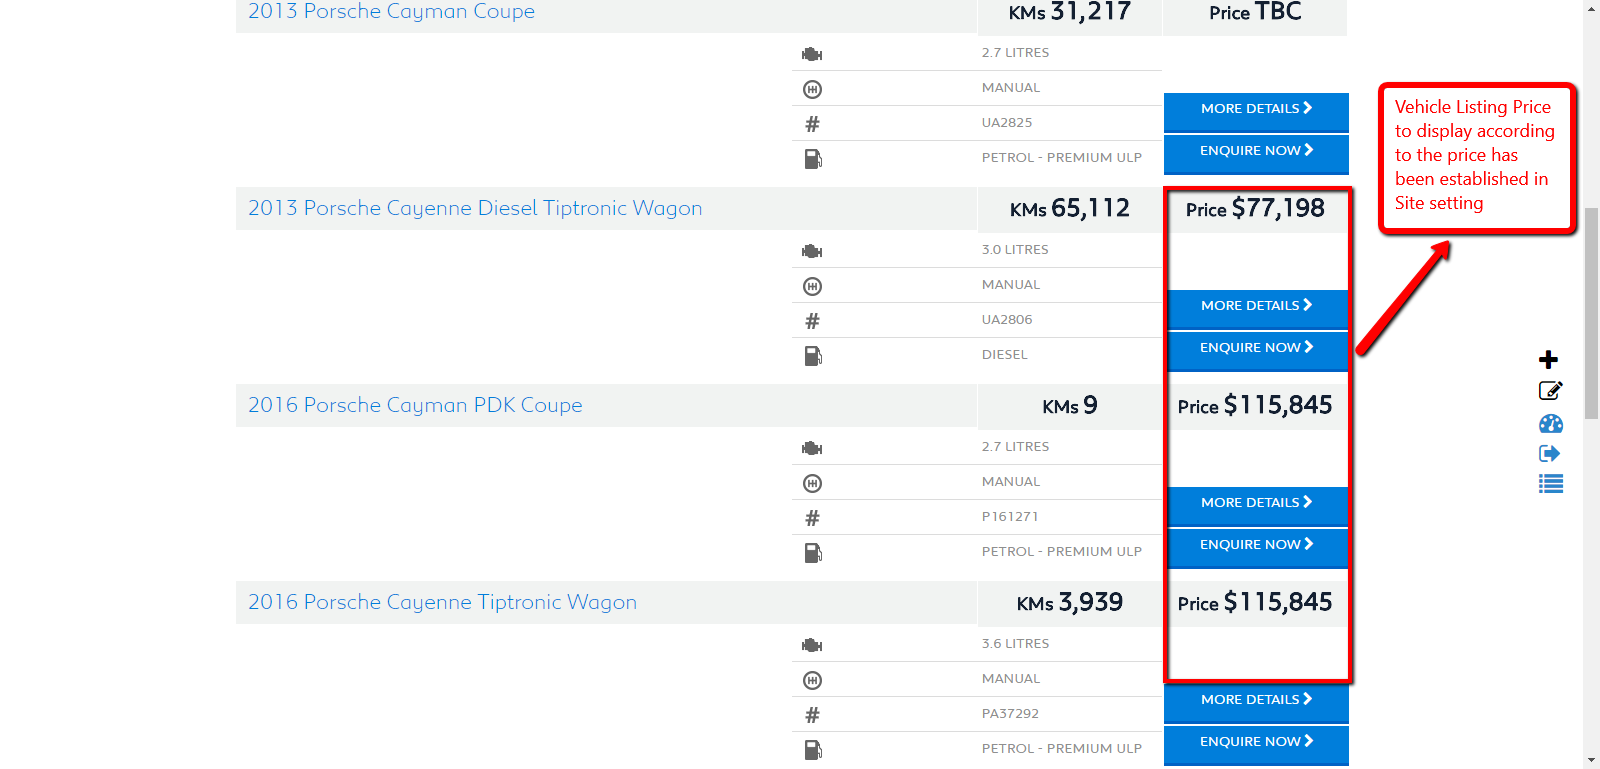
In the Vehicle Listing templates, we display the vehicle's price beside the mileage as shown below.

Vehicle Data
Most vehicles have 2 prices in the supplied data, the Drive Away price and the Base price
- Drive Away Price = The selling price of the car including any transfer fee, government taxes or dealer delivery
- Base Price = The base price of the car before any additional drive-away fees are added
As per ACC guidelines, it is recommended you always use the Drive Away price. This setting allows you to set the price displayed based on rules to suit your business which can be configured in the Admin Site Settings.
- You can also set the text to display if there is no price available, the default is TBC (To Be Confirmed)
- At times, you may not have both prices set for a Vehicle in your Dealer Management System (DMS)
- The data displayed on your listing will be the same as the data you have entered in your DMS
Drive Away vs Base Price
- Use Drive Away Price - always use the Drive Away Price. If the drive-away price is not available, then TBC (to be confirmed) will be displayed
- Use Base Price - always use the Base Price. If the drive-away price is not available, then TBC (to be confirmed) will be displayed
- Use Drive Away Price if available else use Base Price - Use the Drive Away Price.
- If the drive-away price is not available, then Base Price will be displayed.
- If neither price is available, then TBC (to be confirmed) will be displayed
- Use Base Price if available else use Drive Away Price - Use the Base Price.
- If the Base price is not available, then the Drive Away Price will be displayed.
- If neither price is available, then TBC (to be confirmed) will be displayed
- No Price Text
- If the rules are set that no price can be displayed (for example, you may set Use Drive Away Price but there is no value entered in your DMS for Drive Away Price)
- The text to display instead of the price is used
- The default text is TBC but this can be changed to any value you wish
- Just be careful of the text length and test to ensure it matches the space available on your listing page
Follow the step-by-step guide to configure your listing price.
Selecting Price for a Vehicle Listing
-
1Log in as an administrator and go to the Admin Dashboard.
Learn how to log in here → -
2Go to any page on your site
-
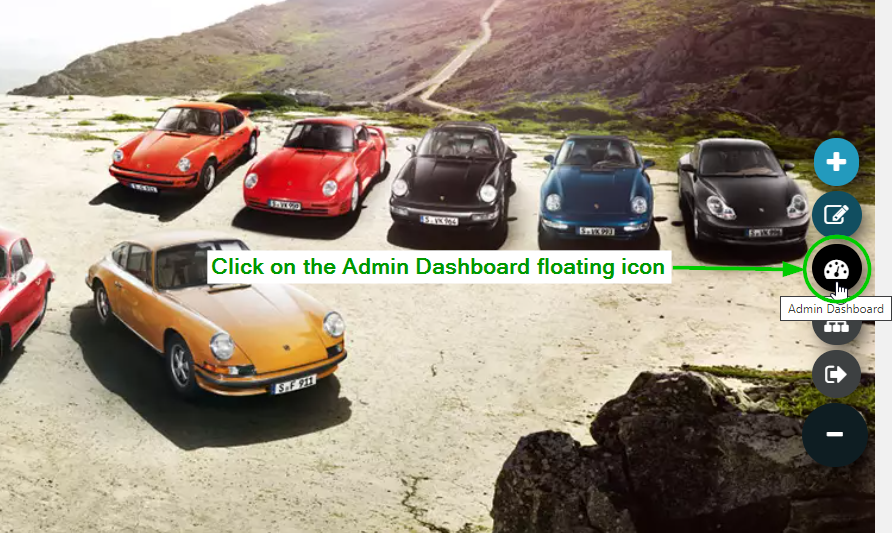
3Hover on the floating icons to the right of the page
-
4Click on the Admin Dashboard icon
-
5Once you're in the Admin Dashboard, click Settings from the left panel
-
6Select Site Settings
-
7You will be directed to the Site Setting Management page
-
8Under Search Curly Brackets, on the first field, enter "price" then click the Search button to the right
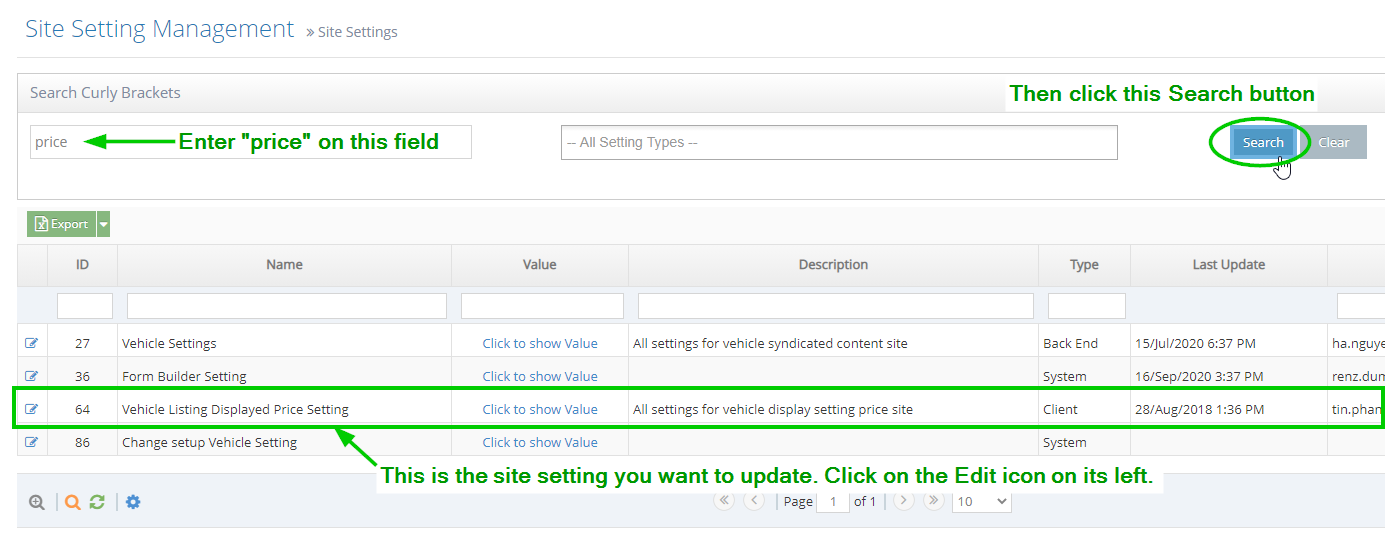
-
9The results will be displayed in the grid
-
10The site setting that controls the displayed price is the Vehicle Listing Displayed Price Setting
-
11Click on the Edit icon on its left
-
12You will be taken to the Edit page for this setting
-
13In the Price field, you can select the price you want to display in the listing:
- Use Drive Away Price
- Use Base Price
- Use Drive Away Price if available else use Base Price
- Use Base Price if available else use Drive Away Price
-
14In the No Price Text field, enter the text you want to show if the vehicle has no price (allow empty)

-
15Once done, click Save or Save and Continue Edit
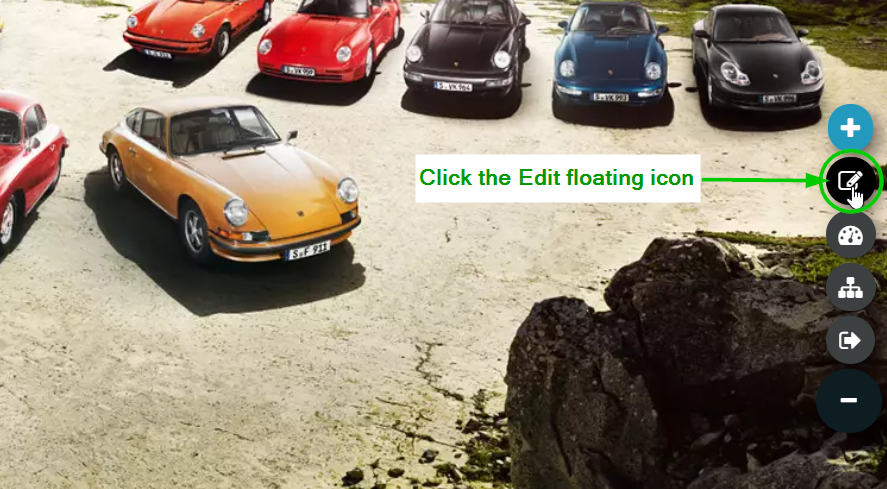
Adding a Vehicle Listing on a Page
Adding a Vehicle Listing via Edit Page
-
1Log in as an administrator and go to the Admin Dashboard.
Learn how to log in here → -
2Go to the page you want to add the vehicle listing to
-
3Hover on the floating icons to the right of the page
-
4Click on the Edit floating icon
-
5In the content editor, choose icon "{T}" to add curly bracket
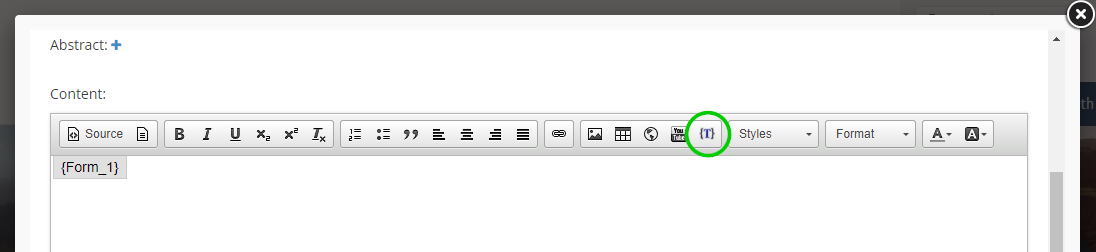
-
6The Select Curly Bracket window will appear
-
7Search for the vehicle listing curly bracket by entering "vehicle" on the search field
-
8Click on the Vehicle Listing curly bracket
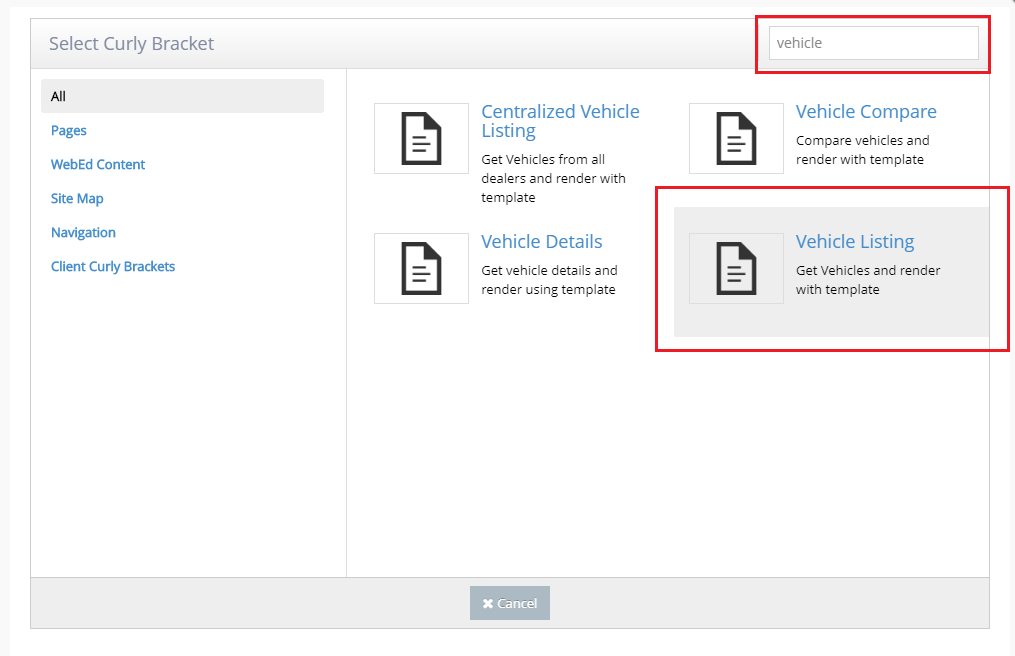
-
9Configure your Vehicle Listing curly bracket
- Enable search: Check = enable , uncheck = disable
- Types: choose the vehicle type you want to show
- Show All Vehicle type filter: Check = dropdown list vehicle type have all vehicle types
- Make: input the vehicle's make you want to show (allow empty)
- Model: input the vehicle's model you want to show (allow empty)
- Stock Number: input the vehicle's stock number you want to show (allow empty)
- Total: total vehicle shown in the listing (empty means show all)
- Page Size: number of the vehicle displayed on 1 page (we recommend 10)
- Template Name: select your preferred template for display
- Exclude Make-Model in Sort Options: Check = excludes Make and Model
-
10Preview is displayed on the right of the configuration fields
-
11If you are satisfied with the configuration, scroll down to the bottom of the window and click the Insert button
-
12Click Save or Save and Continue Edit on your page editor as usual
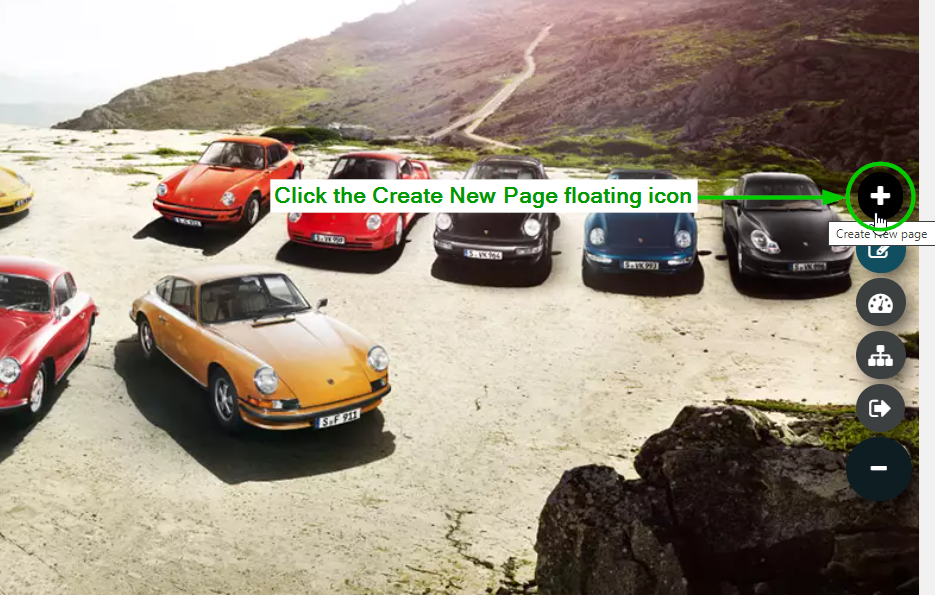
Adding a Vehicle Listing on a New Page
-
1Log in as an administrator and go to the Admin Dashboard.
Learn how to log in here → -
2Go to the page you want to add the vehicle listing to
-
3Hover on the floating icons to the right of the page
-
4Click on the Create floating icon
-
5In the content editor, choose icon "{T}" to add curly bracket
-
6The Select Curly Bracket window will appear
-
7Search for the vehicle listing curly bracket by entering "vehicle" on the search field
-
8Click on the Vehicle Listing curly bracket
-
9Configure your Vehicle Listing curly bracket
- Enable search: Check = enable , uncheck = disable
- Types: choose the vehicle type you want to show
- Show All Vehicle type filter: Check = dropdown list vehicle type have all vehicle types
- Make: input the vehicle's make you want to show (allow empty)
- Model: input the vehicle's model you want to show (allow empty)
- Stock Number: input the vehicle's stock number you want to show (allow empty)
- Total: total vehicle shown in the listing (empty means show all)
- Page Size: number of the vehicle displayed on 1 page (we recommend 10)
- Template Name: select your preferred template for display
- Exclude Make-Model in Sort Options: Check = excludes Make and Model
-
10Preview is displayed on the right of the configuration fields
-
11If you are satisfied with the configuration, scroll down to the bottom of the window and click the Insert button
-
12Click Save or Save and Continue Edit on your page editor as usual
Vehicle Listing Sort Options
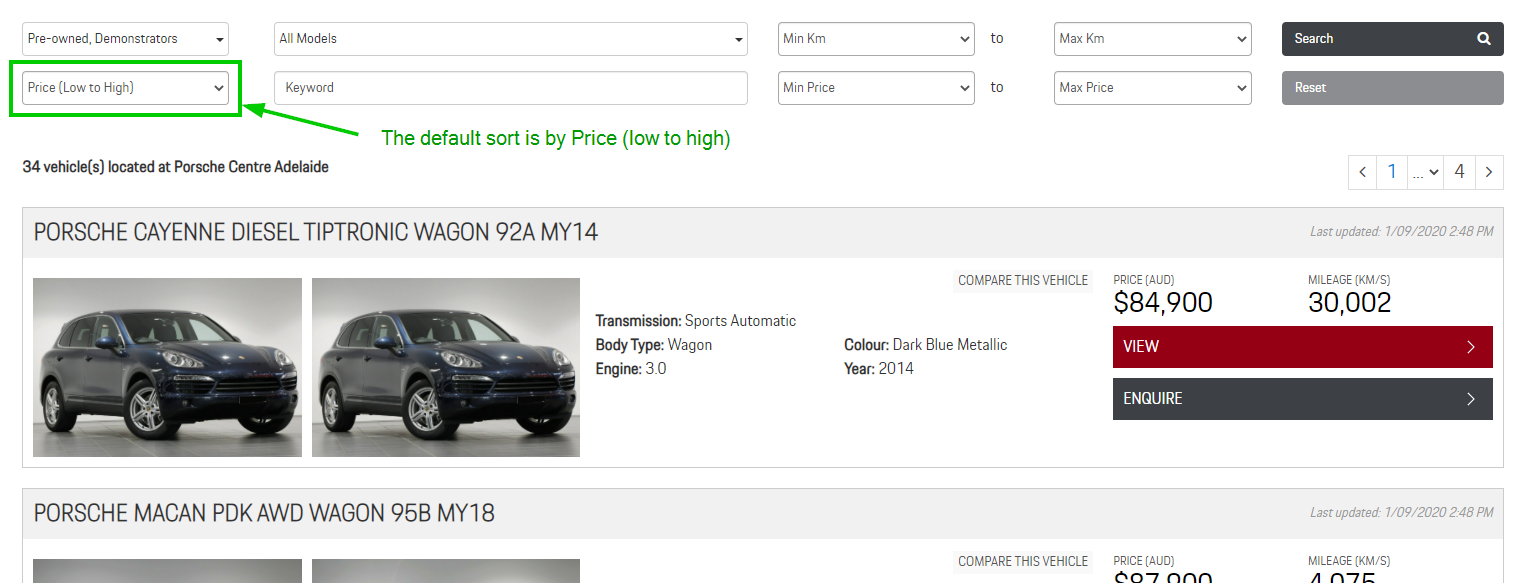
Vehicle Listing Sort Options Overview
On the front end, vehicles displayed using the VehicleListing curly bracket can be sorted by:
- Featured - highlighted vehicles are sorted by record orders in the Admin Vehicle Setting, the administrator can control this.
- Price (low to high or high to low) - vehicles are sorted based on the price data. The administrator can set it to use the Drive Away price or the Base price, learn more.
- Kms (low to high or high to low) - vehicles are sorted based on the mileage (Kms) data.
- Year Made (low to high or high to low) - vehicles are sorted based on the year-made data.
- Last Updated - vehicles are sorted based on the latest imported data.
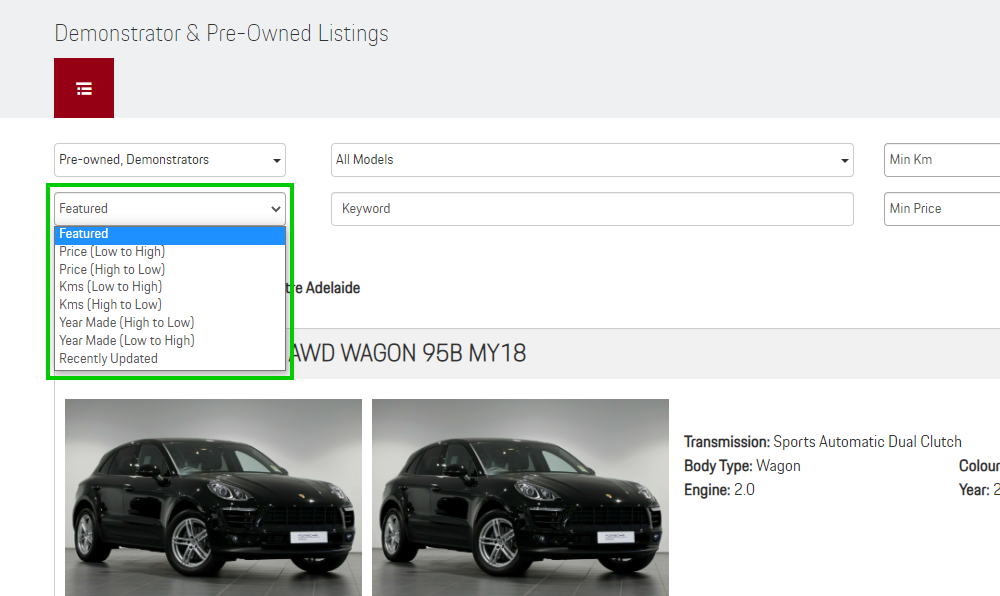
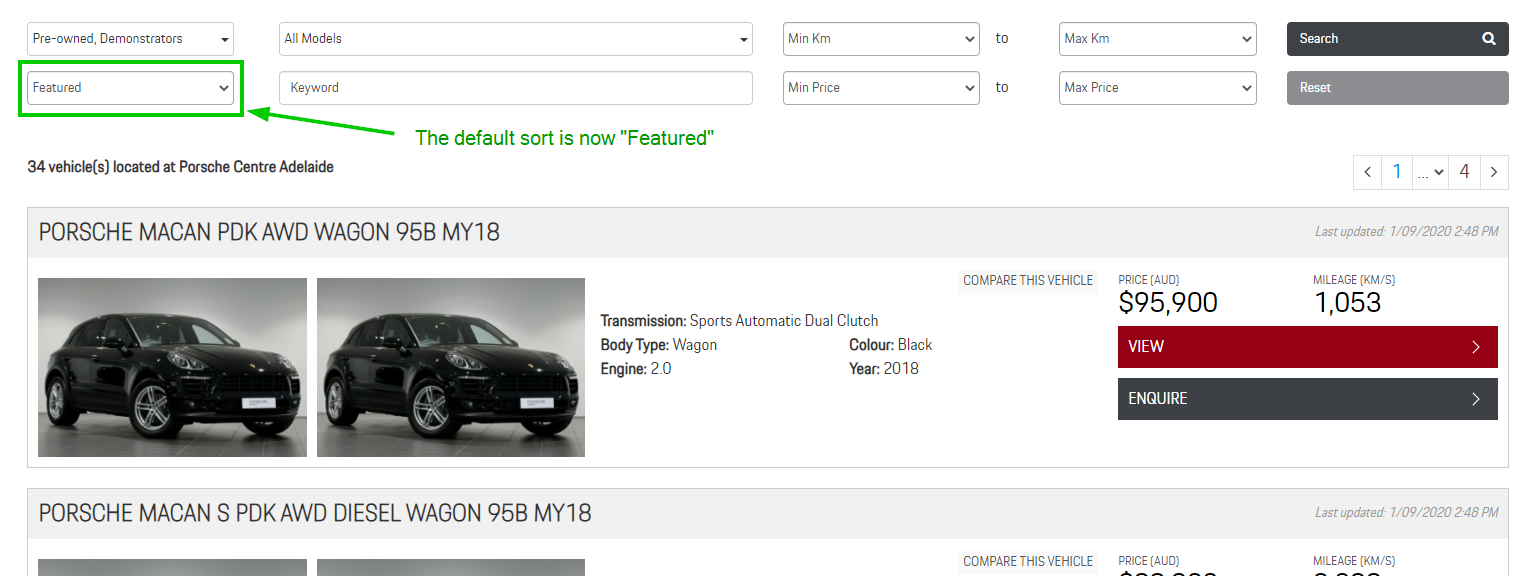
Why you would use Featured as a vehicle sorting option
The default sorting option for vehicles in a vehicle listing is Sort by Price (low to high), but, having Featured vehicles as a sorting option is useful if the administrator wants to "feature" vehicles regardless of the price, mileage, year or last update. The administrator can add the Featured option in the site settings.
Follow the steps below to add Featured as an option on your listing.
Managing the Vehicle Listing Sort Options
-
1Log in as an administrator and go to the Admin Dashboard.
Learn how to log in here → -
2Once you're in the Admin Dashboard, from the left pane, click Settings > Site Setting
-
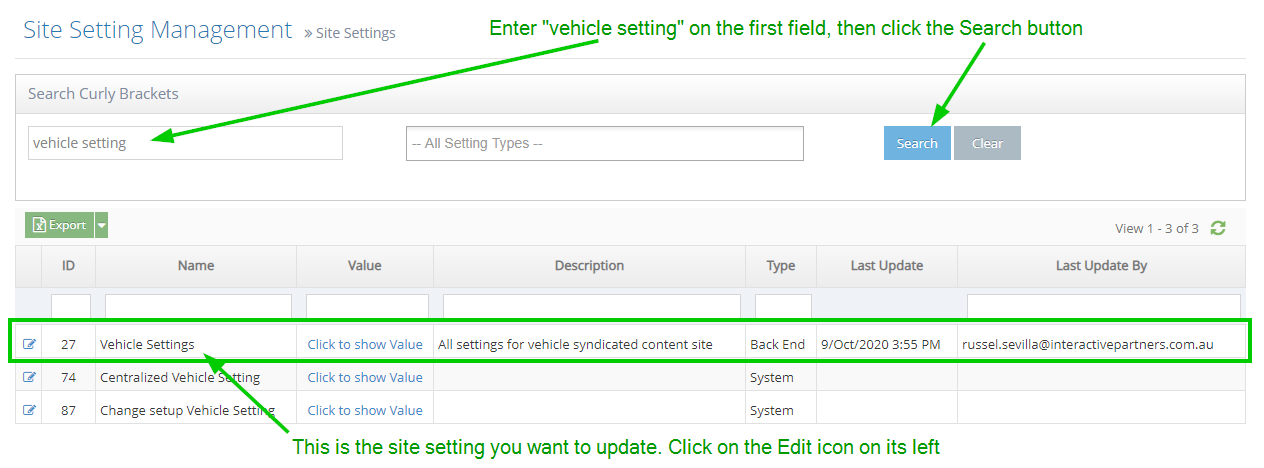
3UnderSearch Curly Brackets, on the first field, enter"vehicle setting"then click theSearchbutton to the right
-
4The results will be displayed in the grid
-
5The site setting that controls the displayed price is theVehicle Settings
-
6Click on theEditicon on its left
-
7You will be taken to the Edit page for this setting
-
8Once you're in the Edit Site Setting: Vehicle Settings, scroll down to the bottom
-
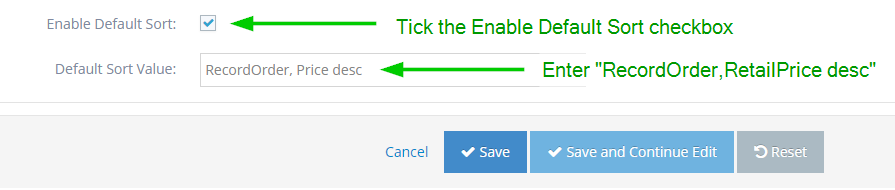
9Tick the checkbox for Enable Default Sort
-
10And enter "RecordOrder, Price desc" or "RecordOrder, Price asc" on the Default Sort Value field
- This means the default sort on the vehicle listing will be the record order, then the price (descending or ascending)
-
11Click Save or Save and Continue Edit
-
12Go back to the vehicle listing on the front end
-
13Notice that the default sort is now "Featured"
-
14The visitor can always change this by clicking on another sorting option