Curly Bracket Overview
Curly Bracket functions are placed within an editor on the relevant page or page area such as a highlight. Admin can customise the data to show on the frontend.
Why you would use Curly Bracket Function
Curly bracket functions are designed to hide complexity from the editor from the content editor and provide a simple database UI for content to be updated. Curly Bracket output is controlled by templates which allow for designer control of the look and feel of the output.
Usually used for lists of items such as news listings, vehicles, testimonials etc. Most modules make use of a curly bracket function. It also allows for different lists of items to be displayed in different ways. is very useful when a user wants to add modules or plugins to pages or sections. A user can implement a curly bracket without technical knowledge or using any code like HTML or script, the reason why a curly bracket is one of the key features in WebEd9 CMS.
How to add a Curly Bracket to Page Content
via Front-End Editor
-
1Log in as an administrator and go to the Admin Dashboard.
Learn how to log in here → -
2On the page you want to update, click on the Edit page icon to start.

-
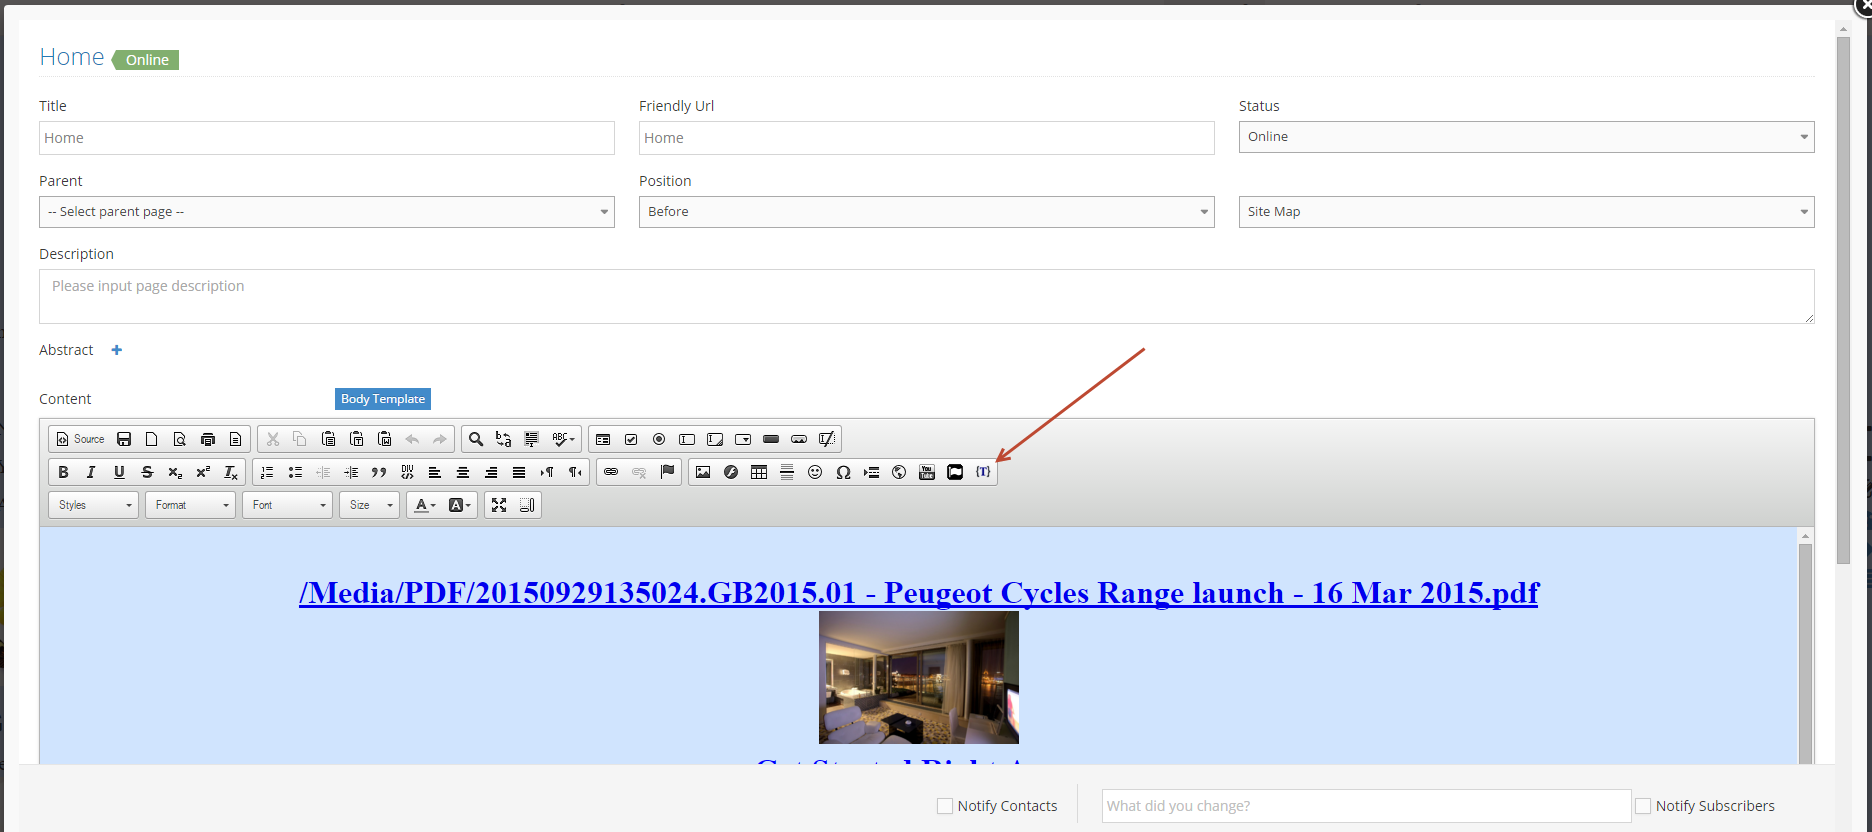
3In the new popup, click the icon to find a Curly Bracket

-
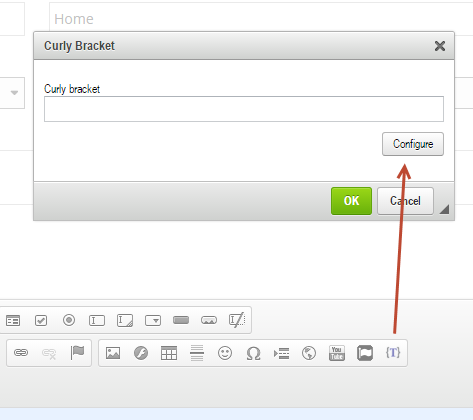
4In the new popup, click the Configure button
-
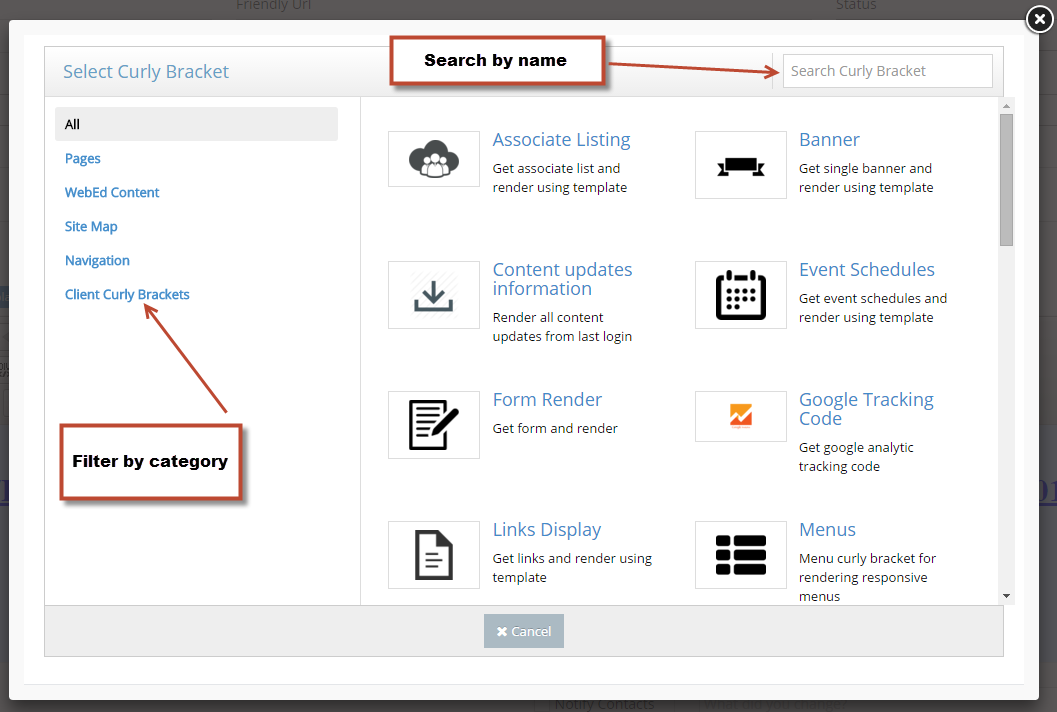
5List Curly Brackets: Search the Curly Bracket by category in the left column or enter a part of the name in the textbox in the top right.
-
6Each Curly Bracket has different configurable parameters which make it easy to control the content displayed.
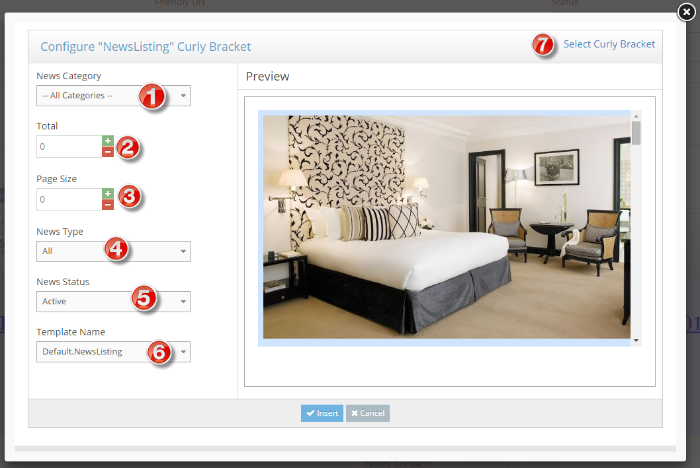
Configure parameters of a Curly Bracket:- For example, News Listing Curly Bracket
- (1)- News Category: select a category in the drop-down list or all categories
- (2)- Total: Enter the number of items to display, and enter zero to show all items
- (3)- Page size: enter a number to limit the number of items displayed per page and zero to show all
- (4)- Type: select a news type to display (There are two types: General and Hot)
- (5)- Status: select a status (Active, Inactive, Archive)
- (6)- Template Name: select a template to display news items.
- (7)- Select Curly Bracket: choose another Curly Bracket
- Preview: A simple view to review news and template before completing configuration.
-
7Click the Insert button to complete configure step.
-
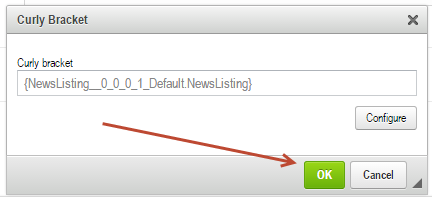
8Click OK in a small popup to complete.
-
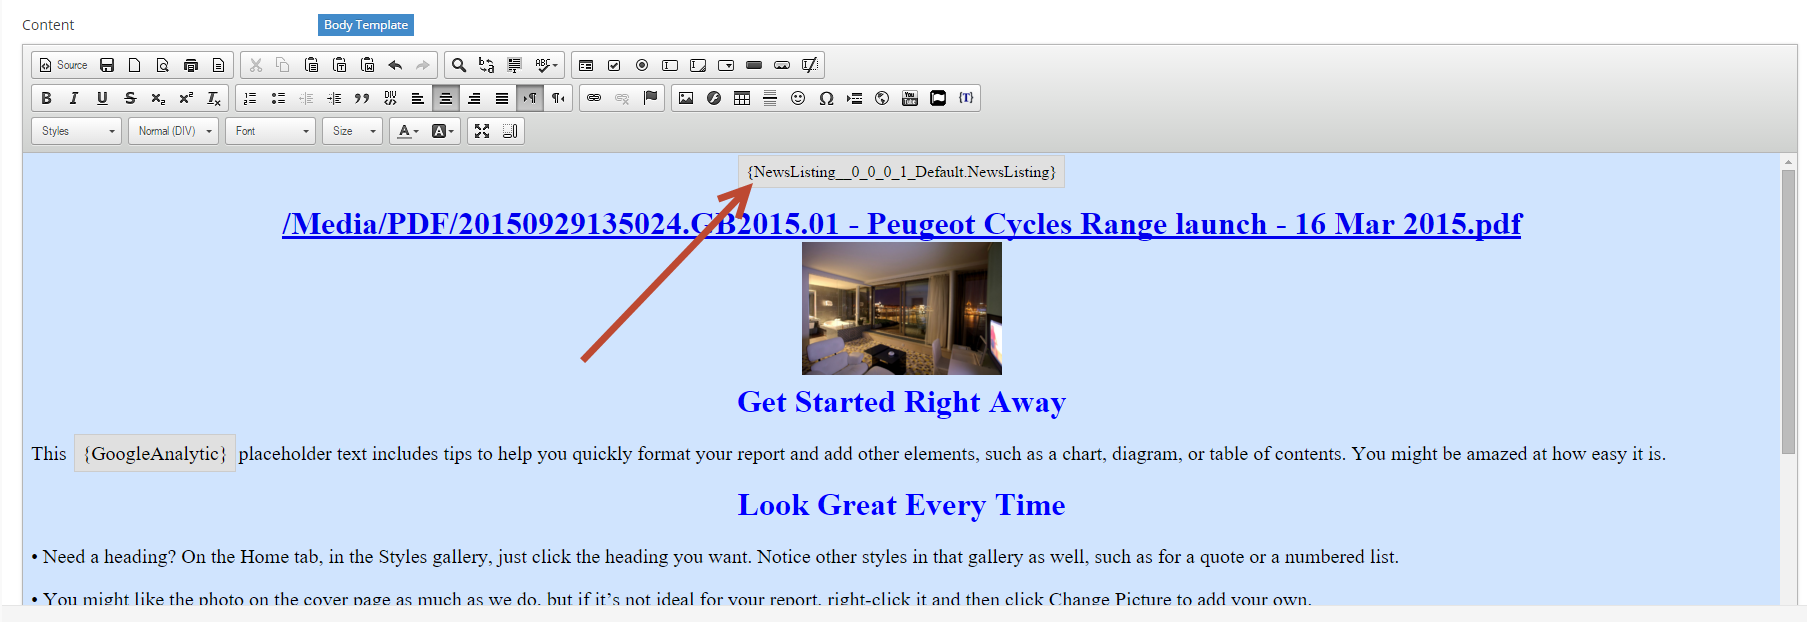
9The Curly Bracket will display a preview of the content of a page.
-
10Click Update and Close to view the result.
Using Templates to Format the Output
NB! Default Curly Brackets shouldn't be edited and/or updated as the default ones will be updated by the system to defaults. To make a custom template, first, copy the Default Curly Bracket and rename it. You can then edit as needed.
via Admin Panel
-
1Log in as an administrator and go to the Admin Dashboard.
Learn how to log in here → -
2In the left menu, select: System Settings > Module Management > Curly Bracket Tags

-
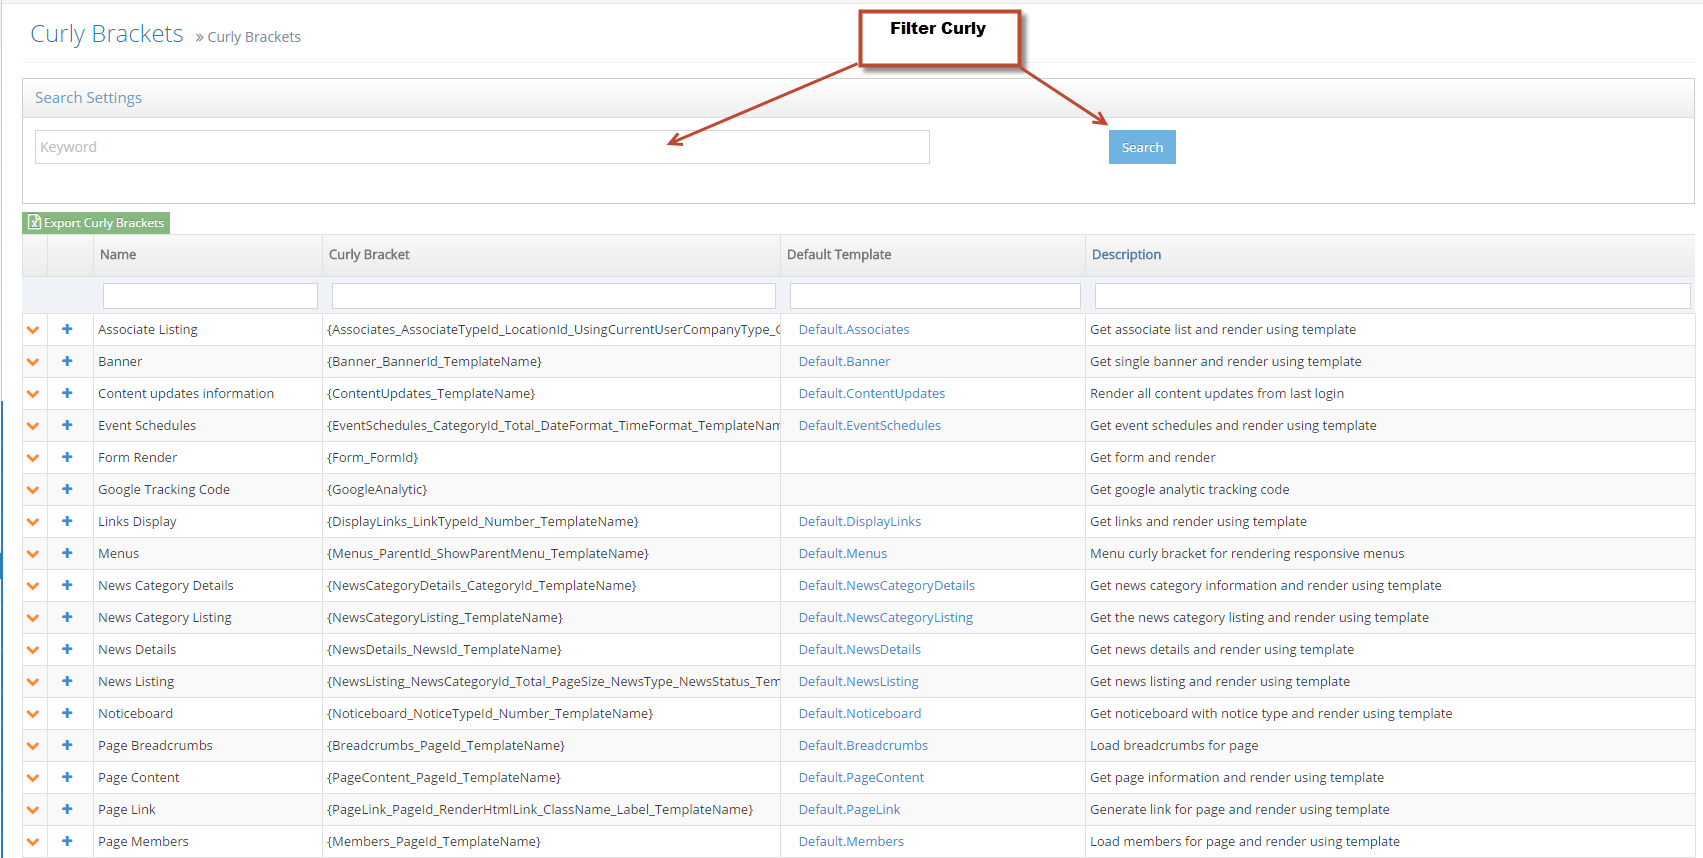
3In the grid, the list Curly Bracket will be displayed with Name, Curly Bracket, Template Name, and Description. Also, allow a quick search for a Curly Bracket.
-
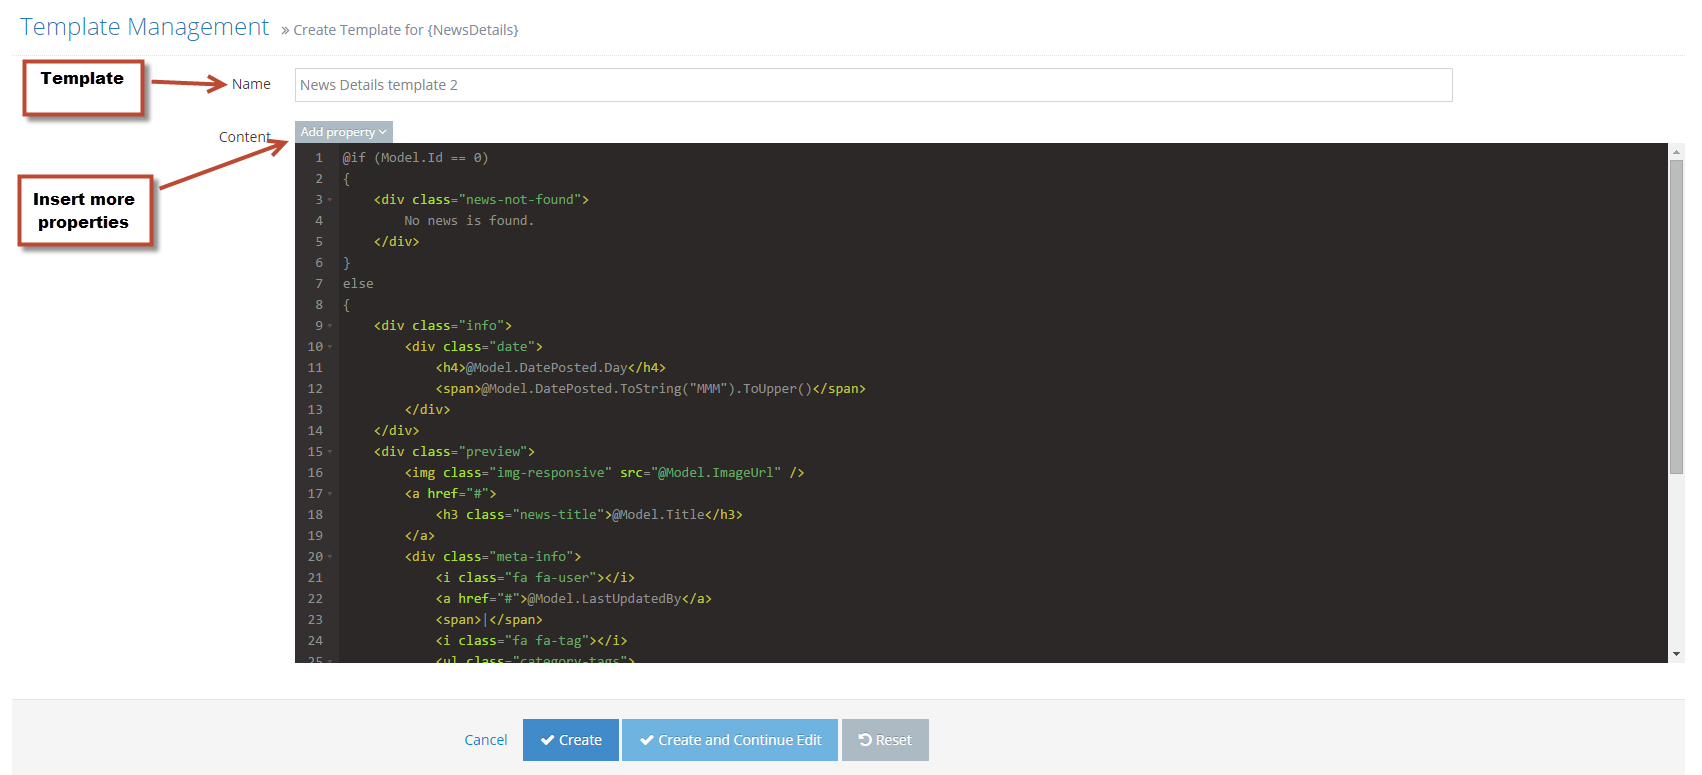
4Add a new Template for Curly Bracket by clicking the

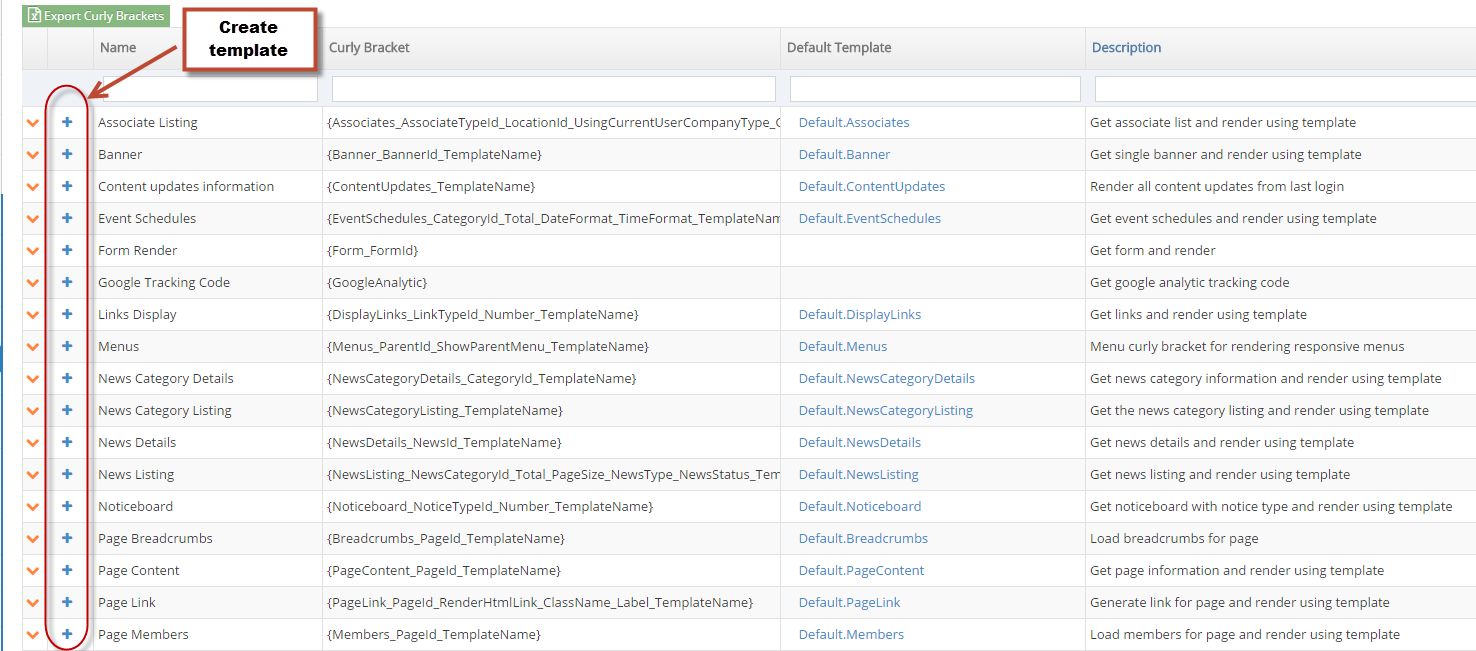
- Name: Template name is required and not allow duplicate.
- Content: A default content will be displayed, Admin should be added more properties by clicking on Add Property select-box.
-
5Click Create or Create and Continue Edit to save the template.
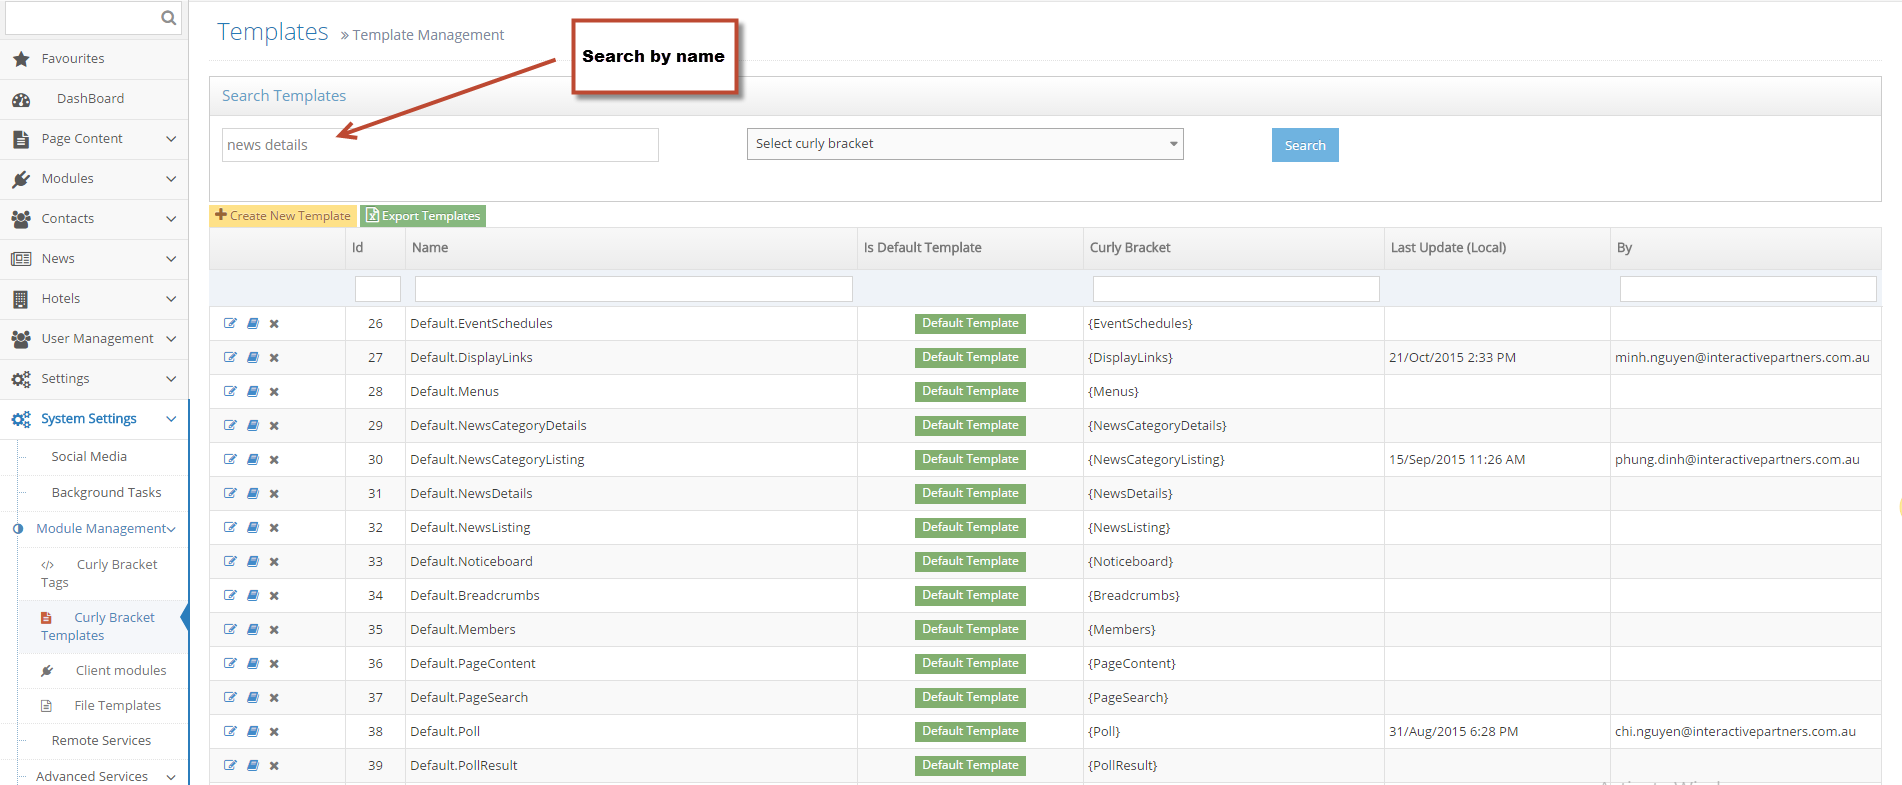
- Edit Curly Bracket template:
- In the left menu, select: System Settings > Module Management > Curly Bracket Templates
- Search for a template to modify
- Edit Curly Bracket template:
-
6Click the icon to edit, click Save or Save and Continue Edit to save changes.

-
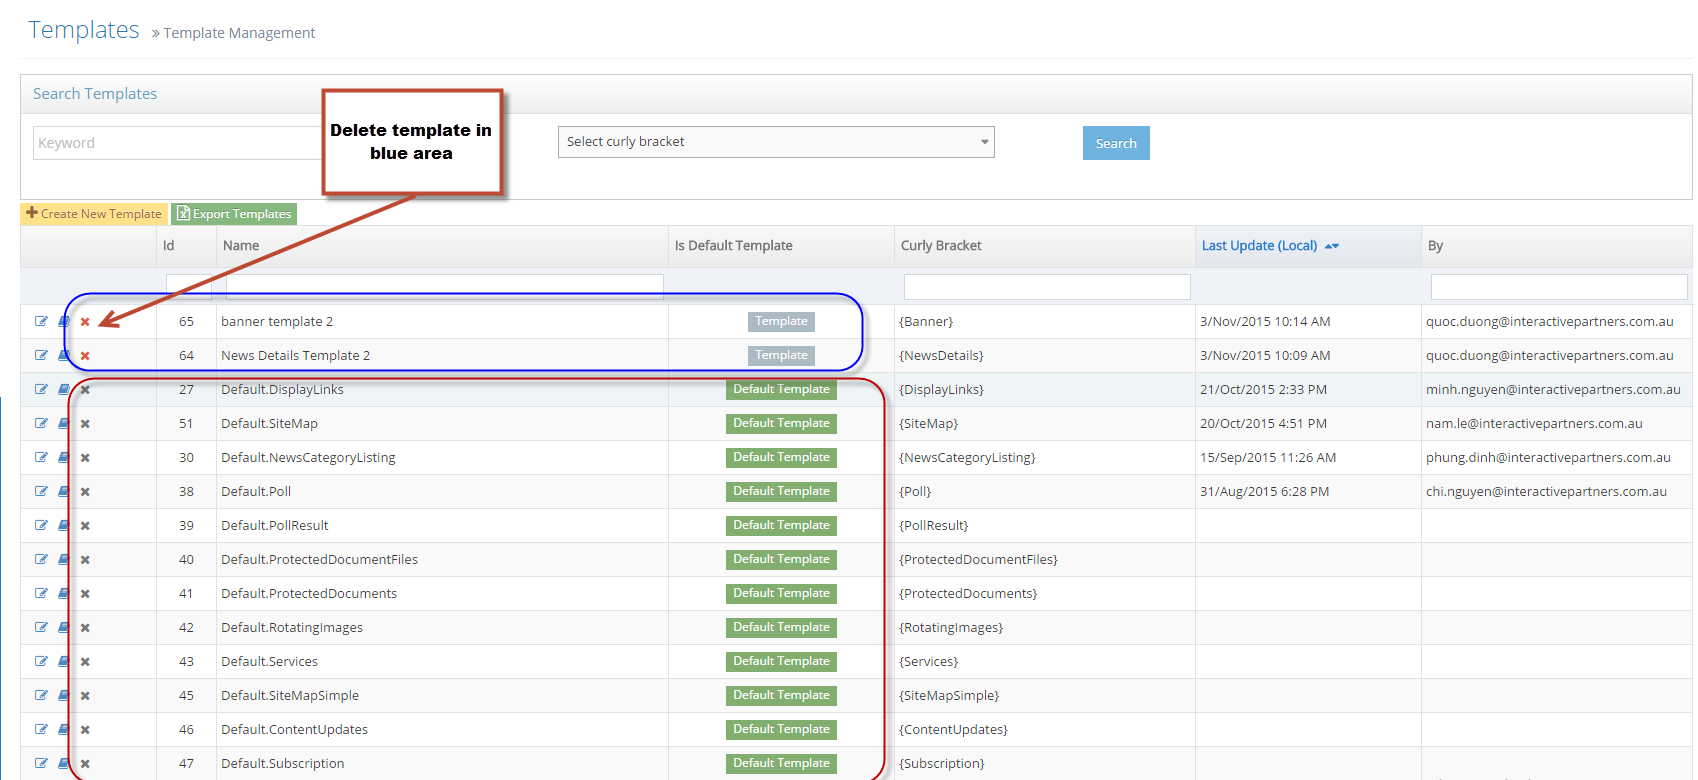
7Delete Curly Bracket Template.
-
8The Template had been marked as Is default template can not be deleted.
-
9Click the icon to delete a Curly Bracket Template

List of Curly Bracket Modules
List of Curly Bracket Modules
WebEd Curly Brackets allow the editor to quickly insert special WebEd functionality into the page content. The purpose is to provide a fast way for complex content to be added to any page
| Module | Curly Bracket Function | Parameter Name | Parameter Value |
|---|---|---|---|
| Associates Click here for further explanation and steps to use this module. |
AssociateListing | AssociateTypeId | The associate type to load |
| LocationId | The location to load | ||
| UsingCurrentUserCompanyType | Use the current user company type | ||
| CompanyTypeId | The company type to load | ||
| Status | The status of current associate: All = 1, New = 2, NotNew = 3 | ||
| TemplateName | The template name of the template that is used for rendering, this is an optional parameter, if not defined then it will get the default template | ||
| Banners Click here for further explanation and steps to use this module. |
Banner | BannerId | The id of a banner that you need to get |
| TemplateName | The template name of the template that is used for rendering is an optional parameter, if not defined then it will get the default template | ||
| CustomSQLContent | CustomSQLContent | ConnectionName | The connection name to execute the query |
| Query | The SQL query to be executed and get data to display | ||
| UseLocalDatabase | Check this to enable calling from the local database | ||
| Template | Template to render the data returned from the query | ||
| EventRegistrationForm Click here for further explanation on how a user can book a particular event schedule. |
EventBookingConfirmation | TemplateName | The template name of the template that is used for rendering, this is an optional parameter, if not defined then get the default template |
| Events Click here for Events Quickstart Guide. |
EventListing | CategoryId | The category id of events to display, this is optional parameter, if not defined then get all kinds of category |
| EventId | The event to display, this is an optional parameter, if not defined then get all events | ||
| EventScheduleId | The event schedule to display, this is an optional parameter, if not defined then get all events= schedule | ||
| EventCrossOverBooking | Check to enable booking on multiple events | ||
| EnableFilter | Check to enable searching and filtering | ||
| TemplateName | The template name of the template that is used for rendering, this is an optional parameter, if not defined then get the default template | ||
| Events Click here for more information on managing event schedules on the events module |
EventScheduleWithDetails | EventId | The event id of schedules to display, this is an optional parameter, if defined then get all event schedule |
| EventScheduleId | The event schedule id of schedules to display, this is an optional parameter, if defined then it will get the event schedule | ||
| TemplateName | The template name of the template that is used for rendering, this is an optional parameter, if not defined then get the default template | ||
| Forms Click here for futher explanation and steps to use this module. |
Form | FormId | The id of Form that need to to get |
| GroupMessages Click here for futher explanation and steps to use this module. |
GroupMessage | TemplateName | The template name of template that used for rendering, this is optional parameter, if not defined then get the default template |
| Links Click here for futher explanation and steps to use this module. |
DynamicLink | Query String | Query to decide if link true or link false is printed. |
| Expected Result | Expected result of query to decide which link | ||
| Link True | Link to be displayed if query returns \true\" or 1" | ||
| Link False | Link to be displayed if query returns \false\" or 0" | ||
| TemplateName | The template name of template that used for rendering, this is optional parameter, if not defined then get the default template | ||
| Links | LinkTypeId | The Id of link type | |
| Number | The number of links to display | ||
| TemplateName | The template name of template that used for rendering, this is optional parameter, if not defined then get the default template | ||
| Locations Click here for futher explanation and steps to use this module. |
Location | //"ShowAllLocation | |
| LocationId | The id of location that used for rendering | ||
| TemplateName | The name of template that used for rendering, this is optional parameter, if not defined then get the default template | ||
| LocationTypeId | The id of location that used for rendering | ||
| LocationsOnMapWithGeoCode | LocationTypeId | The id of location type on which the locations are gotten bases on, if not defined all locations will be gotten | |
| TemplateName | The name of template that used for rendering, this is optional parameter, if not defined then get the default template | ||
| Locator | Latitude | Default lattitude | |
| Longitude | Default longitude | ||
| Zoom | Default zoom | ||
| SelectedLocationType | Location types will be displayed | ||
| DefaultLocationType | Default location types | ||
| TemplateName | The name of template that used for rendering, this is optional parameter, if not defined then get the default template | ||
| Menus | Menu | ParentId | The parent id to load as root, if not defined or empty then root will be all |
| ShowParentMenu | Parameter to check if we show parent as first node of menu or not | ||
| TemplateName | The template name of menus, this is optional parameter, if not defined then get the default template | ||
| News Click here for futher explanation and steps to use this module. |
NewsListing | NewsCategoryId | The news category to load, this is optional parameter, if not defined then get all kinds of category |
| Total | The total news to get | ||
| PageSize | The page size of listing, if not defined or = 0 then disable the paging | ||
| NewsType | Type of news: Hot News = 2, Not Hot News = 1, All = 0 | ||
| NewsStatus | The status of news: Active = 1, Archive = 2, Inactive = 3 | ||
| TemplateName | The template name of template that used for rendering, this is optional parameter, if not defined then get the default template | ||
| NewsDetails | NewsId | The id of news that need to generate details | |
| TemplateName | The template name of template that used for rendering, this is optional parameter, if not defined then get the default template | ||
| NewsCategories Click here for futher explanation and steps to use this module. |
NewsCategoryDetails | CategoryId | The id of category that need to generate details |
| TemplateName | The template name of template that used for rendering, this is optional parameter, if not defined then get the default template | ||
| NewsCategoryListing | TemplateName | The template name of template that used for rendering, this is optional parameter, if not defined then get the default template | |
| Notices | NoticeBoard | NoticeTypeId | The Id of notice type |
| Number | The number of notices to display | ||
| TemplateName | The template name of template that used for rendering, this is optional parameter, if not defined then get the default template | ||
| Pages | Breadcrumbs | PageId | The id of page that need to generate breadcrumbs |
| TemplateName | The template name of template that used for rendering, this is optional parameter, if not defined then get the default template | ||
| Members | PageId | The id of page that need to generate members | |
| TemplateName | The template name of template that used for rendering, this is optional parameter, if not defined then get the default template | ||
| PageContent | PageId | The id of page that need to get content | |
| TemplateName | The template name of template that used for rendering, this is optional parameter, if not defined then get the default template | ||
| PageLink | PageId | The id of page that need to generate link | |
| RenderHtmlLink | Render html link or not | ||
| ClassName | The class of link | ||
| Label | The label of link | ||
| TemplateName | The template name of template that used for rendering, this is optional parameter, if not defined then get the default template | ||
| PageSearch | TemplateName | The template name of template that used for rendering, this is optional parameter, if not defined then get the default template | |
| SyndicatedContent | PageId | The id of page that need to generate | |
| SyndicatedHtmlTemplate | Id | The id of template that need to generate | |
| TemplateName | The template name of template that used for rendering, this is optional parameter, if not defined then get the default template | ||
| PaymentGateway | PaymentGateway | TemplateName | The template name of template that used for rendering, this is optional parameter, if not defined then get the default template |
| PhotoGalleries | PhotoGallery | RelativePath | The relative path of protected photo gallery want to show |
| TemplateName | The template name of template that used for rendering, this is optional parameter, if not defined then get the default template | ||
| Polls | Poll | PollId | The Id of poll. This field can be empty, if it's empty or equal 0, system will check the url of page for PollID parameter |
| TemplateName | The template name of template that used for rendering, this is optional parameter, if not defined then get the default template | ||
| PollResult | PollAnswerIdsString | The Ids of poll answers to display result, Ids separated by commas | |
| TemplateName | The template name of template that used for rendering, this is optional parameter, if not defined then get the default template | ||
| ProtectedDocuments | ProtectedDocumentFiles | RelativePath | The relative path of protected documents want to show |
| Total | Get total files in folder | ||
| TemplateName | The template name of template that used for rendering, this is optional parameter, if not defined then get the default template | ||
| ProtectedDocuments | RelativePath | The relative path of protected documents want to show | |
| TemplateName | The template name of template that used for rendering, this is optional parameter, if not defined then get the default template | ||
| SessionVariable | The session variable to check | ||
| ConditionalExpression | The condition to check the variable | ||
| IsFolder | Select the folder name or set a value | ||
| Value | Select the folder name or set a value | ||
| RollOverFilmStrips | RollOverFilmStrip | RollOverGroupIds | Get thumbnails of rollover group ids |
| ThumbnailWidth | Thumbnail Width | ||
| DisplayMainImageFirst | Display main image at first position | ||
| ThumbnailHeight | Thumbnail height | ||
| TemplateName | The template name of template that used for rendering, this is optional parameter, if not defined then get the default template | ||
| RollOverThumbnails | RollOverThumbnail | RollOverGroupIds | Get thumbnails of rollover group ids |
| ThumbnailSize | Define width of thumbnail | ||
| DisplayMainImageFirst | Display main image at first position | ||
| TemplateName | The template name of template that used for rendering, this is optional parameter, if not defined then get the default template | ||
| RotatingImages | RotatingImage | GroupId | The group id of rotating images |
| IsRunCentral | Get data from central | ||
| TemplateName | The template name of template that used for rendering, this is optional parameter, if not defined then get the default template | ||
| RssFeeds | RssFeed | RssFeedId | The id of rss feed that need to to get |
| Number | Display number of items | ||
| TemplateName | The template name of template that used for rendering, this is optional parameter, if not defined then get the default template | ||
| Services | Services | Number | The number of services to get |
| TemplateName | The template name of template that used for rendering, this is optional parameter, if not defined then get the default template | ||
| SiteMap | SiteMap | TemplateName | The template name of template that used for rendering, this is optional parameter, if not defined then get the default template |
| SiteMapSimple | TemplateName | The template name of template that used for rendering, this is optional parameter, if not defined then get the default template | |
| Snippets | SnippetEffects | SnippetCategoryId | The news category to load, this is optional parameter, if not defined then get all kinds of category |
| ShowRoot | Show root category | ||
| EnableDataSheet | Enable data sheet from when download the document | ||
| TemplateName | The template name of template that used for rendering, this is optional parameter, if not defined then get the default template | ||
| Snippet | SnippetId | The id of snippet that need to generate | |
| EnableDataSheet | Enable data sheet from when download the document | ||
| TemplateName | The template name of template that used for rendering, this is optional parameter, if not defined then get the default template | ||
| SocialMedia | SocialFeed | TokenId | The token id of social to load |
| Total | The total items to get | ||
| TemplateName | The template name of template that used for rendering, this is optional parameter, if not defined then get the default template | ||
| SocialMediaButtons | SocialMediaButton | SocialMediaButtonGroupIds | Get social media button of social media button group ids |
| IconSpacing | Spacing between Icons | ||
| IconSize | Icon Size | ||
| TemplateName | The template name of template that used for rendering, this is optional parameter, if not defined then get the default template | ||
| SocialMediaShareButtons | SocialMediaShareButton | URL | Link to share. If empty, it will share the current page |
| ShowFacebook | Show share Facebook | ||
| ShowTwitter | Show share Twitter | ||
| ShowGooglePlus | Show share Google+ | ||
| ShowPinterest | Show share Pinterest | ||
| ShowLinkedIn | Show share LinkedIn | ||
| TemplateName | The template name of template that used for rendering, this is optional parameter, if not defined then get the default template | ||
| Subscriptions | ContentUpdate | TemplateName | The template name of template that used for rendering, this is optional parameter, if not defined then get the default template |
| Subscription | Module | The subscription module | |
| TemplateName | The template name of template that used for rendering, this is optional parameter, if not defined then get the default template | ||
| Testimonials | Testimonials | Number | The number of testimonials to get |
| TemplateName | The template name of template that used for rendering, this is optional parameter, if not defined then get the default template | ||
| Vehicles | CentralizedVehicleListing | DefaultSortBy | The selected option on Sort drop down list |
| EnableSearch | Show or hide filter vehicle form at top of vehicle listing page | ||
| TemplateName | The template name of template that used for rendering, this is optional parameter, if not defined then get the default template | ||
| VehicleTypeIds | Vehicle types, if it's empty the system will show vehicles all types | ||
| ShowAllVehicleTypesFilter | It is using for show all vehicle type on the filter or not | ||
| SearchMake | Display vehicles by Make | ||
| SearchModel | Display vehicles by Model | ||
| SearchStockNumber | Display vehicle by stock number | ||
| Total | The total vehicles to get | ||
| PageSize | The page size of listing, if not defined or = 0 then disable the paging | ||
| SortBy | The sorting of listing, it default sorting by price low to high | ||
| Vehicles | VehicleCompare | Show Inactive Vehicles | Show inactive vehicles in comparison |
| Selected Stock Numbers | Stock numbers joint by colon to display as default comparison | ||
| TemplateName | The template name of template that used for rendering, this is optional parameter, if not defined then get the default template | ||
| Vehicles | VehicleDetails | VehicleId | The id of vehicle that need to generate details |
| TemplateName | The template name of template that used for rendering, this is optional parameter, if not defined then get the default template | ||
| Dealer | The dealer of vehicle that need to generate details | ||
| VehicleListing | EnableSearch | Show or hide filter vehicle form at top of vehicle listing page | |
| VehicleTypeIds | Vehicle types, if it's empty the system will show vehicles all types | ||
| ShowAllVehicleTypesFilter | It is using for show all vehicle type on the filter or not | ||
| SearchMake | Display vehicles by Make | ||
| SearchModel | Display vehicles by Model | ||
| SearchModel | Display vehicle by stock number | ||
| Total | The total vehicles to get | ||
| PageSize | The page size of listing, if not defined or = 0 then disable the paging | ||
| TemplateName | The template name of template that used for rendering, this is optional parameter, if not defined then get the default template | ||
| ExcludeMakeModelSortOptions | Exclude Make-Model sort options in Sort drop down list, if not defined or = 0 then include Make-Model options | ||
| VideoAndPhotoFilmStrips | VideoAndPhotoFilmStrip | VideoAndPhotoFilmStripCategoryIds | Display video and photo fiml strip by categories |
| TemplateName | The template name of template that used for rendering, this is optional parameter, if not defined then get the default template |
Menus Module
What is Menu Module?
This curly bracket is used for rendering a responsive menu or navigation on the page. Using this curly bracket, you can have a functional menu navigation using the title of pages you created for your site.
Inserting Menu Module via Curly Brackets
-
1Log in as an administrator and go to the Admin Dashboard.
Learn how to log in here → -
2Go to Pages and open the page content editor where you want to add this curly bracket.
-
3In the editor, click the Curly Bracket icon to open the configuration curly brackets

-
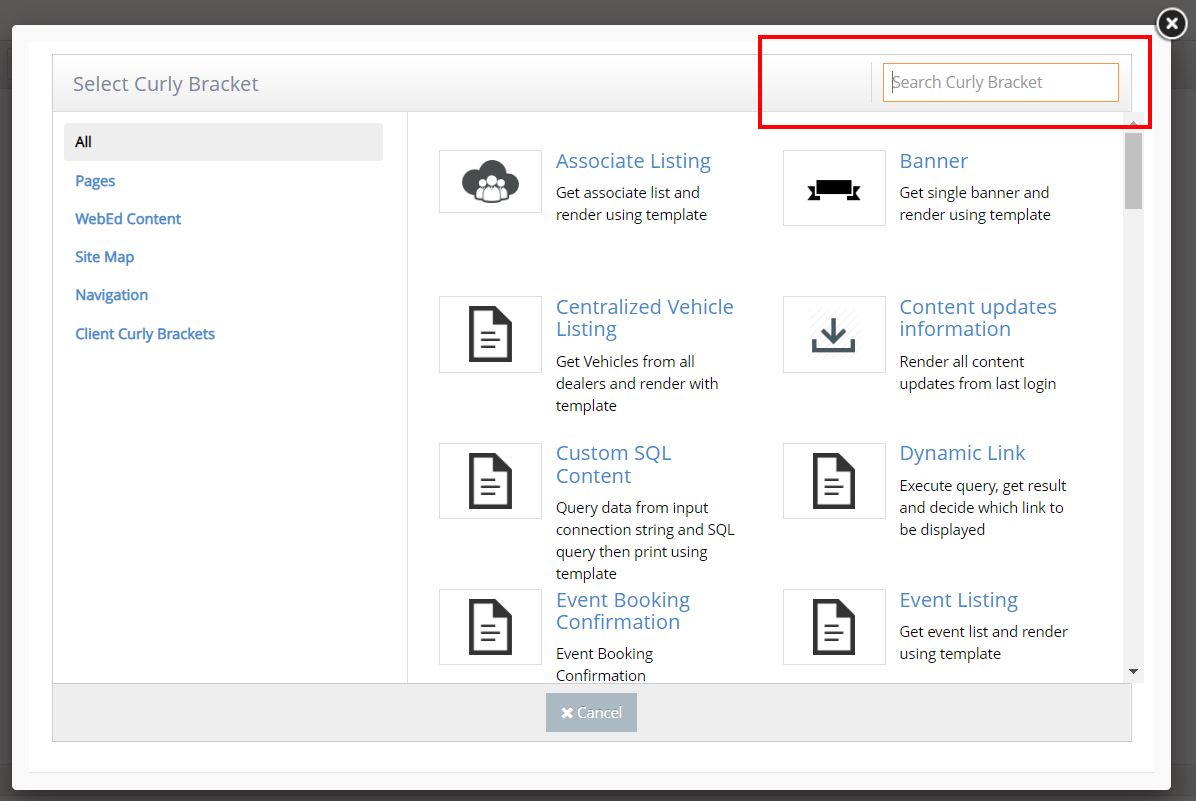
4Once clicked, the Curly Bracket box pops up and there you can see the list of Curly Bracket modules
-
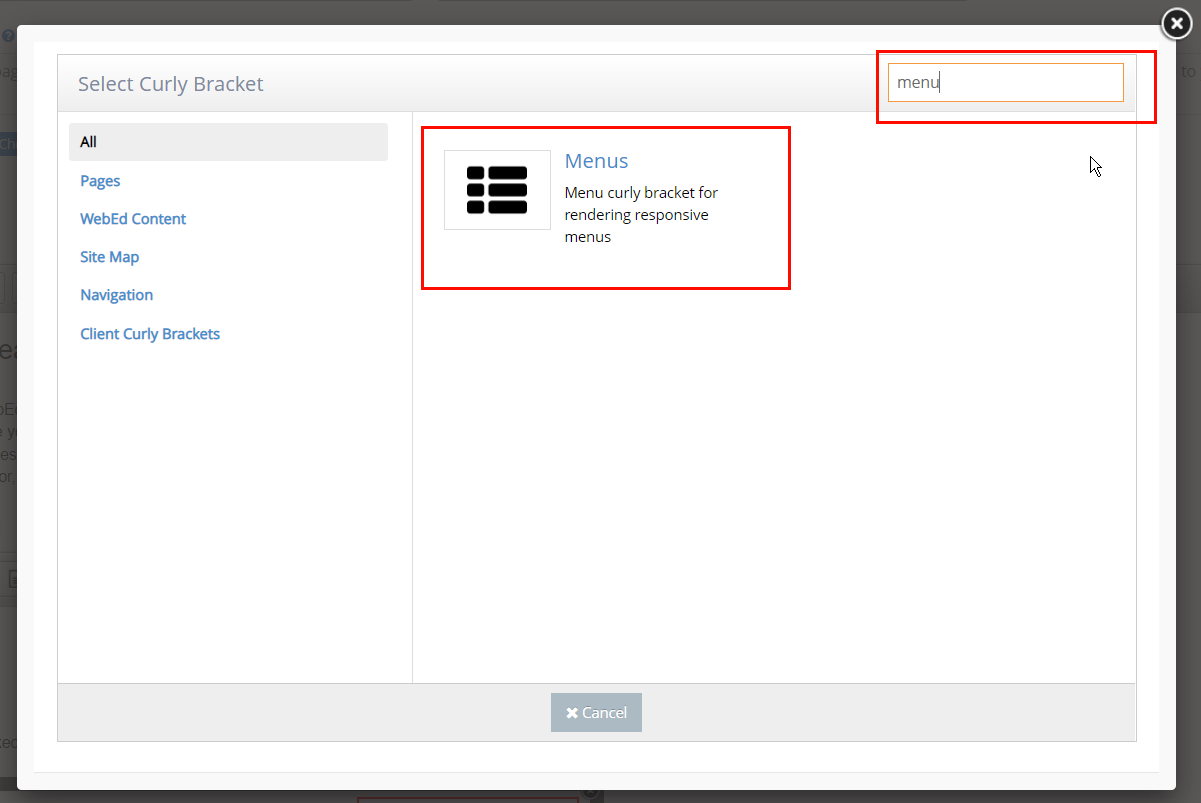
5In the Search box, you can put the specific name of the Curly Bracket that you want to create. Search for Menu and click on the Menus item in the search results box.
-
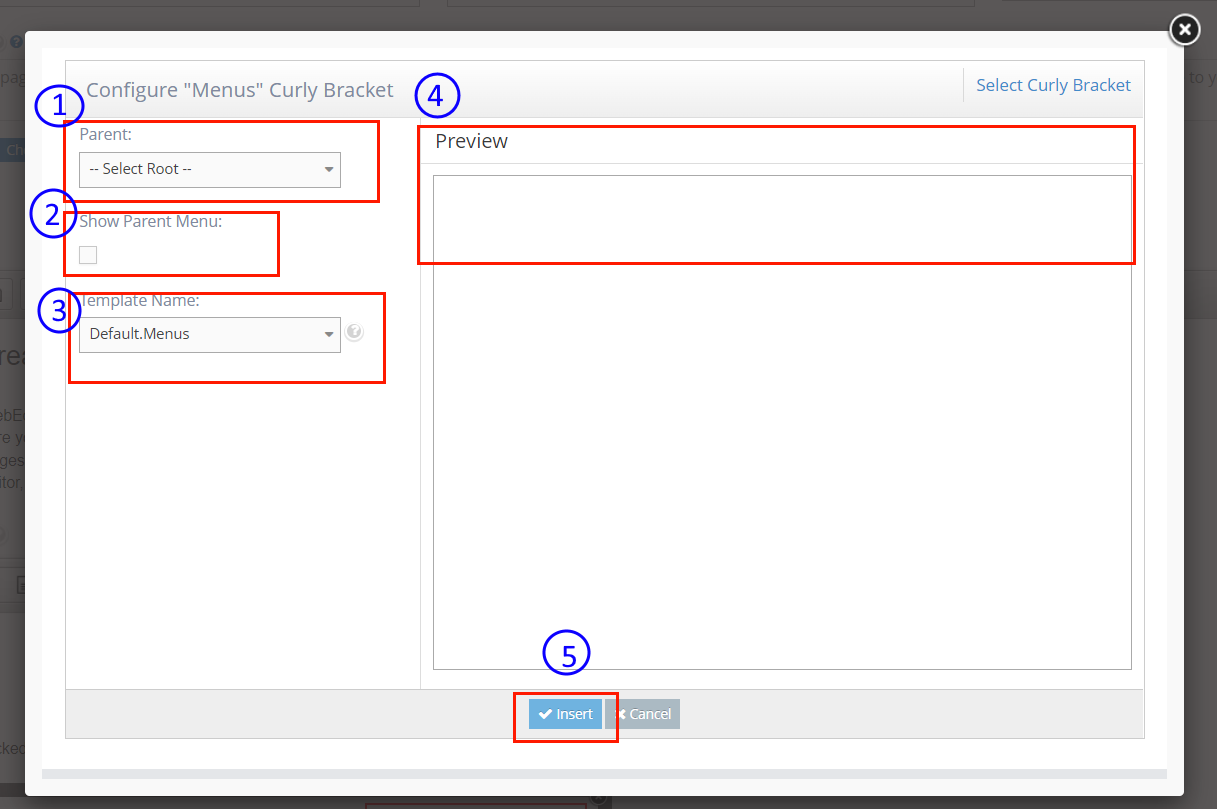
6The Configure "Menus" will display. Set up configuration options on the left side and review the UI (User Interface) on the right side.
- ParentID - The parent id to load as root, if not defined or if empty then root will be all page titles and links will display
- ShowParentMenu - this is where to check if we show the parent as the first node of a menu or not
- TemplateName - this will use as the template of menus, this is an optional parameter, if not defined then get the default template
- Preview - this is where to display the preview of your selected module.
- Insert - click this button to insert in your page content editor.
-
7Click Update And Close. Then you can see the Menu on the page.

To customize or create a new TemplateName for Menus
-
1Log in as an administrator and go to the Admin Dashboard.
Learn how to log in here → -
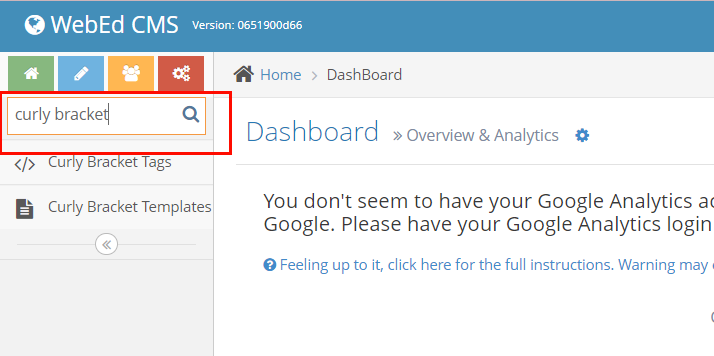
2Go to the Admin, search for Curly Bracket Templates
-
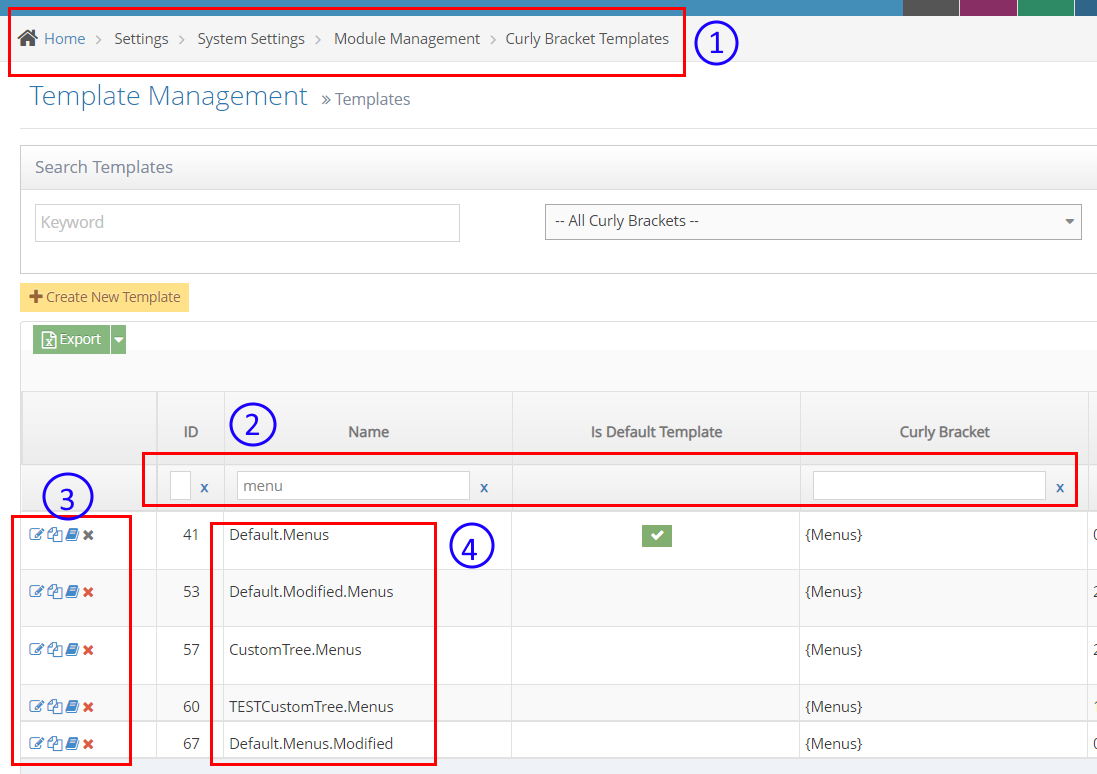
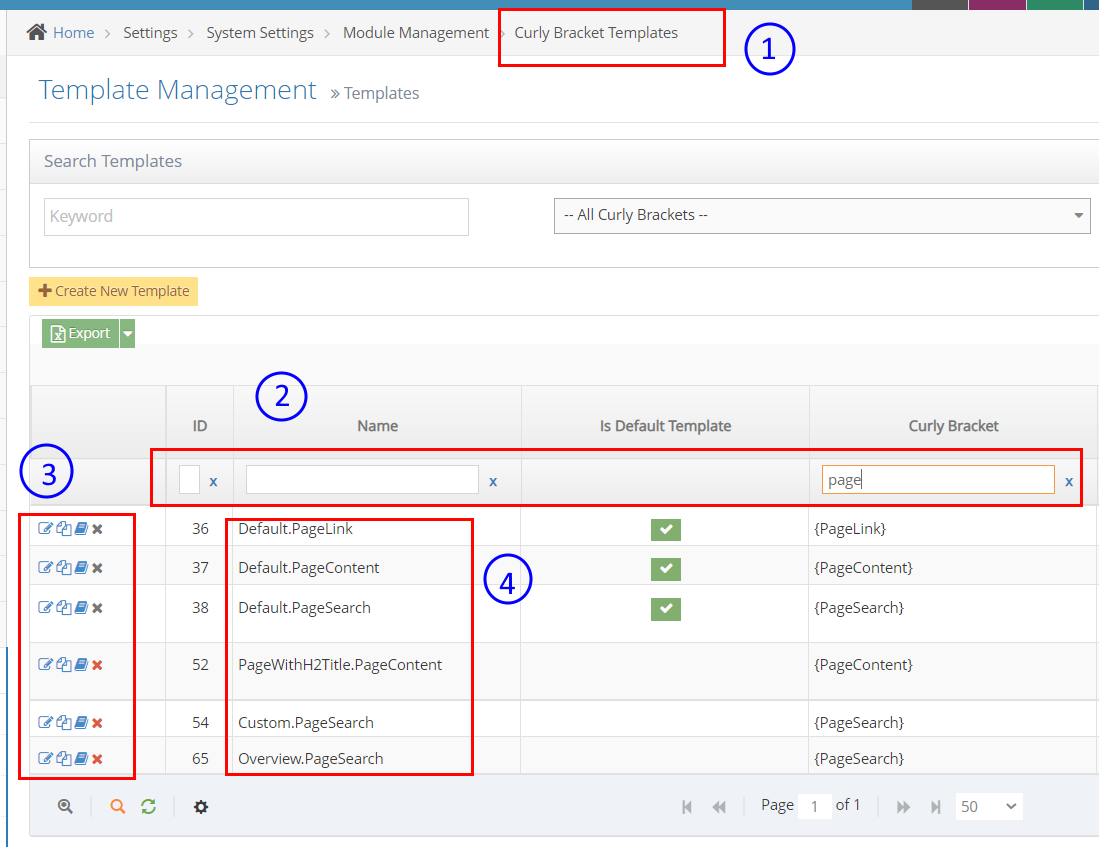
3Or you may directly go to Home > Settings > System Settings > Module Management > Curly Bracket Templates
-
4Once you're on the Template Management page, you can search for the template name of the curly bracket module in the text fields.
-
5On the left side icons, there you can edit the Template or you can duplicate a template to create a new one.
-
6Under the Name column is where you can see the list of the duplicated menu module with other designs.
Pages Module
What is a Pages Module?
This module consists of multiple curly bracket functions. It is used for rendering dynamic content from Page Management contents or functional navigation on the page.
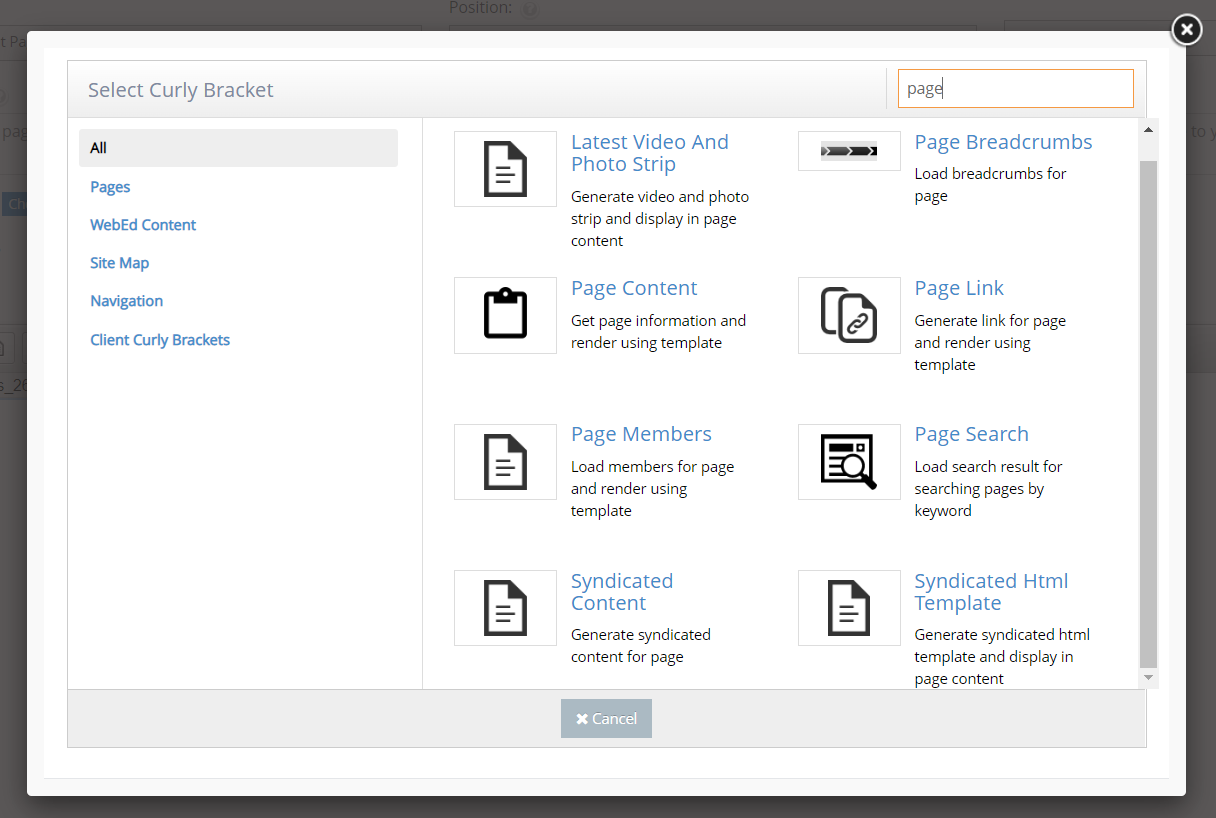
- Page Breadcrumbs - breadcrumb is a small text path, often located at the top of a page content indicating where the user is on the site. To add breadcrumbs to your page, you will use this curly bracket function
- Page Content - it is used to get page information and render using a template
- Page Link - it is used to generate a link for pages and render using a template
- Page Members - it is used to loading members for the page and render using a template
- Page Search - it is used to load search results for searching pages by keywords
- Latest Video And Photo Strip - it is used to generate video and photo strips and display them in the page content
- Syndicated Content - it is used to generate syndicated content for a page
- Syndicated HTML content - it is used to generate syndicated HTML templates and display them in a page content
Inserting Page Module via Curly Bracket
-
1Log in as an administrator and go to the Admin Dashboard.
Learn how to log in here → -
2Go to Pages and open the page content editor where you want to add this curly bracket.
-
3In the editor, click the Curly Bracket icon to open the configuration curly brackets

-
4Once clicked, the Curly Bracket box pops up and there you can see the list of Curly Bracket modules

-
5In the Search box, you can put the specific name of the Curly Bracket that you want to create. Search for Page and page curly brackets will be shown in the search results box. There, you can choose and click on the specific curly bracket that you want to put in your page content.
For Page Breadcrumb configuration
These steps will guide you on how to set up configuration settings for your Page Breadcrumb curly bracket.
-
1Log in as an administrator and go to the Admin Dashboard.
Learn how to log in here → -
2Make sure you are in your page content editor to click the curly bracket icon.
-
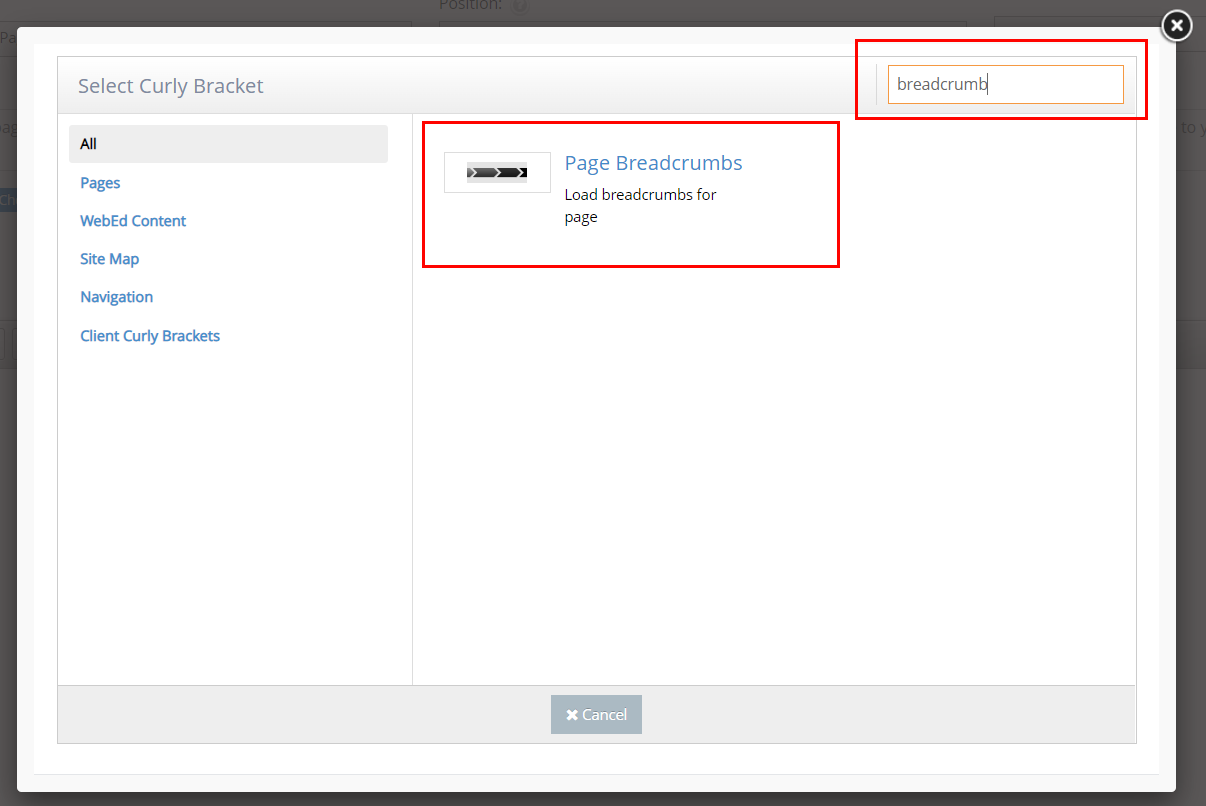
3Then type breadcrumb in the search bar
-
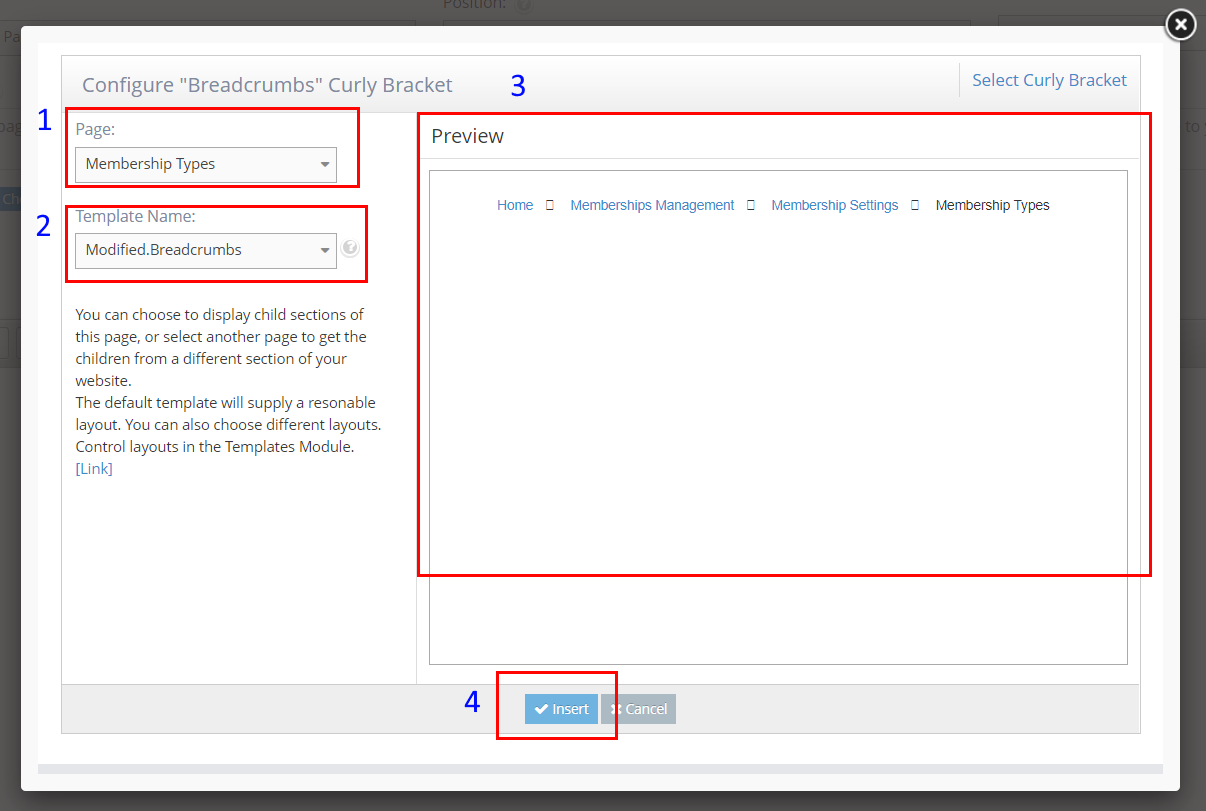
4The Configure "Breadcrumbs" will display. Set up configuration options on the left side and review the UI (User Interface) on the right side.
- ParentID - select a page title under the Page Select field, the id of the selected page will be needed to generate breadcrumbs.
- TemplateName - this will use as the template of breadcrumb, this is an optional parameter, if not defined then get the default template
-
5Click Update And Close. Then you can see the Breadcrumb on the page.

-
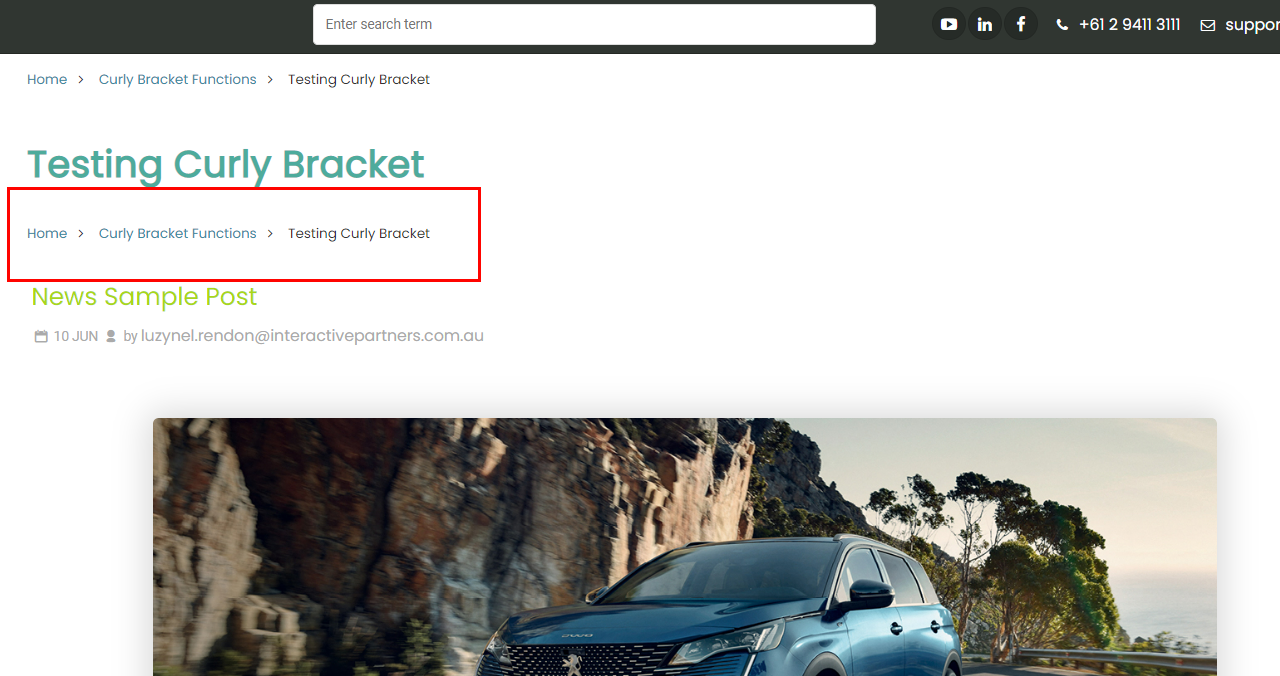
6The generated breadcrumb in your page content would look like this.
For other Pages' curly bracket functions
The same goes with other Pages' curly bracket functions. Follow the Page Breadcrumbs steps to guide you on how to set up configuration when you want to add it to your page content.
To customize or create a new Template Name for Pages (curly bracket)
These steps will guide you on how to create/customize the display and styles of your Page curly bracket.
-
1Log in as an administrator and go to the Admin Dashboard.
Learn how to log in here → -
2Go to the Admin, search for Curly Bracket Templates

-
3Or you may directly go to Home > Settings > System Settings > Module Management > Curly Bracket Templates
-
4Once you're on the Template Management page, you can search for the template name of the curly bracket module in the text fields.

-
5On the left side icons, there you can edit the Template or you can duplicate a template to create a new one.
-
6Under the Name column, is where you can see the list of the duplicated menu module with other designs.
PageContent Module
Step 1 - Creating Your Content
-
1Log in as an administrator and go to the Admin Dashboard.
Learn how to log in here → -
2Click Pages > Pages
-
3I suggest finding a page that is similar to copy
e.g.: page ID 15. So put 15 in the search space and hit enter (see below)
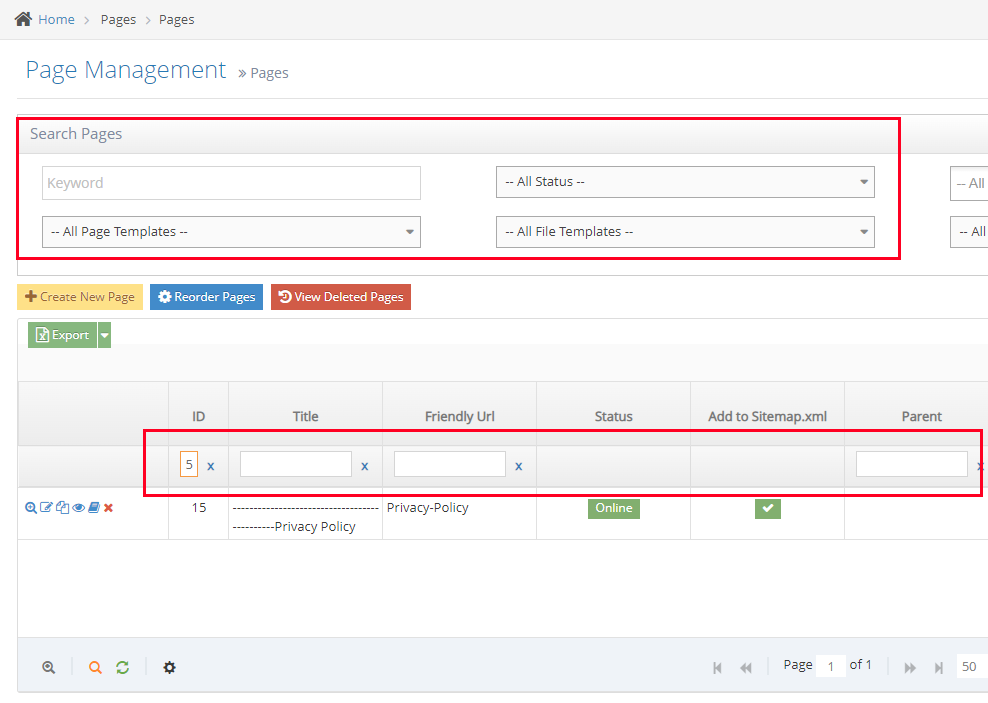
I would suggest taking a look at how this content was created - look at all the elements of the content you want to re-create e.g. get your image ready to be the same size (456x256px in this instance) & prepare what you want the new content to say etc. -
4Edit the Page content you want to COPY
-
5Hit the ‘source button’ and copy all the code in the Page Content you want to copy - then close the item down
-
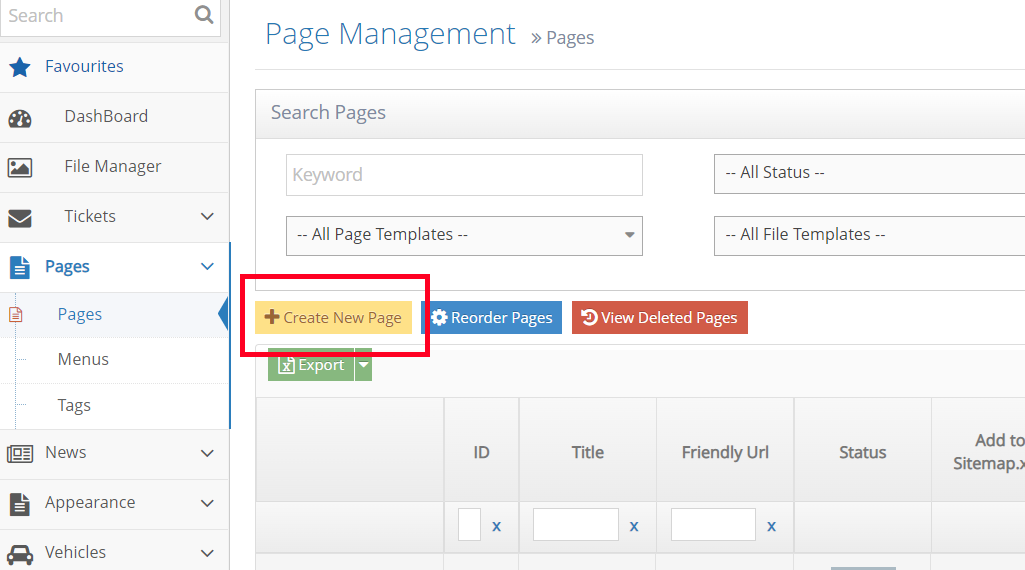
6Return to the Pages index and create your new Page Content by clicking on the yellow square as shown
-
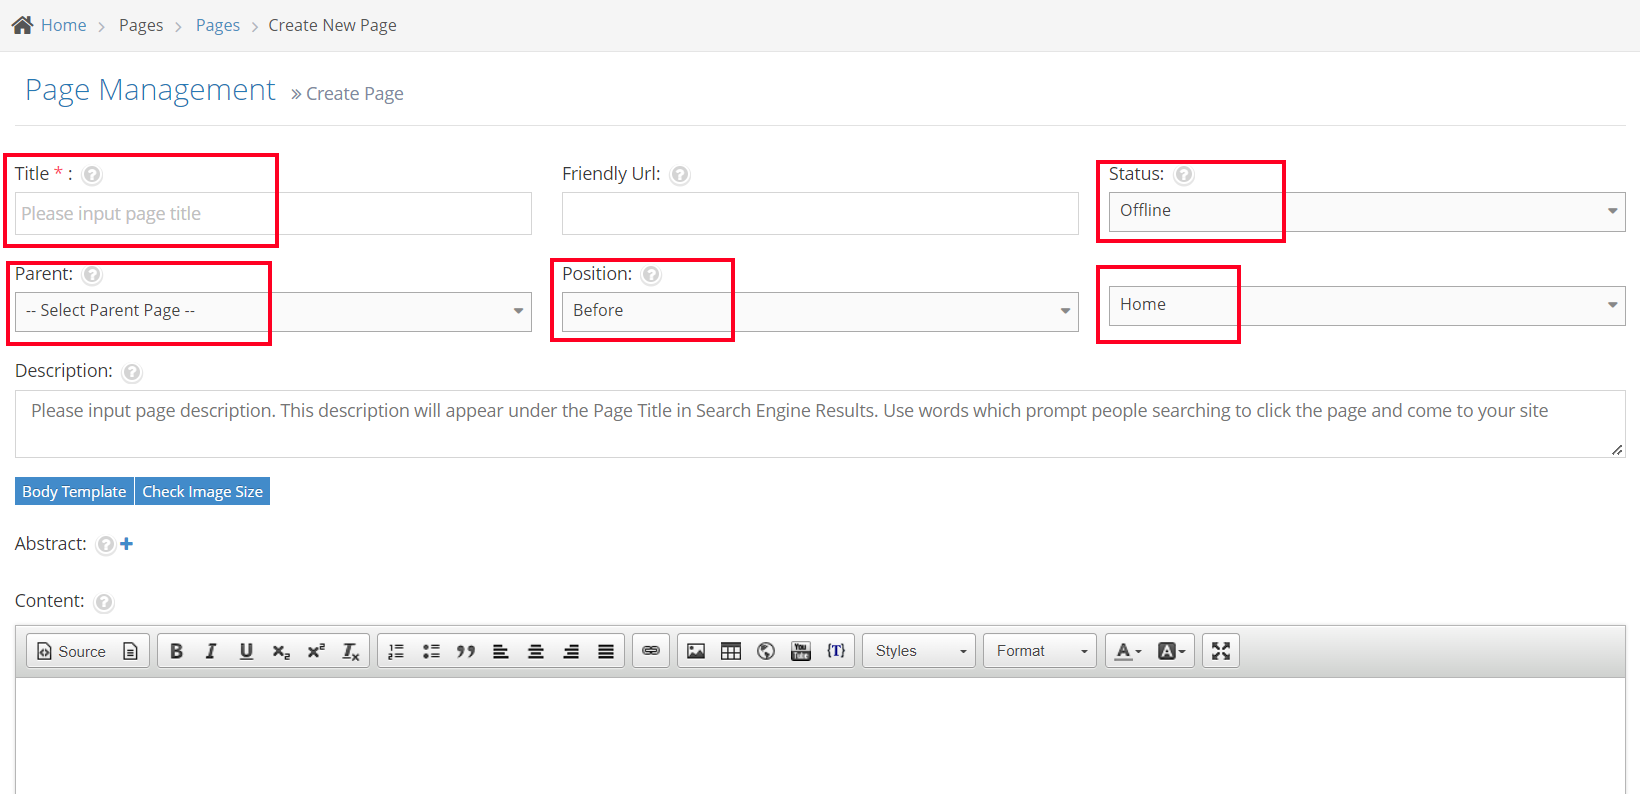
7Your new page is the same as any other at this stage
-
8Add your new page title
-
9Put in the page description (for SEO) etc
-
10Set the page status as online
-
11When using the curly bracket Page content, you do not need to fill out the position on the page because you will be putting the item directly onto your chosen page using the curly brackets
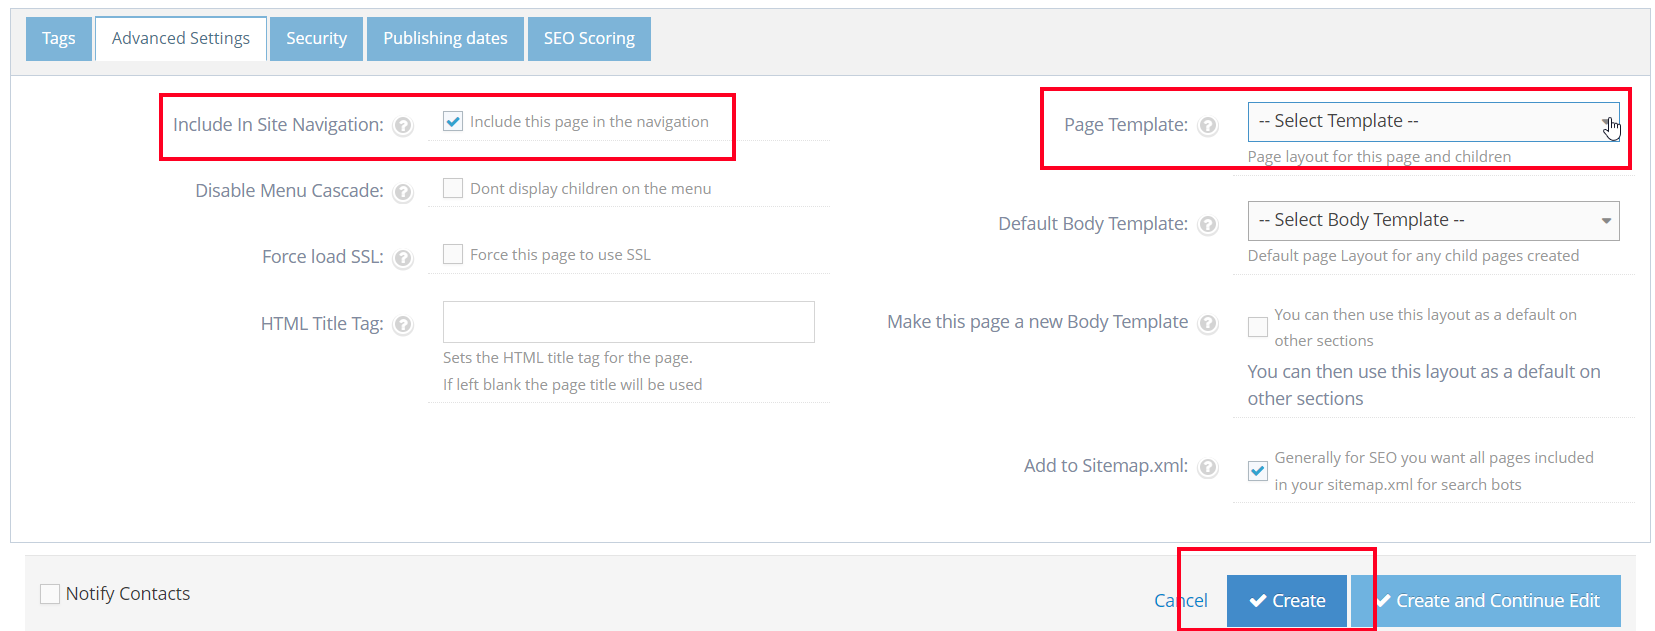
Important: Remove the page from site navigation by going to Advanced Settings at eh bottom of the page and un-checking or removing the arrow from site navigation - see image
-
12Include Site Navigation box needs to be blank
-
12Click the Insert button to complete the config step, then click the OK button to finish.
Your new page content
-
1Go to the content editor window
-
2Hit ‘Source’, put your cursor inside the edit window and paste your saved code into the box.
-
3Hit Source again to see your copied content
-
4Now you can edit over this copied content with your new image/words etc.
-
5Once contented - hit Create or Create and Continue to Edit
Step 2 - Putting your new content on the actual web page
-
1Log in as an administrator and go to the Admin Dashboard.
Learn how to log in here → -
2Go to the page you want to add your new content and edit
-
3Decide where you want the content to go - use the red line to create a space - look for the "Enter" sign on the right-hand side of the red line
-
4Once you are in the correct position, put your cursor in the gap and go to the Curly bracket icon
-
5Choose configure and search for Page Content
-
6Once open, use the 'Page ID' drop-down to choose your page content
* If you cannot find it,pick a page and change the id numberlater - Hit Insert
-
7Once you hit insert this is what appears - here you can change the ID number
-
8Once you are happy with the page ID - hit OK and your new curly bracket (with new page content) will be inserted on the page
-
9Save and close the page - check the content is what you expected
RSS Feeds Module
RSS Feeds Module Overview
- The RSS Module allows you to bring different RSS News Feeds from other sites and have them appear as content on your site.
- Many Sites publish an RSS feed that can be consumed by your site
Inserting RSS Feed via Curly Bracket
-
1Log in as an administrator and go to the Admin Dashboard.
Learn how to log in here → -
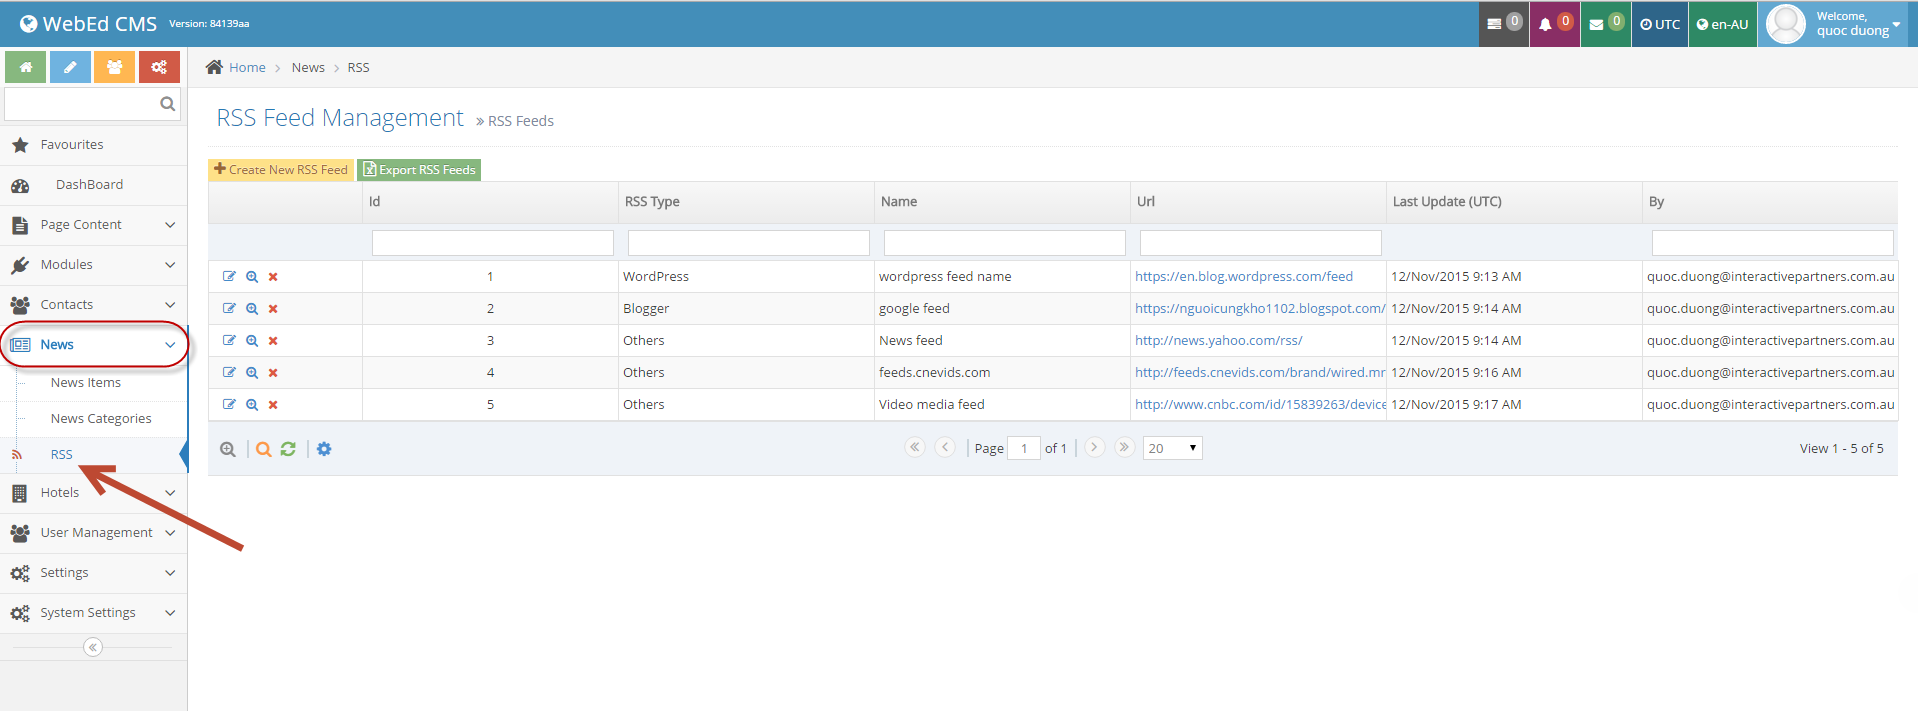
2In the left menu, select News > RSS.

-
3List of RSS Feeds will be displayed in a grid.
-
4Create a New RSS Feed button


-
5When selecting Blogger type, only enter the Blogger name instead of the full URL.

-
6Insert RSS Feed to page.
-
7Log in to manage your website area (see the login section for details). And right, navigate to the page you wish to change and click
 to edit by using any of the three options in the example below
-
8The Template had been marked as Is default template can not be deleted.
-
9A popup will be displayed. In the Content Editor click select CurlyBracket icon

-
10Click Configure button in the small popup to go to the curly bracket page.
-
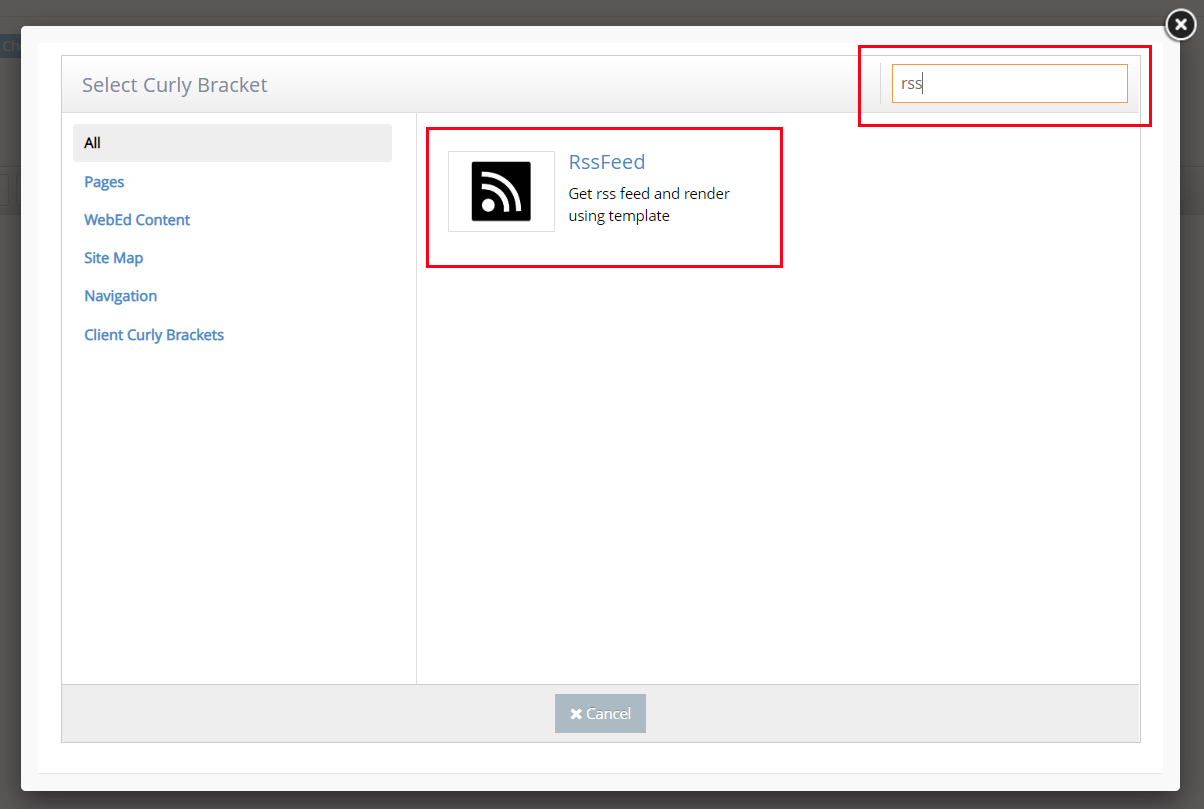
11Search RSS Feed and enter the RSS in the search box. Then click the RSS item.
-
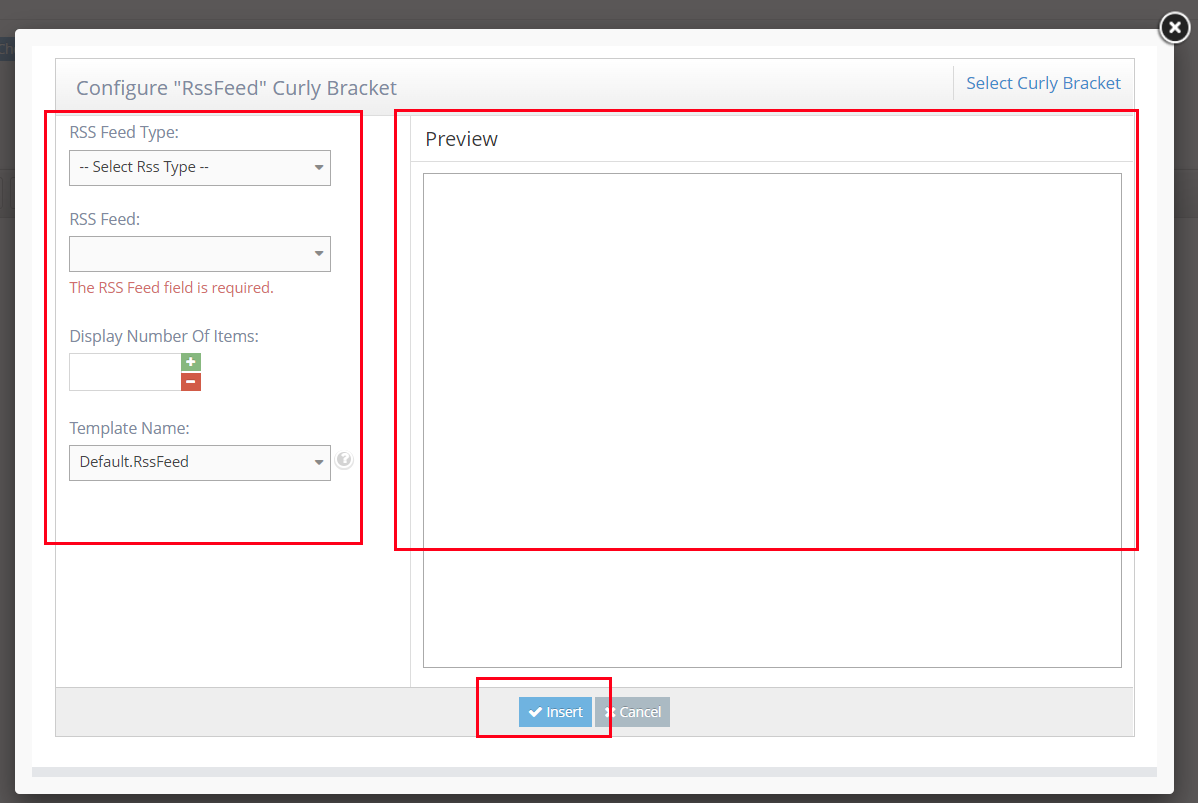
12Configure RSS, in this popup:
- (1): Select an RSS Type then list RSS belonging to the current type will be listed at the second dropdown
- (2): Choose an item in RSS Feeds then look at the review in the right corner
- (3): Limit records display. The blank value is load all items.
- (4): Select a template for the RSS Feed.
-
13Click the Insert button to complete the config step, then click the OK button to finish.
List of Curly Bracket Functions
WebEd Curly Brackets allow the editor to quickly insert special WebEd functionality into the page content. The purpose is to provide a fast way for complex content to be added to any page
|
Module |
Curly Bracket |
Parameters |
Description |
|---|---|---|---|
|
Site Setting |
{SettingValue_SettingName} |
|
Get setting value from name and render |
|
Banner |
Banner ID is invalid. Please check the data again. |
|
Get banner by id and render |
|
Page |
Invalid page id |
|
Render page content by id |
|
Associated Location |
{AssociatedLocations_LocationType} |
|
Find all locations of type and render using template |
|
Associated Location |
{InteractiveGoogleMap_LocationType} |
|
Get interactive google map of location where user can click on each location to see the details |
|
Associated Location |
{LocationsOnMapByIds_LocationIds} |
|
Get maps by location ids and render using template |
|
Associated Location |
{LocationsOnMapById_LocationId_Template} |
|
Get location by id and render using template |
|
Associated Location |
{LocationsOnMapByData |
|
Display the map by input information and template |
|
Associated Location |
{LocationsOnMap_LocationTypeId |
|
Get locations from various input parameters and render using template |
|
Associated Location |
{LocationsOnMap} |
parameters come from the request url:
|
Get locations from various input parameters from url and render using template |
|
Associates |
{PresentAssociates} |
Get all locations that ToDate >= now and render |
|
|
Associates |
{NewAssociates} |
Get all locations that IsNew = true and render |
|
|
Associates |
{AssociatesByType_Type} |
|
Get all associates by type and render |
|
Associates |
{AllAssociates} |
Get all associates and render |
|
|
Products |
{Categories} |
Get all product categories with brand = 1 and render |
|
|
Message |
{MessageOfTheDay} |
Get random newest message and present |
|
|
Highlight |
{Highlights} |
Get all highlights and render |
|
|
Photo Gallery |
{Photogallery_Folder} |
|
Get all images in folder and render using template |
|
Career |
{CareersList} |
Get all careers and render |
|
|
Group Message |
Get all messages of current user and render |
||
|
UsedCars |
{UsedCars} |
Get vehicle listing and render |
|
|
Event |
{EventsCalendar} |
Get event calendar and render !? |
|
|
Event |
{EventsListings} |
Get event listing and render using template |
|
|
Event |
{EventsListingByCategory_CategoryId} |
Get events by category and render using template |
|
|
Event |
{EventsListingByLocation_LocationId} |
|
Get all events of location and render using template |
|
Event |
{EventListDropDown} |
||
|
Event |
{EventDetails_EventId} |
|
Get event by id and render |
|
Event |
{EventRegistration_EventId} |
|
Get event reregistration by id and render |
|
Competition |
{Competition_CompetitionId} |
|
Get competition by id and render |
|
Page |
{DisplayTaggedPages_tagCategory |
Display page by tag |
|
|
Protected Documents |
|
Get protected documents and render |
|
|
Testimonial |
Testimonials |
Get random testimonials and render |
|
|
Testimonial |
{DynamicTestimonials_Count} |
|
Get a number of testimonials and render by template |
|
Tell A Friend |
{TellAFriend} |
Get tell a friend |
|
|
Campaign |
{Campaign_Code} |
|
Get campaign by code and render |
|
Product |
{ShoppingCart} |
Render shopping cart |
|
|
News |
{News} |
Get RSS feed from CC and render |
|
|
News |
|
|
Get a number of news and render using template |
|
News |
{NewsListingDateFormat_DateFormat} |
|
Get news listing and print out with date format |
|
News |
{NewsListingByCategory_CategoryId} |
|
Get news of category and render using template |
|
News |
|
Show news, if url has news id then render news details |
|
|
News |
{NewsListingDynamic_IsArchive_CategoryIds |
|
Render news listing by template, if url has news id then render news details |
|
News |
{NewsListingOnly_IsArchive_CategoryIds |
|
Render news listing by template |
|
News |
{ArchivedNewsListing} |
Show archive news |
|
|
News |
{ArchivedNewsListingByCategory_CategoryId} |
|
Get archive news of category and render using template |
|
News |
{RelatedNews_CategoryIds_Count_Template} |
|
Get related news item with current categories |
|
News |
{NewsCategoryTitle_NewsId_Separator} |
|
Get news categories title and split by separator |
|
Roll over Thumbnails |
|
||
|
Roll over Thumbnails |
|
|
Render roll over thumbnails of group |
|
Rotating Images |
Invalid Group Id |
|
Get rotating images from setup parameters and render |
|
Rotating Images |
{DynamicRotatingImages_GroupName_Template} |
|
Get rotating images by group name and render using template |
|
Survey |
{Survey_SurveyId_ContactId} |
||
|
Survey |
{SurveyResults_SurveyId_ContactId} |
||
|
Snippets |
{SnippetsListing_CategoryId_ShowRoot} |
|
Get the list of snippets with categories and render using template |
|
Vehicles |
{Vehicles_EnableSearch |
|
Get vehicle listing and render using template |