- Notifications Overview
- Send Notifications from the Edit Page
- Search the Contacts to Notify
- Setup the Notification Template
- Saving Configuration
- Confirmation Configuration
- Sending Notifications from Admin
- How to create, edit and delete Notification Template in Admin Dashboard
- Subscribe to Automatic Updates
Notifications
Notifications Overview
Notifications allow you to quickly update any contacts in your database about new content or updates to your website. You can select contacts or groups of contacts to notify and a link to the new content. This will ensure new content is published and key contacts are advised of the new content.
Send Notifications from the Edit Page
STEP-BY-STEP
-
1Log in as an administrator and go to the Admin Dashboard.
Learn how to log in here → -
2Go to any page and click Edit or Create New Page
-
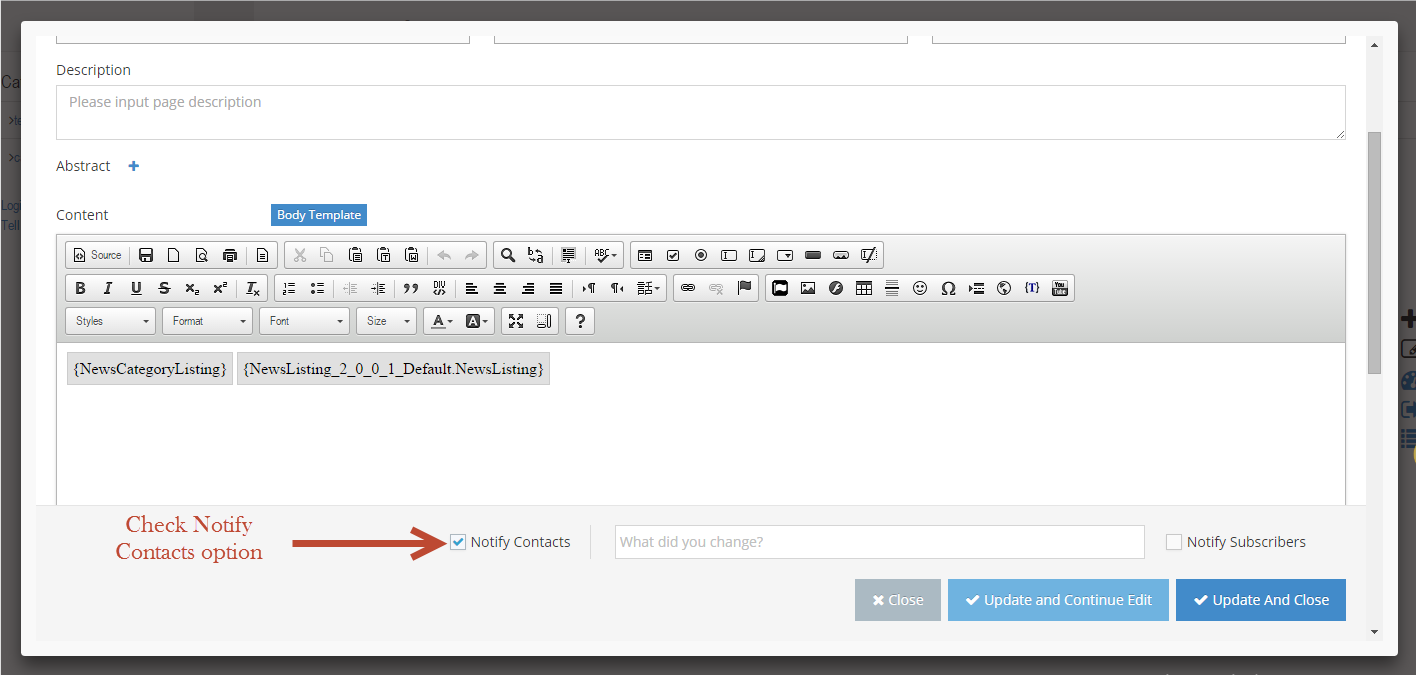
3Check the Notify Contacts option
-
4Click the "Update and Continue Edit" or "Update And Close" button to save changes
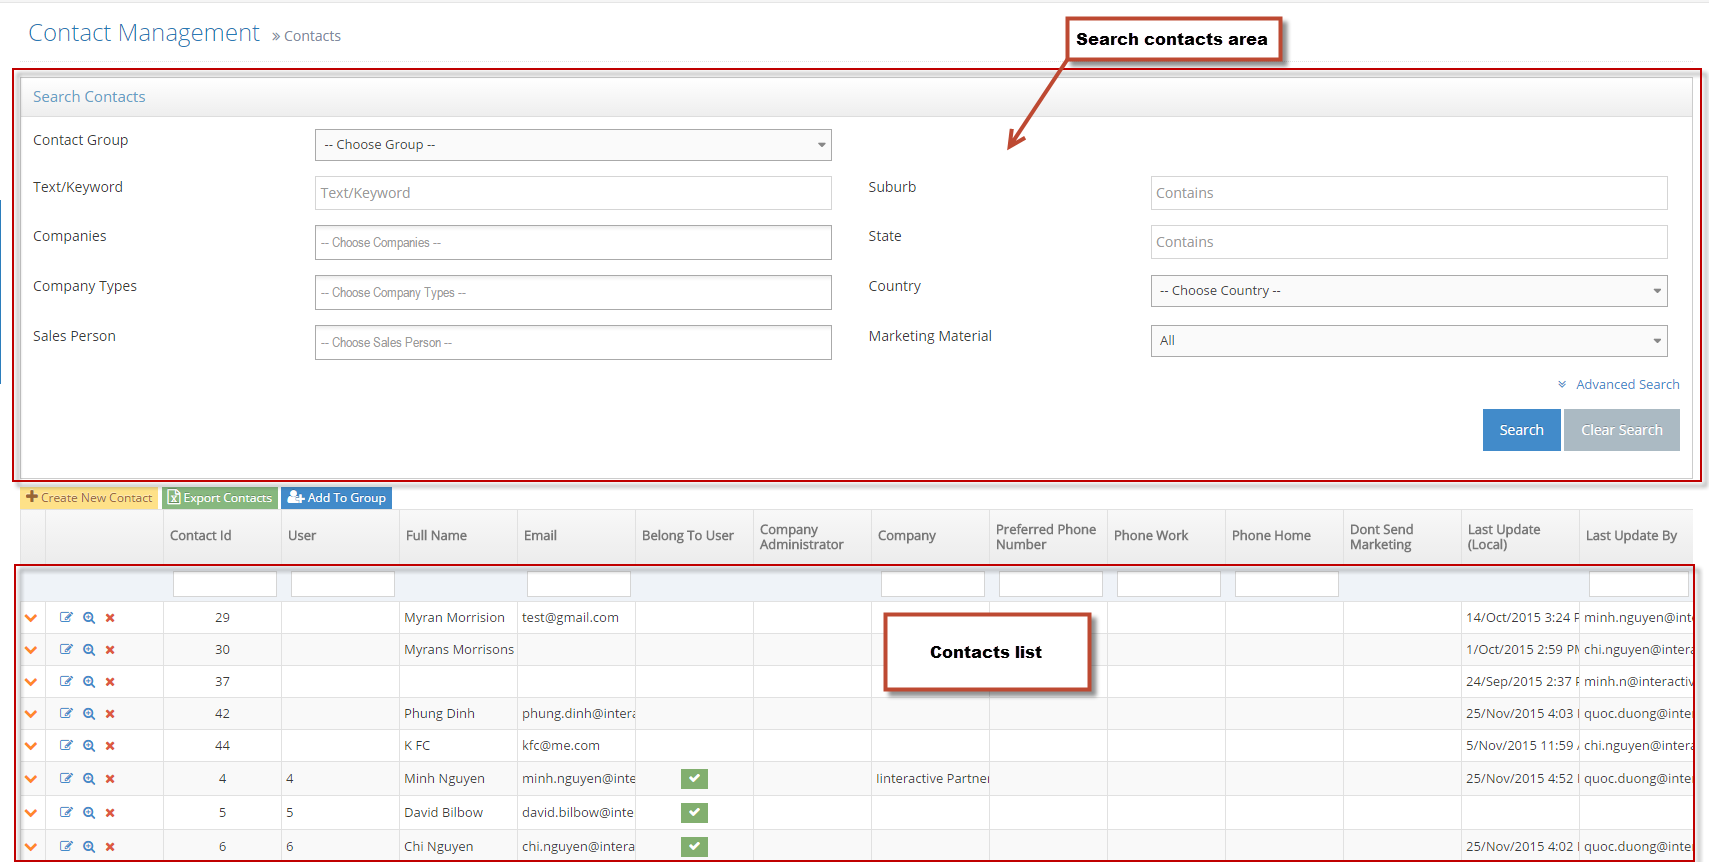
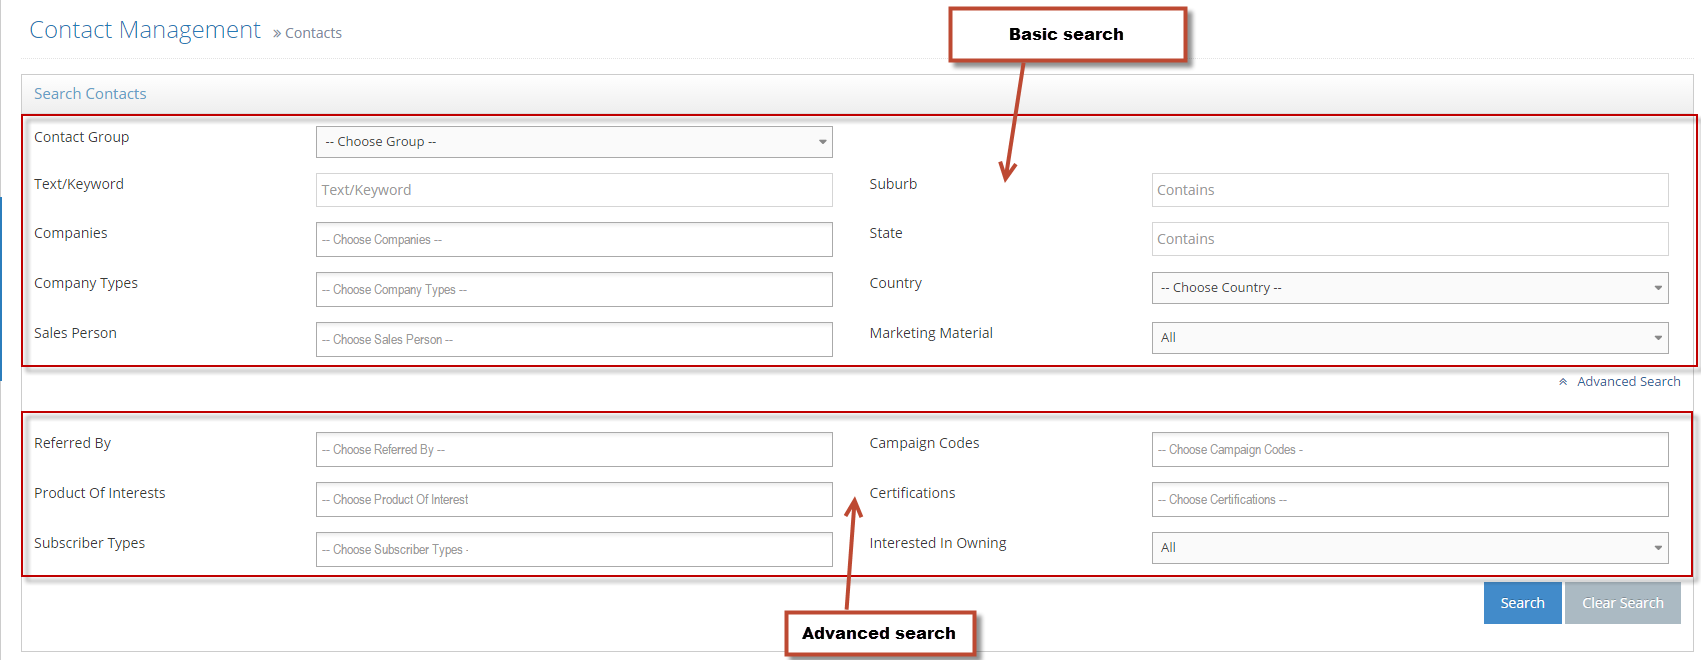
Search the Contacts to Notify
Basic Search
Advanced Search
STEP-BY-STEP
-
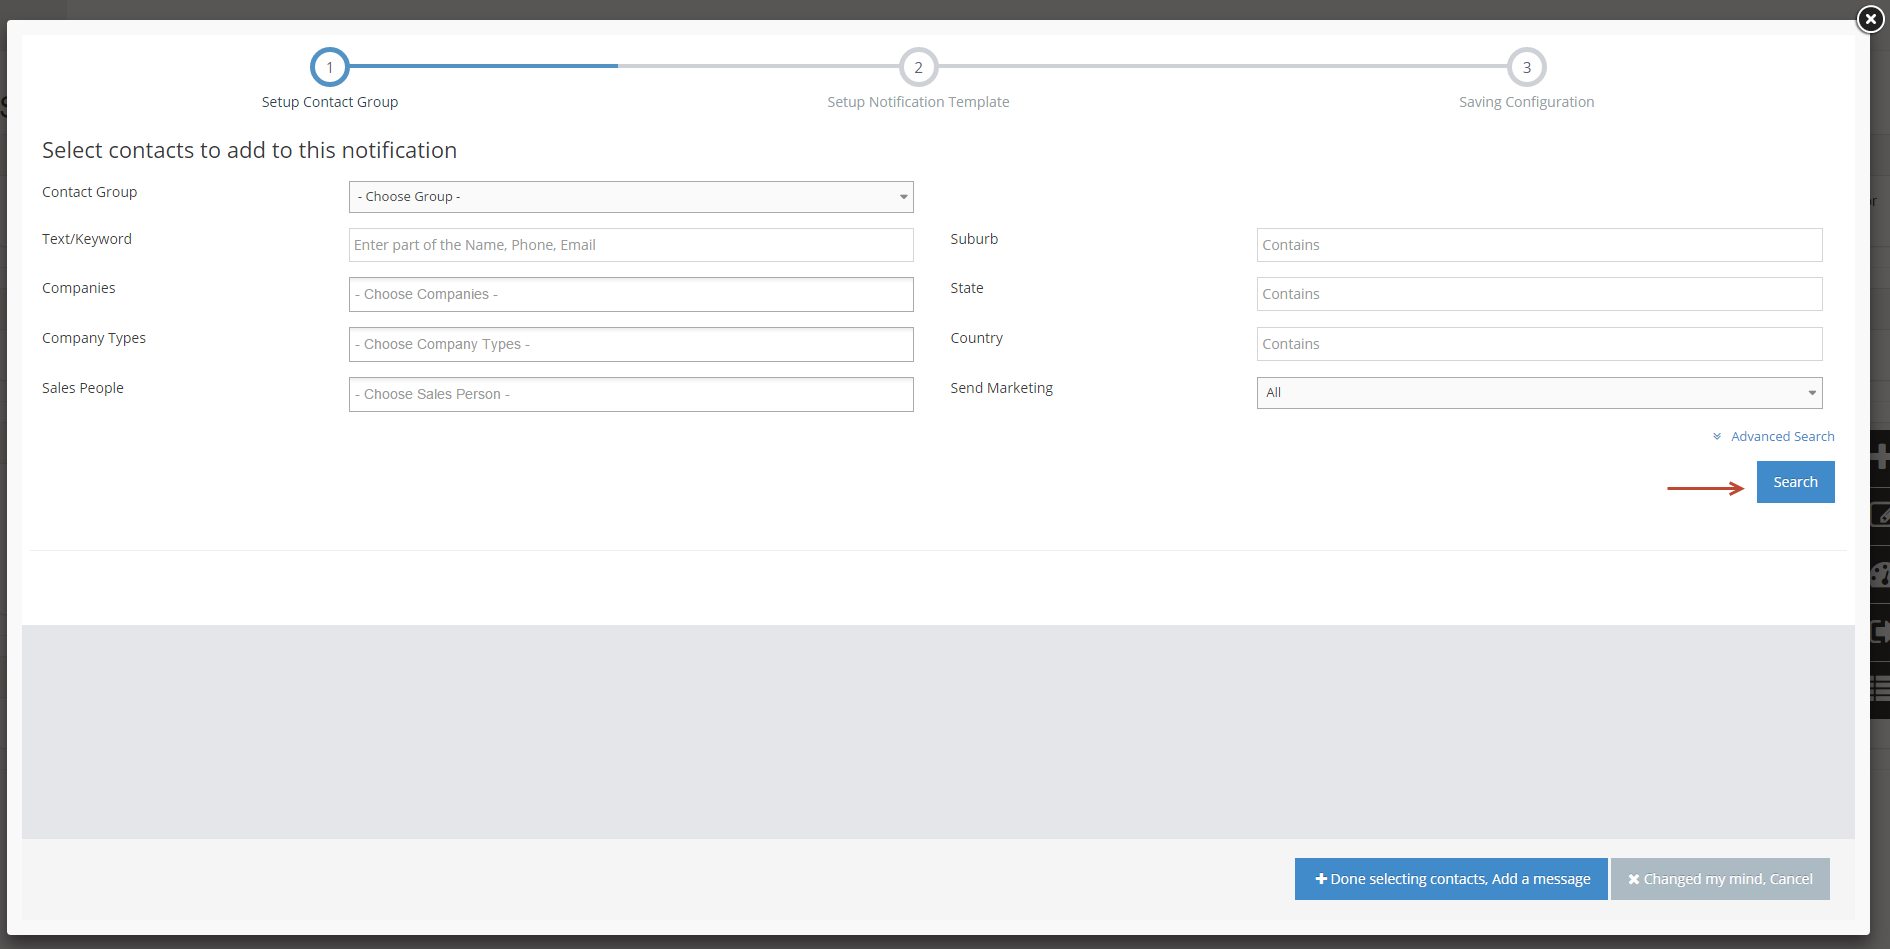
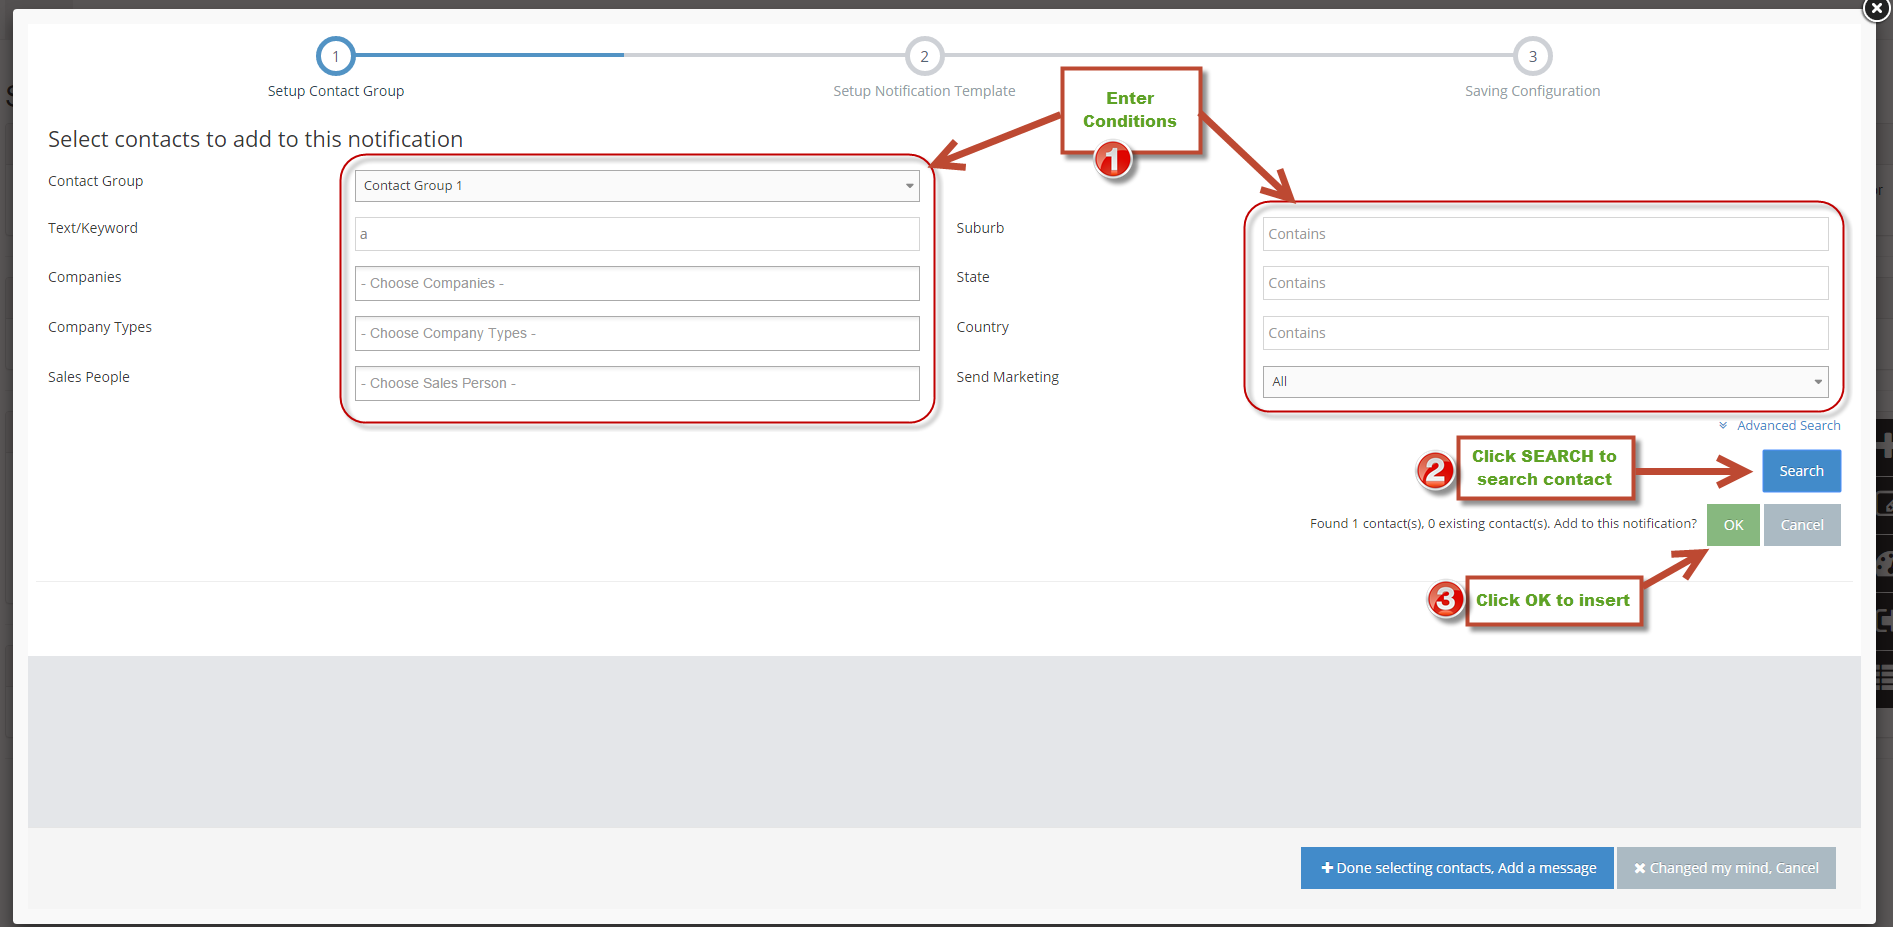
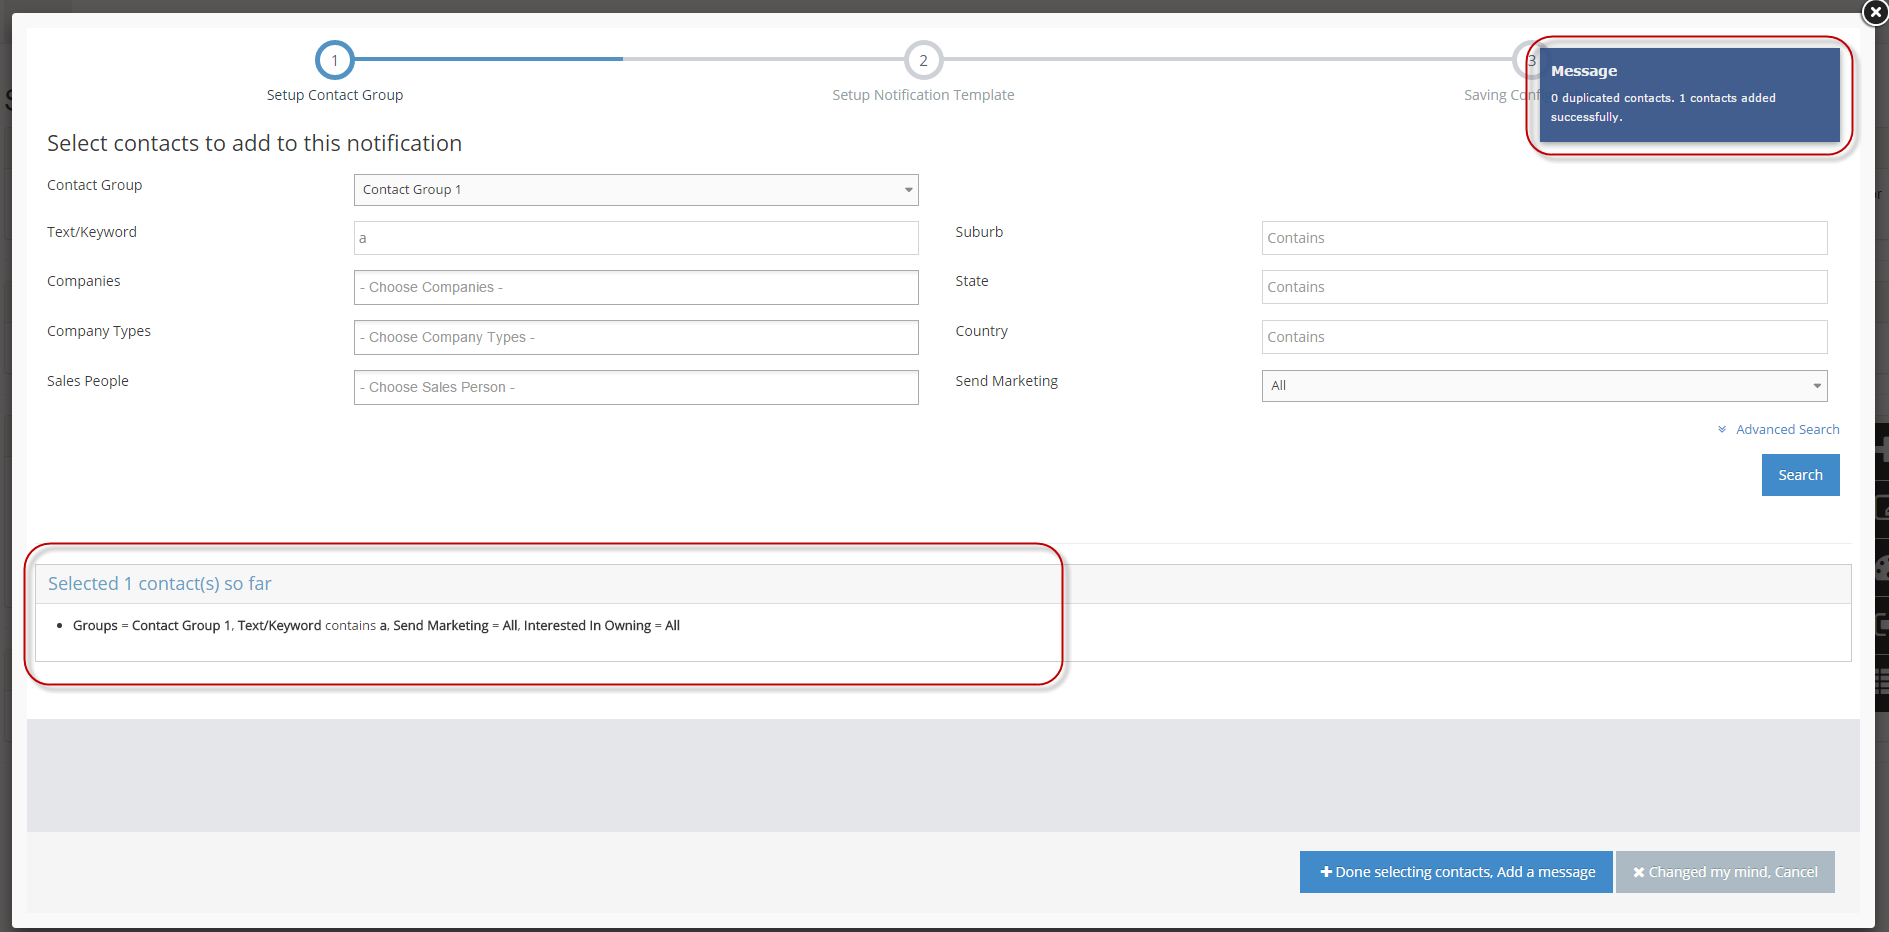
1Enter search conditions, and click Search button to find matching contacts
-
2Click OK to add contacts and query search to this Notification
-
3A confirmation message will be displayed at the top right and a search will display.
-
4Search for more contacts:
- repeat the above steps using different criteria until you have selected and added all the contacts required
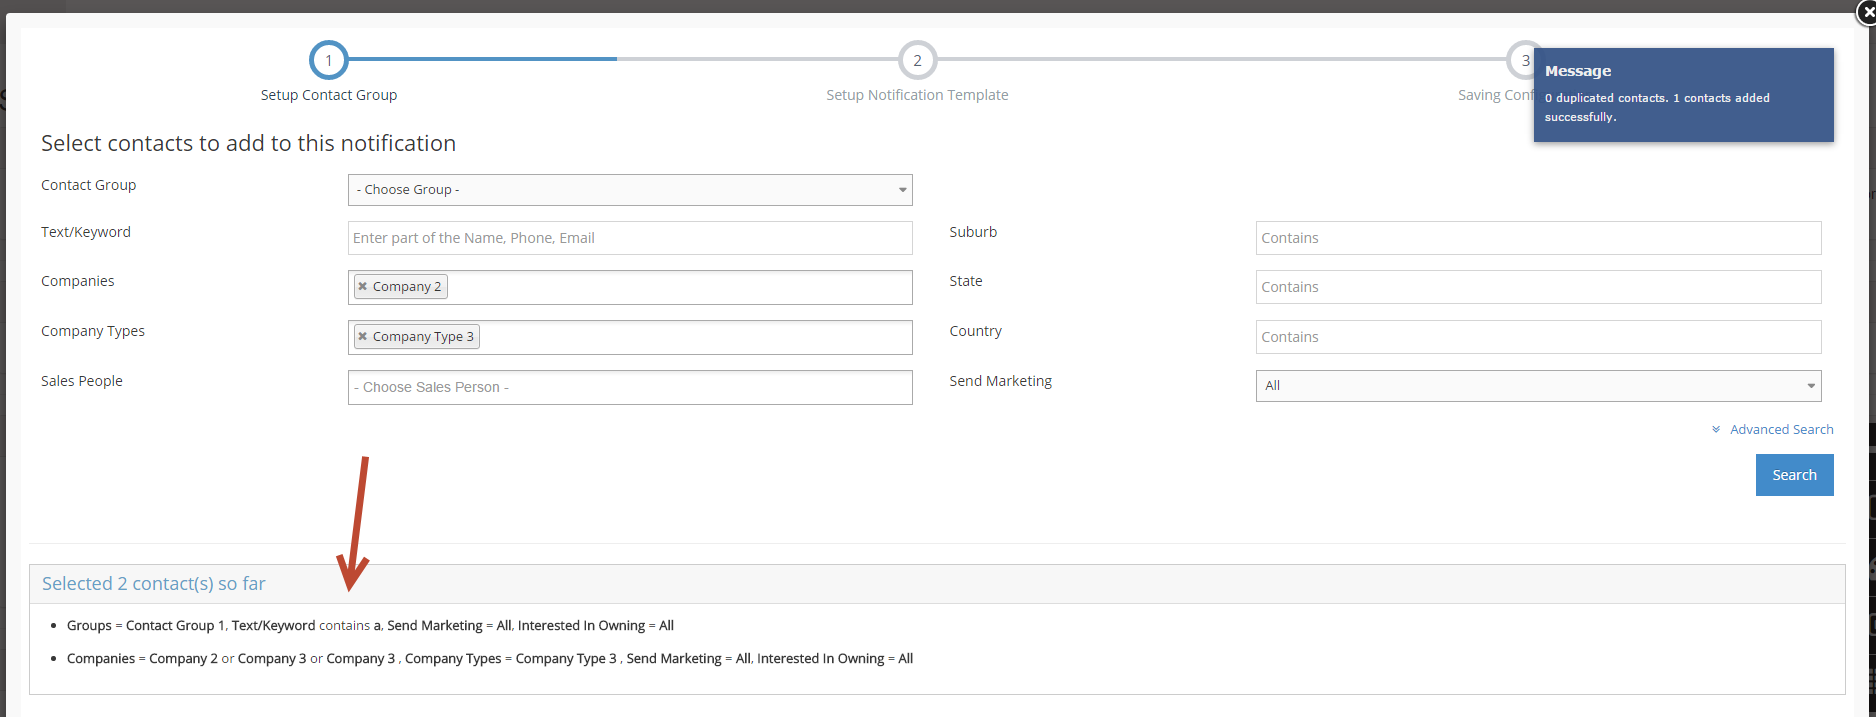
-
5After you have completed adding contacts, click Done Selecting Contacts
-
6Add a message to go to the Select Template step
Setup the Notification Template
STEP-BY-STEP
-
1Select any existing template in the drop-down list
-
2Modify the email subject

-
3Click the Go to Save Configuration button to save the template and go to the next step
Saving Configuration
STEP-BY-STEP
-
1Add new Contact Filter Name
-
2Enter a Notification Template Name
-
3Optionally set a Date and Time to send the Notification.
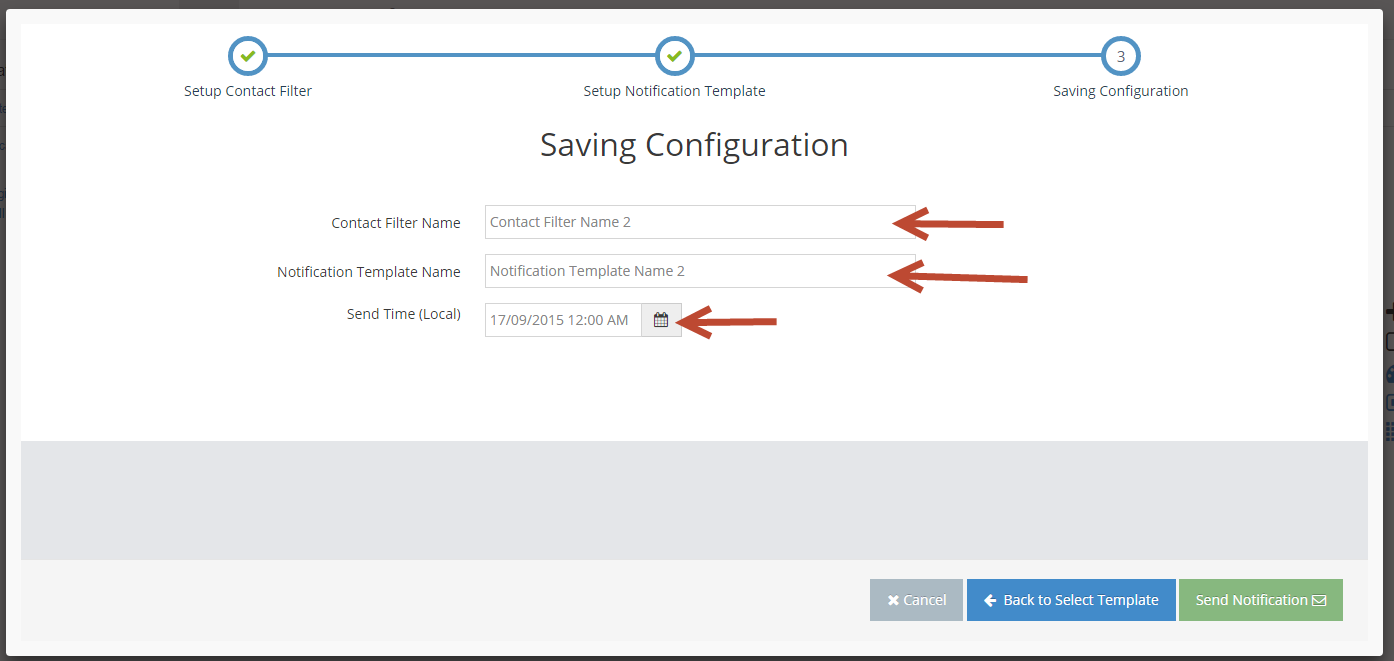
-
4Click Send Notification button to continue
Confirmation Configuration
STEP-BY-STEP
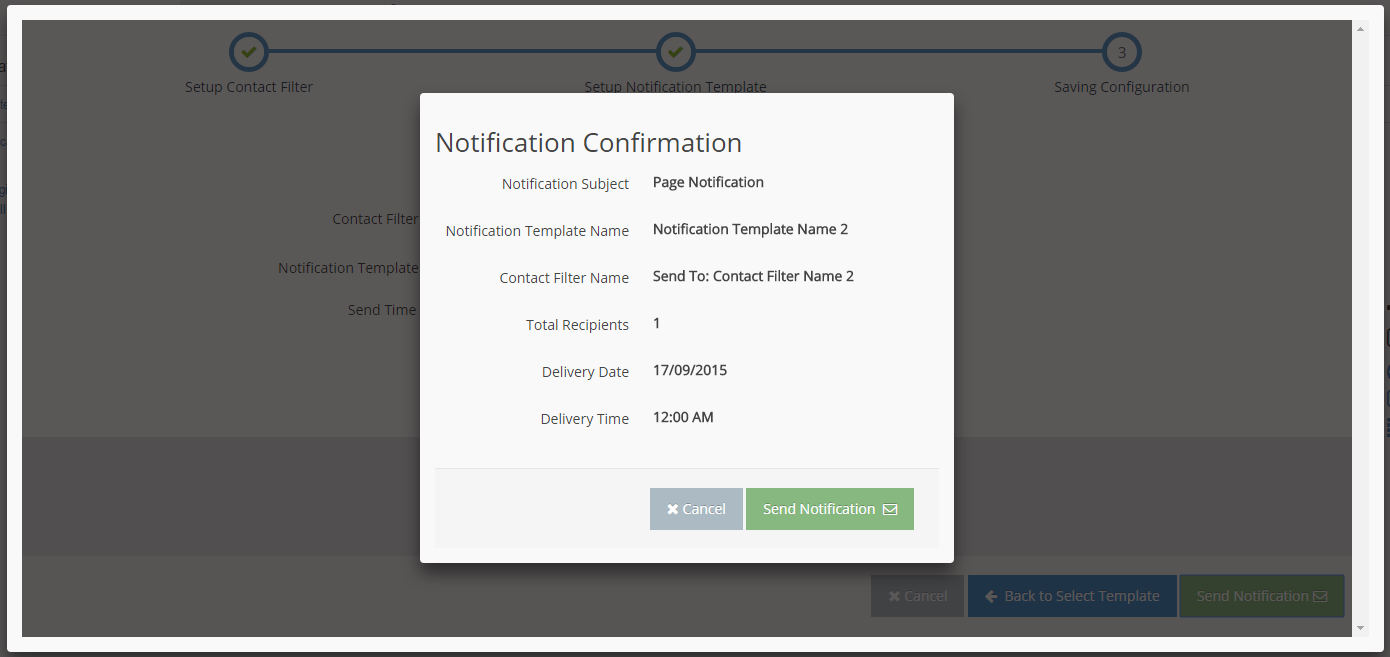
-
1A new confirm popup will be displayed.
-
2If all information is correct, click Send Notification to finish.
-
3Click the Cancel button to close confirm popup and modify information for previous steps.
Sending Notifications from Admin
Select the Contacts for Notifications Broadcasting
STEP-BY-STEP
-
1Log in as an administrator and go to the Admin Dashboard.
Learn how to log in here → -
2In the left menu, select Contacts > Contact Listing
-
3Select conditions to search

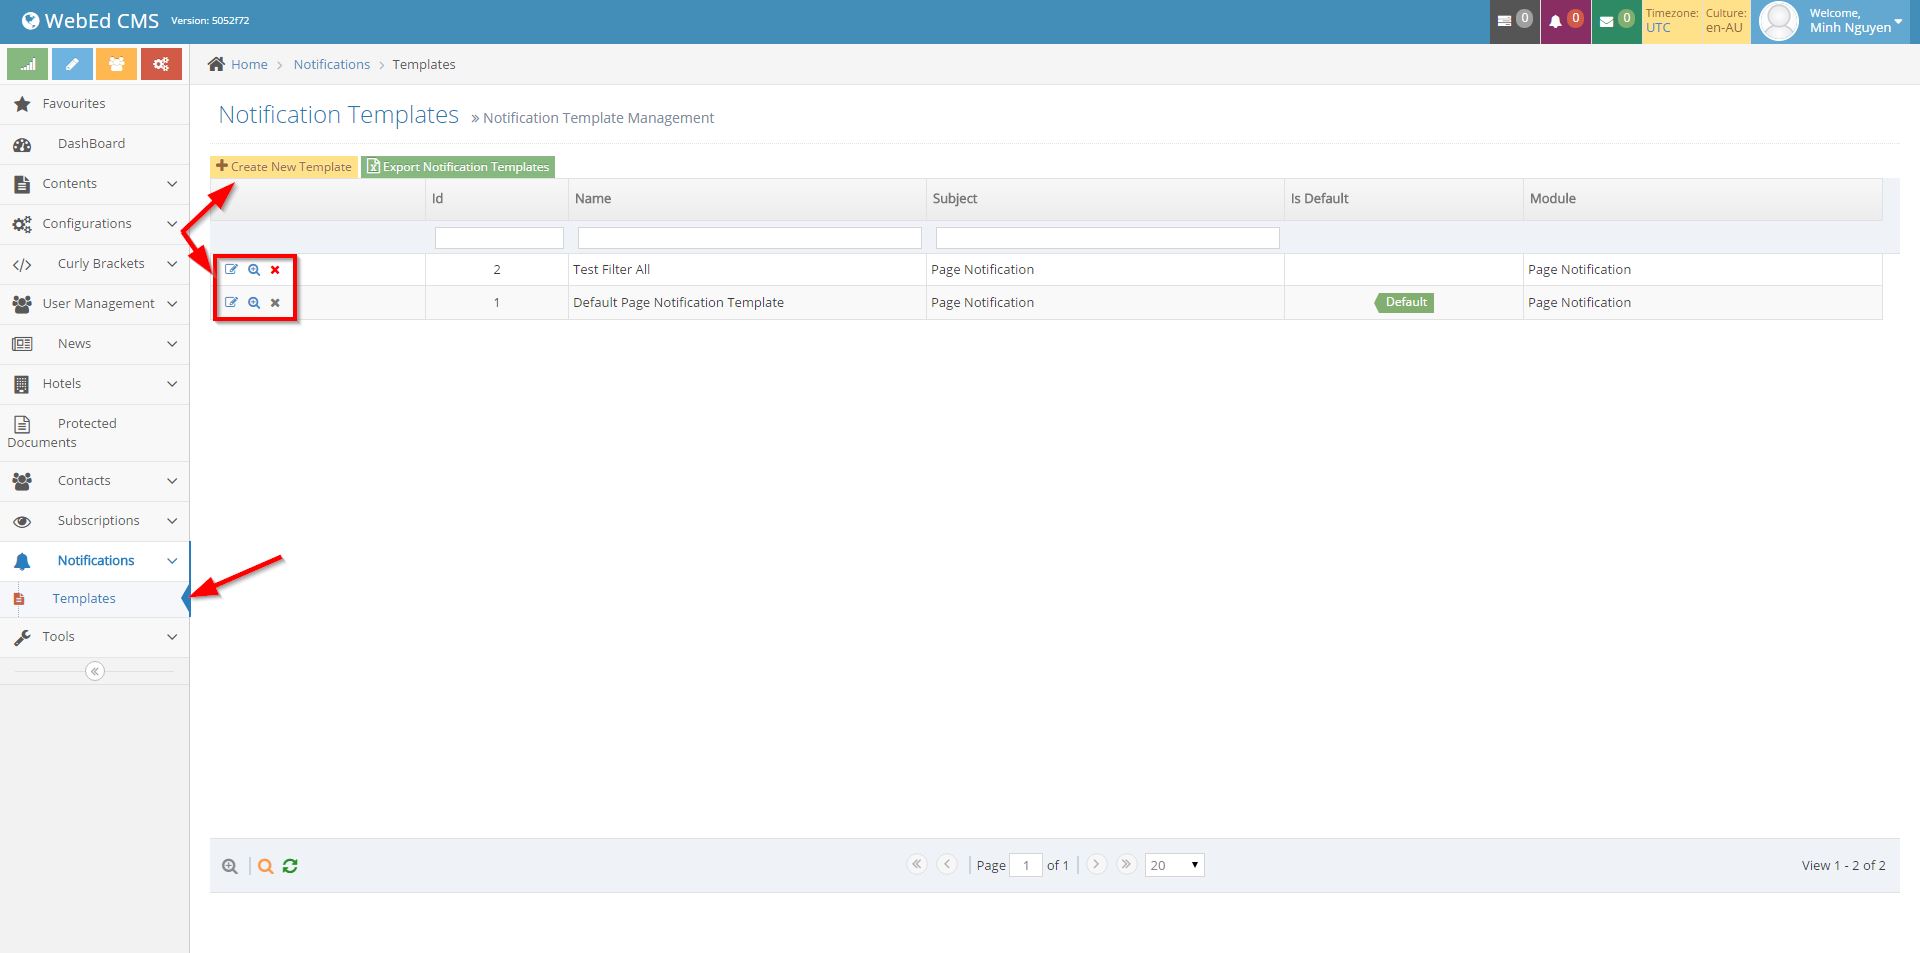
How to create, edit and delete Notification Template in Admin Dashboard
STEP-BY-STEP
-
1Log in as an administrator and go to the Admin Dashboard.
Learn how to log in here → -
2Go to Admin Dashboard >> Modules >> Notifications >> Templates and select your suitable action in the 1st column or select Create New Template
Subscribe to Automatic Updates
Subscribe to Automatic Updates Overview
The notifications module allows your site visitors to register for updates to sections of your website
Why you would use a Notify Me Module?
Notify Me Module is a very useful step to increase your visitors/reader base and for your information. It will deliver a report through a subscriber at a specific time or in response to an event or site update.
Adding Notify Me to a Page
How to Add Subscription Curly Bracket in Page Templates
STEP-BY-STEP
-
1Log in as an administrator and go to the Admin Dashboard.
Learn how to log in here → -
2Go to the Admin page and log in using your username and password correctly.
-
3In Admin >> Page Content >> Look and Feel >> Page Templates.
-
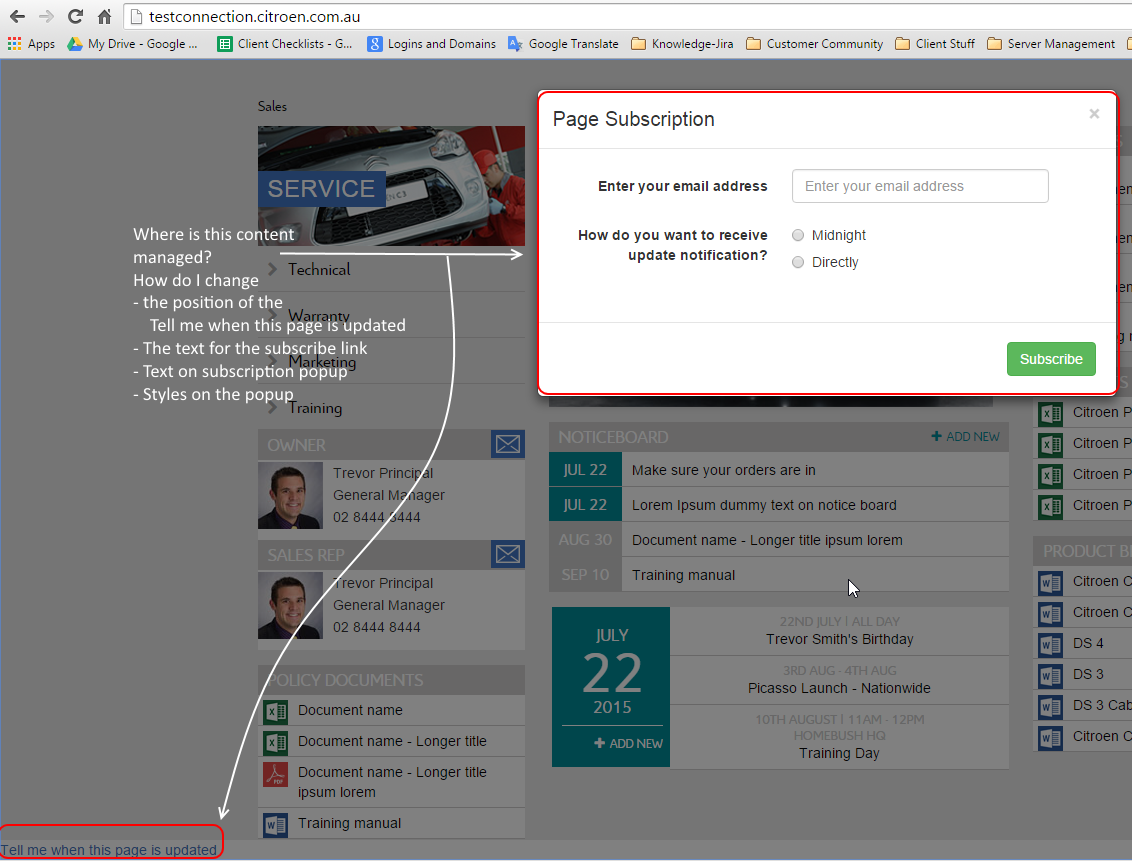
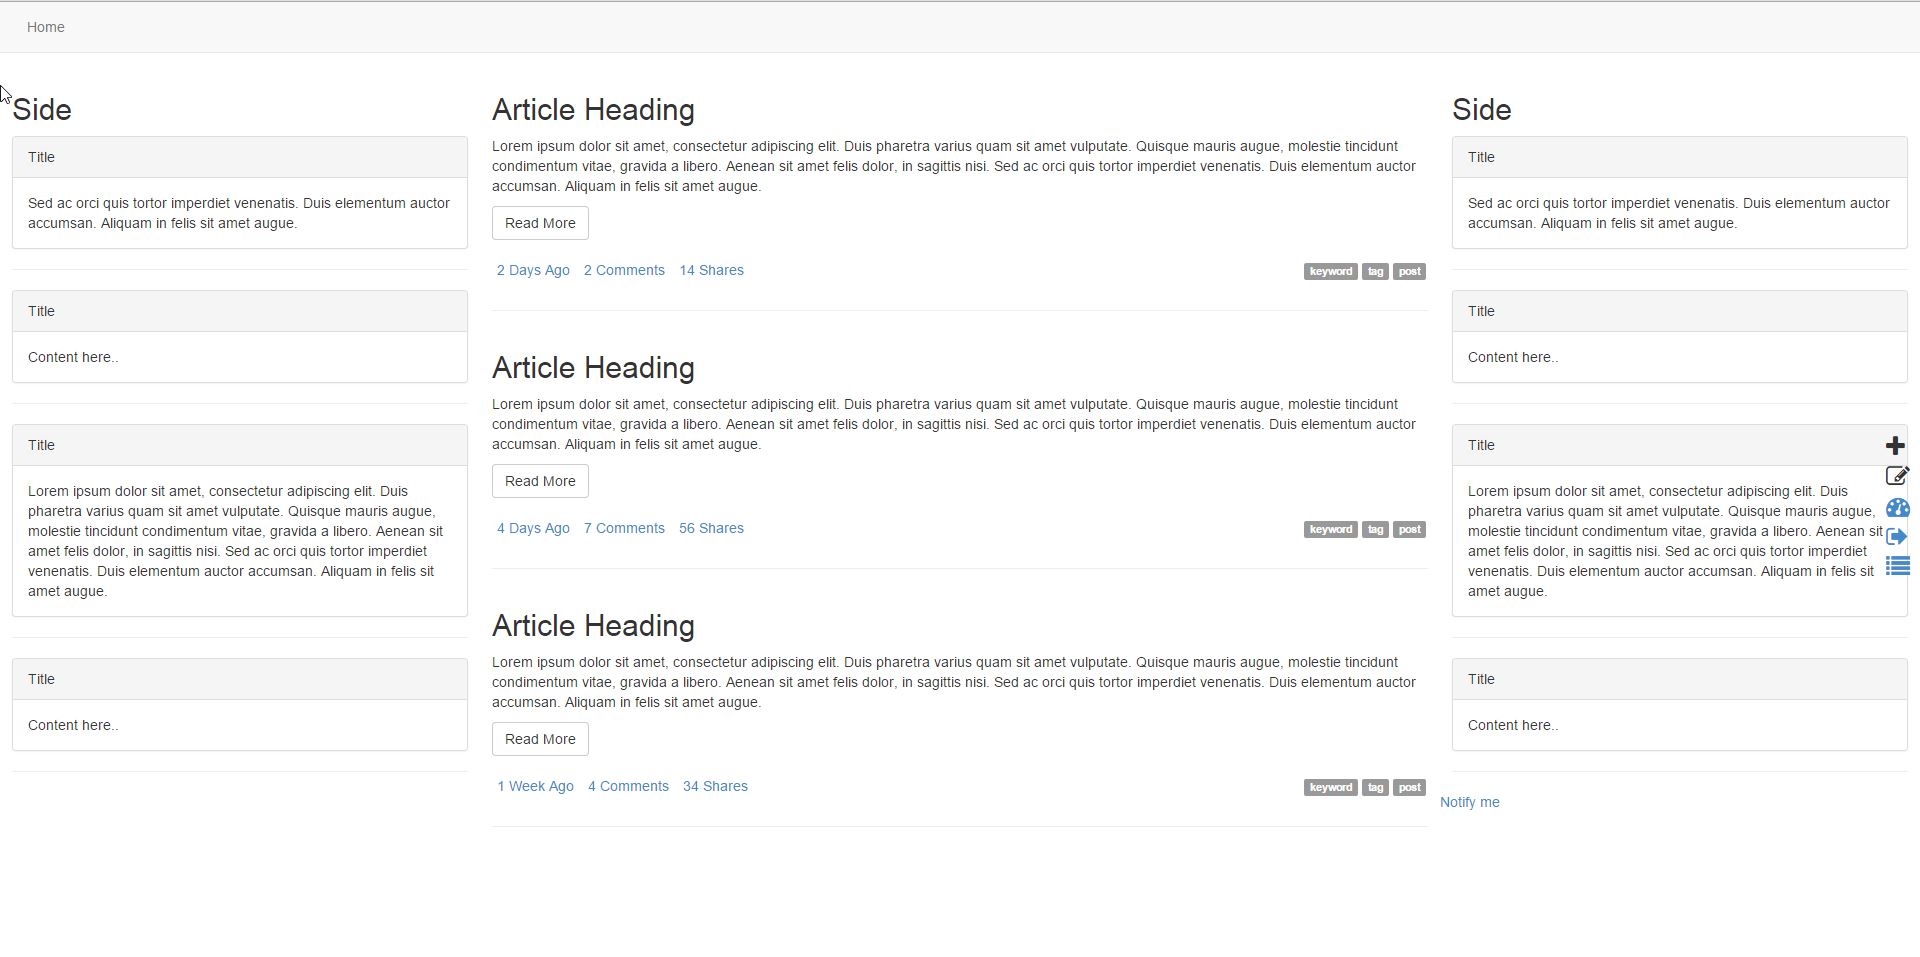
4Every page has "Tell me when this page is updated" text at the end of the page and test the curly bracket.
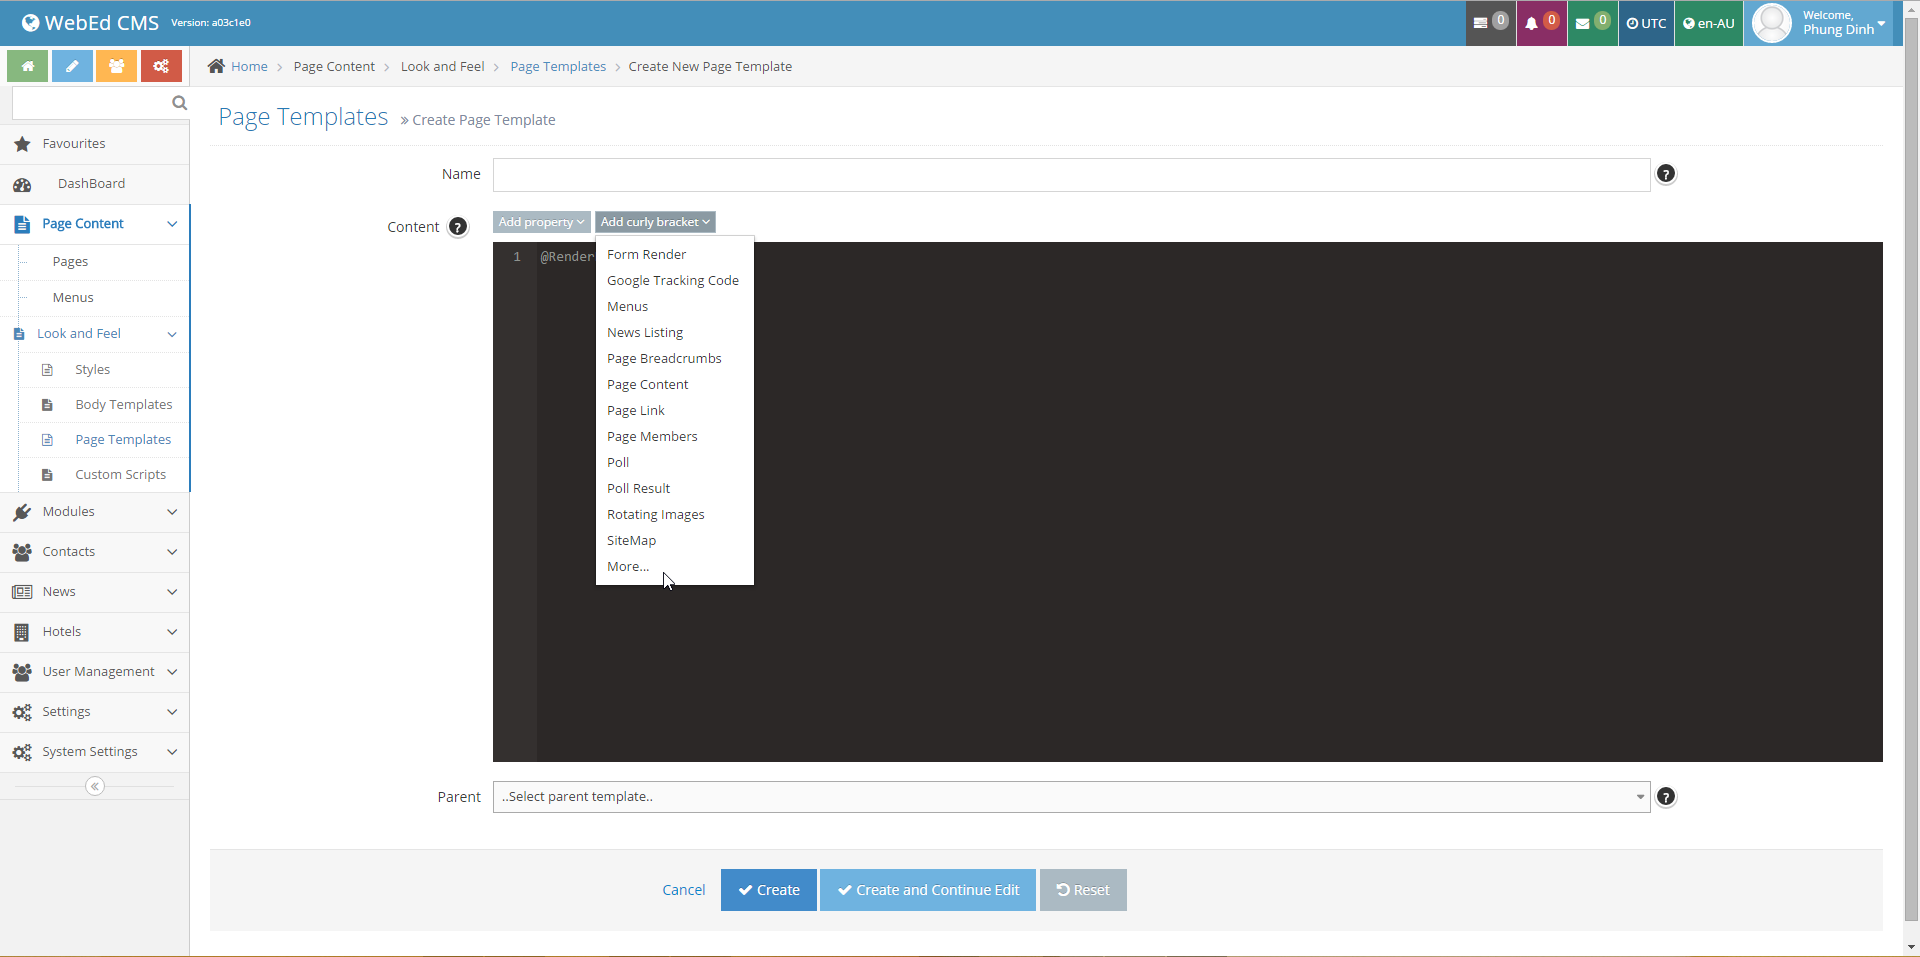
-
5Click More and search with the Sub keyword
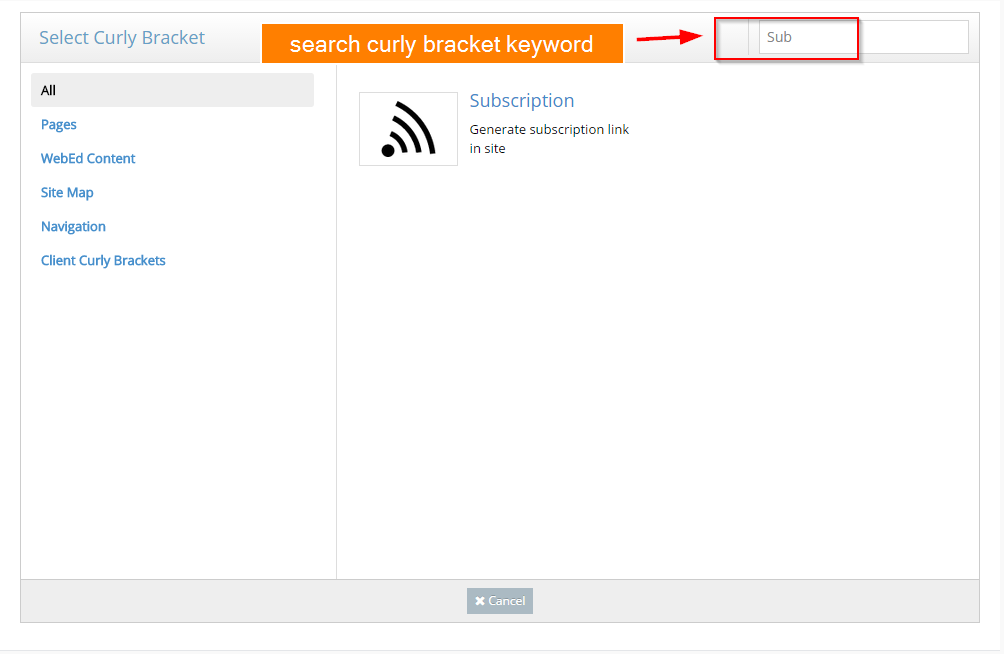
-
6Click Subscription icon
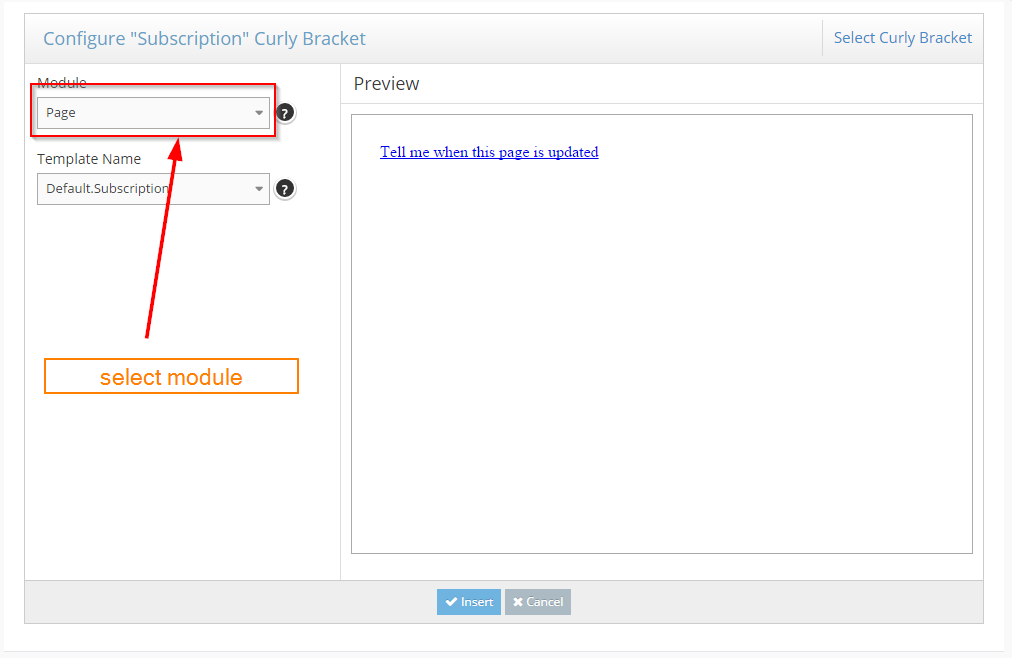
-
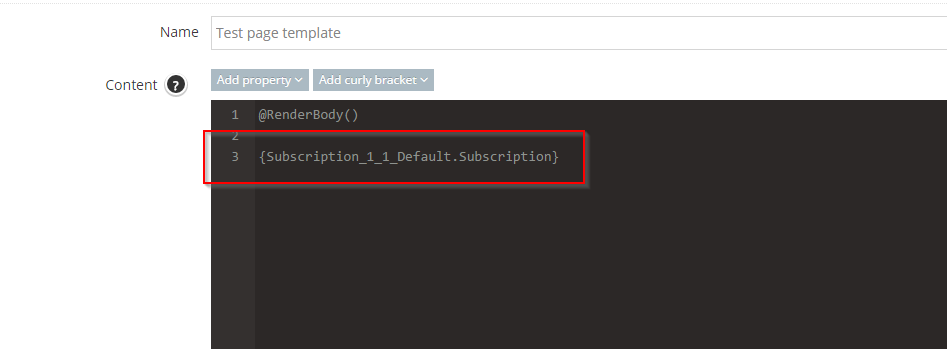
7The curly bracket will be inserted into the content
How to Configure the Background Tasks
STEP-BY-STEP
-
1Log in as an administrator and go to the Admin Dashboard.
Learn how to log in here → -
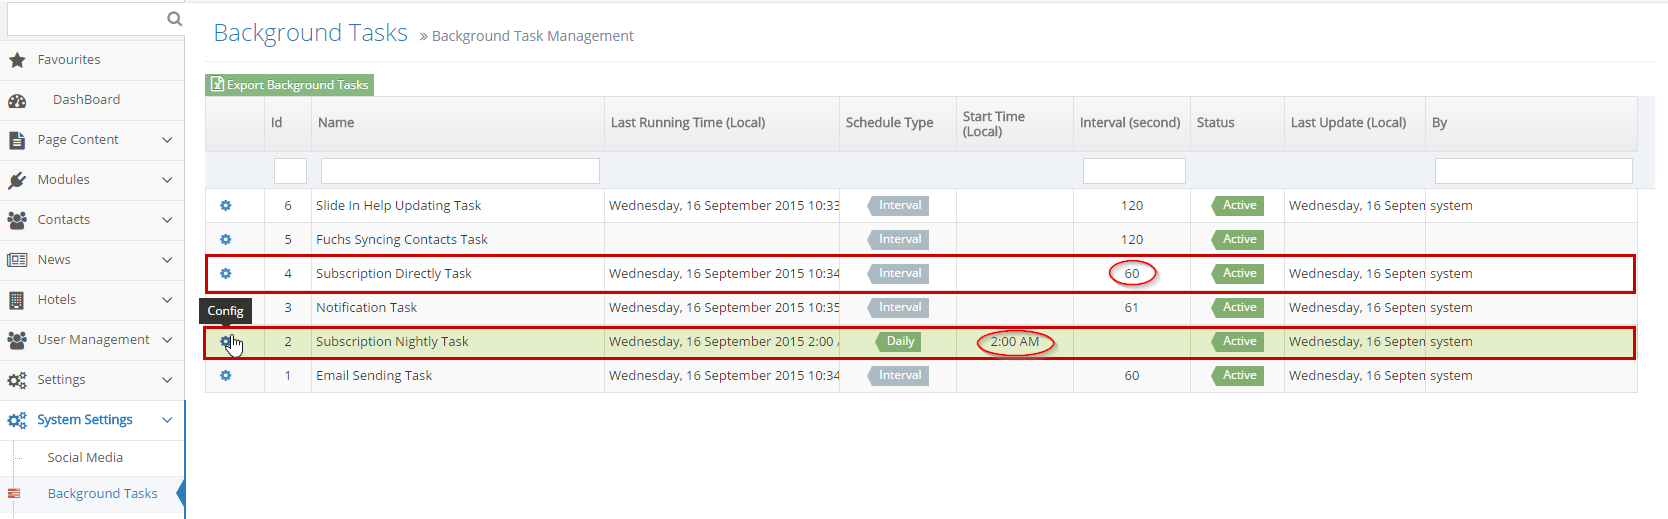
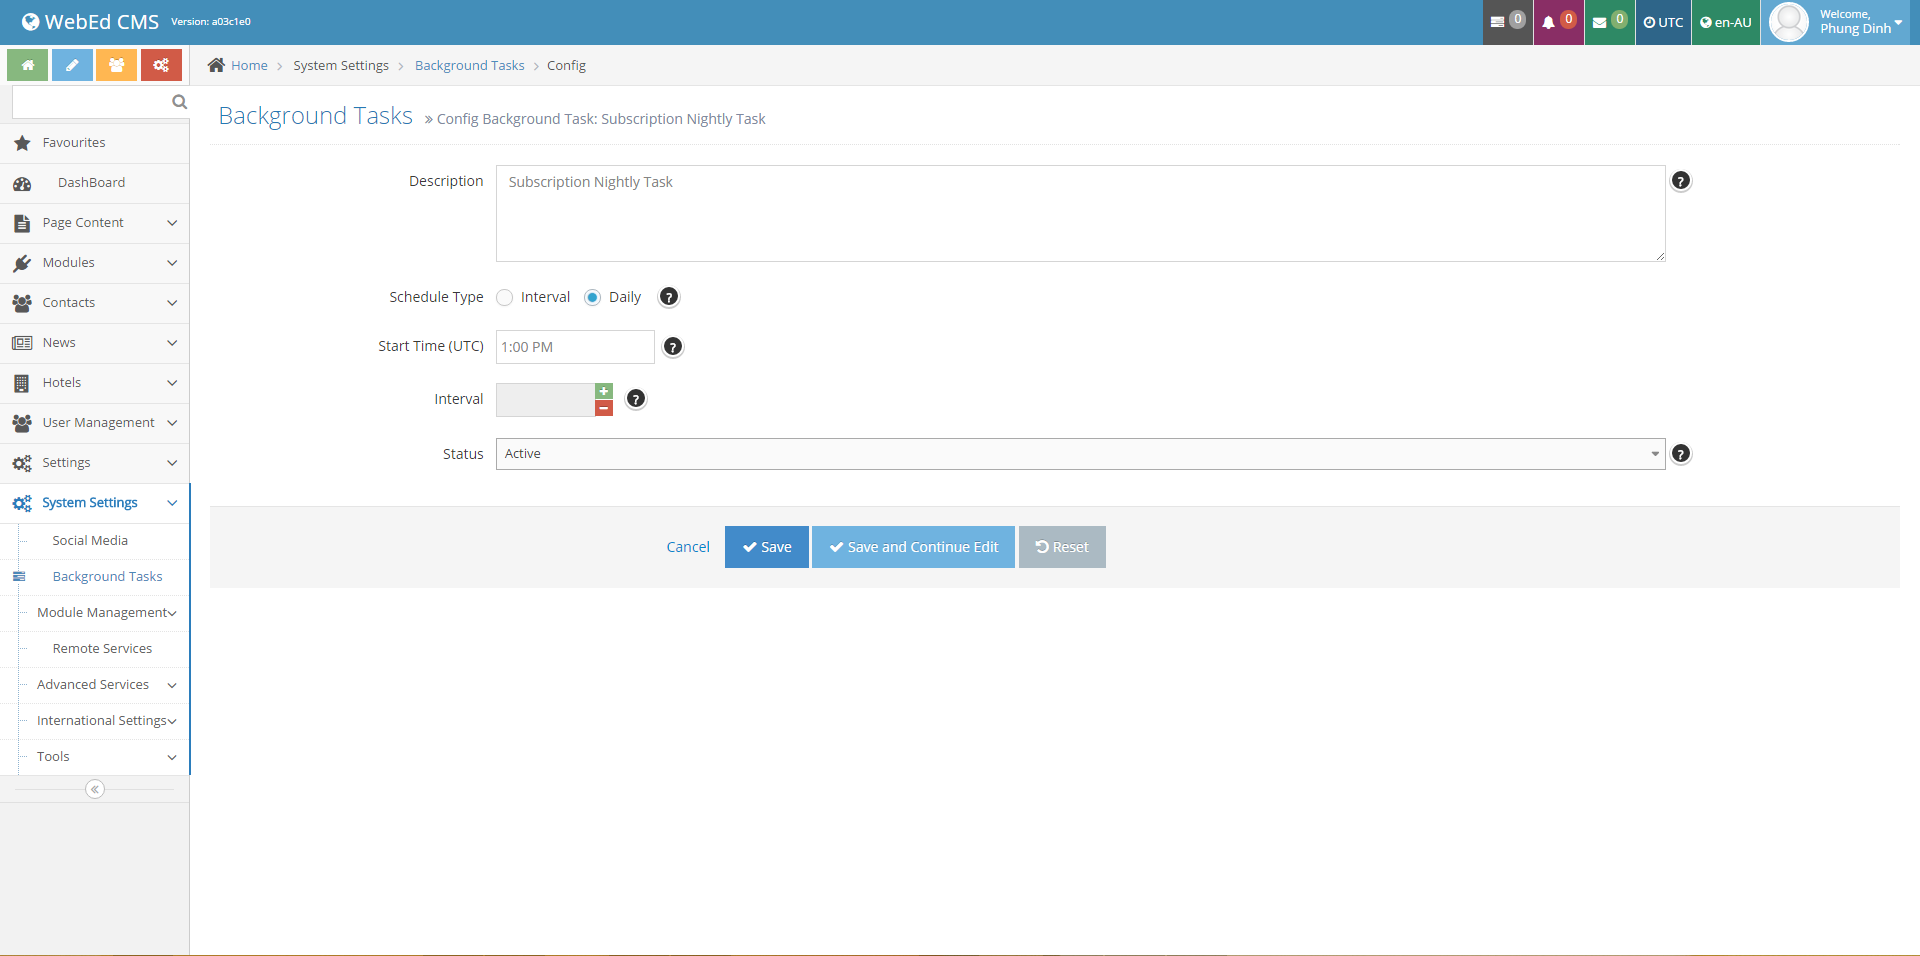
2Go to Admin >> System Settings >> Background Tasks and click the config icon of Subscription Directly Task or Subscription Nightly Task and change the time
-
3Click Edit to configure and Set Subscription Nightly Task in two ways:
- Select Schedule type is Interval and then set Interval value: Background tasks will be running following this value
- Select Schedule type is Daily and then set Start Time: Background tasks will be daily running following this value
-
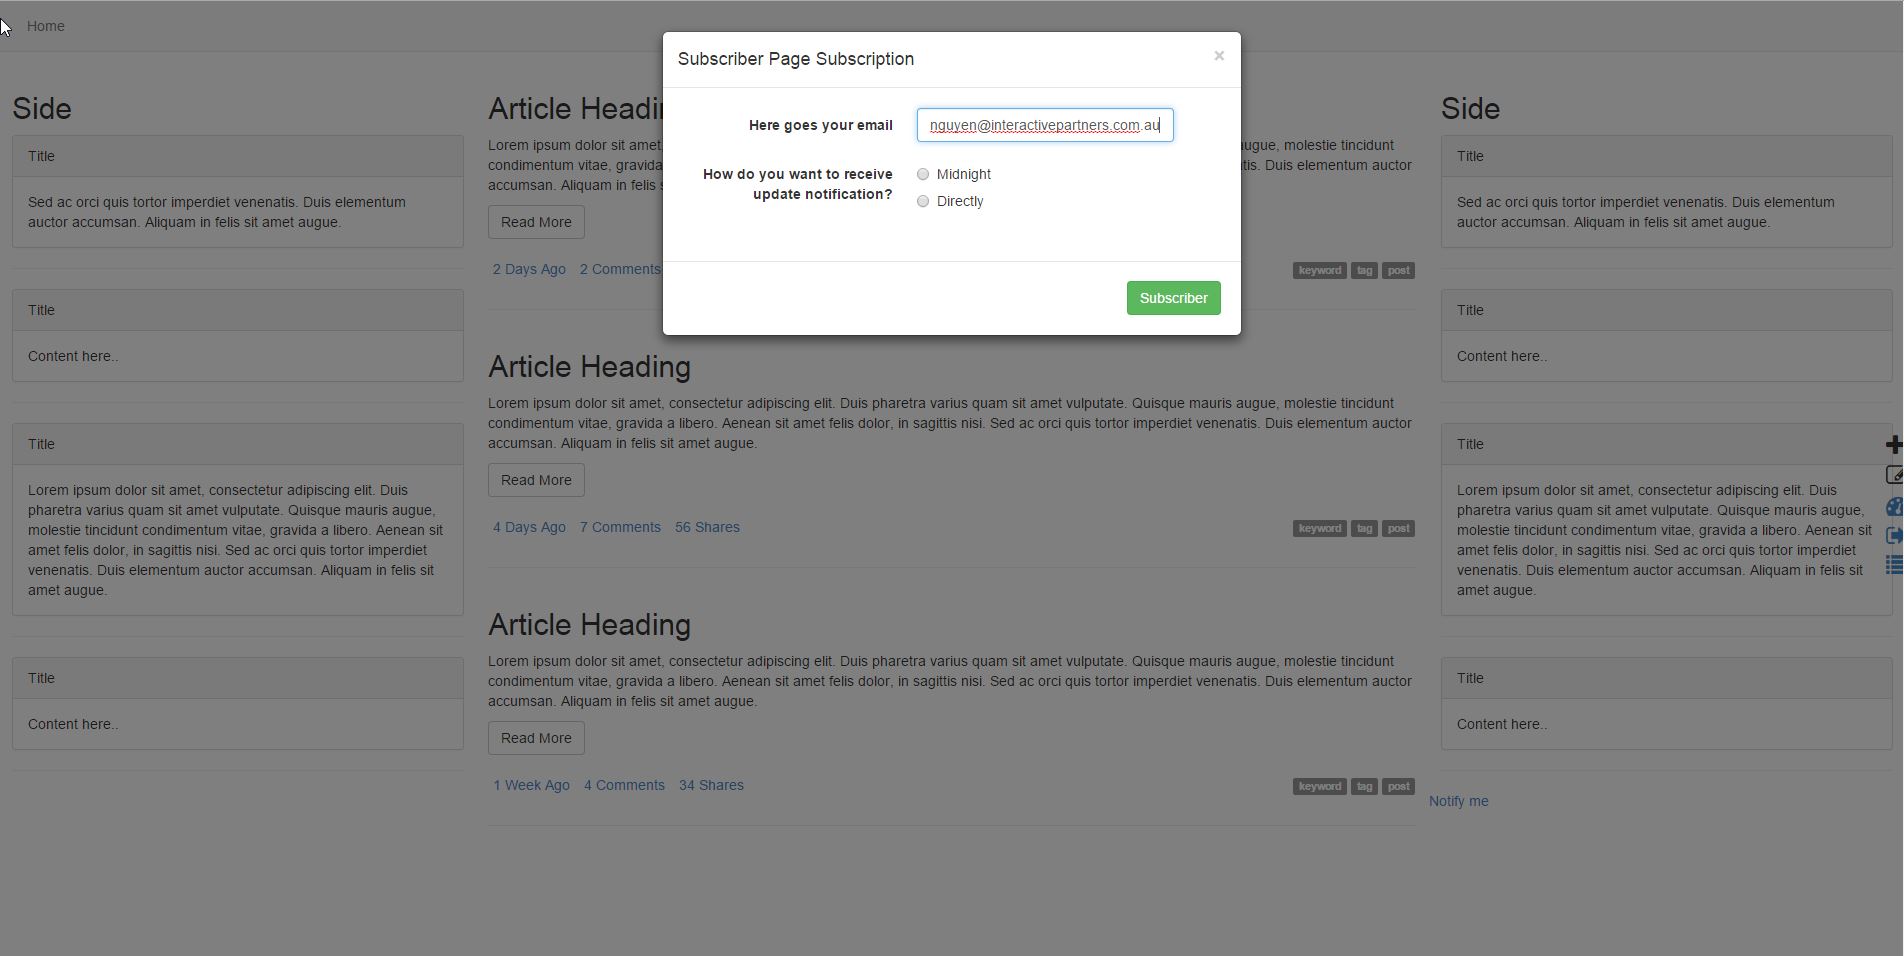
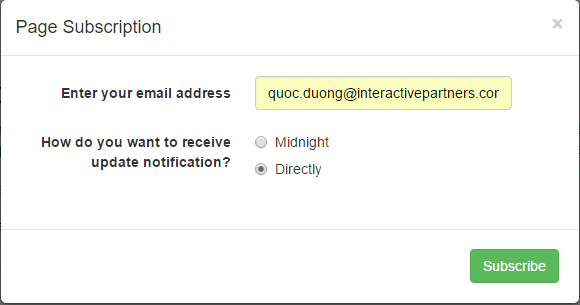
4Go to Homepage, Click "Notify Me". The popup will display on the page.
-
5Then Input the email address you want to Notify and click Subscribe button.
-
6Go to Homepage, Edit and check to Notify Subscriber and input notify data.
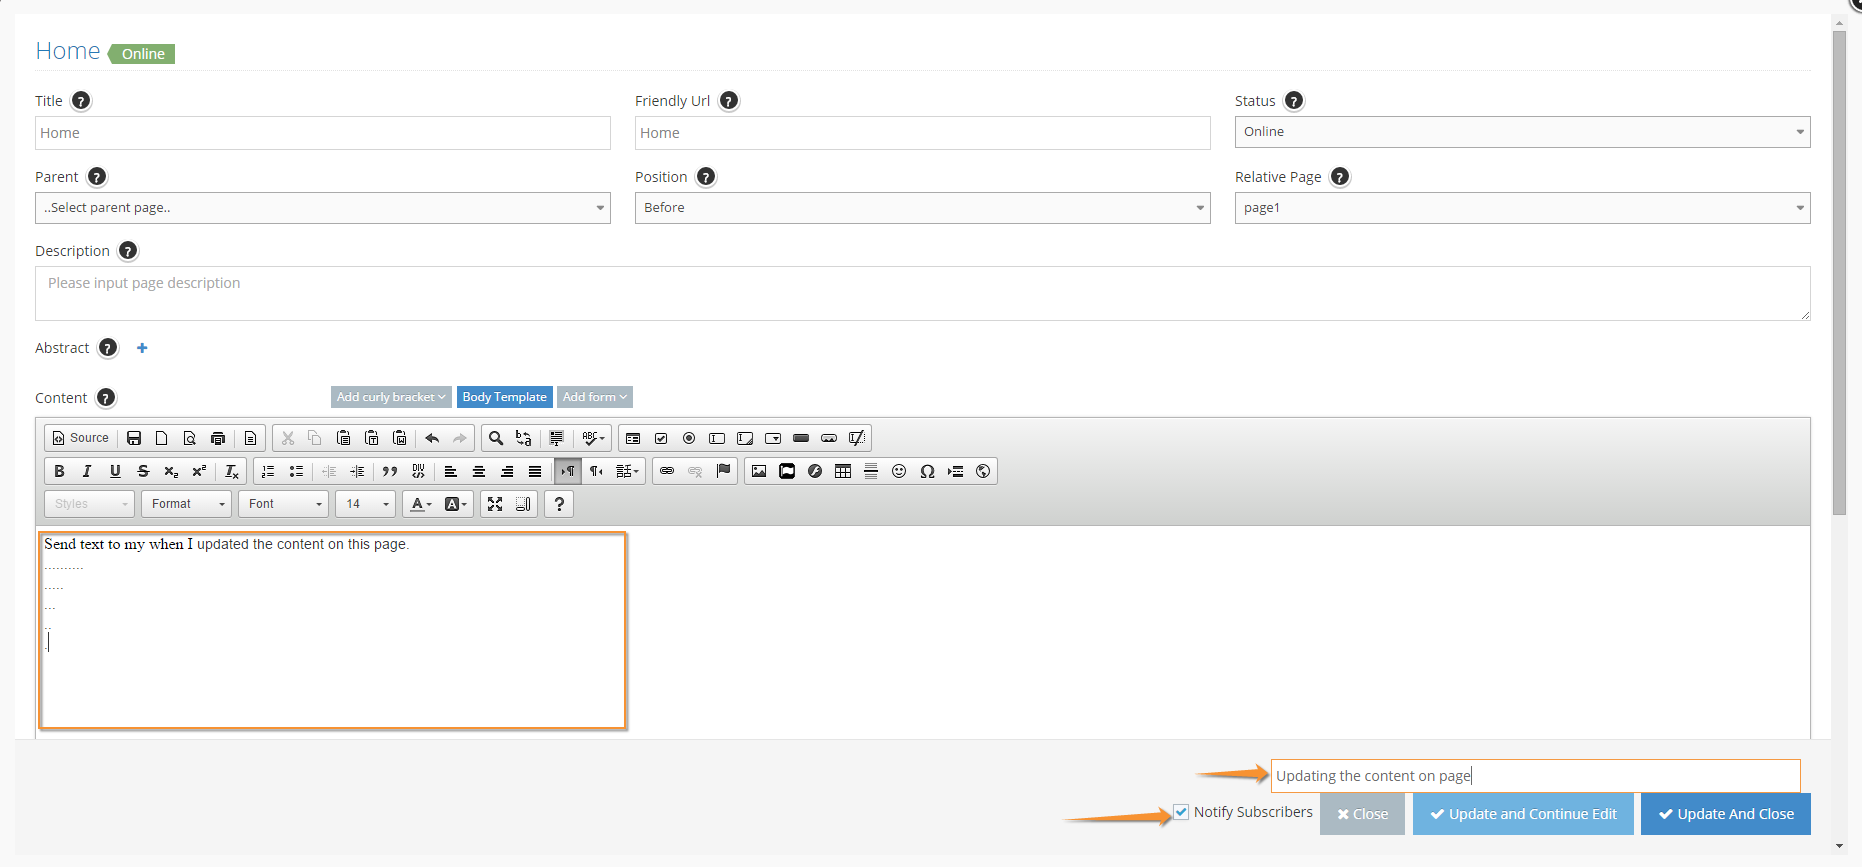
-
7Email is sent to the subscriber with Homepage notification data after 60 seconds.
Now you go to the e-mail box to check Subscription.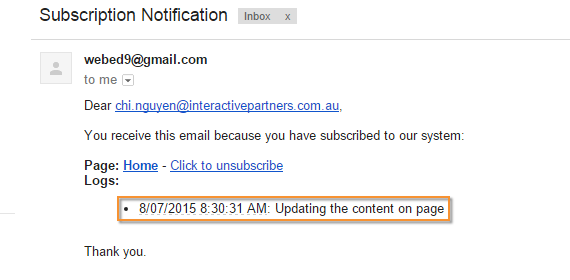
-
8The Nightly Task that sends data to the subscriber on the page is updated.
-
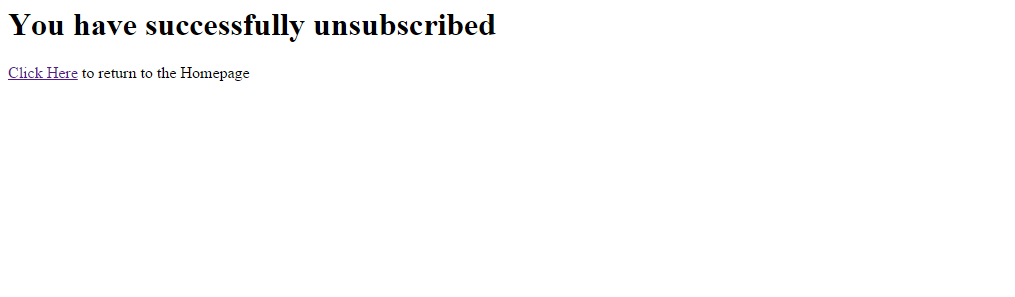
9When you click to unsubscribe in Email. It takes you to the redirect page "Stop Notifying me when content is updated" and subscriptionAction will be prompted for confirming the removal of update notifications then This page is deactivated from the user's "Notify Me".
-
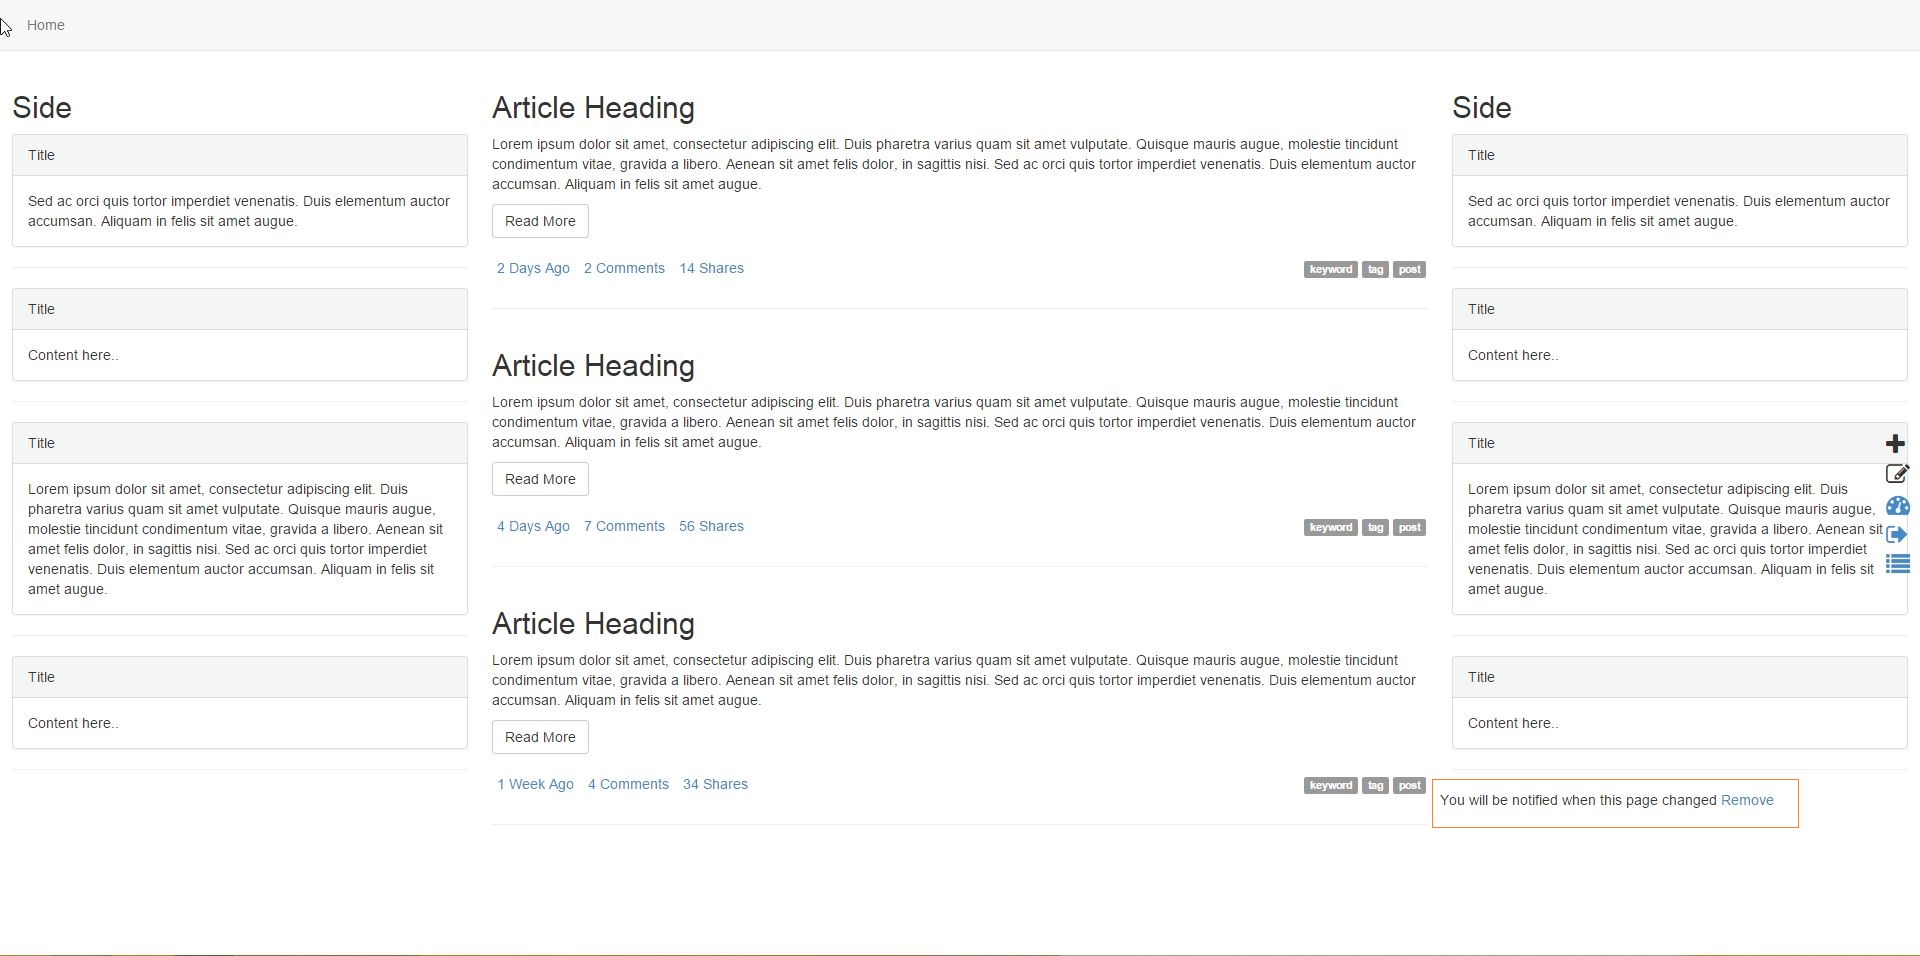
10After the submitted Subscribe button, you will see the text at the bottom change to "You will be notified when this content changes. Remove"
-
11Go to the Admin site and see the left menu: Click on Modules » Subscription.
- Subscription is shown, 1 ACTIVE and 1 DEACTIVED with the deactivated date when you test the Unsubscribe Date Record function.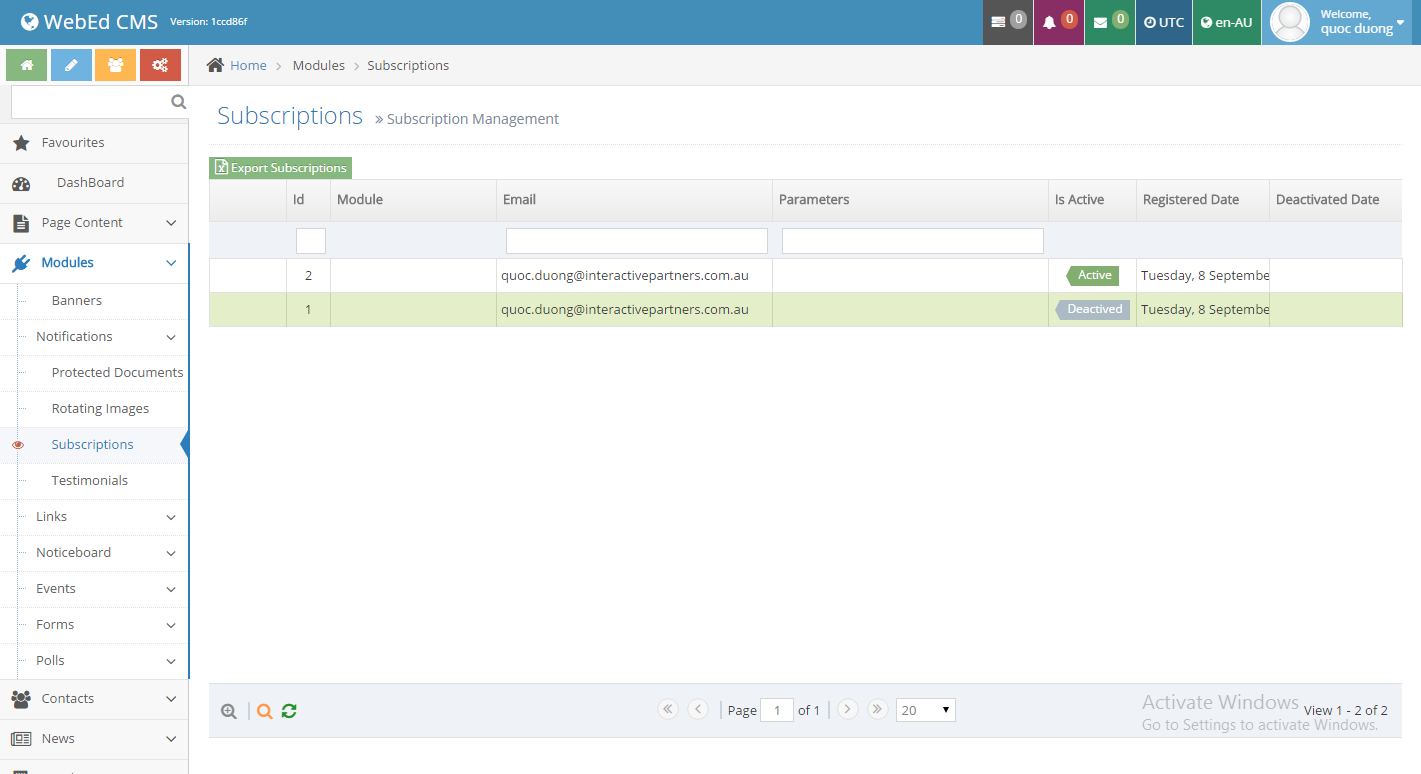
How to define the Notify Me message by an administrator
STEP-BY-STEP
-
1Log in as an administrator and go to the Admin Dashboard.
Learn how to log in here → -
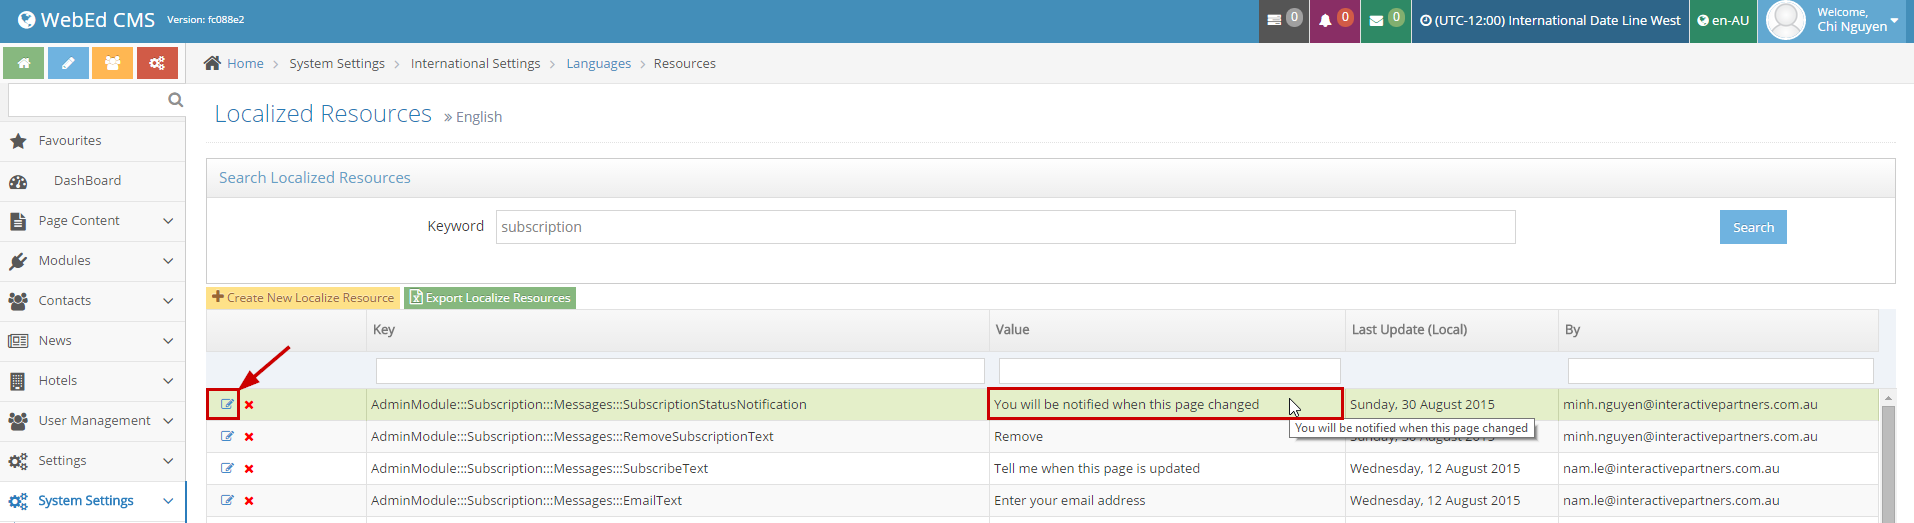
2Go to Admin >> System Setting >> International Settings >> Languages and click the Edit Resource link.

-
3Next, you search with Keyword "subscription" and Edit to update the message
Notification Email and Tell A Friend to Share via Social
- Ensures users can elect to be notified once per day for updates or multiple times per day when updating
- Allow users to change their own "Notify Me" as they see fit through a user "Notify Me" interface
- When emails are sent to subscribers they will be presented with options to tell a friend, share via social Media
- This means each time a page is updated a notification email is sent to the subscribers
- Change the way to receive a subscription
- Enter your email and select the Directly option
Add or Remove Share Options
STEP-BY-STEP
-
1Log in as an administrator and go to the Admin Dashboard.
Learn how to log in here → -
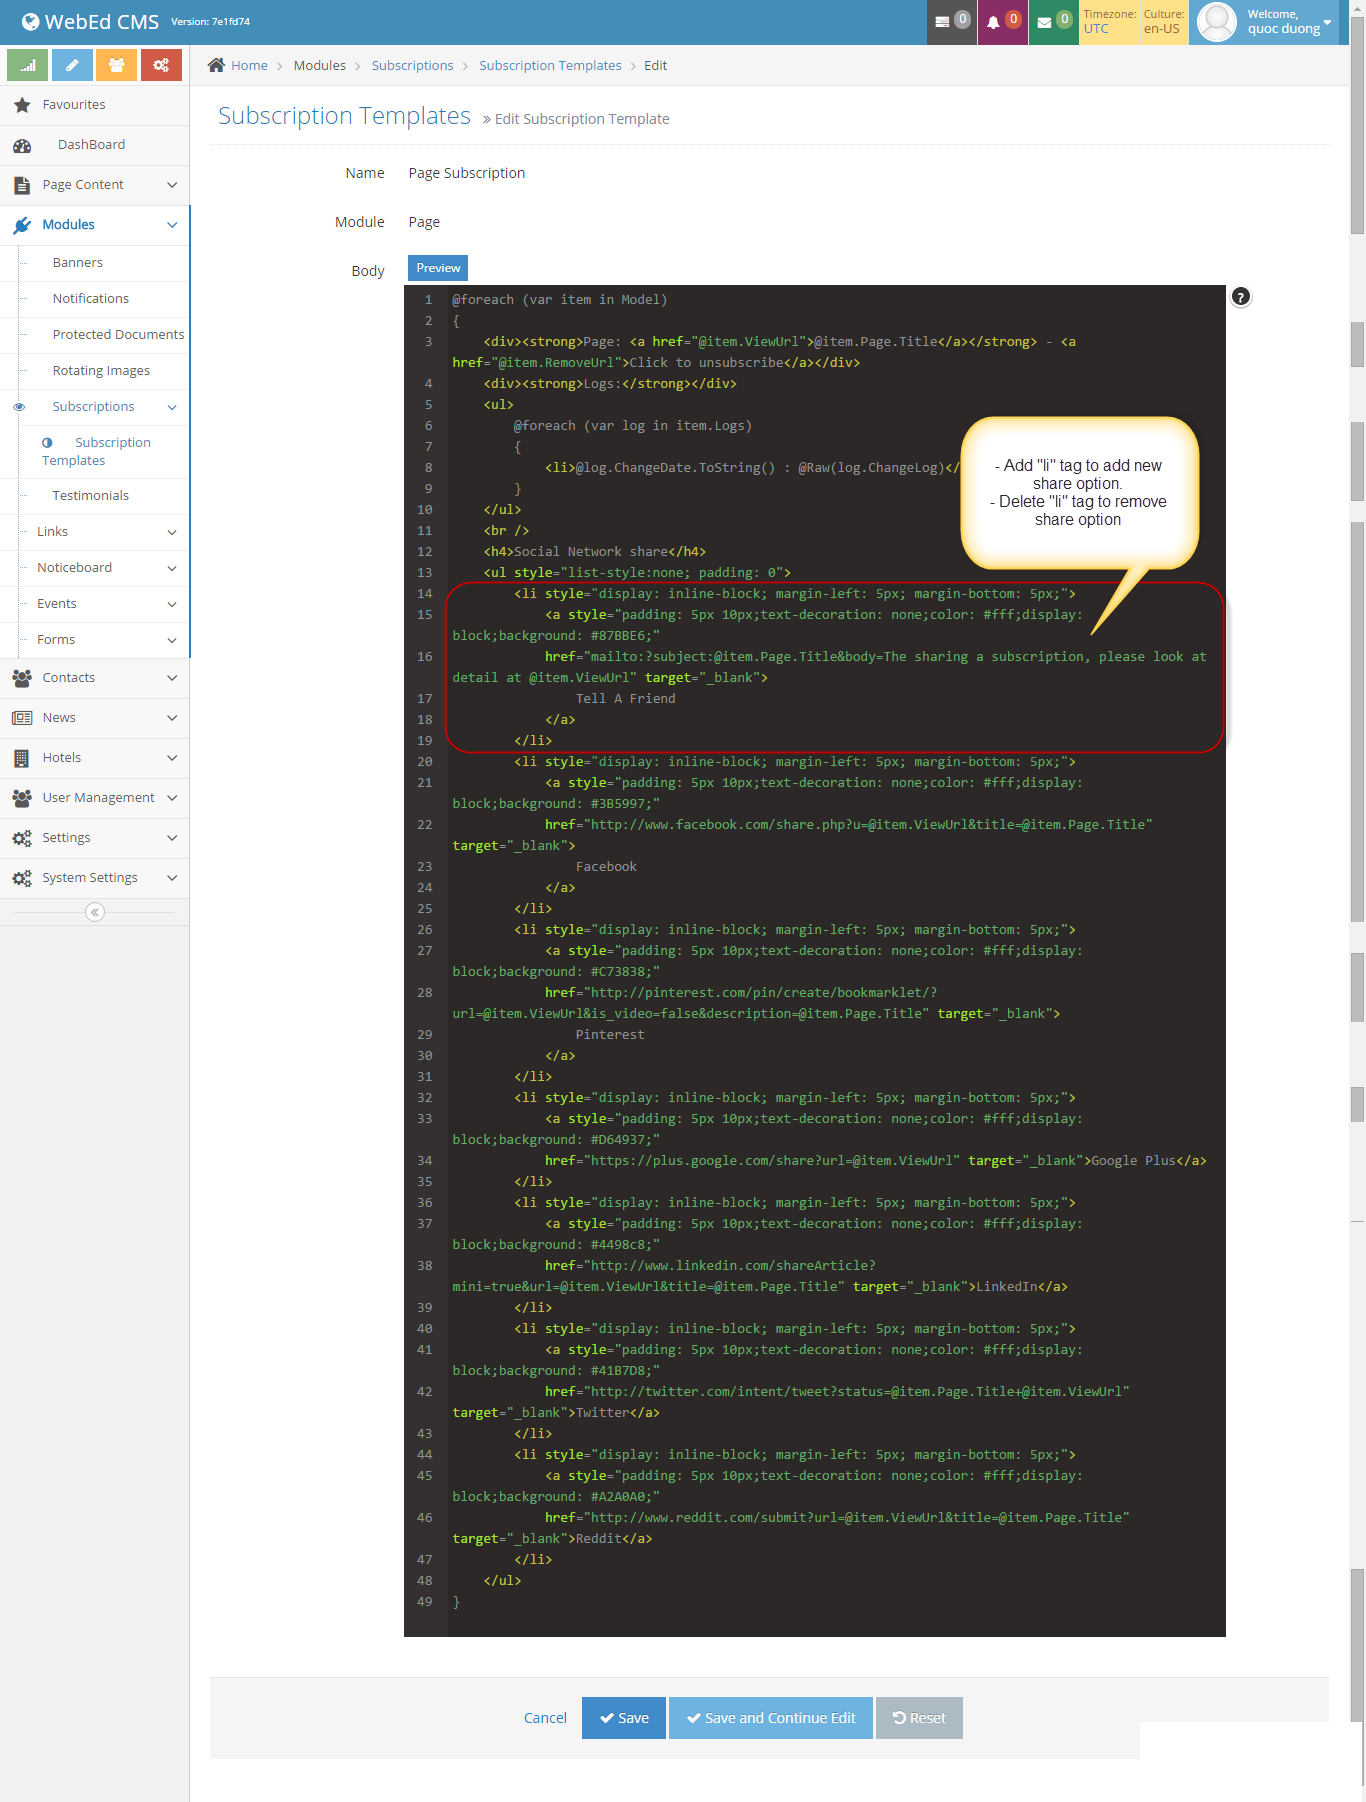
2Go to Admin >> Modules >> Subscriptions >> Subscription Templates and click the Edit icon.
Modifying the Subscription Template
STEP-BY-STEP
-
1Log in as an administrator and go to the Admin Dashboard.
Learn how to log in here → -
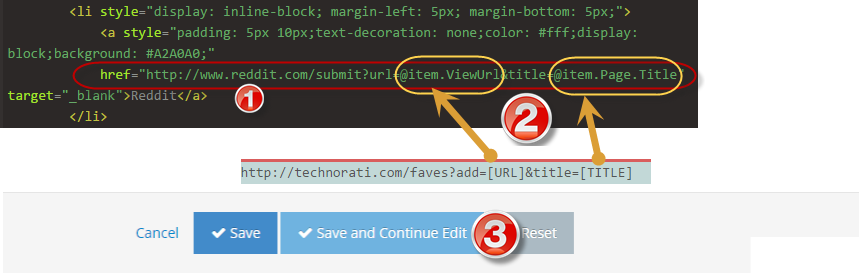
2Copy a list element and paste it inside the unordered list element then apply the colour property inside the "a" element for a new option.
-
3Delete a list element to remove a share option.
Adding More Share options
STEP-BY-STEP
-
1May add other share options with URL structure as an image below.
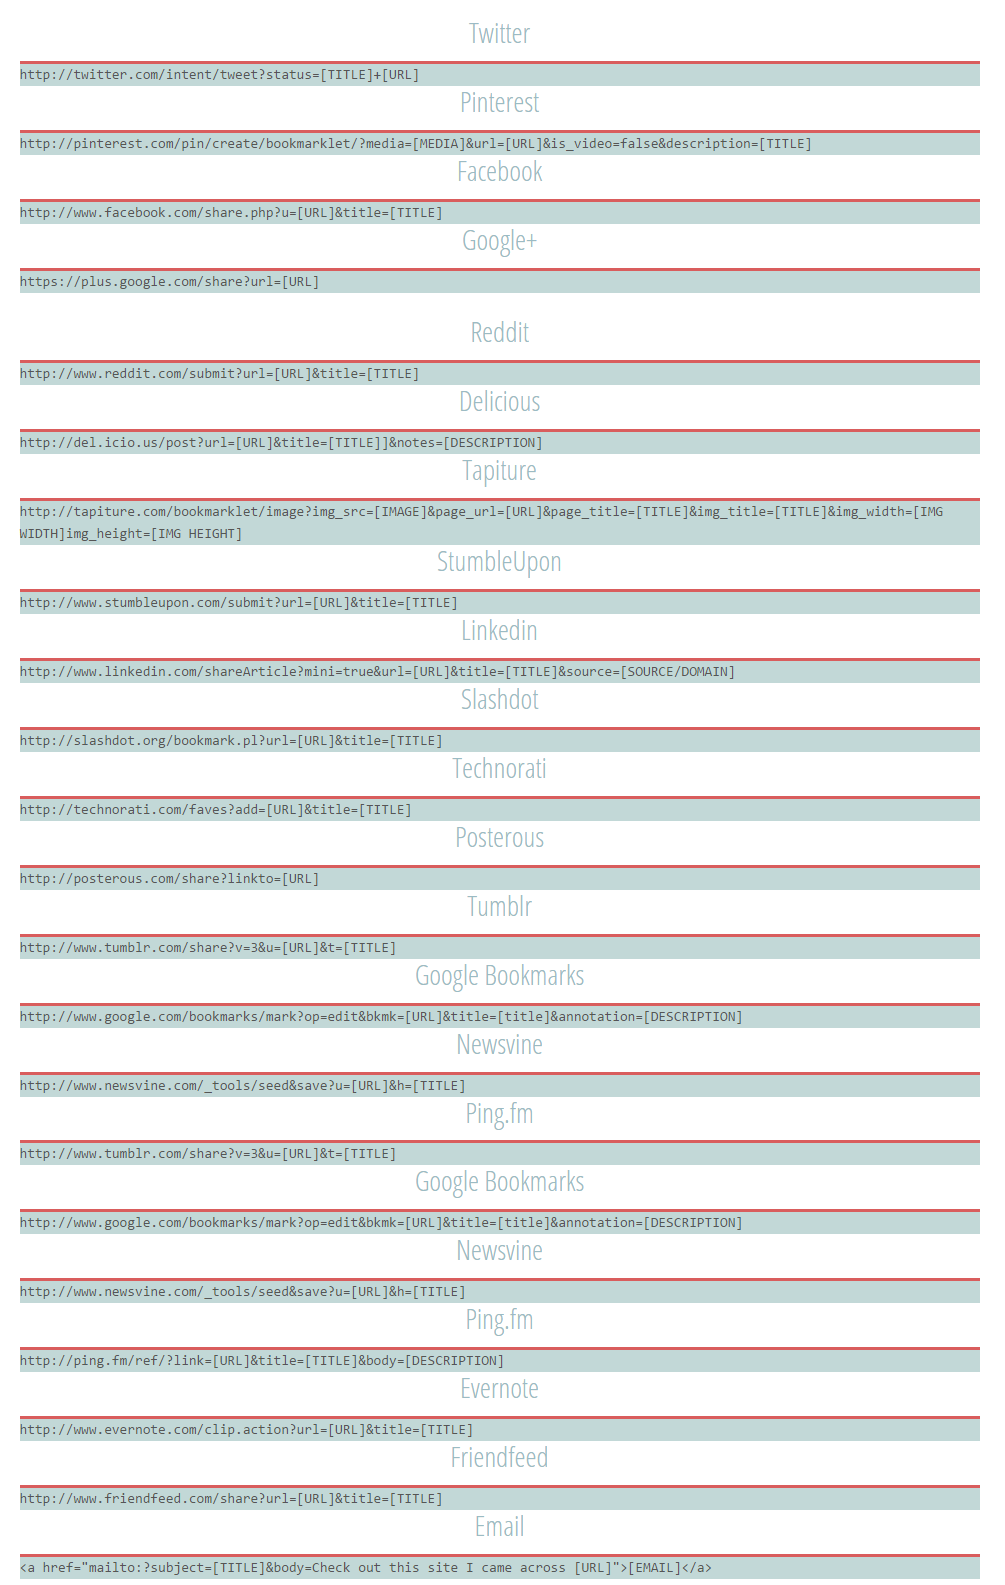
-
2Replace href for new social network want to add.
-
3Replace [TITLE] by @item.Page.Title, replace [URL] by @item.ViewUrl
-
4Press the Save button to save the template.
-
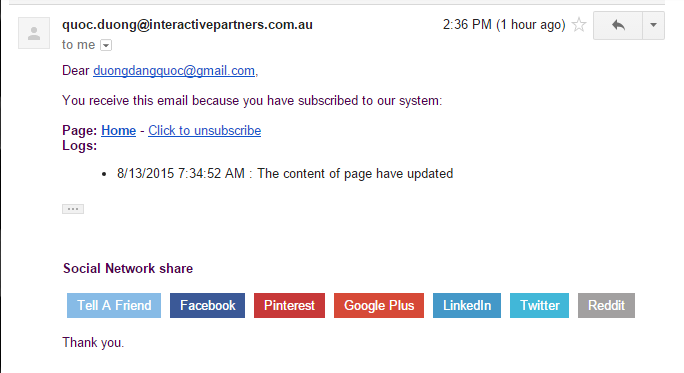
5Edit page content as the guide above, press Save then check your inbox email after 60 seconds. You received an e-mail.
-
6The content of the email should look like this:
How to Enable or Disable Subscription Feature
STEP-BY-STEP
-
1Log in as an administrator and go to the Admin Dashboard.
Learn how to log in here → -
2Go to any page and click Edit or
-
3Check the Notify Contacts option
-
4Click the "Update and Continue Edit" or "Update And Close" button to save changes