- Contacts Overview
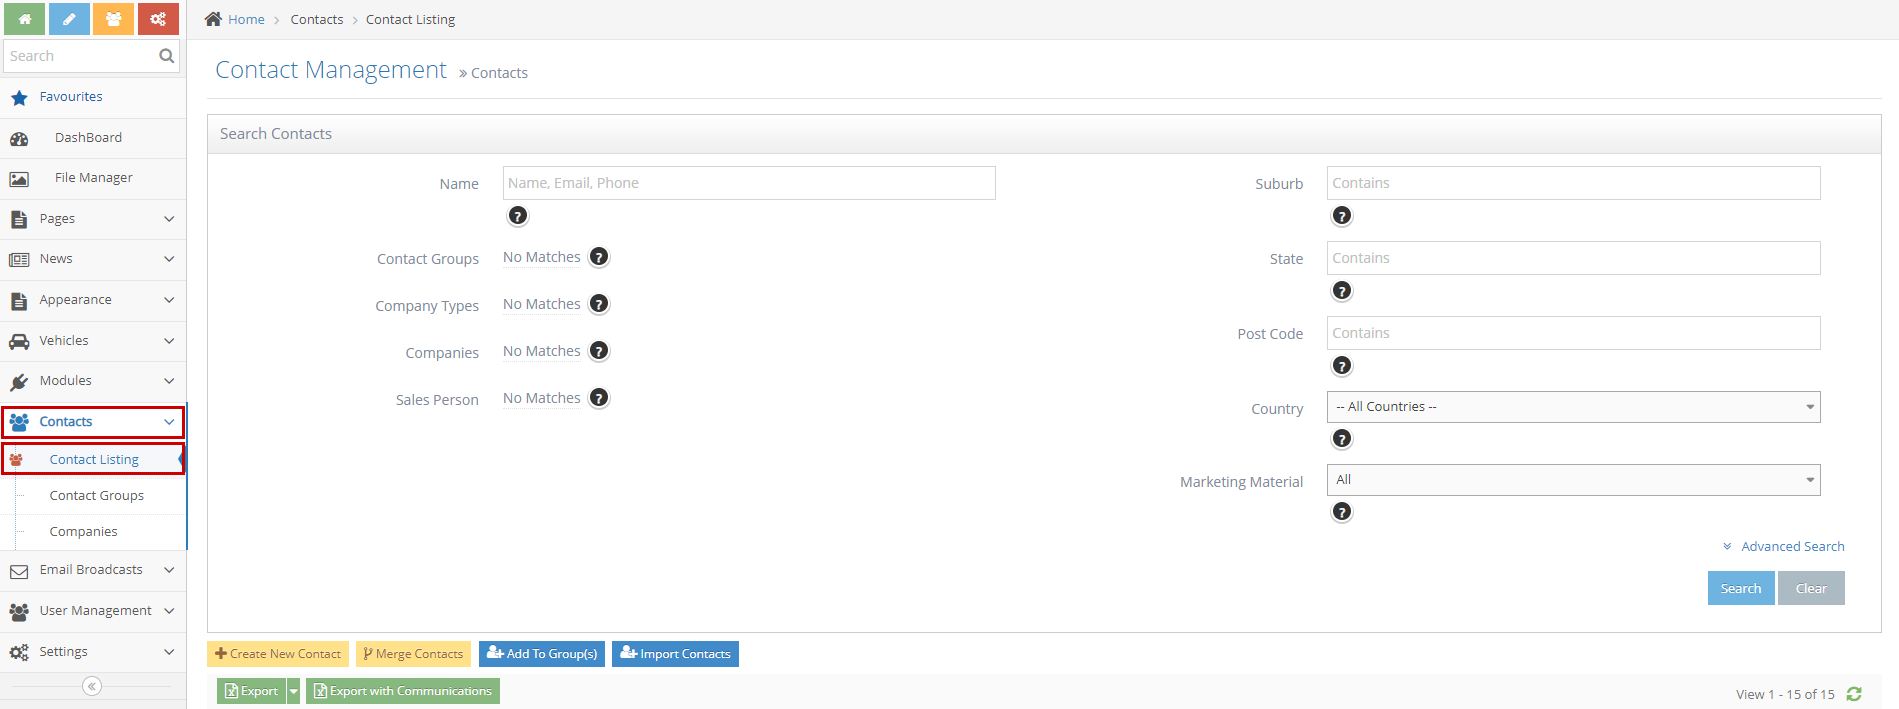
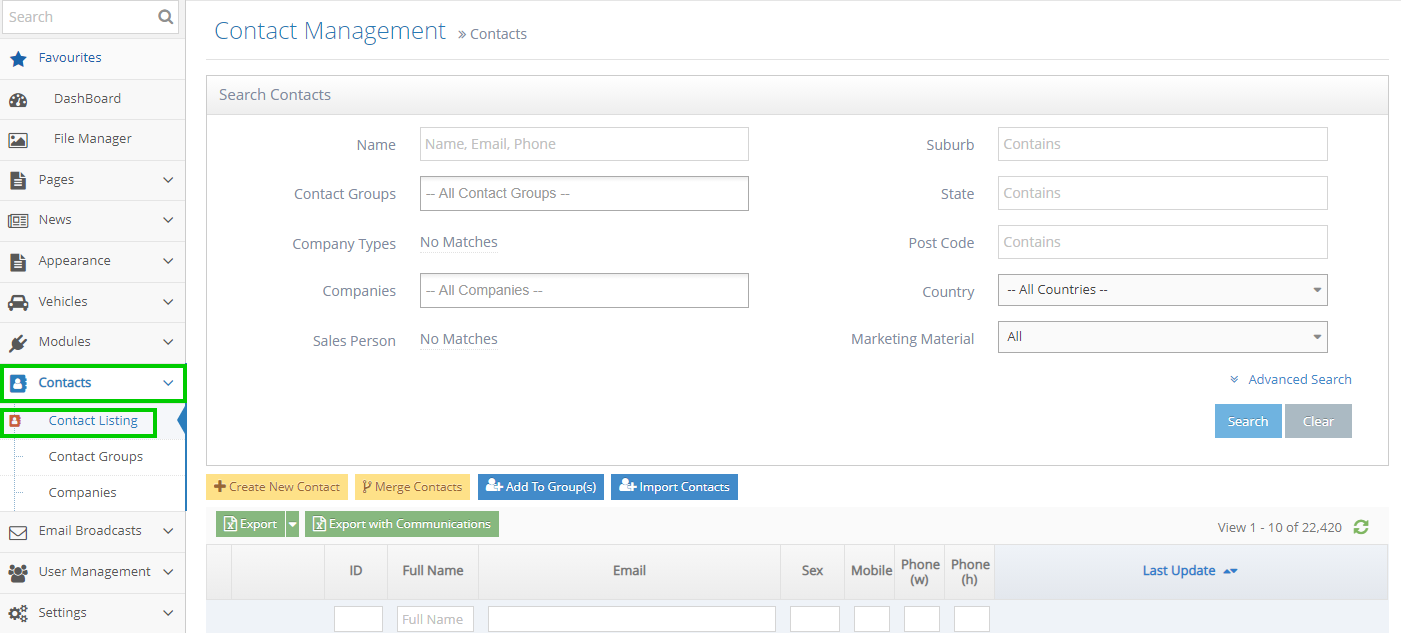
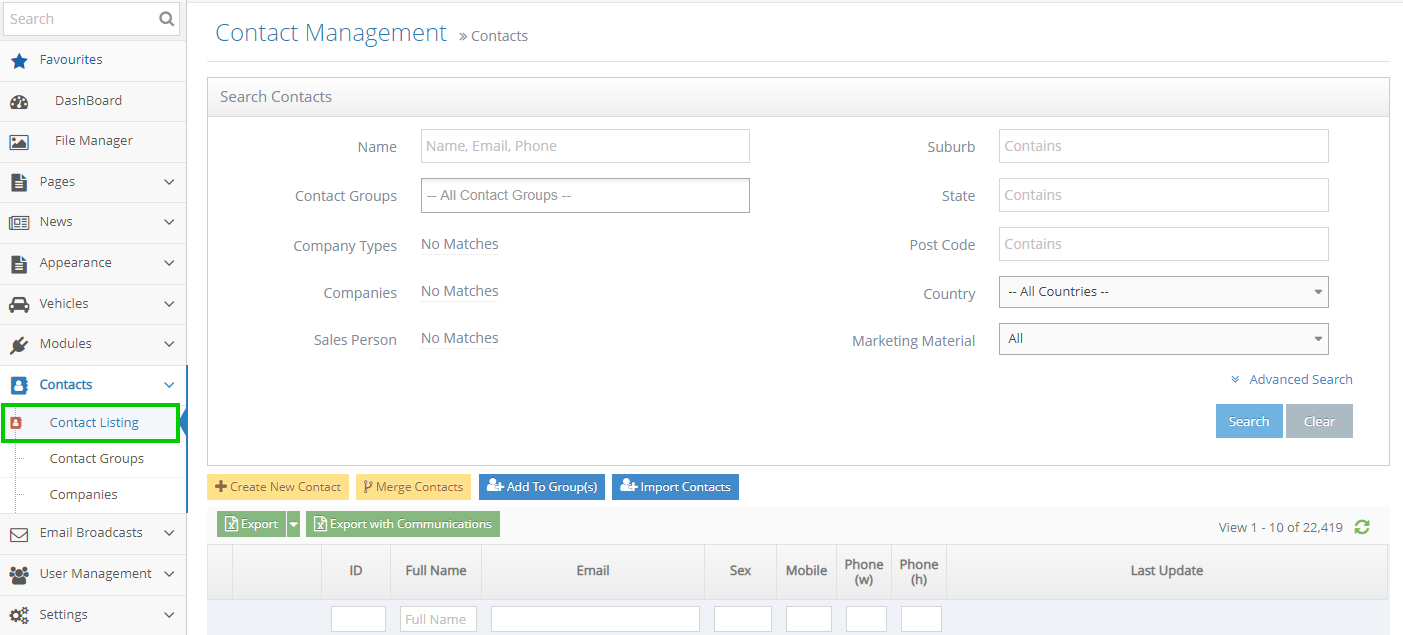
- Navigate to the Contacts Module
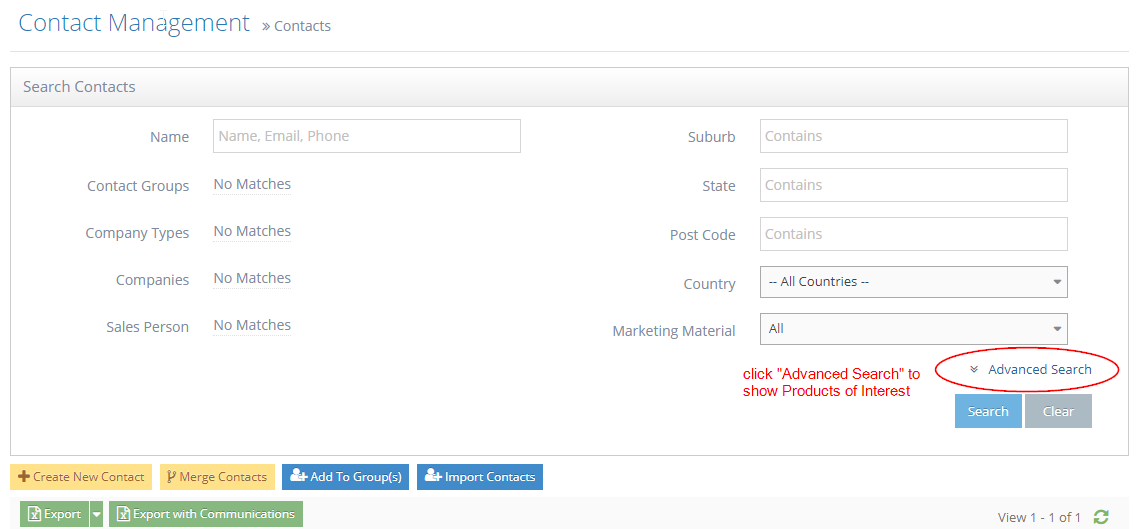
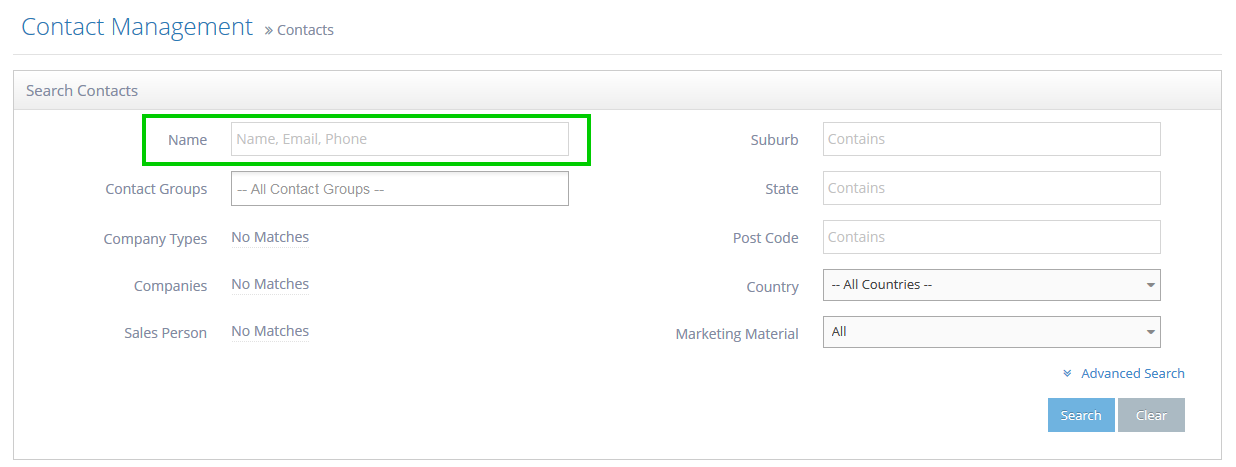
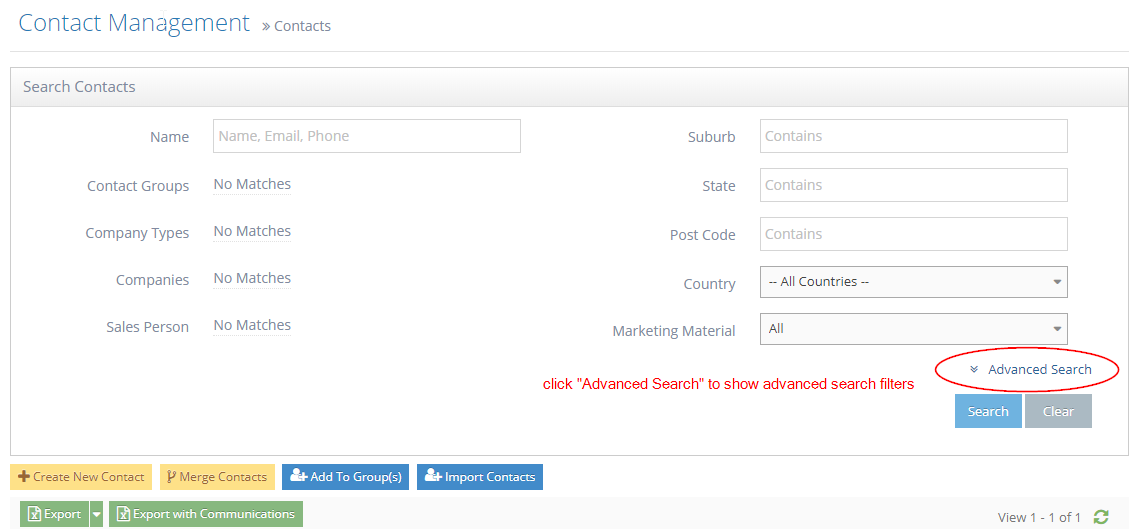
- Search Contacts
- Advanced Search
- Contact Note
- Contact Groups
- Building Your Database
- Connecting a Contact to a Company
- Merging Contacts
- Linking Contacts to Companies
- Using Products of Interest in Advanced Search
- Sending an Email to an Individual Contact
- Edit Company Details via Company Setup
- Attaining Lead Reports
- Contact Matching Rule Site Setting
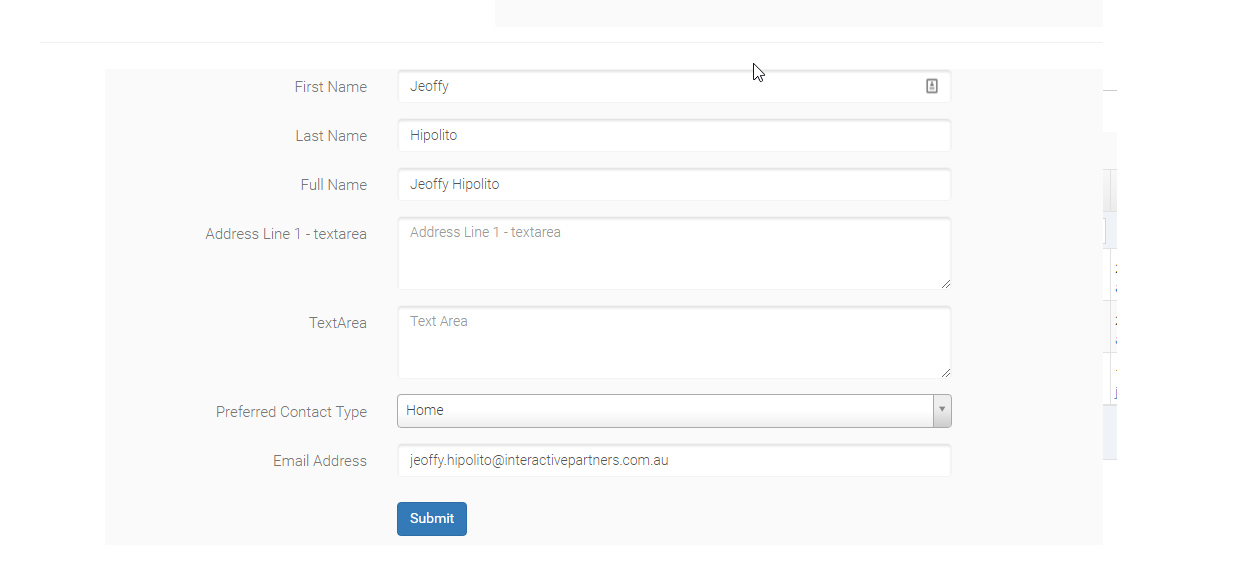
- Export Form Data
Contacts
Contacts Overview
The contacts module provides a simple Contact Relationship Management (CRM) like application for your website. It captures all forms submitted and creates a database of contacts that can be segmented by the campaign, product of interest and other tagging factors.

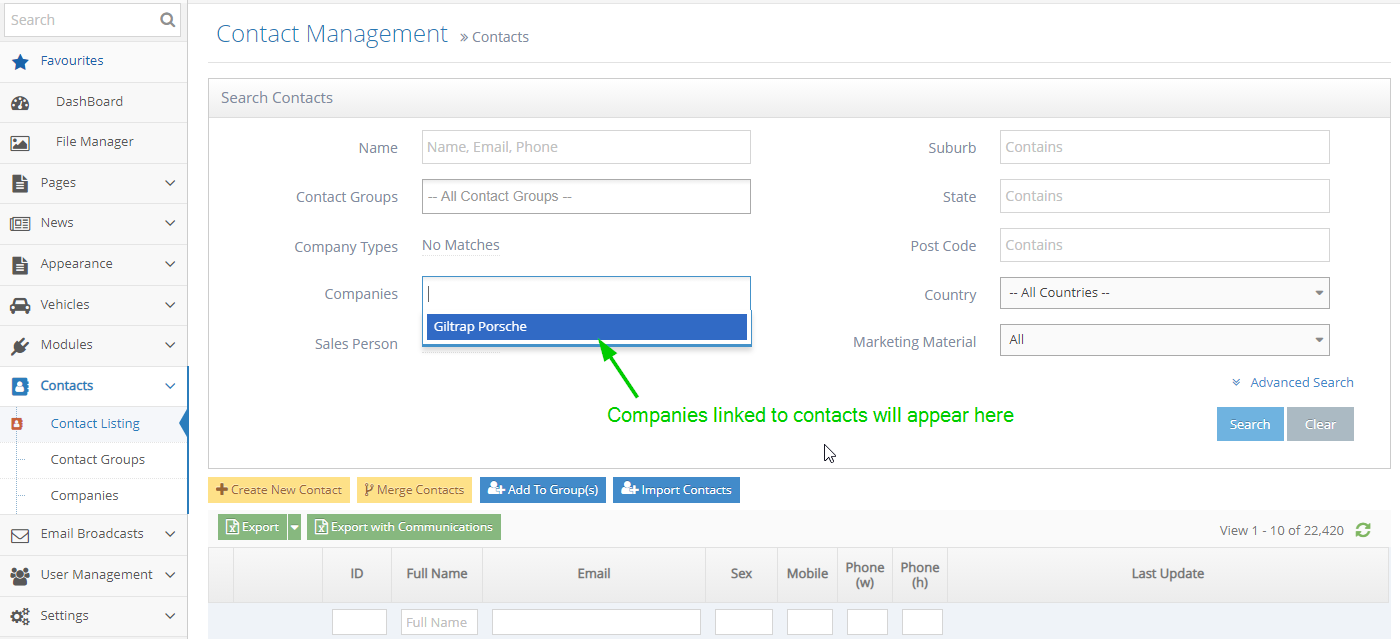
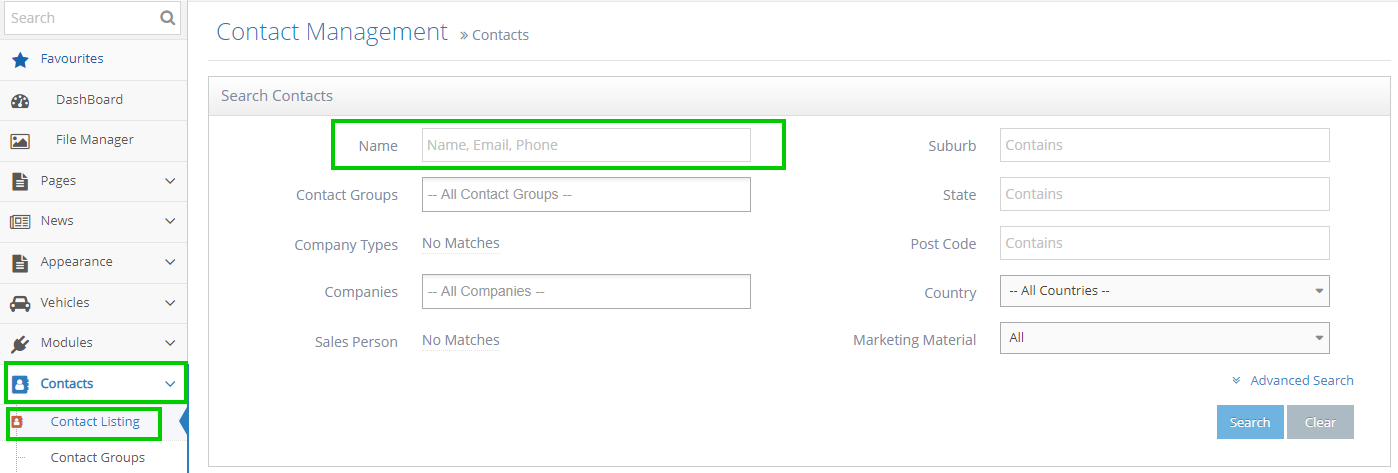
Search Contacts
-
1You can search for contacts by entering part of their name, email address, phone or mobile into the keyword text box
-
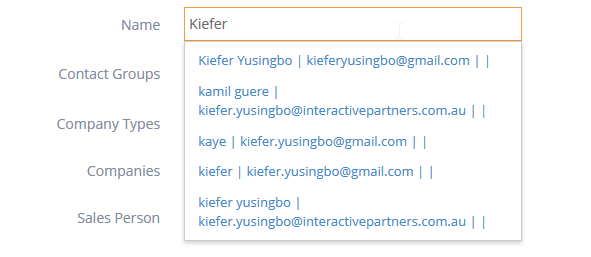
2You can also use it to search by entering part of your first and last name
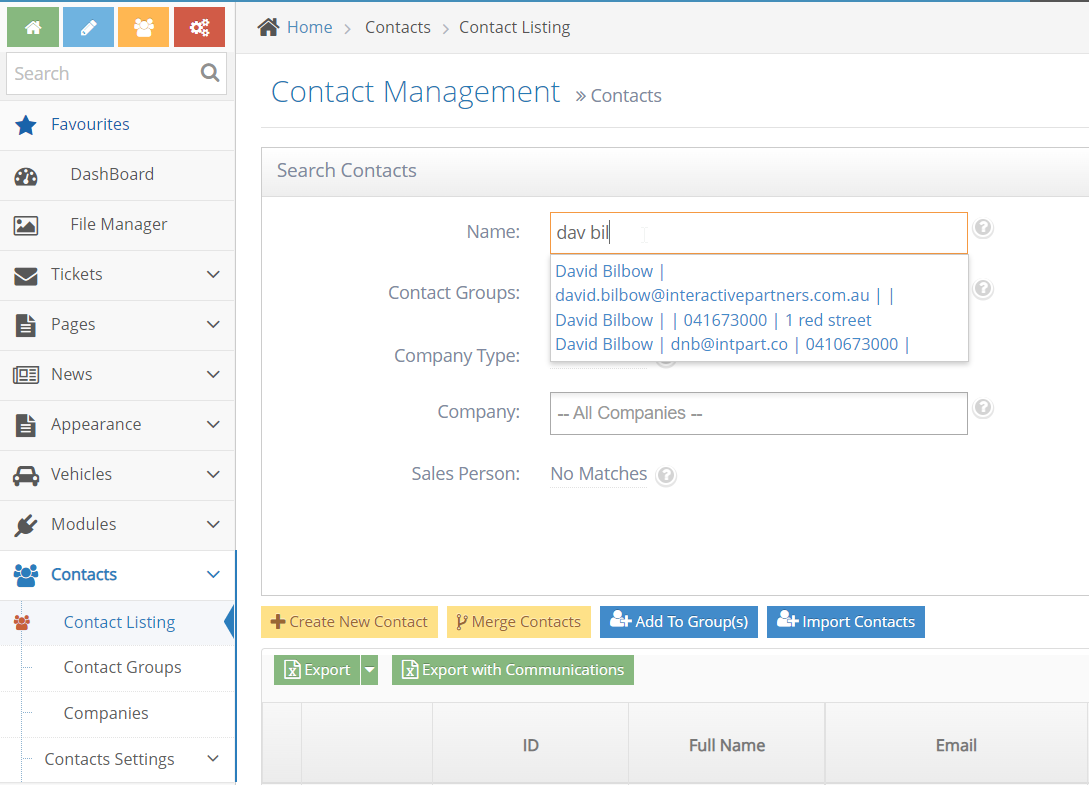
-
3Matching contacts will start to appear as you type
-
4Click any contact to jump directly to the contact
-
5Or use the Search Button to display a listing of all matching contacts
-
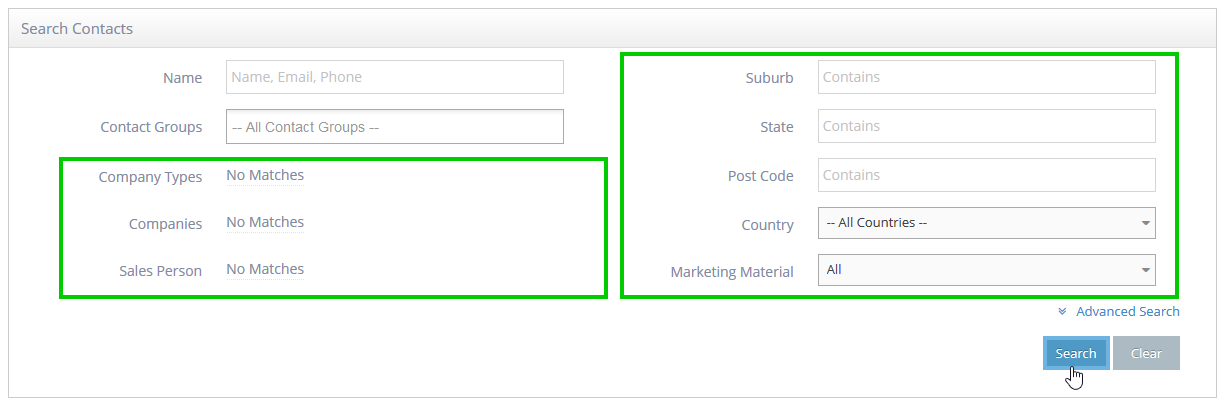
6Use other filters such as Company Types, Companies, suburbs, state
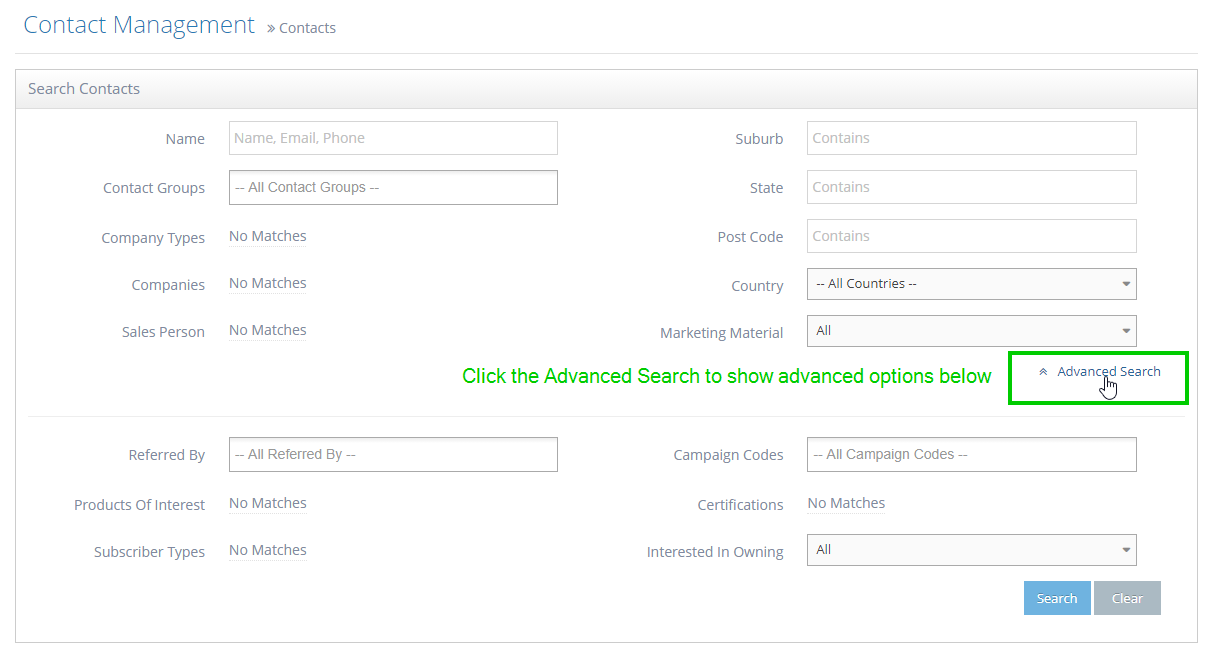
Advanced Search
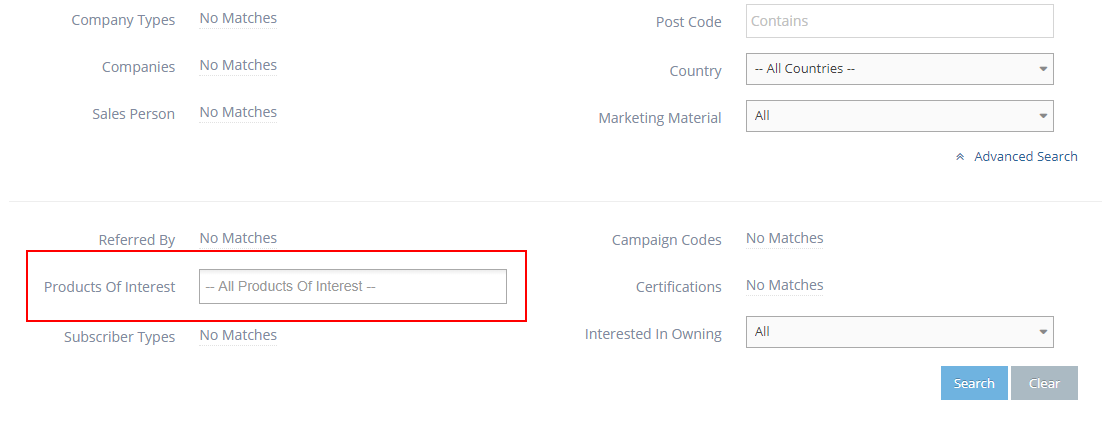
- You can also search using the advanced search. This will display additional segmentation filters for your contacts
- If you have set up campaign codes or products of interest in your forms, you can see the available options listed
-
1
In the Search Contacts section, click the "Advanced Search" link on the bottom right, just above the Search/Clear buttons
-
2
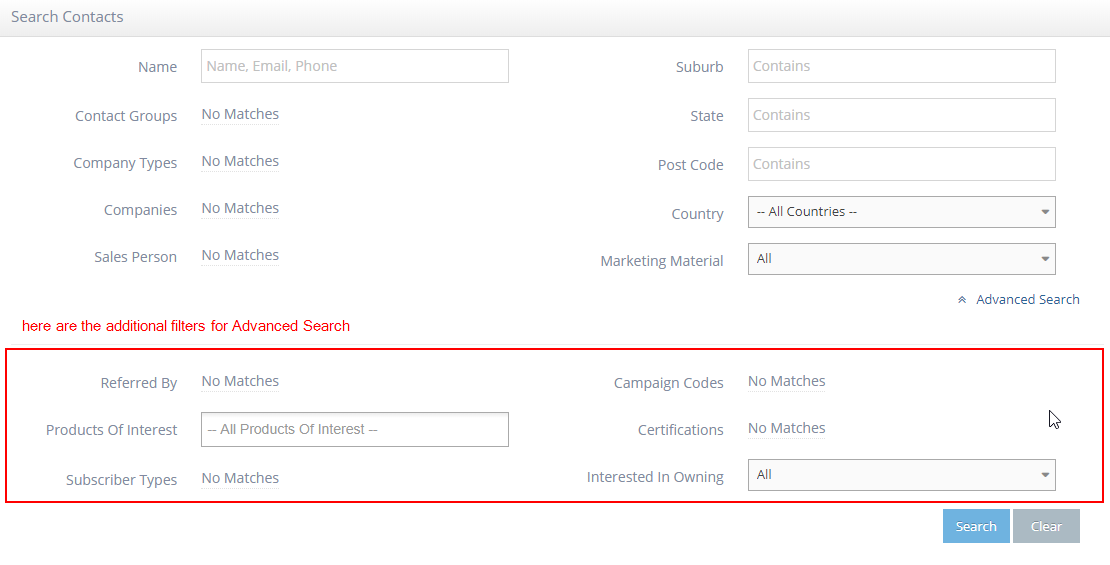
Upon clicking "Advanced Search", you are presented with additional filters you can use for searching. These filters are in use in the existing forms and will show the results of contacts who submitted the forms that use the corresponding filter selected.
- Referred By
- Products of Interest
- Subscriber Types
- Campaign Codes
- Certifications
- Interested in Owning
-
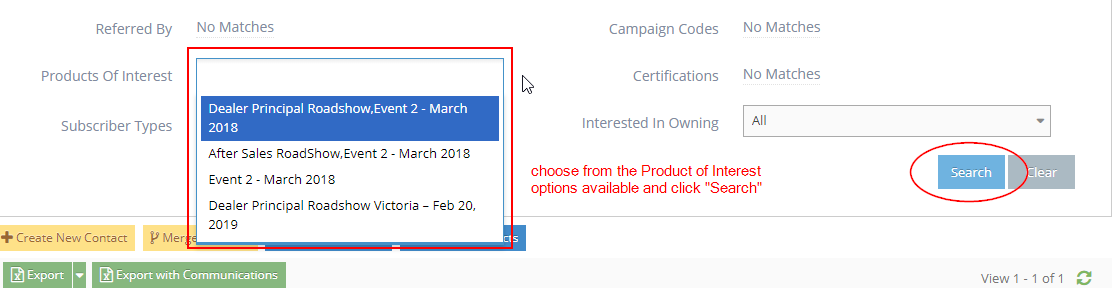
3
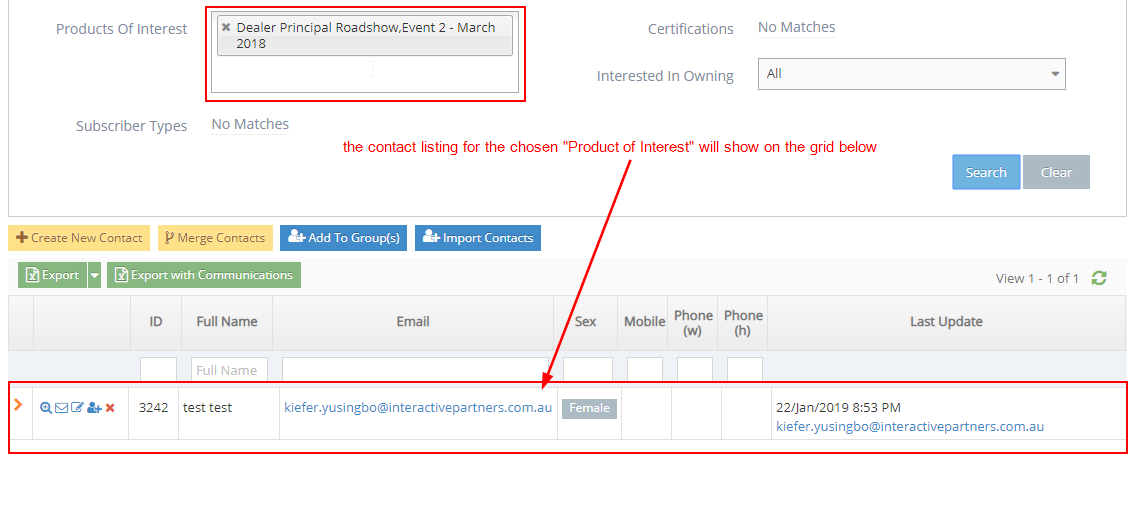
For example, using "Products of Interest" as a filter:
Select the specific Product of Interest you want to check from the options
-
4
After choosing the Product of Interest from the options, click the "Search" button on the right
Note: Product of Interest options will only be available once they have been set up on the "Product of Interest" module
-
5
The contacts for the selected "Products of Interest" should show on the grid below the search section

Contact Note
Contact Note Overview
Contact Note record notes and interactions against individual contacts for easy recording of contact history. Each communication you have with a contact can be recorded and add to the company's knowledge about your key contacts and customers. You can use this feature to keep track of important information on contacts.
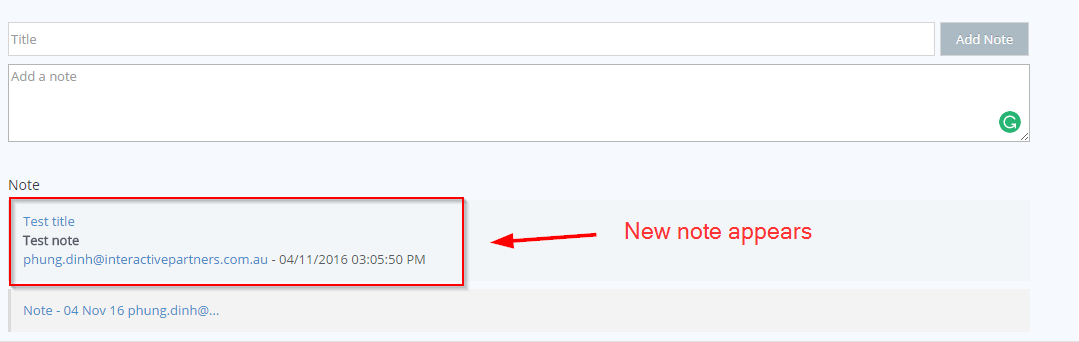
Creating a new Contact Note
- Go to Contacts → Contact Listing
- On per row of the contact grid → click on the view sub-grid icon


- Enter the title, note → click Add Note
- On per row of the contact grid → click on the details icon

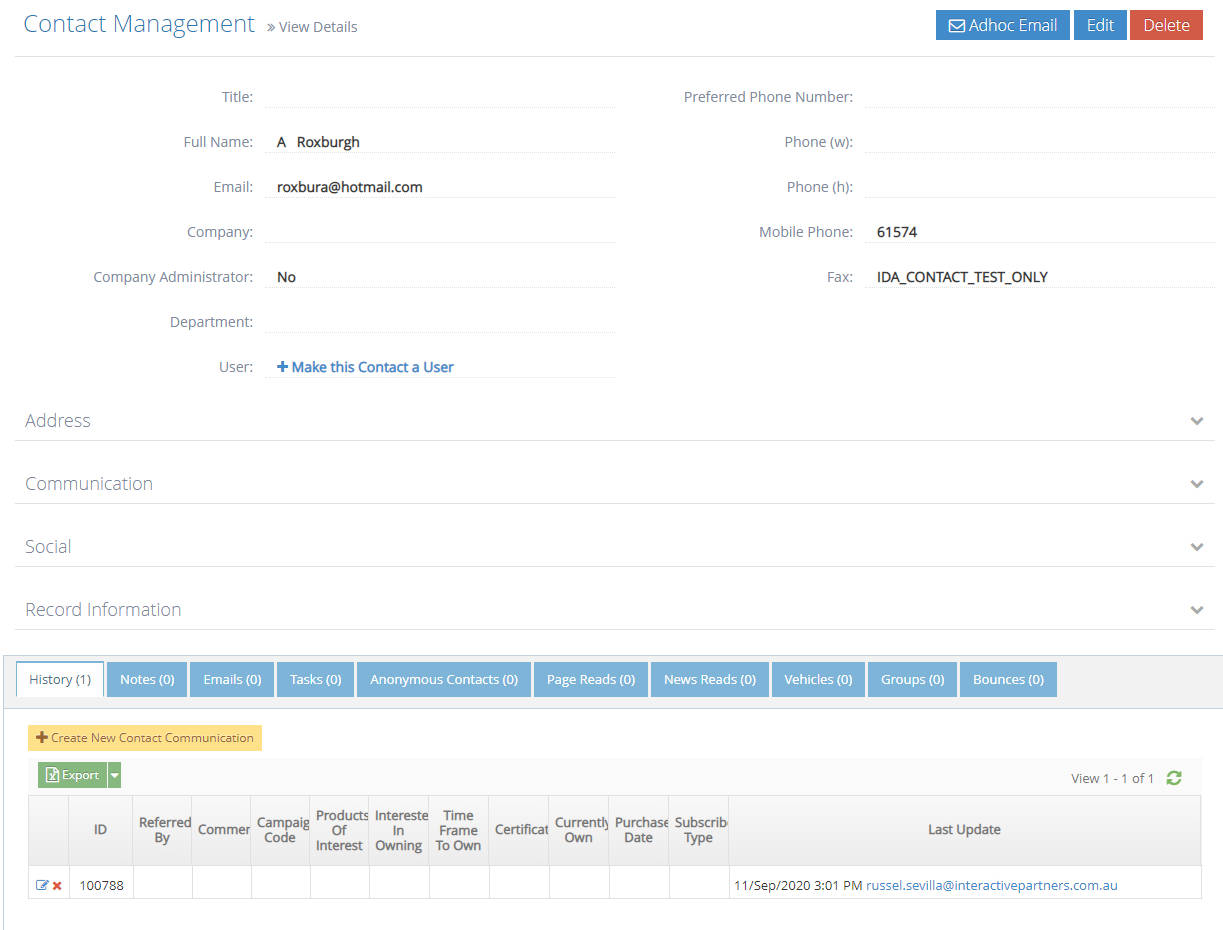
- Navigate to the Notes tab
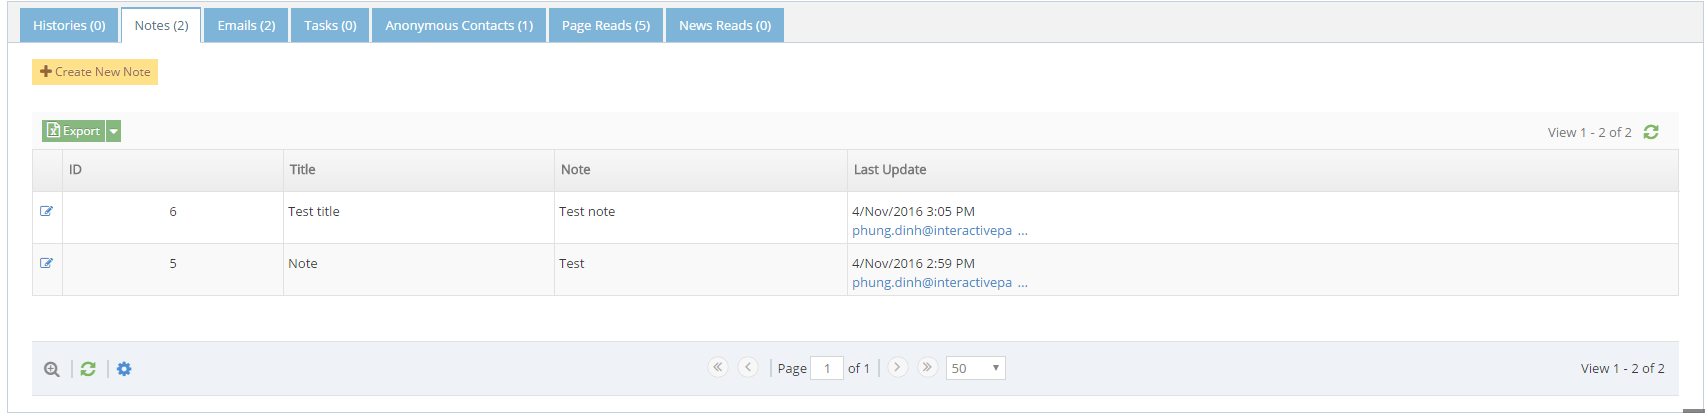
- Click the Create button
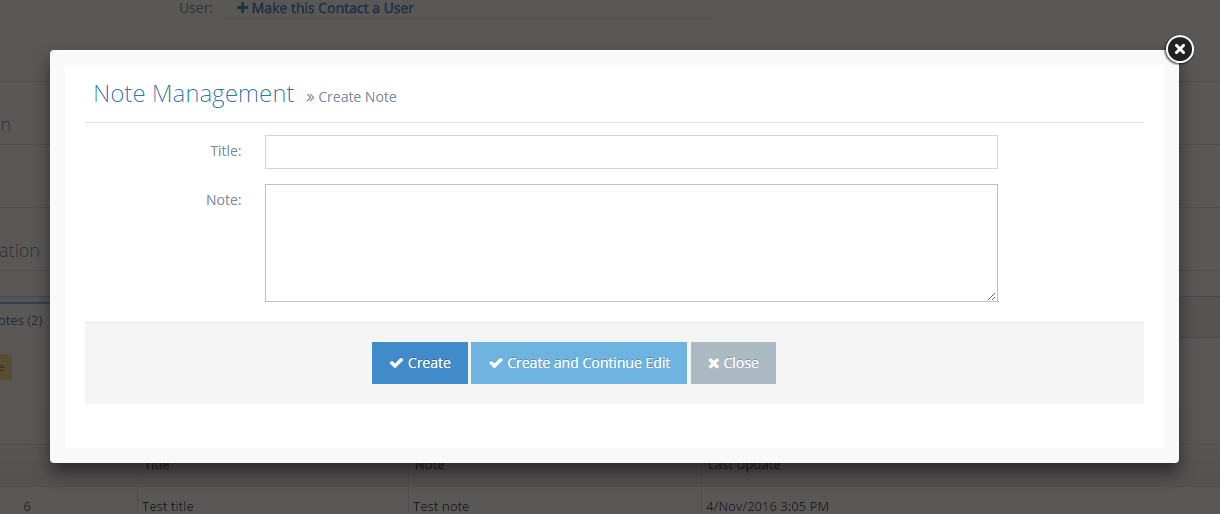
- Enter the title, note → click Create
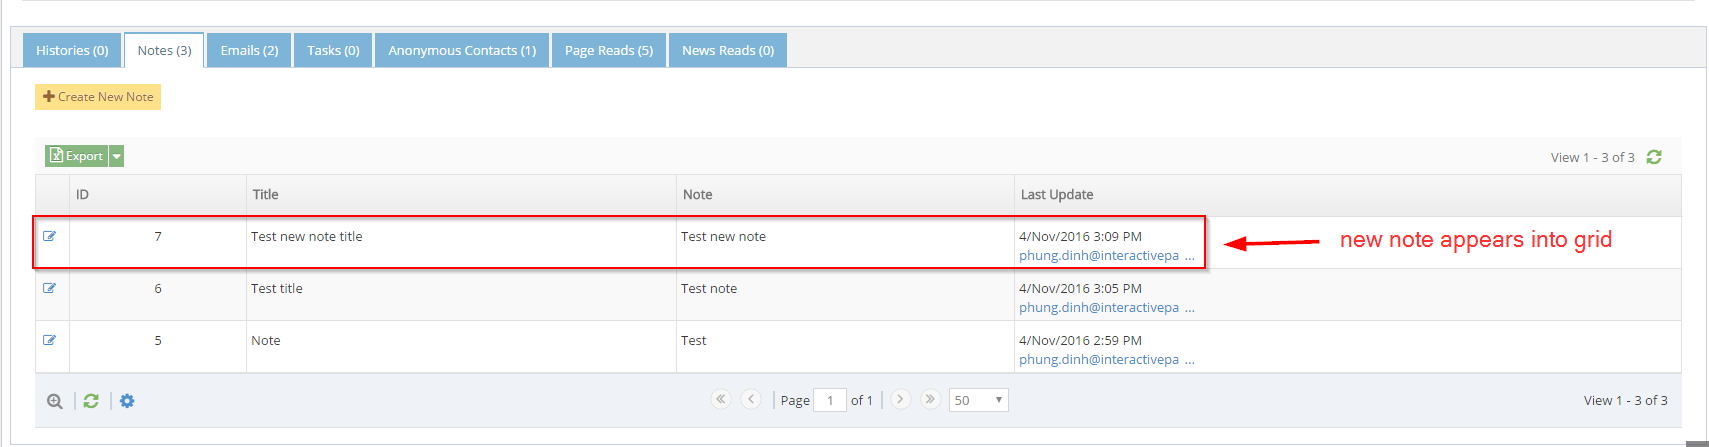
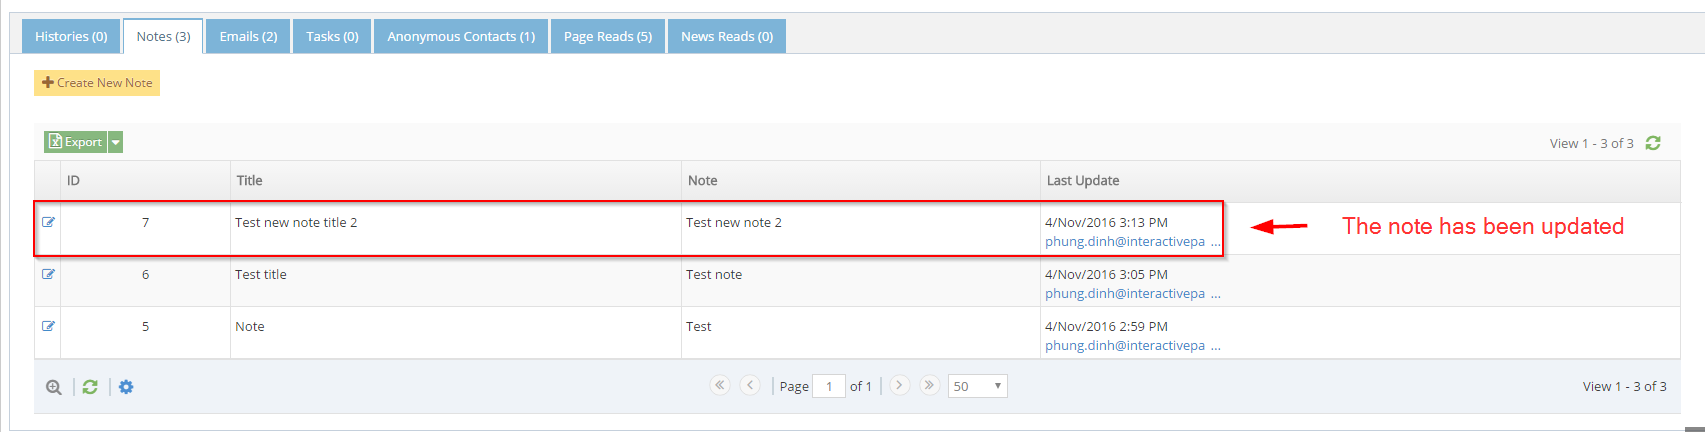
- On the note grid → click on the edit icon if you wanna edit the note

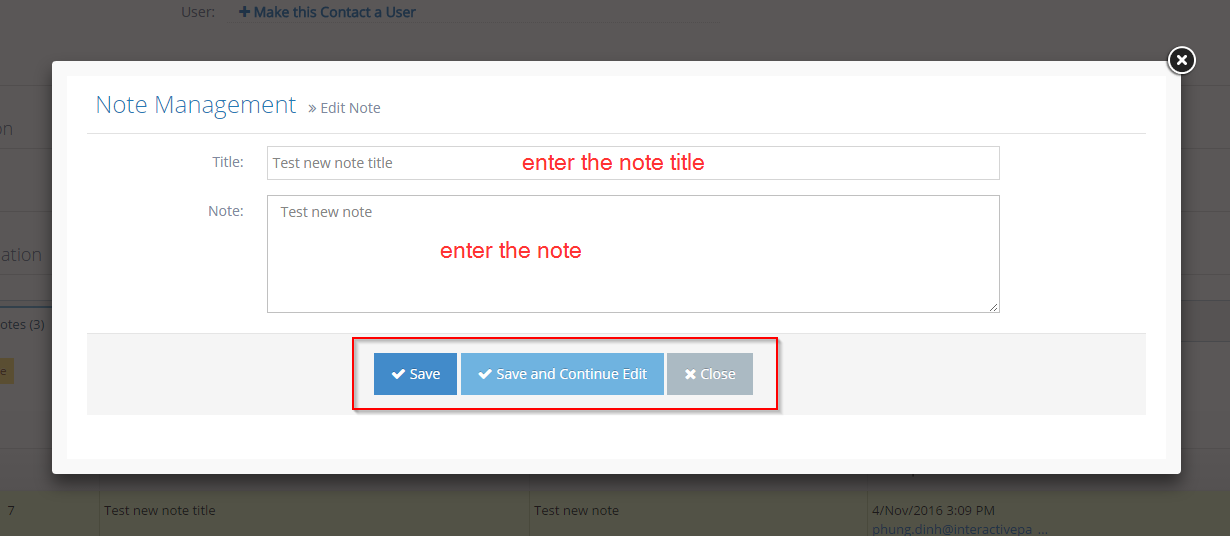
- Enter the title, note → click Save
Contact Groups
To provide an easy way to work with multiple contacts at once, send an email for example, Contact Groups provide a fast way to quickly group contacts.
Contact Groups allow you to link like contacts together. They are most useful for sending email broadcasts. You could for example have a group for anyone who has expressed an interest in a type of product or responded to a particular campaign. You can then target this group with specific offers and email broadcasts.
-
1Log in as an administrator and go to the Admin Dashboard.
Learn how to log in here → -
2Once the list of matching contacts is displayed, you can add them to a Group by Clicking Add to Group
-
3Add all the matching contacts to a group
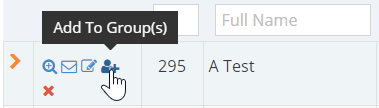
-
4The user can select from an existing group or create a new group
Building Your Database
Datasheeting Overview
Datasheeting is a technique where you swap the content for an email address. It is the perfect way to build your marketing database. A datasheet can be any type of privileged content. Brochures, Price Lists, and White papers are all good examples of datasheets. The visitor is prompted to swap their email address for access to the content protected by the datasheet.
Why you would use a Datasheet
The datasheet is useful if a user wants to swap content for the visitor's email address or any other information.
Datasheet Requirements
- A key aspect of building a database of contacts is collecting email addresses and other information
- Swapping key content for email addresses supports this process
- Key content can include items such as product brochures, specification documents, white papers and price lists
- Any type of content can be referred to as key content
Datasheeting for Site Visitors
- As a site visitor, I want to see some key content
- When I click the link for the key content, I am prompted with a form to complete to access the key content
- When I complete this form, I am redirected to the key content
- The contact is saved in the contacts database
- The product of Interest for the contact will be the endpoint of the key content
- For any other key content in this session, I will not be prompted
- On my next visit, I will be prompted again for the datasheet information so the session controls how long the data is persisted
Datasheeting for Content Administrators
- As a content administrator, I want to decide what content is key and will use data sheeting
- The way I can make datasheet content is by placing a link on a page to the key content
- Example "Click here to see our specifications sheet for product Blah"
- When I go to place a link on the key content, I can select either a page, PDF, image or any other kind of content at any time
- Anything on the site can be accessed
- Instead of a link direct to the content, I insert a link which is datasheet?formID=X&datasheet=EndPoint (or similar) which I use for the datasheet module
- This is instead of using a normal hyperlink but it works the same way
- I can make any link on my site a datasheet by replacing the href in this way
- Example href="media/pdf/whitepaper.pdf" would become href="datasheet?formID=X&datasheet=media/pdf/whitepaper.pdf"
- Now I have one step (after building the form) to make any datasheet active
Datasheeting for Contact Filtering
- Each time a site visitor submits the datasheet form, a contact is created
- Contacts are matched on matching rules as per the site settings - see How to Site Setting: Contact Matching Rule Setting
- Contacts are tagged with the endpoint of the datasheet requested
- Example href="datasheet?formID=X&datasheet=media/pdf/whitepaper.pdf" would record media/pdf/whitepaper.pdf as the product of interest
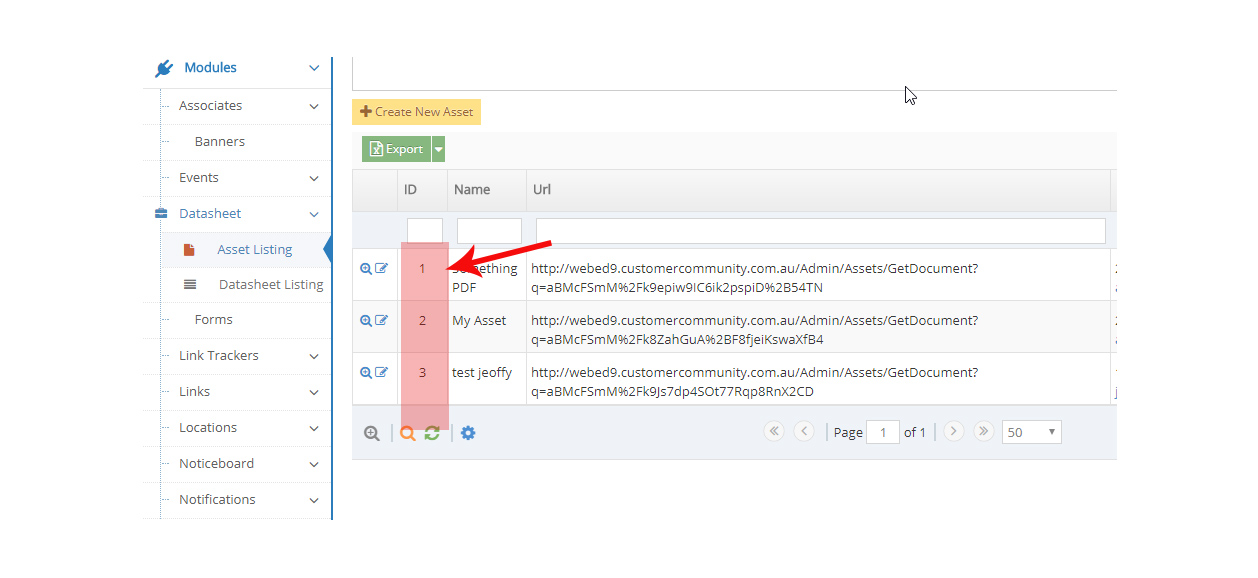
Creating new Asset Listing entry
- Go to admin > Modules > Datasheet > Asset Listing and click Create New Asset
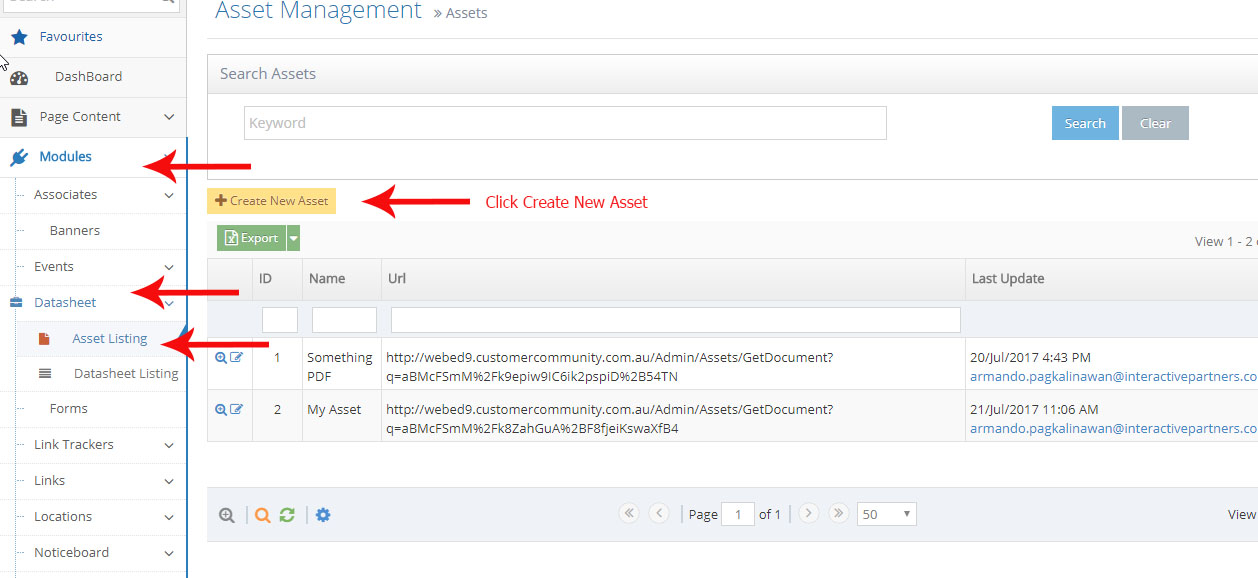
- Enter the details of asset management.
- Name - The name of the asset or file
- File: upload your data files, either pdf, word etc.
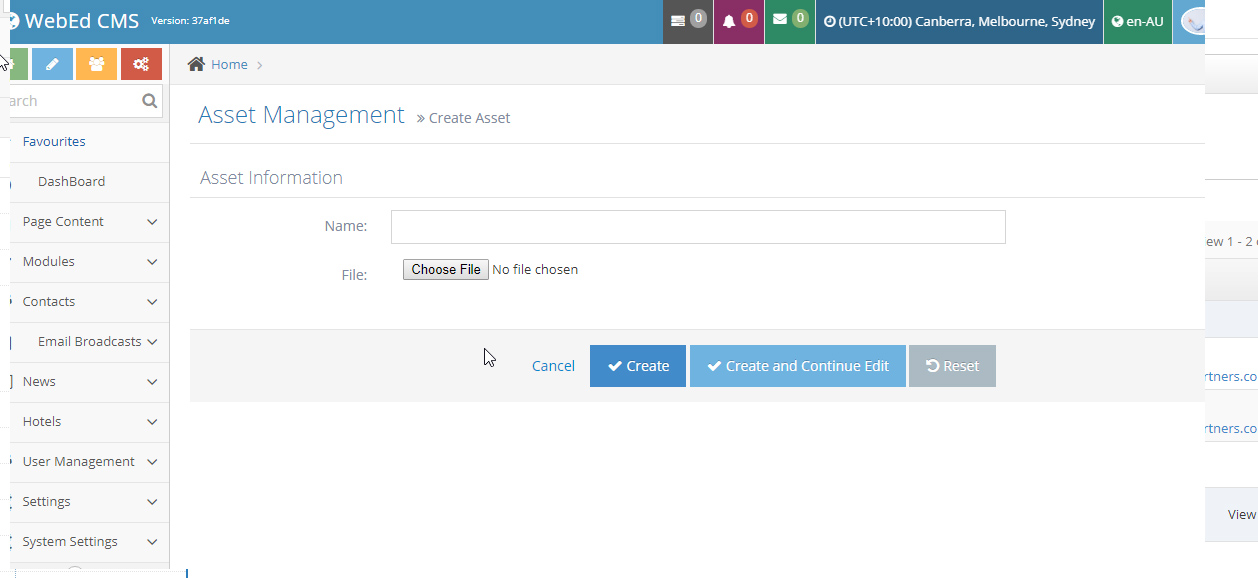
- Click Save
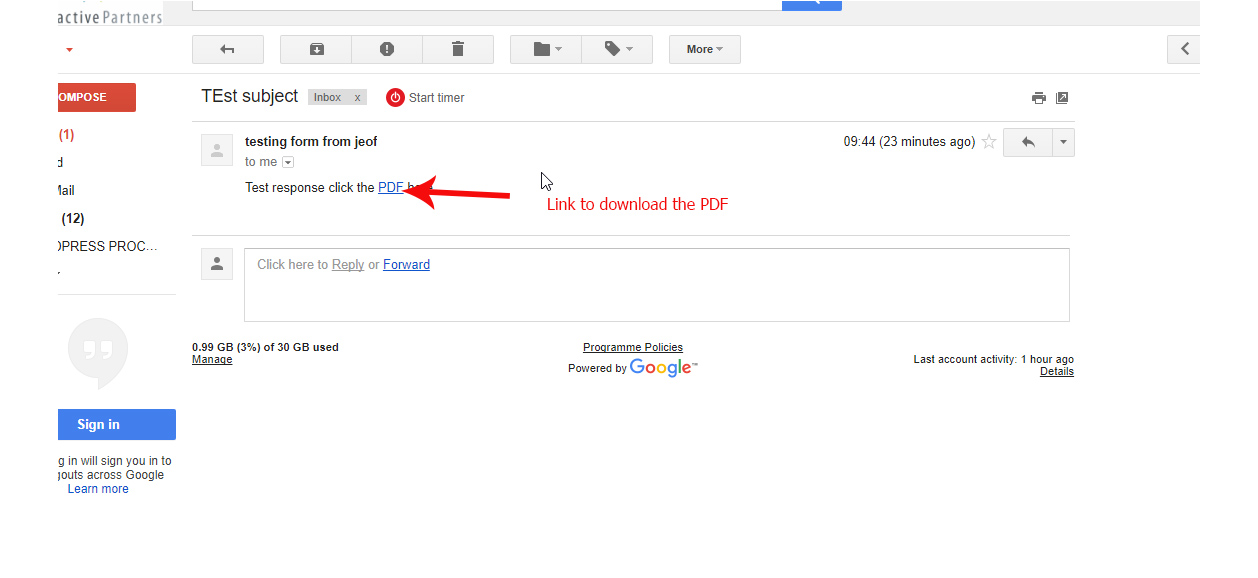
How to add Datasheet into forms
- Go to admin > Modules
- Select Forms and click Create New Form button
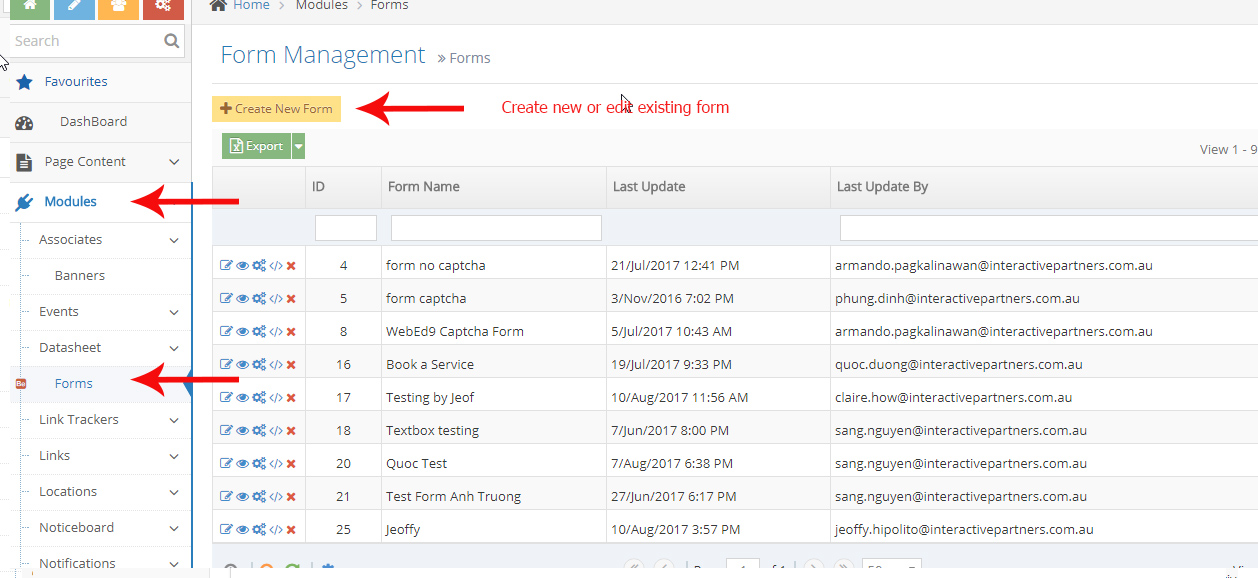
- Configure the form and fields you want
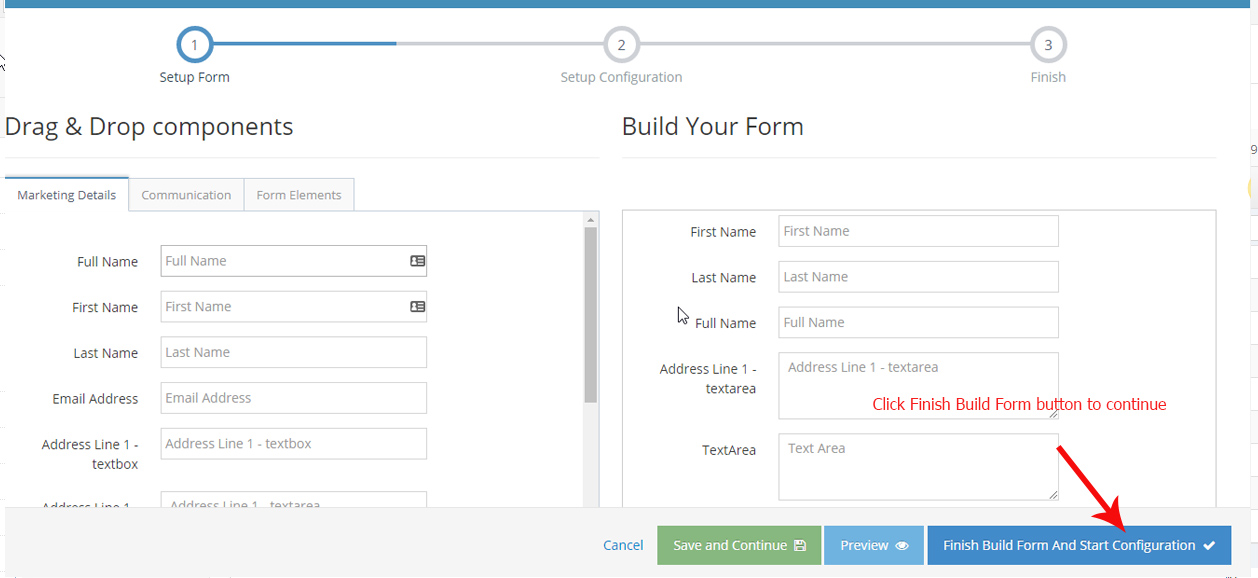
- Click Finish Build Form And Start Configuration button
- On the configuration form page at the bottom section click Advance Option
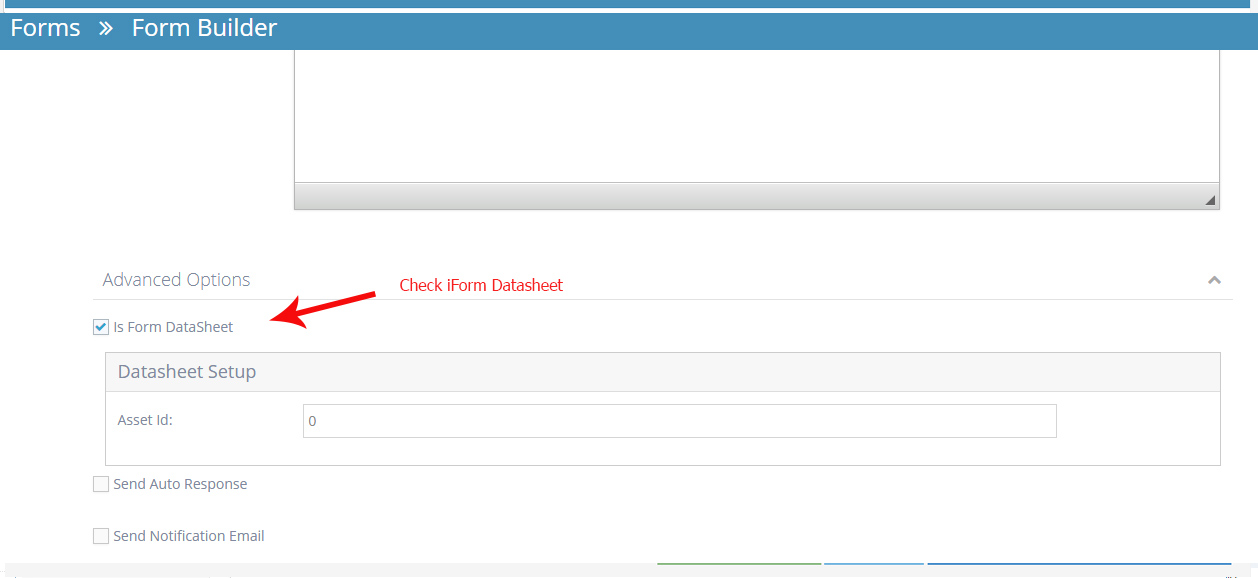
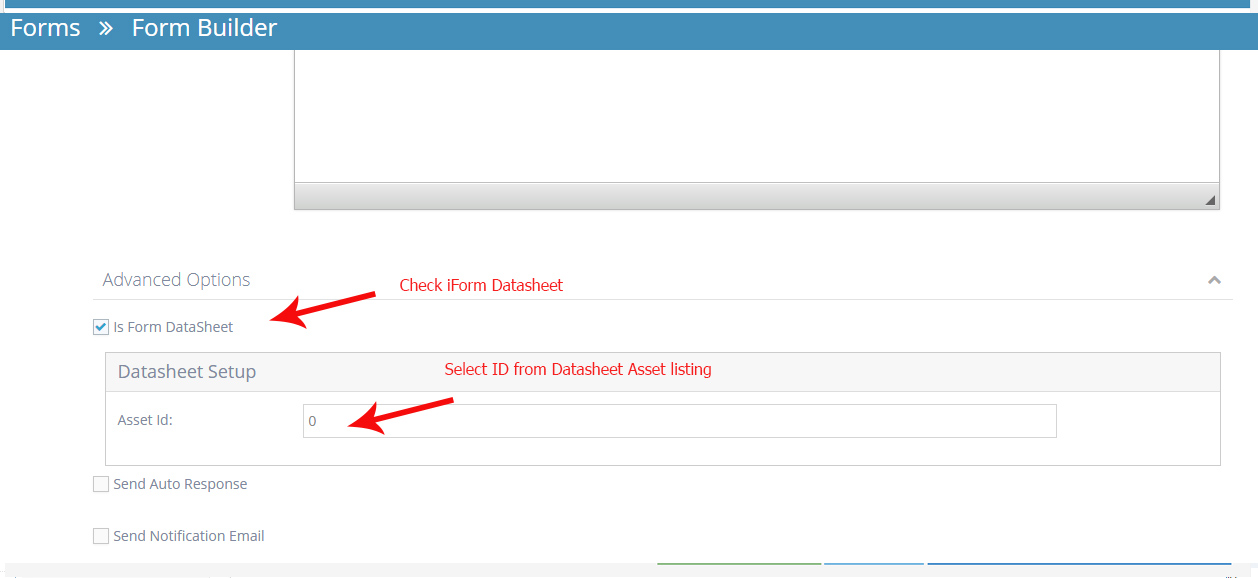
- Check - Is Form DataSheet
- On the Datasheet Setup grey box put the Asset Id
- Next check the Send Auto Response
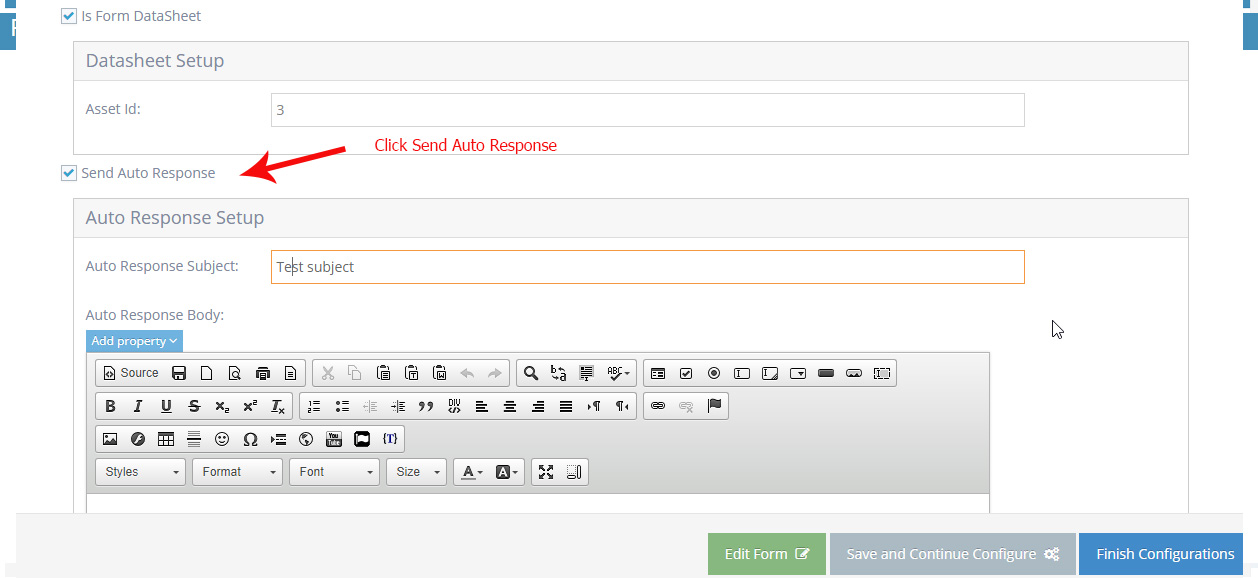
- Auto response subject - the subject name of your autoresponse email
- Auto response body - here you can put the message you want for the PDF or datasheet information like the PDF name or link
- Setup the URL/link of your datasheet
- Click on the link Icon
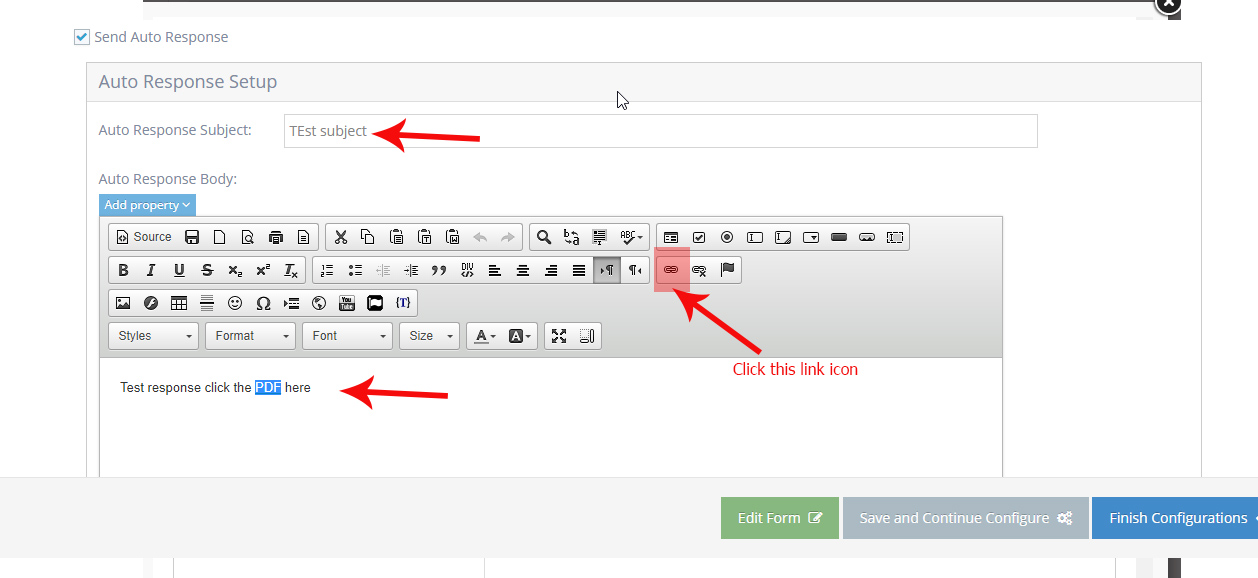
- Go back to your Datasheet Asset Listing
- Copy the Url of your sheet
- Paste it on the Link toolbar dialogue box on the Auto response body
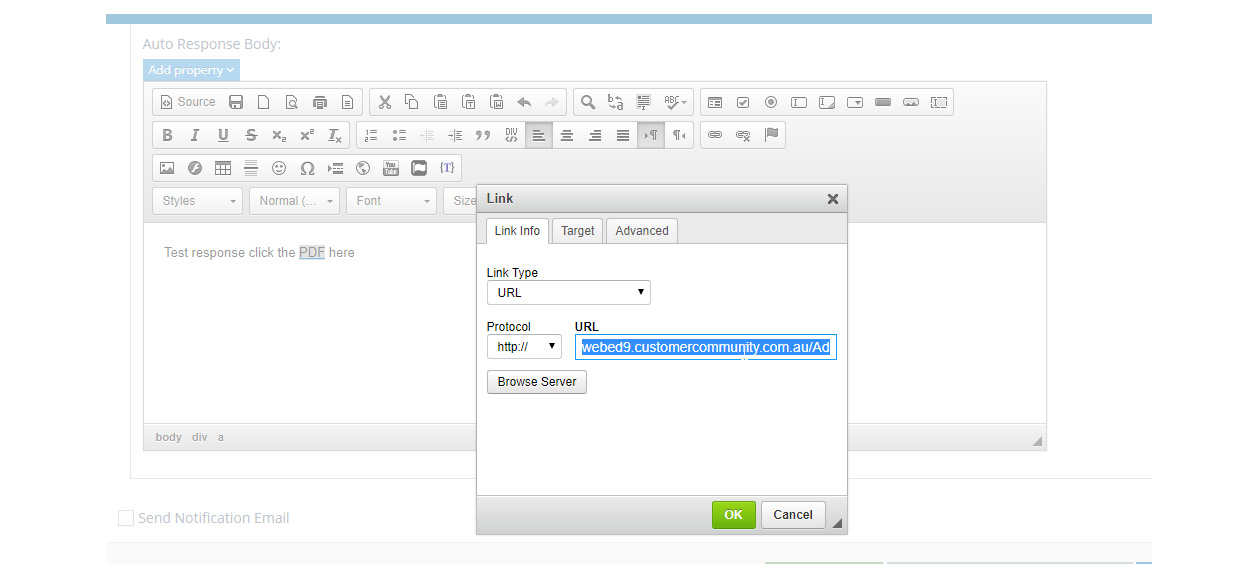
- Click OK button
- Click Finish Configuration
Apply the form and datasheet on the pages
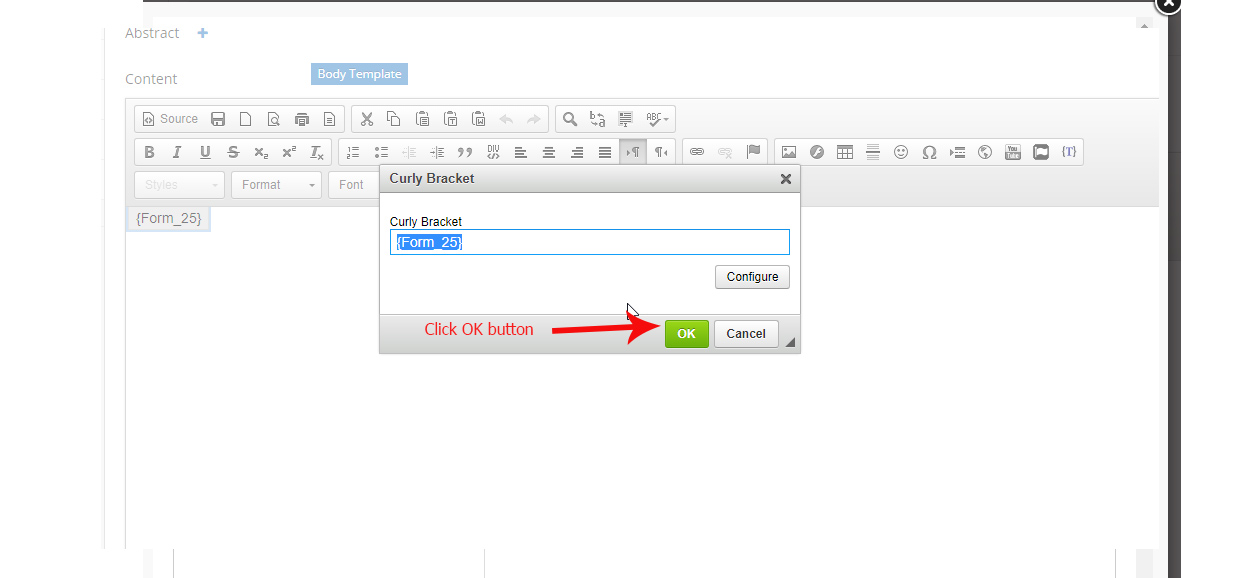
- Create a form using a curly bracket on the editor's page. To add the form using a curly bracket click here for the documentation
- Select the curly bracket on the page editor and search - Form
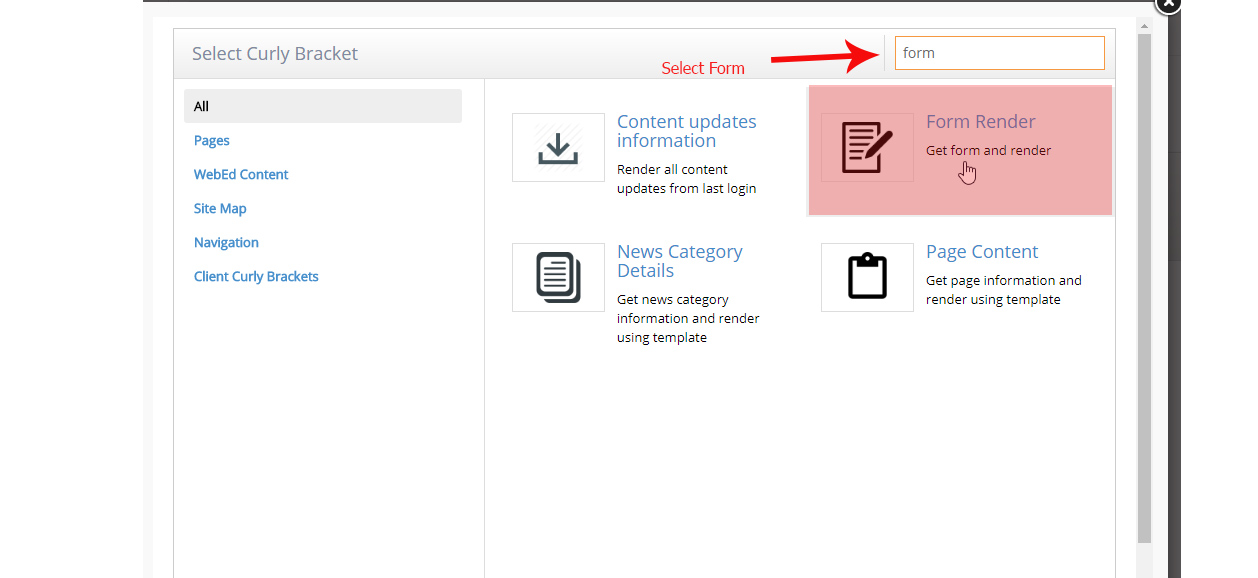
- Select the form you created with the datasheet from the auto-response email
- Click Insert, then click the OK button.
- Save the page
- Go to your page with the form
- Try to fill up and submit a form.
- Then check your email if the auto-response is working including the datasheet link
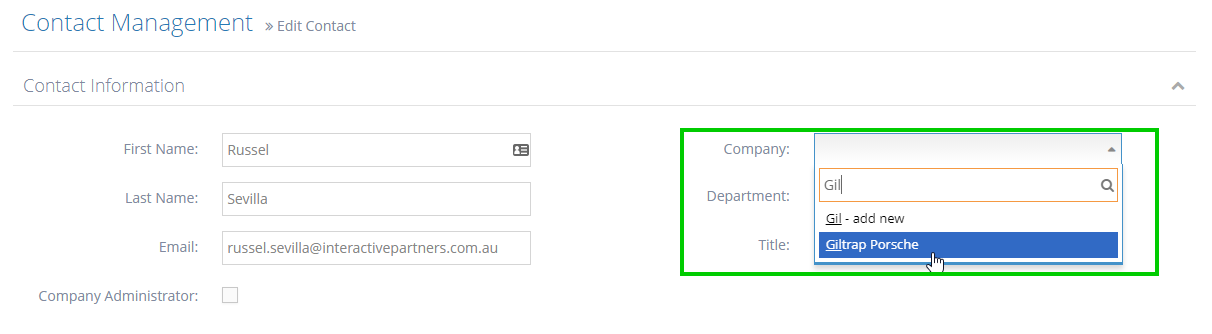
Connecting a Contact to a Company
Company Module Overview
This module is designed to support managing contacts by company. You can create a company, and company types and then add contacts to the company. You can also set permissions for secure areas by company and company type similar to managing user groups.
Navigating to Contacts
-
1Log in as an administrator and go to the Admin Dashboard.
Learn how to log in here → -
2Go to Contacts
-
3When the listing appears, search for the contact you wish to link to a company
-
4Click the Edit icon
-
5Select the company for this contact by starting to type the company name
-
6If the company does not exist, you can create a new company
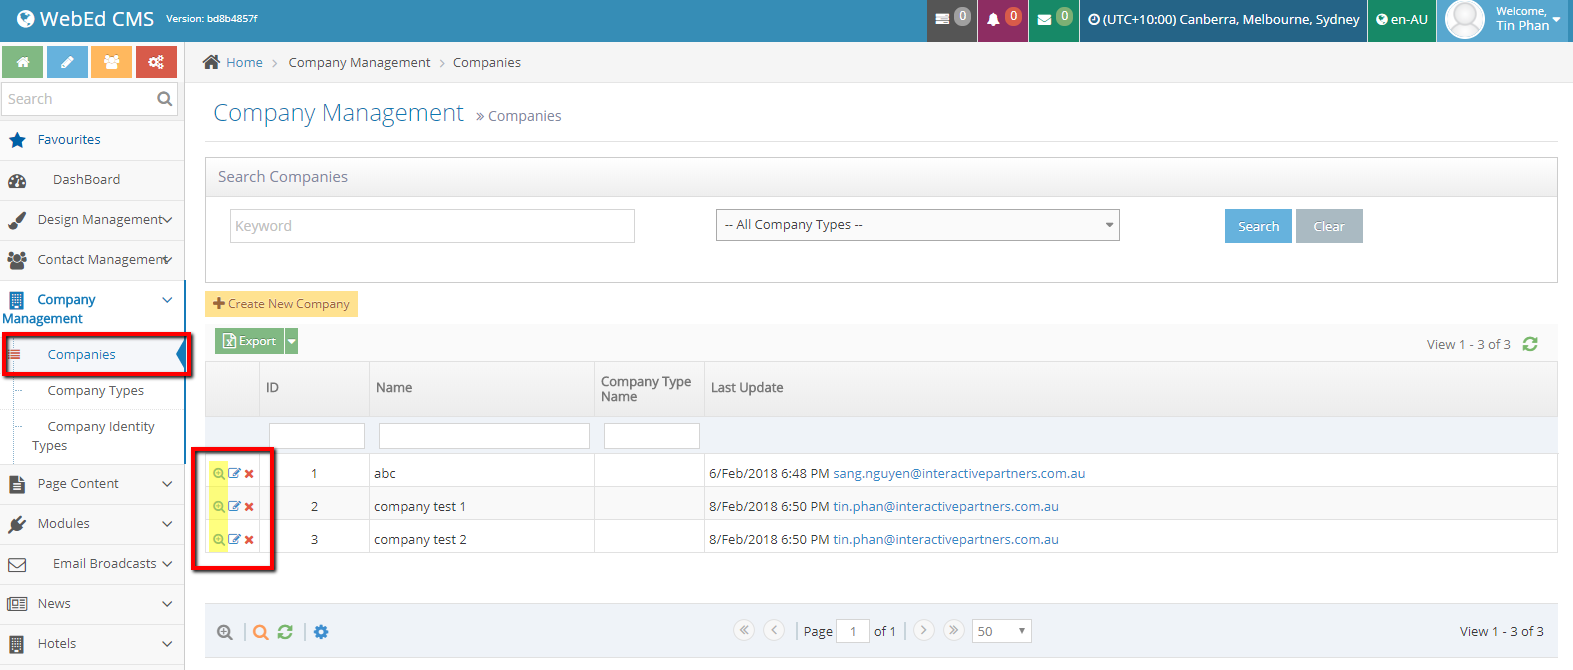
Managing Companies
Contacts are generally connected with Companies. See how to manage companies.
-
1Log in as an administrator and go to the Admin Dashboard.
Learn how to log in here → -
2You click on Contacts -> Companies and create a new Company.
-
3Input the Company Name in the textbox, choose Company Type in the drop-down list, and click the Create button.

-
4The company was created successfully.
-
5You can click on the Edit icon on the left to update the company.

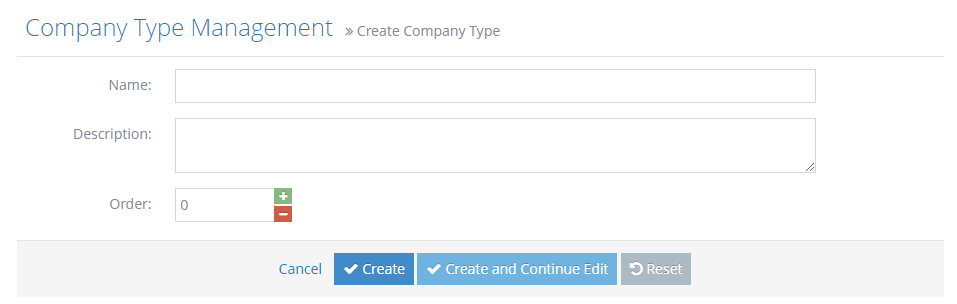
Managing Company Types
Contacts are generally connected with Companies. See how to manage companies.
-
1Log in as an administrator and go to the Admin Dashboard.
Learn how to log in here → -
2On the admin dashboard, click on Settings > Contacts Settings > Company Type
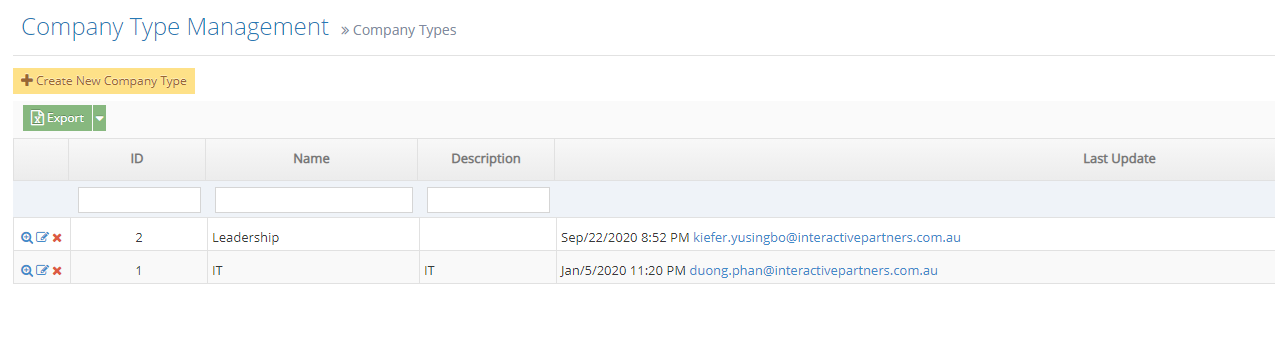
-
3Input the Name and Description
- Name - the name of company types
- Description - the description of what kind of company type you are adding on
-
4Order - the list and order from the grid display
-
5Click Create once done
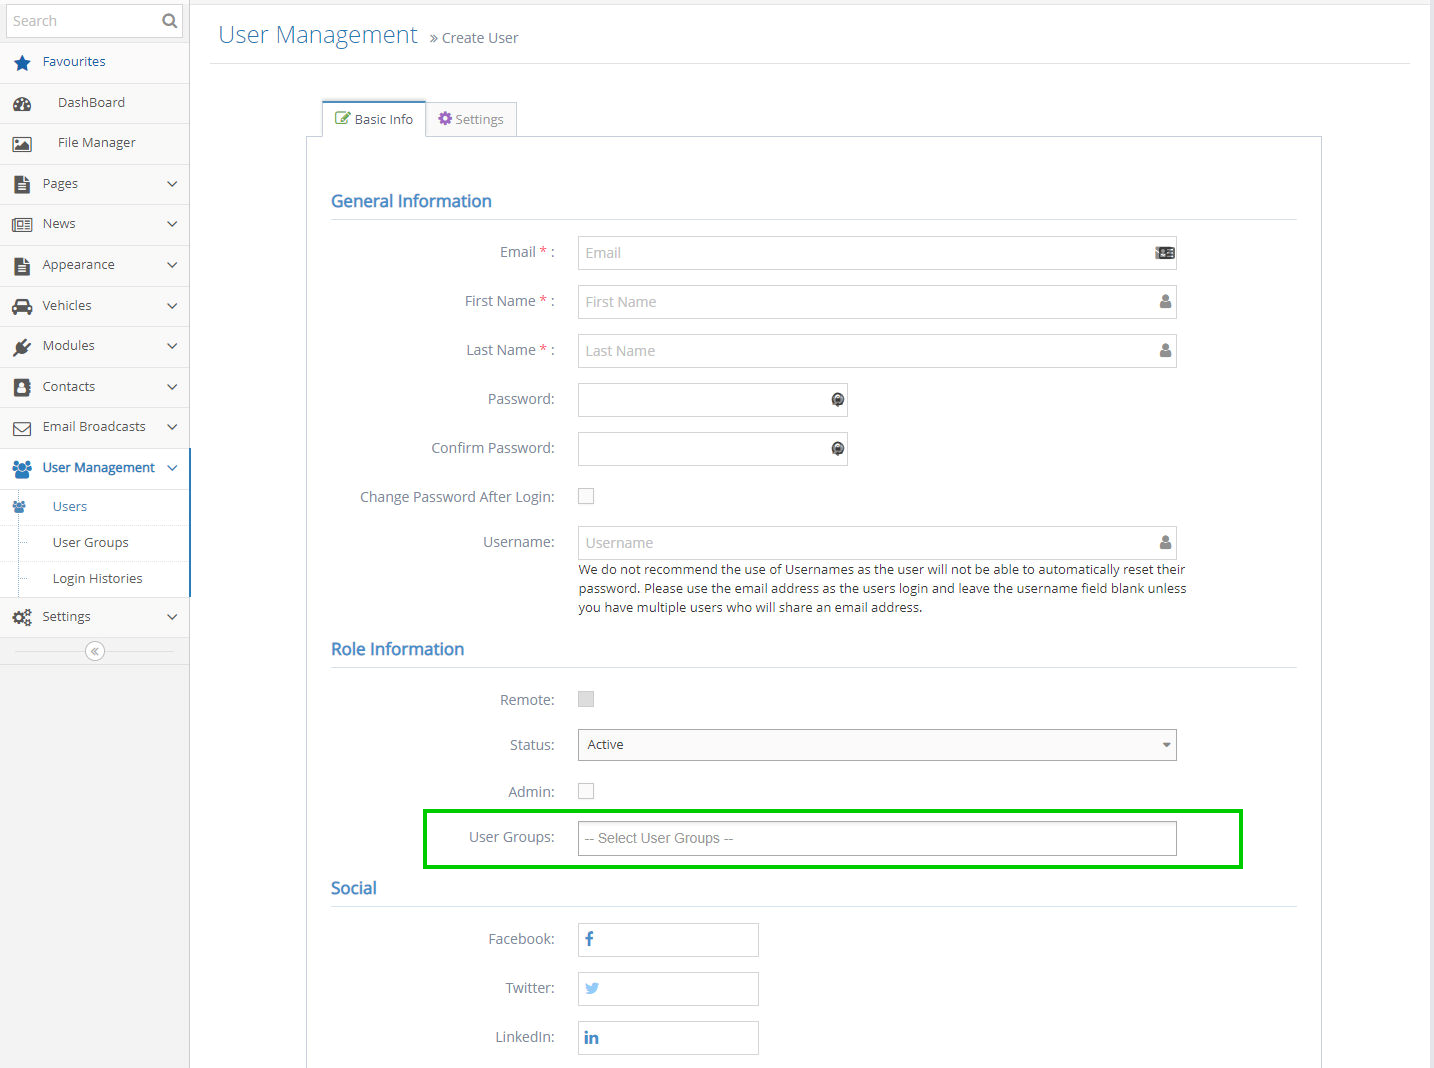
Linking Users with Logins to Secure Portals to a Company
After creating the Company you may want to give them access to a secure portal, this is optional
-
1Create the new User
-
2We recommend using User Groups and limiting the permissions of the User.
-
3On the left navigator, click on User Management > Users
-
4Click Create New User button and input user information
-
5Enter the user information under the Basic Info tab
-
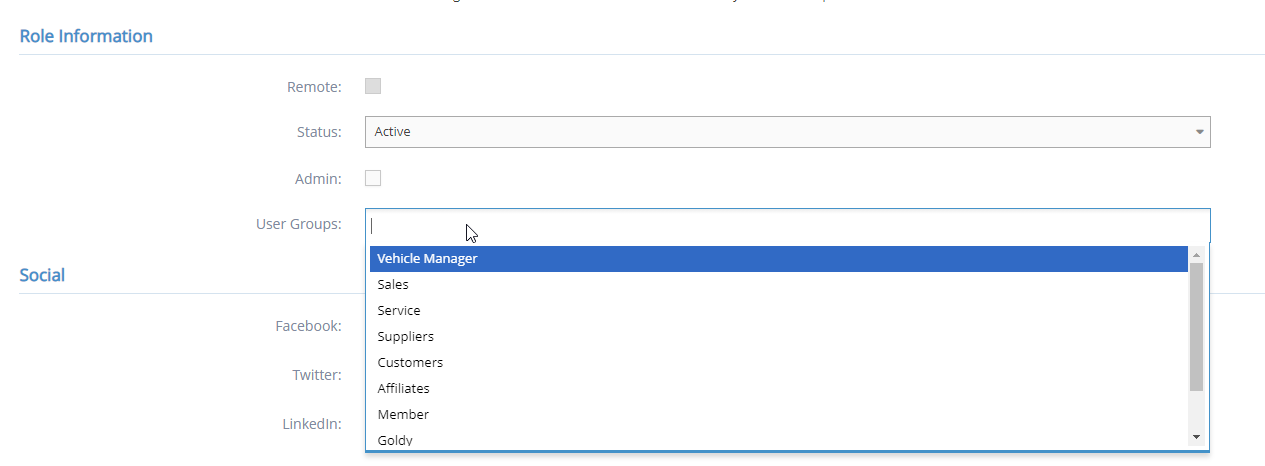
6Click the User Groups field and select the Group for this user in the options. The group controls the access for the user. Examples may be:
- Sales
- Service
- Suppliers
-
7Scroll down to the bottom then, click the Create button.
-
8You should be able to see the newly created user in the User Management.
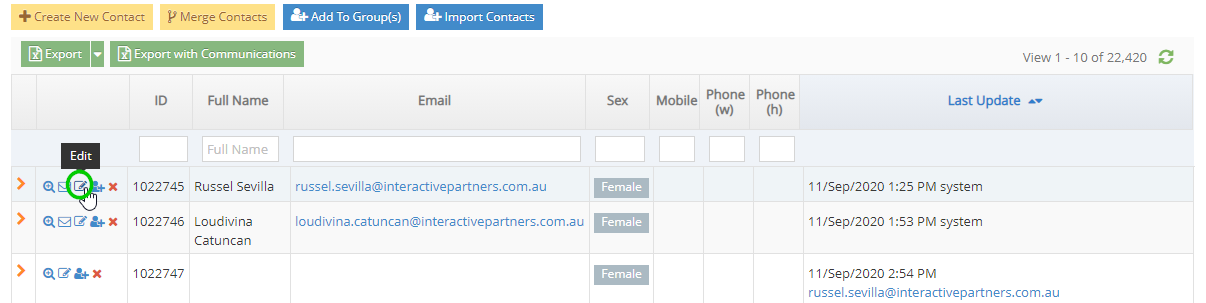
Merging Contacts
Merging Contacts Overview
At times within your system, you might come across multiple contacts that are duplicate entries. This could occur due to variations in email addresses, updates in contact information, or other factors. The following instructions demonstrate the process of consolidating duplicated contacts into a single record. If you have more than two contacts that need merging, start by merging the first two, and then proceed to merge additional contacts in pairs until all duplicated contacts are unified into a single record. All relevant information pertaining to the contact will be combined.
Why you would Merge Contacts
The merge contact can be useful if a user found a duplicate of multiple records with the same information. With this easy step of merging, it will combine all the contacts into a single record.
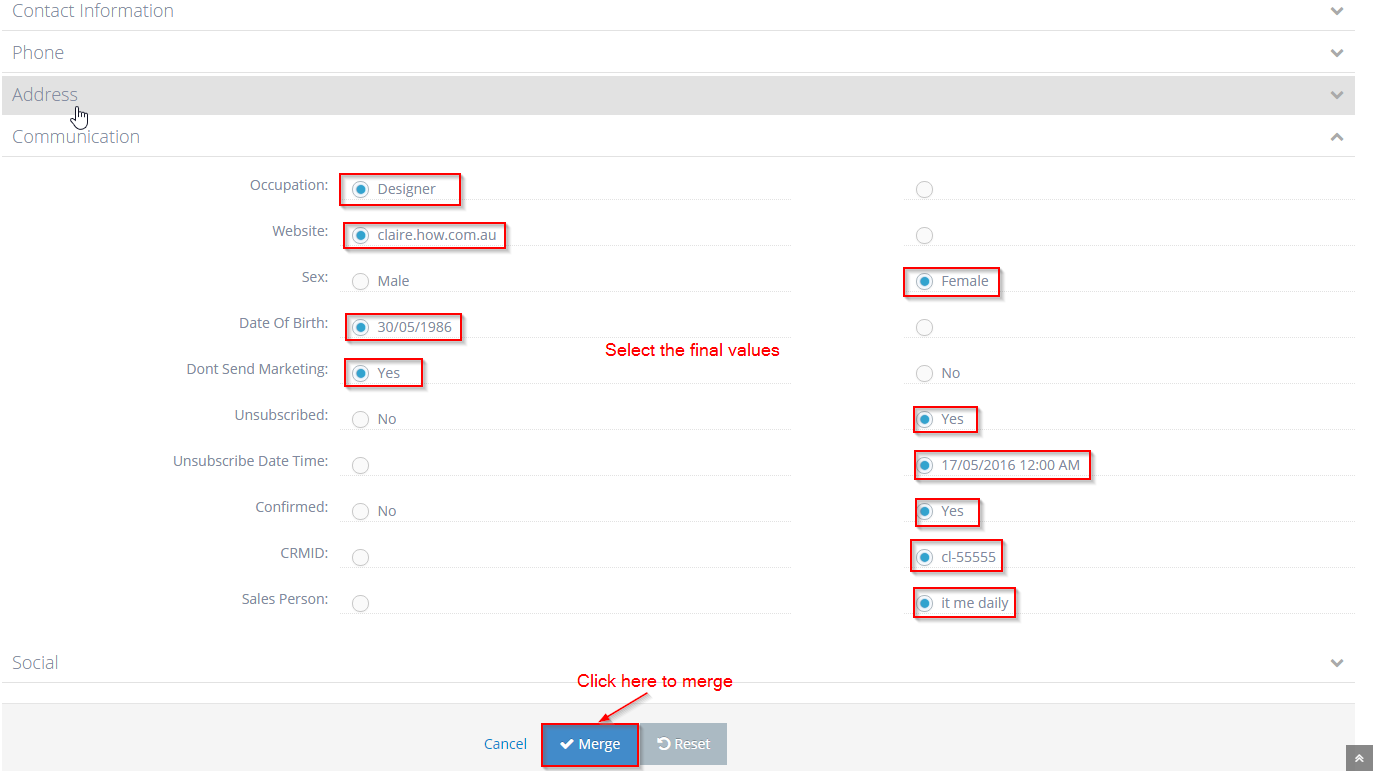
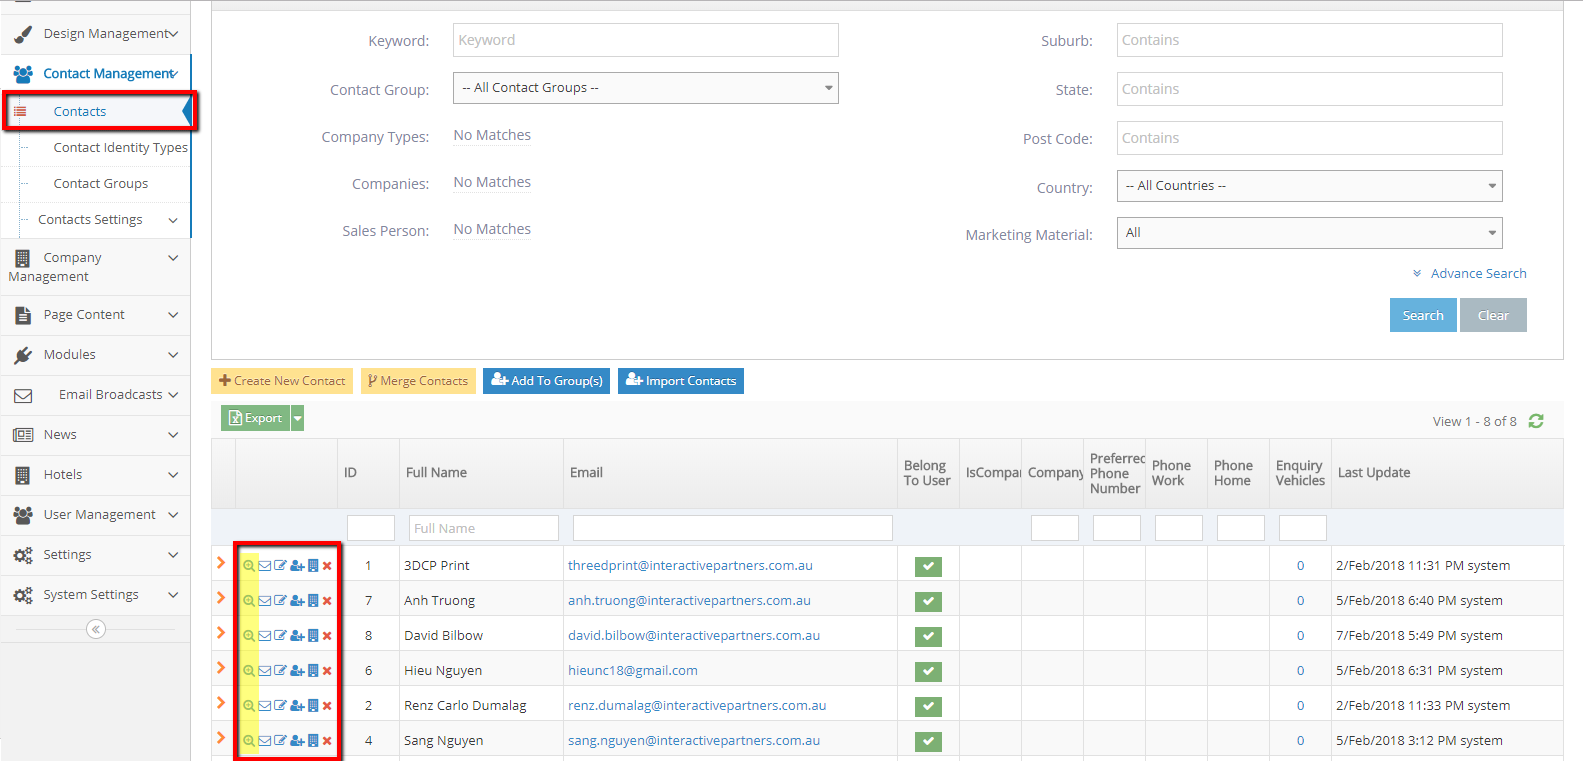
How to Merge Contacts
-
1
Go to Admin Dashboard > Contacts > Contact Listing
-
2
Search Contacts need to be merged, click Search
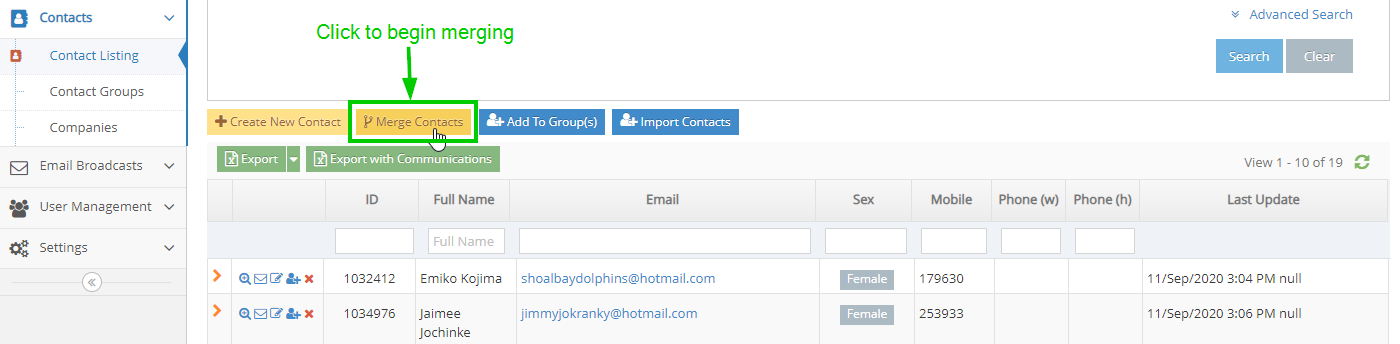
-
3
Click on the Merge Contacts button to begin merging
-
4
Read the instruction below the button
-
5
Checkboxes to the left of each contact will appear
-
6
Tick the boxes beside the contacts you want to merge
-
7
Select the Master Contact by clicking once on the check box
-
8
Select the Slave Contact by clicking twice on the check box

-
9
Click on the Merge Contacts button again >> redirect to the merging confirmation screen

-
10
Go through each field and select the correct value for the final contact

-
11
Click on the Merge button

-
12
Redirect to contact detail pages of the Master Contact
-
13
A successful message is displayed
-
14
Slave Contact is deleted
Video for reference:
Linking Contacts to Companies
Linking Contacts to Companies Overview
When a user wants to add a company name to the contact list users
How to create a Company
-
1
Go to Admin Dashboard → Contacts → Companies
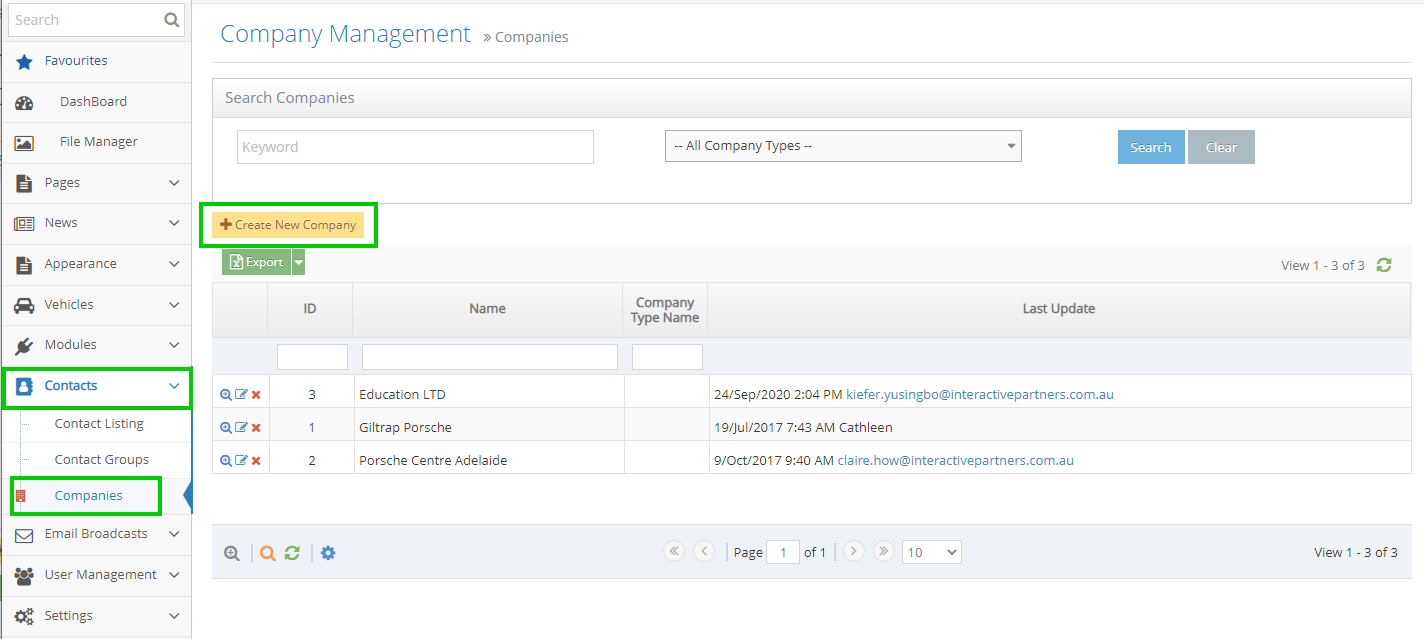
-
2
Fill up the necessary fields
-
3
Click the Create button
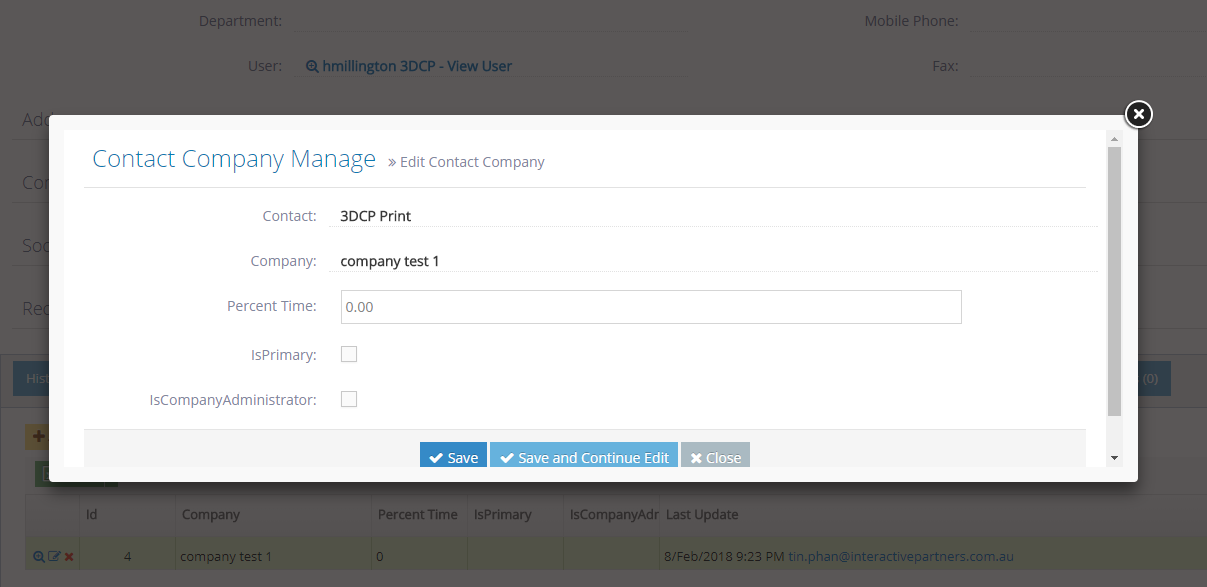
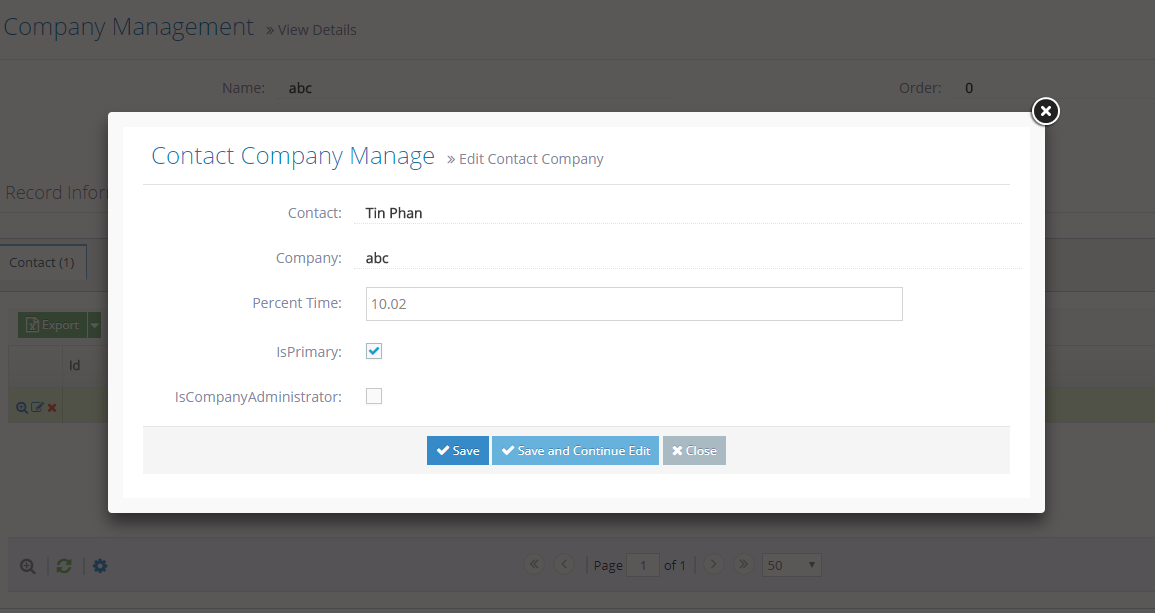
How to Add a Company to a Contact
Adding a Company to a Contact using Contact listing
-
1
Go to Admin Dashboard → Contacts → Contact Listing

-
2
On any row, click the Edit icon to the left of the contact
-
3
In the Company field, enter the Company you wish to add to the contact
-
4
Scroll down to the bottom of the page and click the Save button
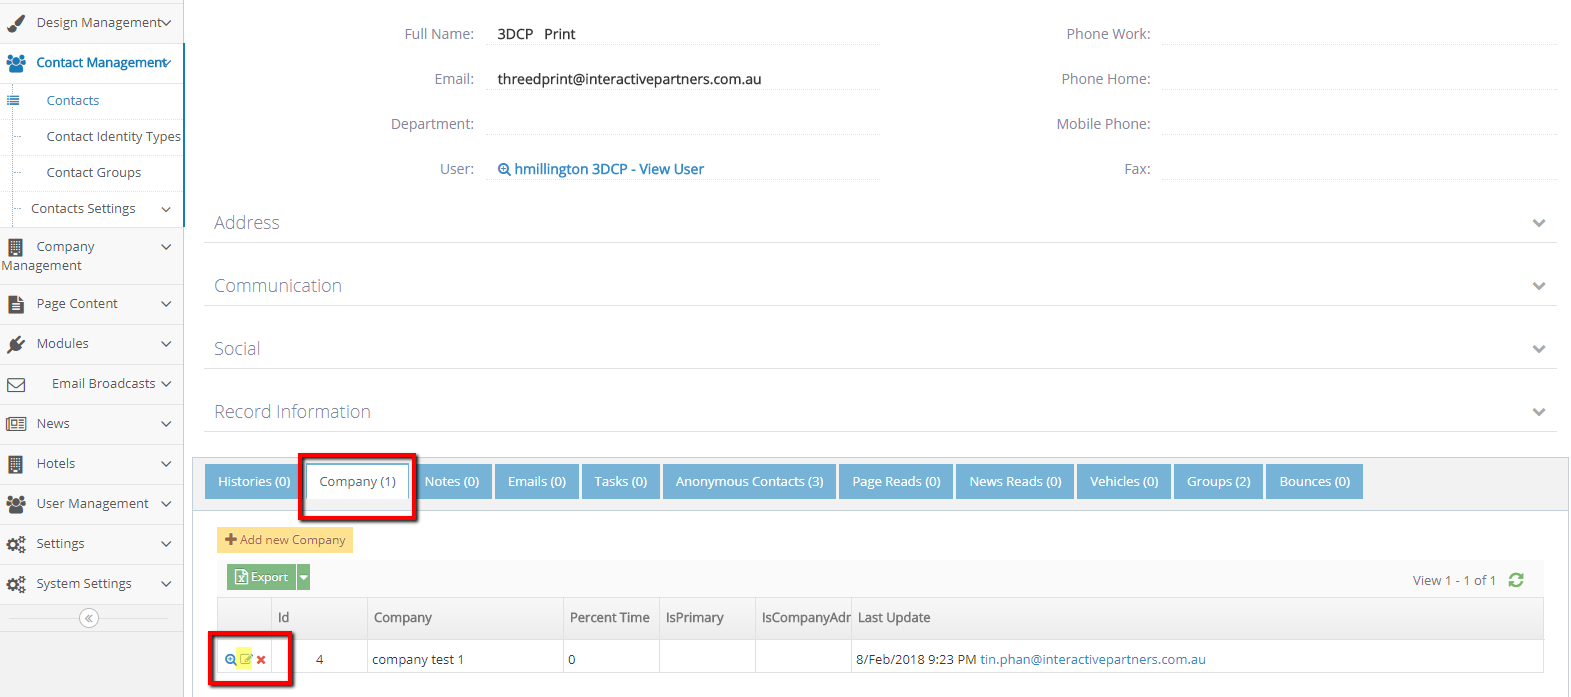
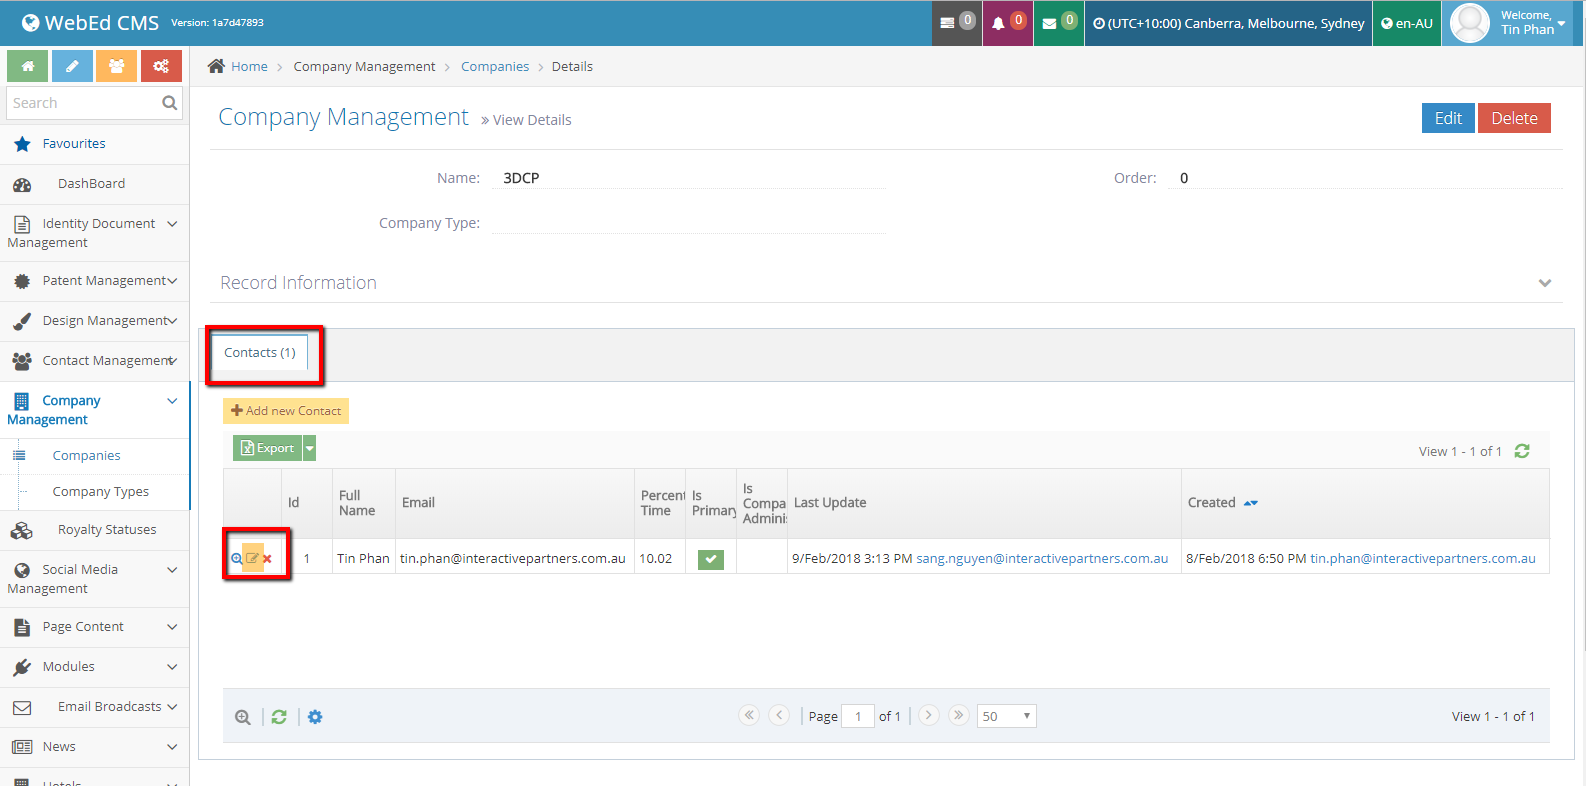
Adding Company to a Contact using the Contact Detail page
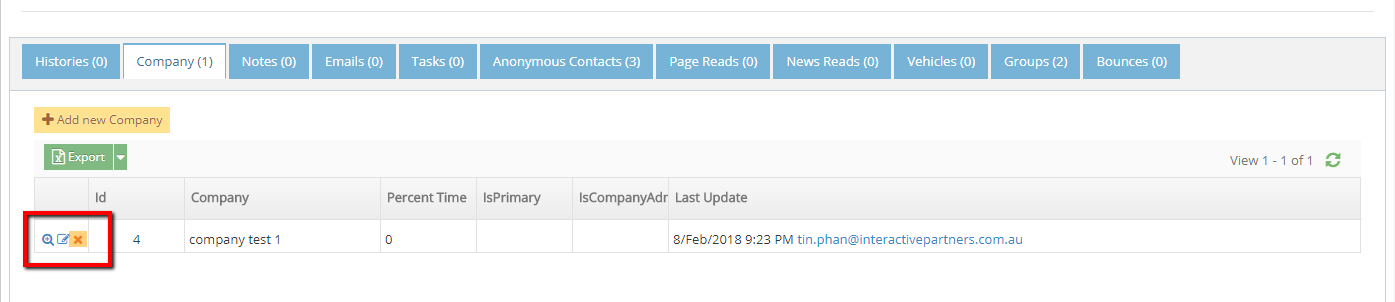
-
1
Go to Admin Dashboard → Contacts → Contact Listing
-
2
On any row, click the icon "View details"
-
3
Details of contact will be shown, scroll down
-
4
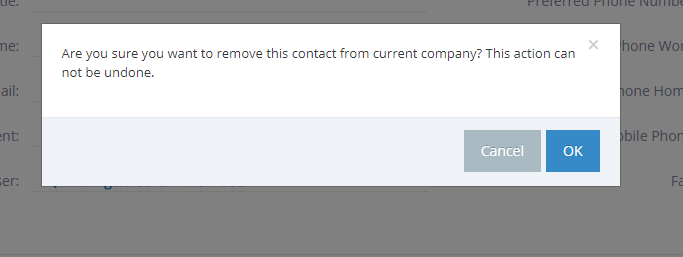
Select the tag "Company"

-
5
Click "Add new Company" and a popup will be shown
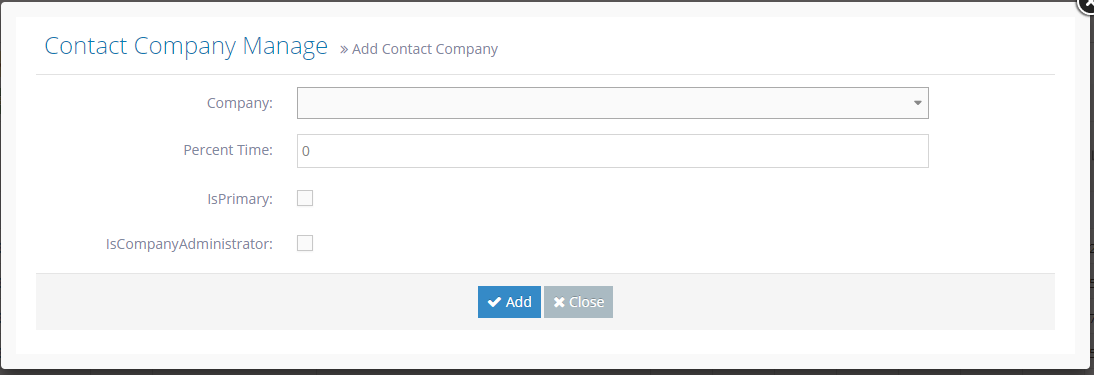
-
6
Fill up the necessary fields
-
7
Click Add button
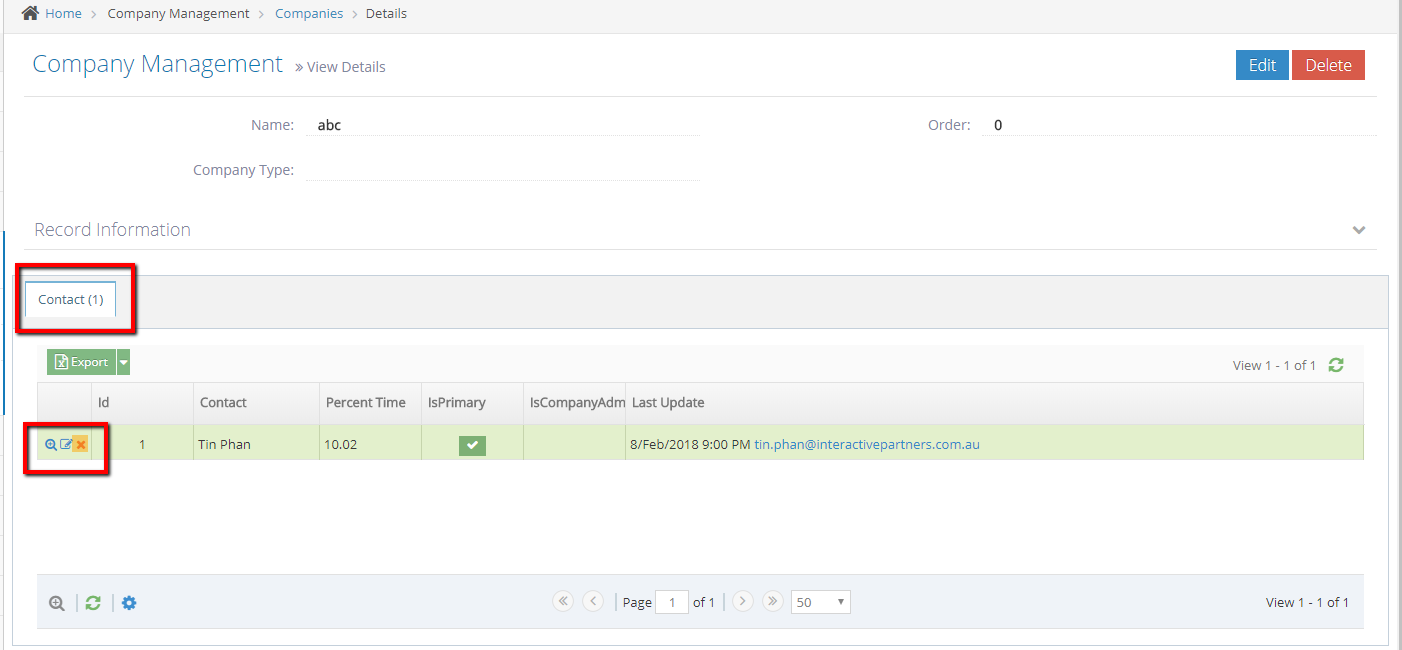
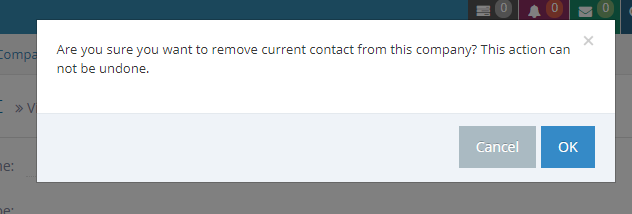
How to Edit a Company Contact
Using Products of Interest in Advanced Search
Advanced Search Overview
The contacts module provides a simple Contact Relationship Management (CRM) like application for your website. It captures all forms submitted and creates a database of contacts that can be segmented by the campaign, product of interest and other tagging factors.

Advanced Search Contacts
- In the Search Contacts section, click the "Advanced Search" link on the bottom right
- This will display additional segmentation filters for your contacts
- You can now see the "Products of Interest" filter
- Select the specific Product of Interest you want to check from the options

- After choosing the Product of Interest from the options, click the "Search" button on the right
- Note: Product of Interest options will only be available once they have been set up on the "Product of Interest" module
- The contacts for the selected "Products of Interest" should show on the grid below the search section

Sending an Email to an Individual Contact
Why you would Send an Email to an Individual Contact
This is useful if you will send a notification, information and private messages to another user within WebEd 9 CMS.
How to send an email to individual contacts from listing
Users can send an Adhoc email to individual contacts from contact listing
-
1
Go to Admin Dashboard > Contacts > Contact Listing

-
2
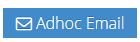
All contacts with an icon can send Adhoc email in the grid
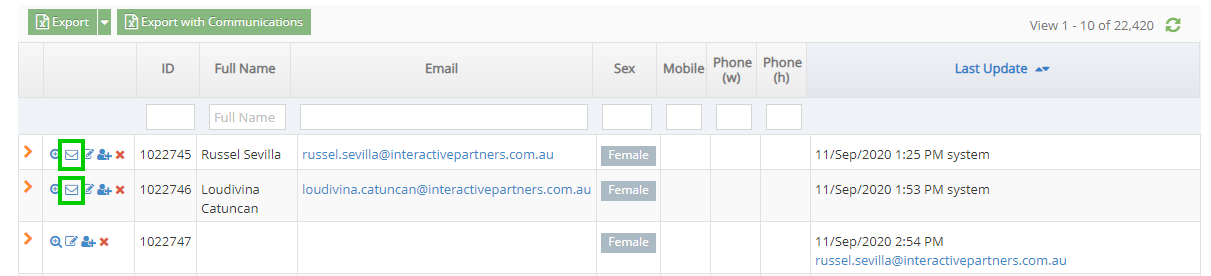

-
3
Click the Adhoc Email icon to send emails to individual contacts

-
4
The Contact Management window will pop up
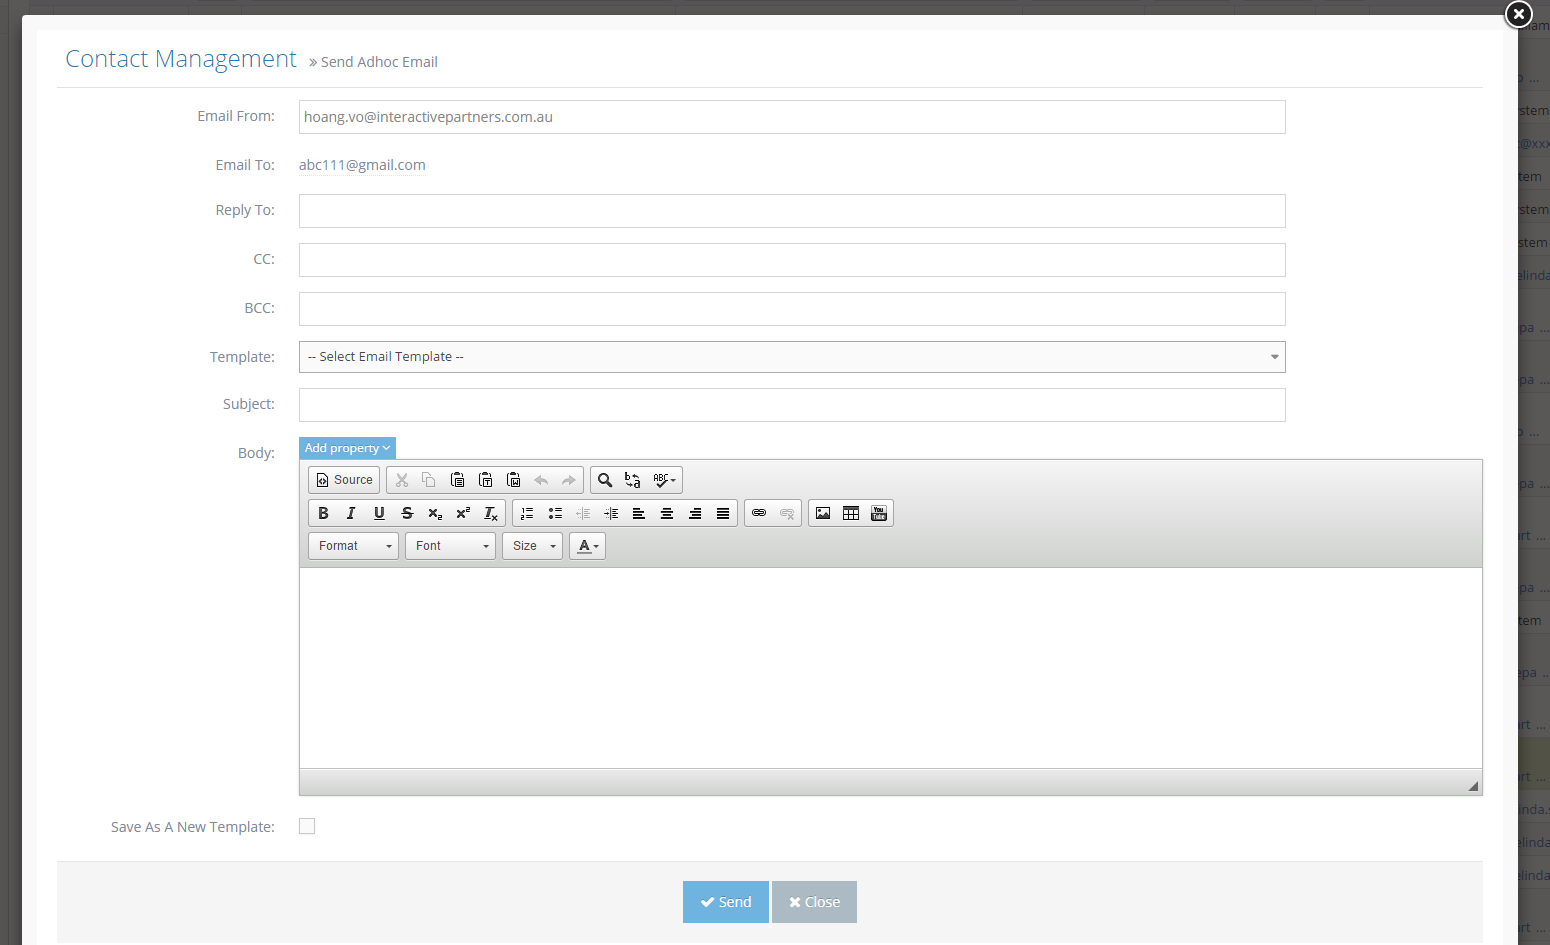
-
5
The email address of the currently logged-in user will be pre-populated in the Email From field
-
6
The email address of the selected contact will be populated in the Email To field

-
7
Input the subject and body to send an email. These fields are required.
-
8
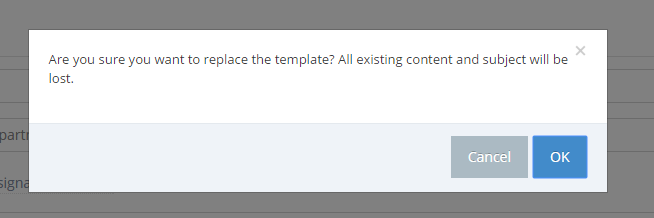
If you want to use an existing template, please choose it from the Template list box (a list of all email templates has the type "Adhoc Email To Contact" in the system ).
- When choosing an existing template, your Subject and Body can be overridden. A popup will be displayed to warn about this.
- Click OK to confirm you want to use the existing template.
-
9
In case you want to save your Subject and body as a new template, please check "Save As A New Template"
-
10
Then input your template name to save (This textbox only appears once you check "Save As A New Template")

-
11
Click the Send button to send the email
-
12
Once an email is sent, it will be logged against the contact record
How to send an email to a contact from the details page
Users can send an Adhoc email to individual contacts from their details page
-
1
Go to Business Dashboard >> Contacts >> Contact Listing
-
2
Click the View Details icon to go to the details page of a contact.

-
3
Click the "Adhoc Email" button in the button group on the top right-hand side
-
4
A popup to send the email will be displayed
-
5
The email of the selected contact will be populated in Email To.
-
6
The email of the currently logged-in user will be pre-populated in Email From

-
7
Input the subject and body to send an email. These fields are required.
-
8
If you want to use an existing template, please choose it from the Template list box (a list of all email templates has the type "Adhoc Email To Contact" in the system ).
-
9
When choosing an existing template, your Subject and Body can be overridden. A popup will be displayed with a warning about this.
-
10
Click OK to confirm if you want to use the existing template.
-
11
In case you want to save your Subject and body as a new template, please check "Save As A New Template"
-
12
Then input your template name to save (This textbox only appears once you check "Save As A New Template")
-
13
Click the Send button to send an email
-
14
Once an email is sent it is logged against the contact record
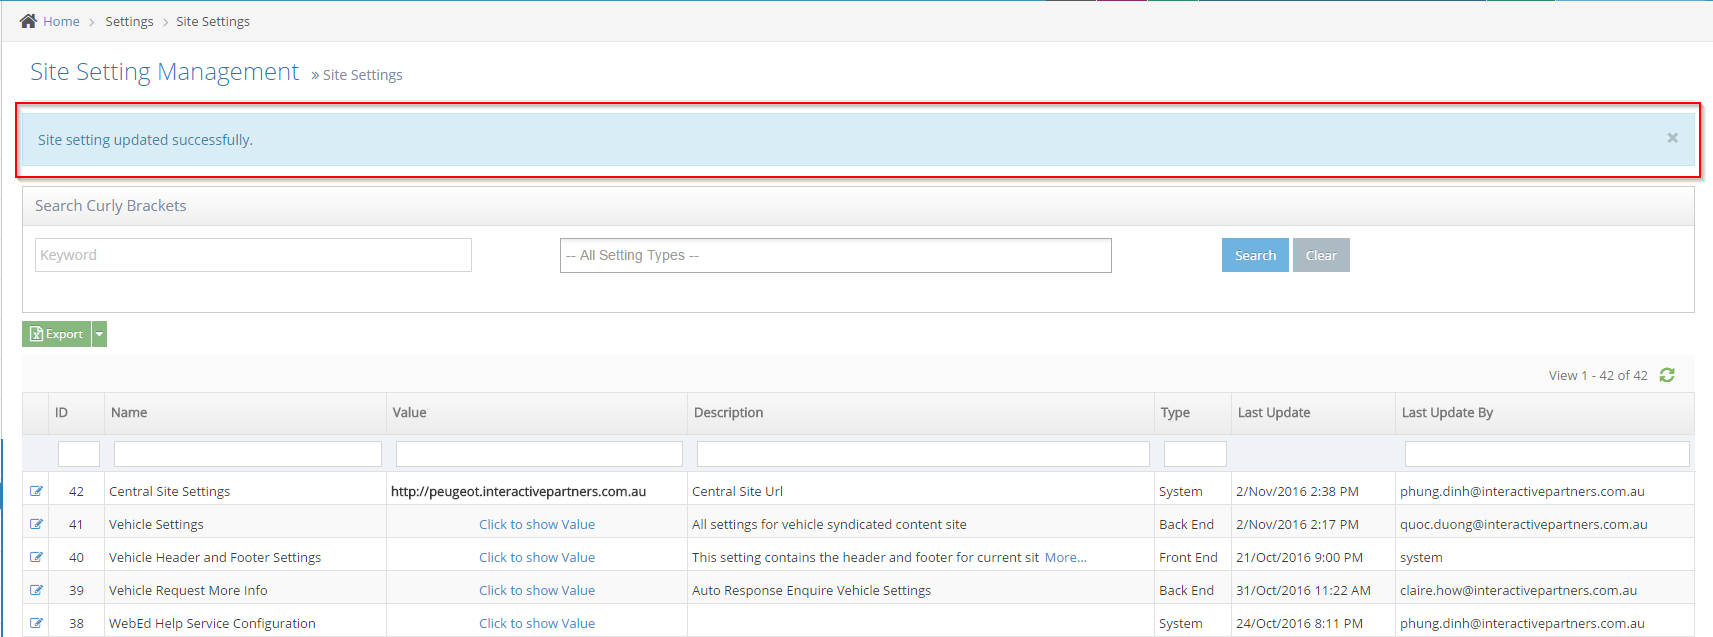
Edit Company Details via Company Setup
Company Set Up Site Setting Overview
This allows dealers to update and make changes on the company details of their website.
Updating the Company Set Up Site Setting
-
1
On the vehicle details, we can update the dealer contact information section (website, address, phone, email etc....) via the Company Setup page inside the admin panel.
-
2
Log in and go to the Admin dashboard
-
3
Click Settings → Site Settings
-
4
In the Site Setting Management page, under Search Curly Brackets, enter "company" and click Search
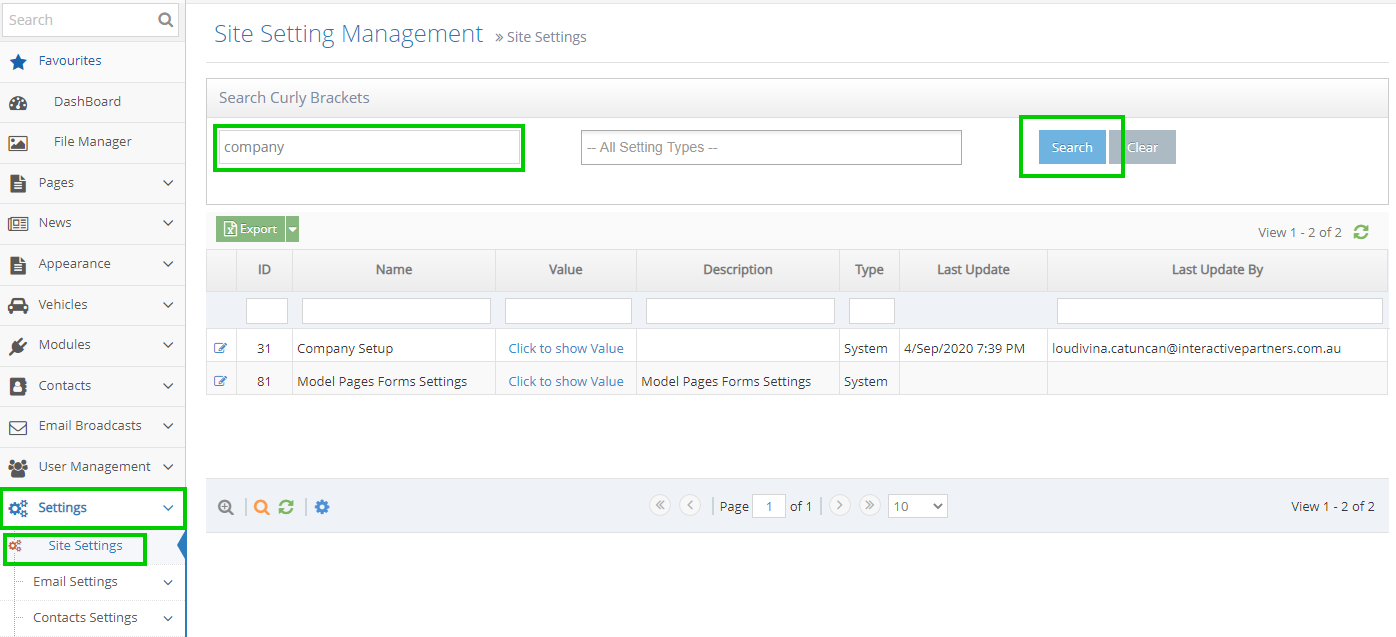
-
5
Click the Edit icon to the left of Company Setup

-
6
Make the necessary changes
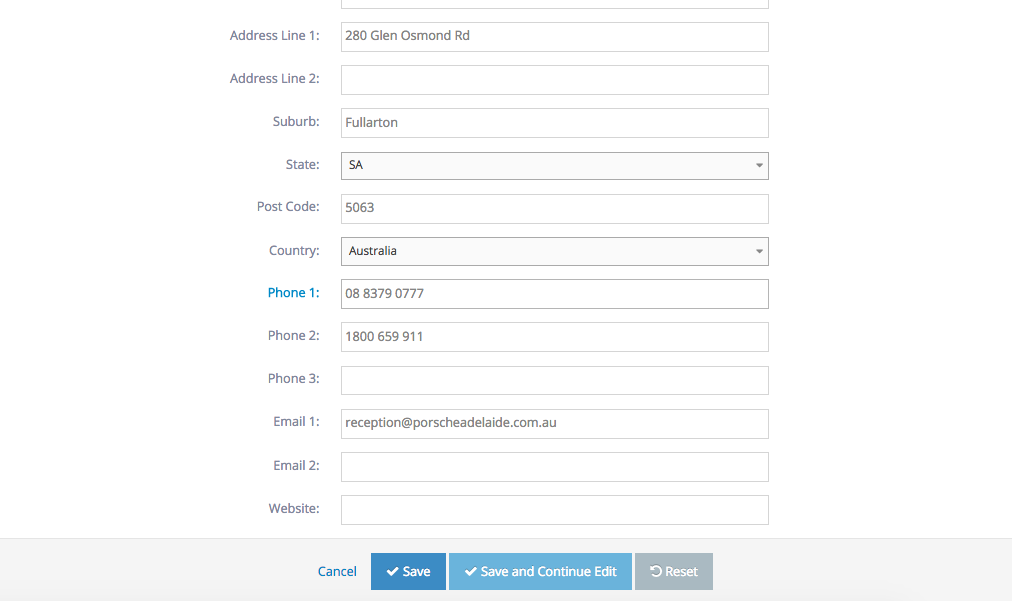
-
7
Scroll down to the bottom of the page and click the Save button
-
8
A notification on top will show that you've successfully updated the site setting
Attaining Lead Reports
How to Merge Contacts
-
1
Go to Admin Dashboard > Contacts > Contact Listing
-
2
Search Contacts need to be merged, click Search
-
3
Click on the Merge Contacts button to begin merging
-
4
Read the instruction below the button
-
5
Checkboxes to the left of each contact will appear
-
6
Tick the boxes beside the contacts you want to merge
-
7
Select the Master Contact by clicking once on the check box
-
8
Select the Slave Contact by clicking twice on the check box
-
9
Click on the Merge Contacts button again >> redirect to the merging confirmation screen
-
10
Go through each field and select the correct value for the final contact
-
11
Click on the Merge button
-
12
Redirect to contact detail pages of the Master Contact
-
13
A successful message is displayed
-
14
Slave Contact is deleted
Video for reference:
Company Set Up Site Setting Overview
This allows dealers to update and make changes on the company details of their website.
Updating the Company Set Up Site Setting
-
1
On the vehicle details, we can update the dealer contact information section (website, address, phone, email etc....) via the Company Setup page inside the admin panel.
-
2
Log in and go to the Admin dashboard
-
3
Click Settings → Site Settings
-
4
In the Site Setting Management page, under Search Curly Brackets, enter "company" and click Search
-
5
Click the Edit icon to the left of Company Setup
-
6
Make the necessary changes
-
7
Scroll down to the bottom of the page and click the Save button
-
8
A notification on top will show that you've successfully updated the site setting
Company Module Overview
This module is designed to support managing contacts by company. You can create a company, and company types and then add contacts to the company. You can also set permissions for secure areas by company and company type similar to managing user groups.
Navigating to Contacts
-
1Log in as an administrator and go to the Admin Dashboard.
Learn how to log in here → -
2Go to Contacts
-
3When the listing appears, search for the contact you wish to link to a company
-
4Click the Edit icon
-
5Select the company for this contact by starting to type the company name
-
6If the company does not exist, you can create a new company
Managing Companies
Contacts are generally connected with Companies. See how to manage companies.
-
1Log in as an administrator and go to the Admin Dashboard.
Learn how to log in here → -
2You click on Contacts -> Companies and create a new Company.
-
3Input the Company Name in the textbox, choose Company Type in the drop-down list, and click the Create button.
-
4The company was created successfully.
-
5You can click on the Edit icon on the left to update the company.
Contact Matching Rule Site Setting
Contact Matching Rule Site Setting Overview
When new contacts are created using the form or the admin interface, contacts are matched using one of the available rules. If an existing contact is found the contact will be updated with the new information. Contacts can be matched by any one rule or multiple rules attempting to match in order:
- First name, Last name, Mobile
- First name, Last name, Email
- Mobile number
- Email Address
Admin can change the Contact Matching Rule using the site set to define the rules.
This setting defines the rule to match the contacts. The rule with the highest priority is used first and then the rules are matched in order of priority. Any disabled rules are ignored. Every rule must have a different priority.
You can see more at /wiki/spaces/ANFBMS/pages/51380409
The Email rule should NEVER be disabled. We use the contact email field as a unique property to identify the contact at many places in the system. Therefore if there are more than one contact has the same email address, it can cause the system to get an error.
How to change the Contact Matching Rule site setting
-
1
Go to Business Dashboard >> Settings >> Site Settings
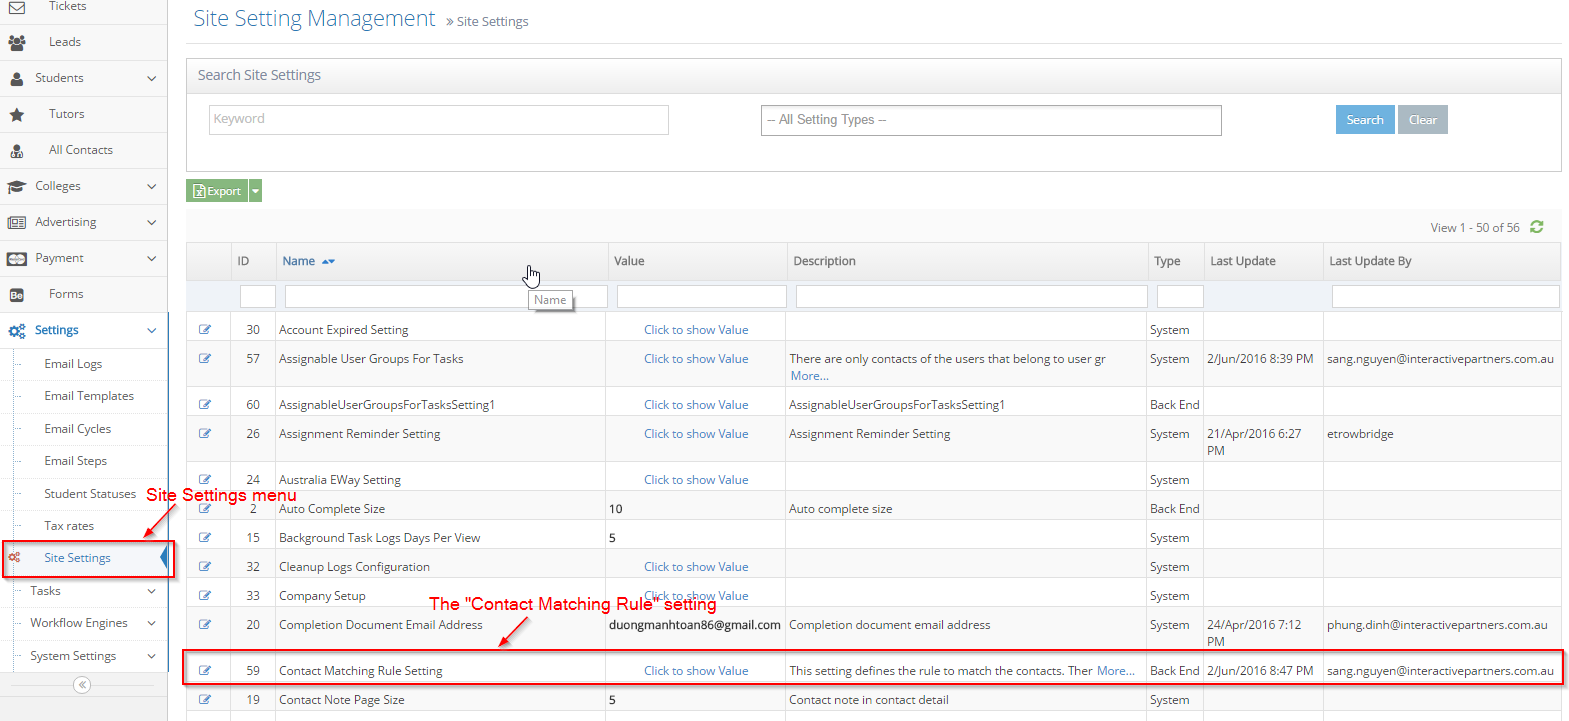
-
2
Click on Edit Button to go to the Edit Site Setting page

-
3
Set a different priority for each rule and disable rules not used
-
4
Click the Save button when done
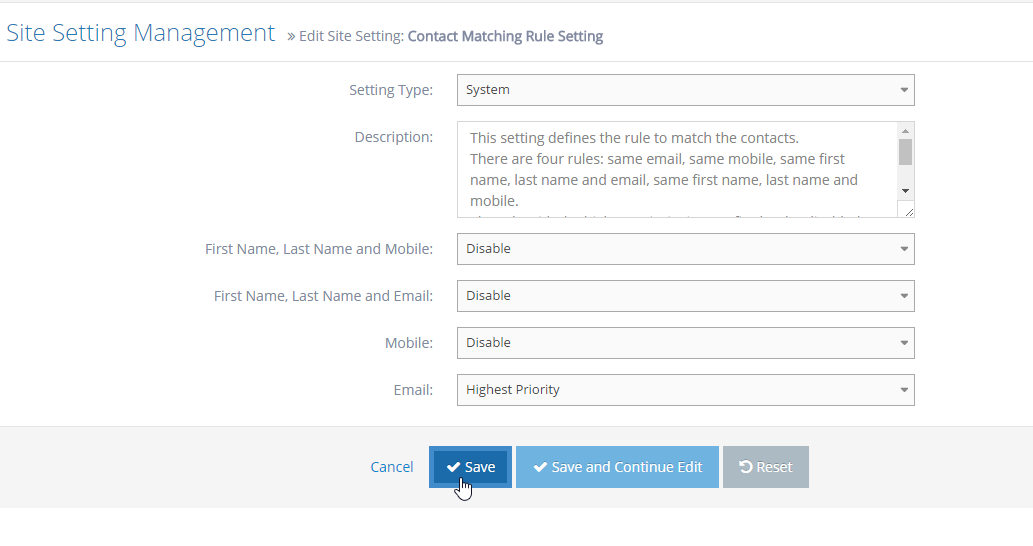
-
5
The Site Setting is updated successfully

Export Form Data
Navigating through the Contacts Module
- Go to Admin > Contacts >Contact Listing
Search Contacts
- You can search for contacts by entering part of their name, email address, phone or mobile into the Name field
- Matching contacts will start to appear as you type
- Click any contact to jump directly to the contact
- Or use the Search Button to display a listing of all matching contacts
- You can use the other filters such as Company Types, Companies, suburb, state, etc, then click the Search button
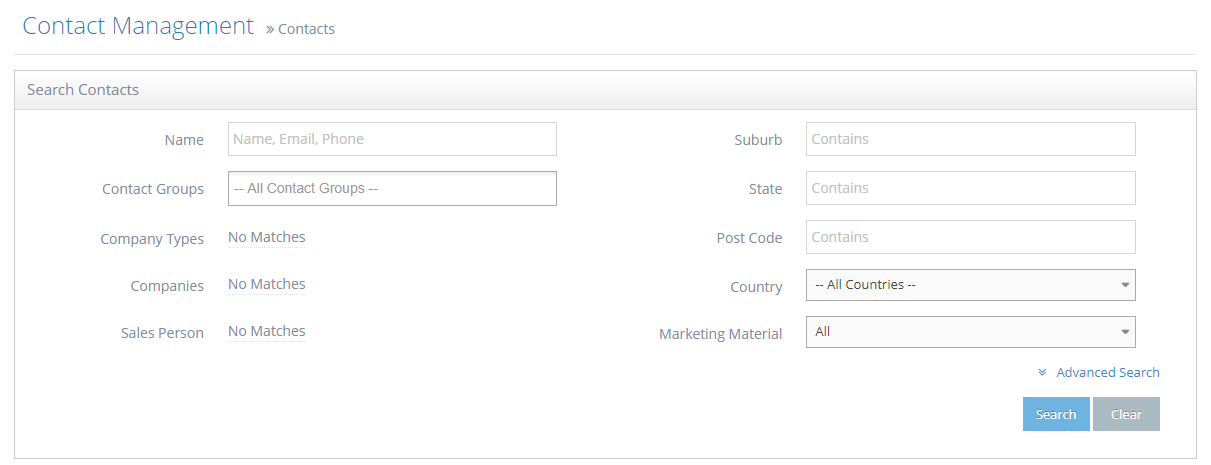
Advanced Search
- You can also search using the advanced search. This will display additional
- If you have setup campaign codes or products of interest in your forms, you can see the available options listed
- In the Search Contacts section, click the "Advanced Search" link on the bottom right, just above the Search/Clear buttons
- Upon clicking on the "Advanced Search" link, you are presented with additional filters you can use for searching
- Note: These filters are in use in the existing forms and will show the results of contacts who submitted the forms that use the corresponding filter selected.
- Referred By
- Products of Interest
- Subscriber Types
- Campaign Codes
- Certifications
- Interested in Owning

Using Referred By
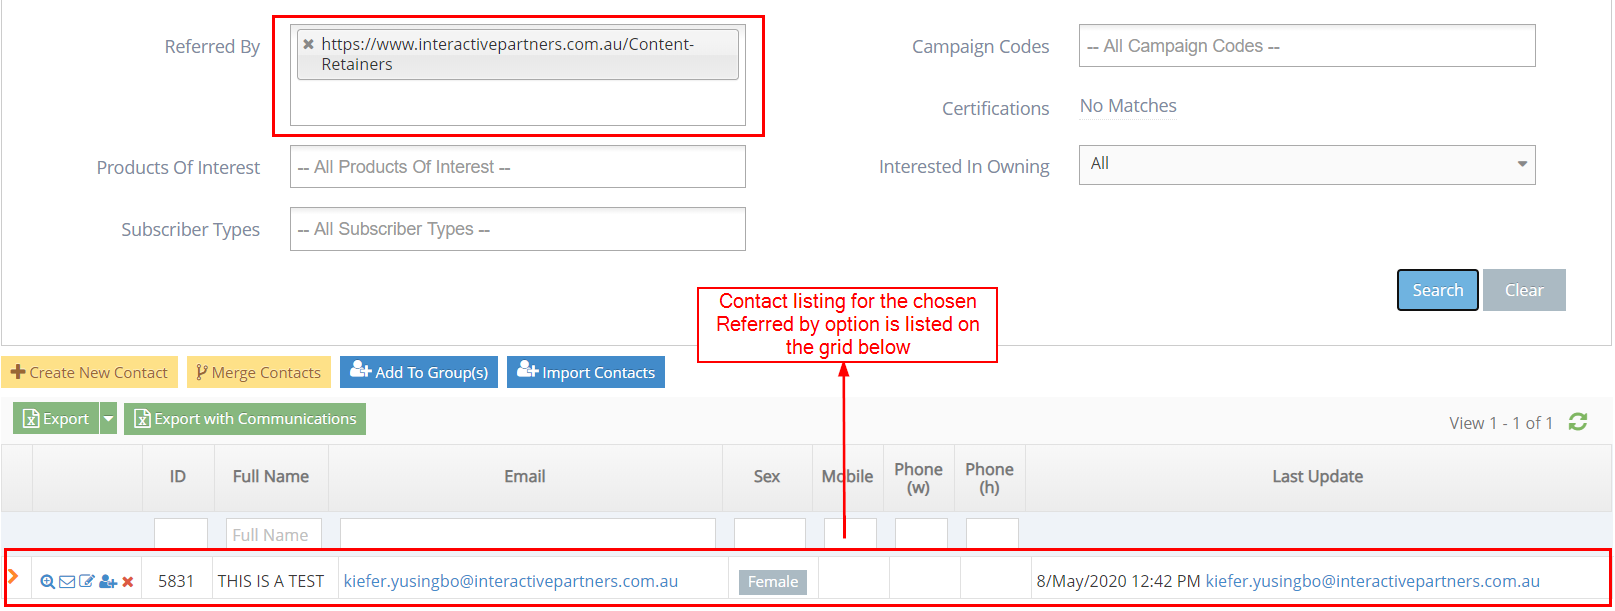
- For example, using "Referred By" as a filter:
- Select the specific Referred URL/page you want to check from the options
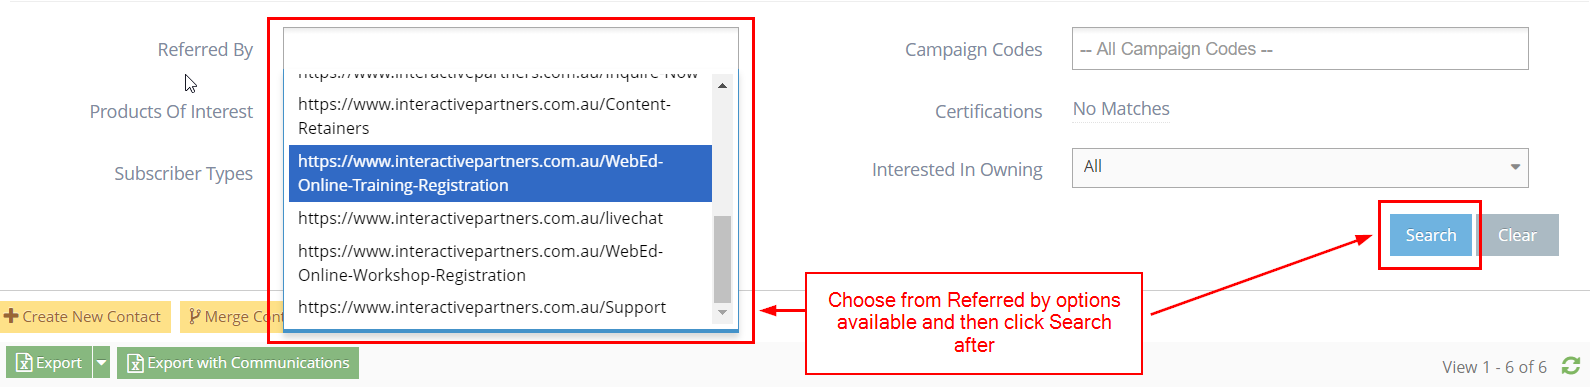
- After choosing the Referred by URL/page from the options, click the "Search" button on the right
- Note: Referred by options will only be available once the form has been set up on the pages and customers submitted the form
- The contacts for the selected "Referred by" should show on the grid below the search section
Using Product of Interest
- For example, using "Products of Interest" as a filter:
- Select the specific Product of Interest you want to check from the options

- After choosing the Product of Interest from the options, click the "Search" button on the right
- Note: Product of Interest options will only be available once they have been set up on the "Product of Interest" module
- The contacts for the selected "Products of Interest" should show on the grid below the search section
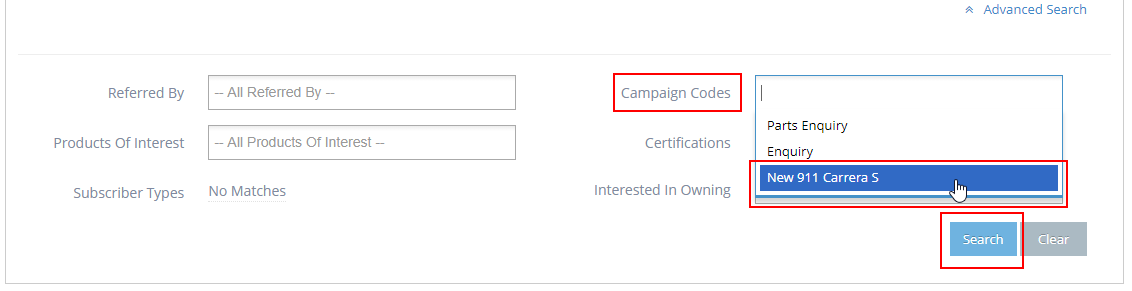
Using Campaign Codes
- For example, using "Campaign Codes" as a filter:
- Select the specific Campaign Code you want to check from the options
- After choosing the Campaign Code from the options, click the "Search" button on the right
- Note: Campaign Code options will only be available once they have been set up on the "Campaign Code" module
- The contacts for the selected "Campaign Code" should show on the grid below the search section
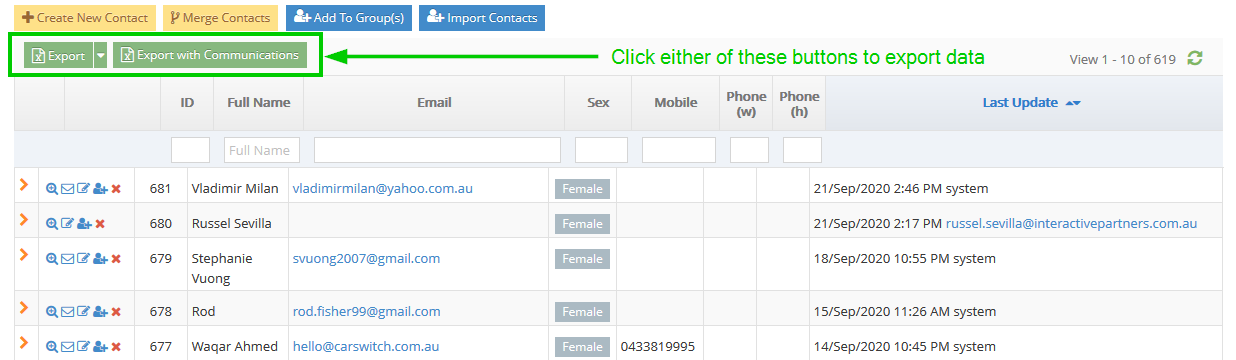
Export Data
- Once the search results have appeared, you can now export the data into XLS.
- Click the 'Export' or 'Export with Communications' button to export the data into XLS
- During import of contact(s) using a CSV file, you will now see that this mapping screen is grouped according to its related data:
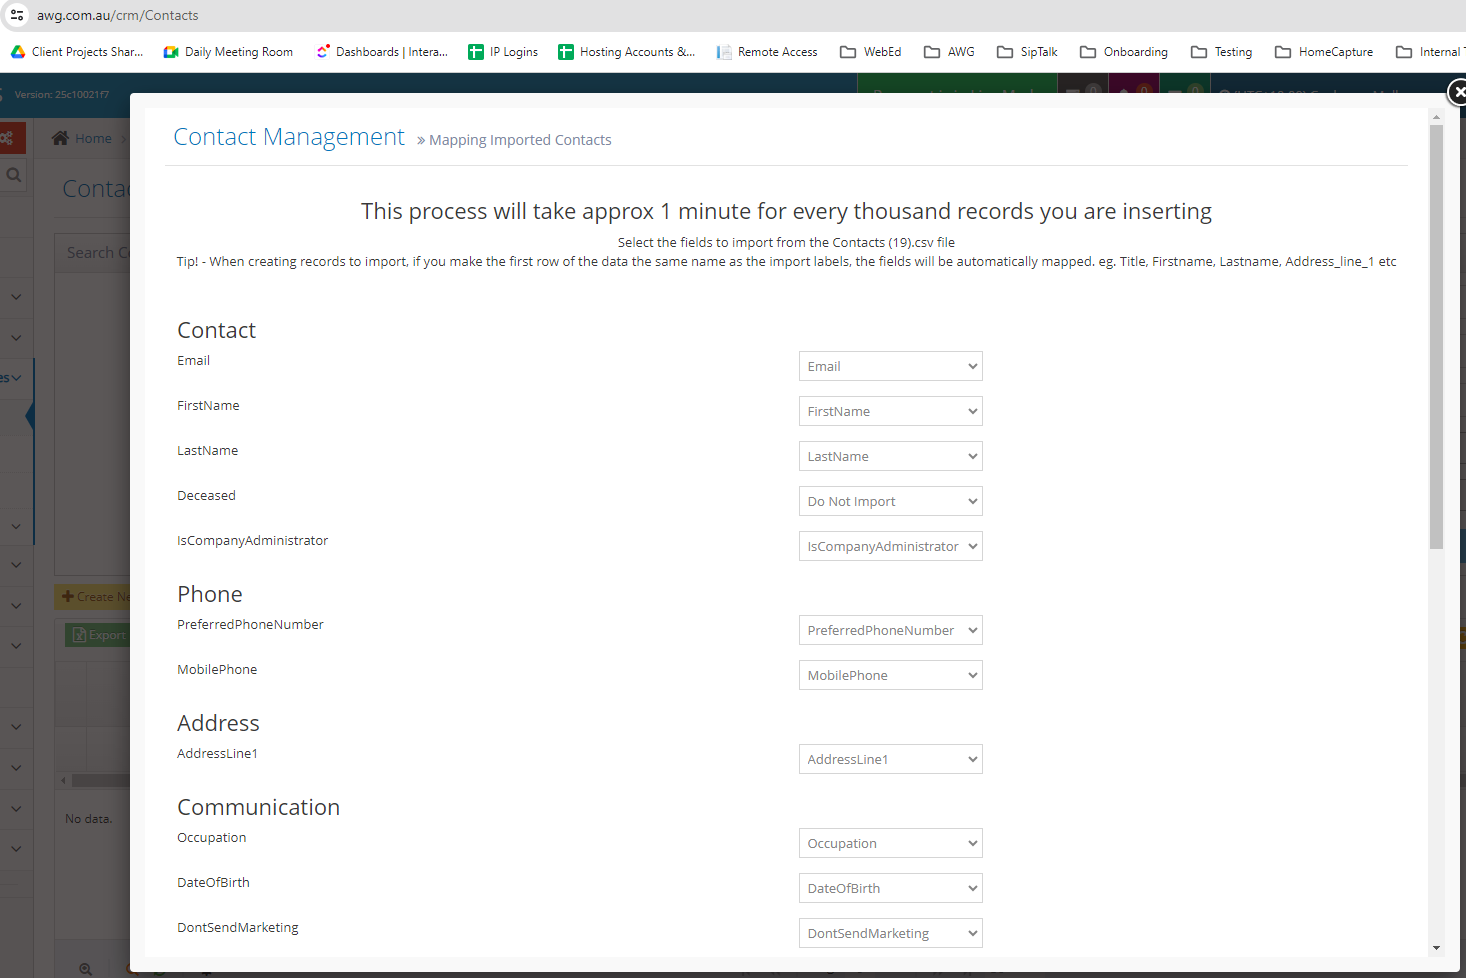
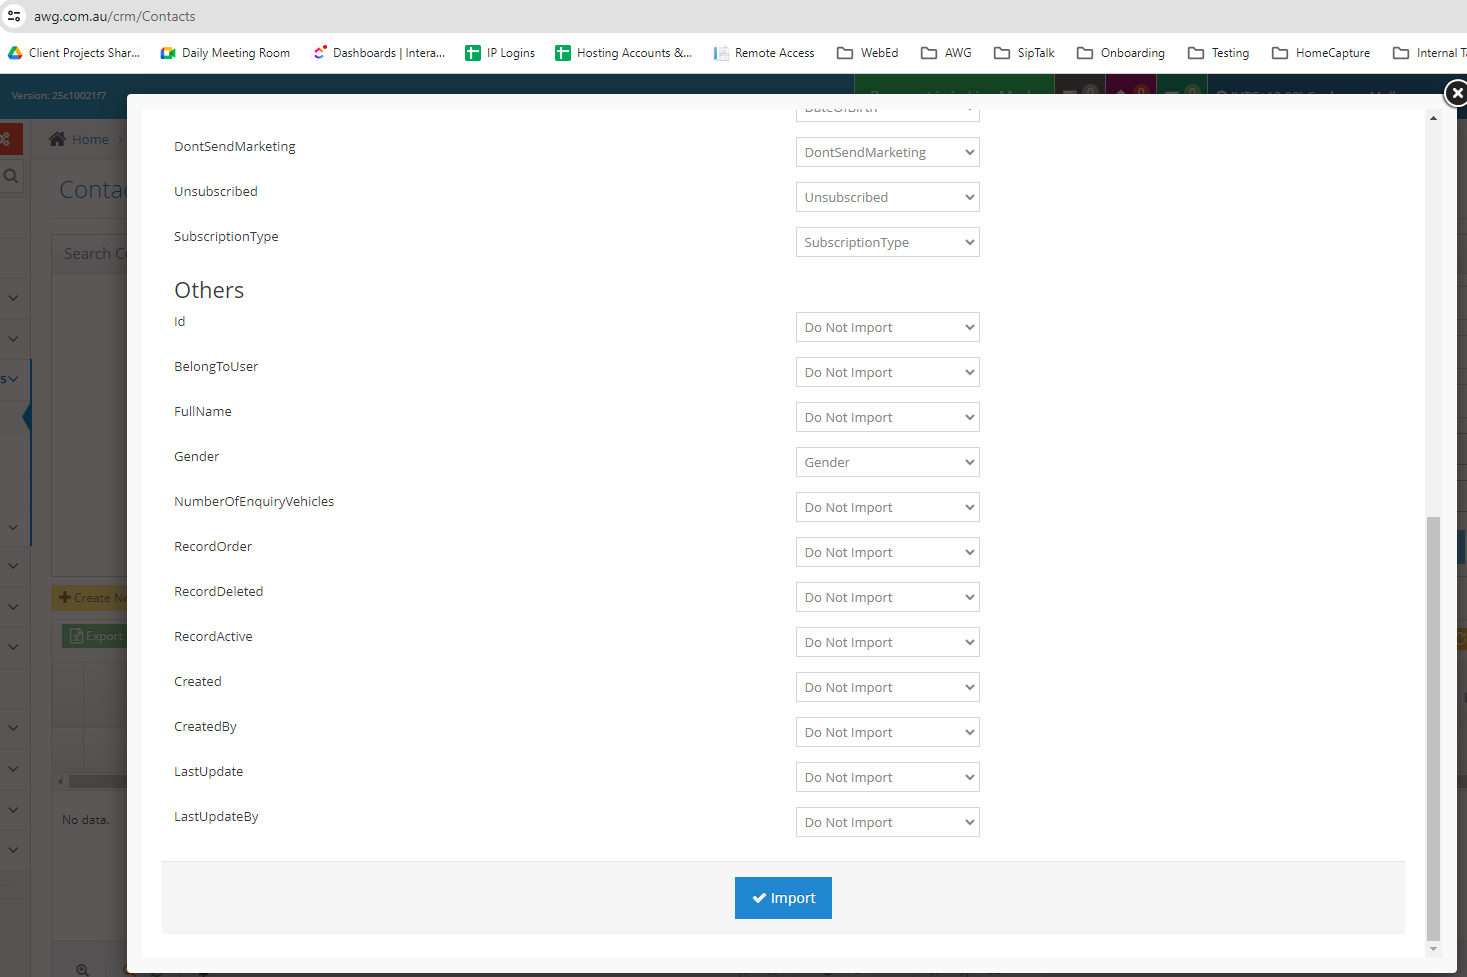
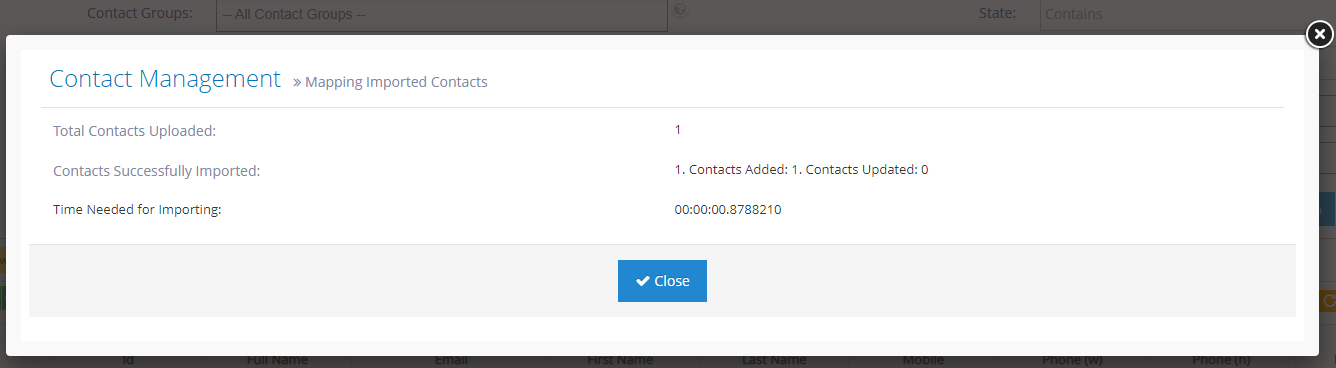
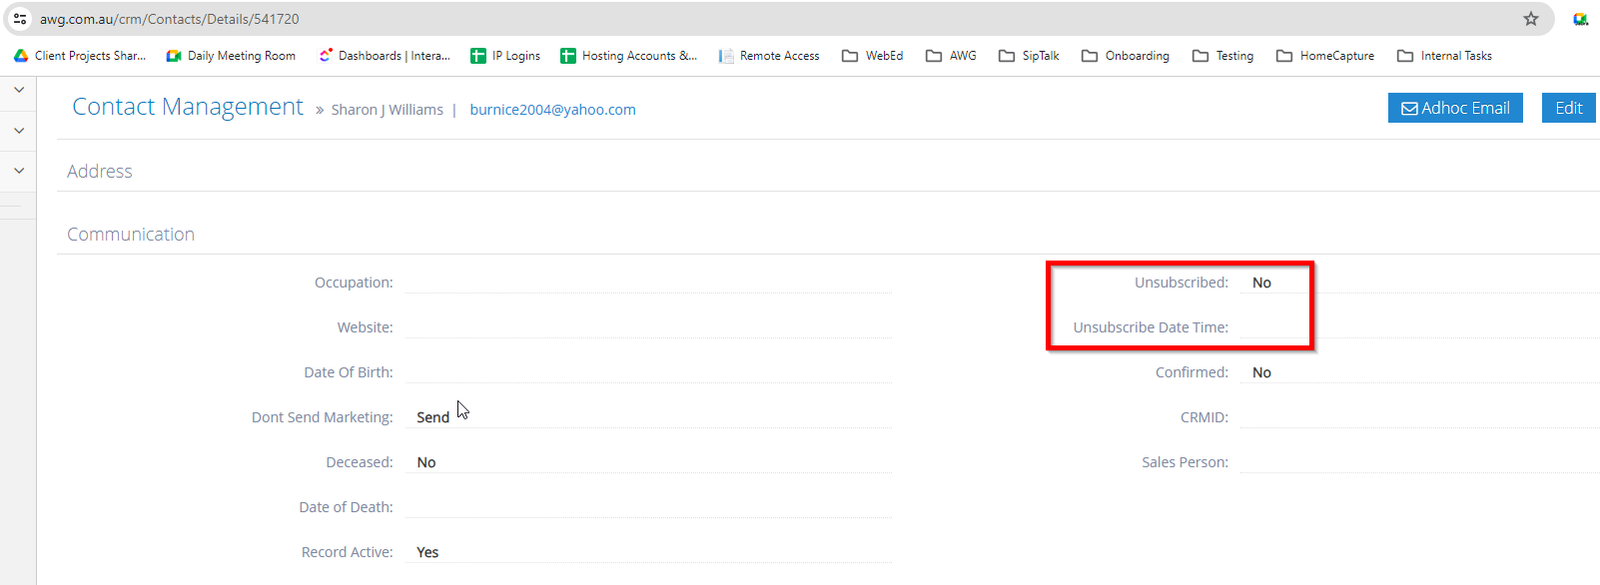
- The Unsubscribed column is also present: